How to Run Community Assemblies
This manual outlines the various steps that you can take to run a community assembly in your local community. It has been created by people in XR’s Future Democracy Hub and Trust The People. This manual collates best practice from people throughout history and from all over the globe, who have used Community Assemblies to come together and achieve great things.
- Creating a Team
- Connecting with the Community and Allies
- Assembly Framing, Scope and Topic
- Assembly Planning
- Community Assemblies - a Quick Start guide!
- Dealing with Difficult Interactions
Creating a Team
“I can’t change the world on my own, it’ll take at least three of us.”
- Bill Mollison
Below, we have listed a few working groups that may help you get a community assembly off the ground. They constitute best practice, not a minimum requirement. Your local group may feel that so many working groups are well beyond your capacity so don’t let this guidance discourage you! It doesn’t take an army of volunteers to put on an assembly!
Alliance Building
Importance: EssentialTiming: From project start
This is the role that you need to establish very early on in your project. At least one person in your local group should lead communications with other organisations. While it will be helpful to brainstorm in your local group around potential assembly topics and locations, you will need to discuss all of these things early on with other organisations and be open to their suggestions if you want to collaborate with them. Unless you have a political or lobbying team, this will also be the role that contacts local politicians and invites them to the assembly. On Rebel Toolkit, you can find resources for local alliance building to inform this work.
Fundraising
Importance: Nice to haveTiming: From project start
You can request financial support with your assembly by filling in this financial support form. However, it is always appreciated if your local group can try to raise as many funds as possible themselves to finance your projects. If you end up up working together with other organisations, you can explore sharing certain costs.
Outreach and Integration
Importance: EssentialTiming: From middle of project
Just like you would do outreach to promote a Heading for Extinction talk, we will do outreach to spread the word about our assemblies. At the end of your assembly, you can invite attendants to join your local group or get involved in a local campaign in which case this team will have to prepare how people can join and what tasks they can take on. You will need an outreach and integration crew later in the project once you are clear on assembly time, location, topic, etc.
More information about Outreach and Integration.
Media and Messaging Crew
Importance: Nice to haveTiming: Middle to end of project
The role of this group is to promote the assembly through the media. That could involve your local group’s own online channels and newsletter, but you could also try local press outlets or ask allied organisations to promote the event in their newsletters and social media. On top of that, this team will coordinate taking pictures of the assembly and capturing them on your social media.
If you would appreciate any support with your local media work, feel free to contact media@rebellion.earth and they can put you in touch with your regional/national Media & Messaging rep.
Facilitators
Importance: Super essentialTiming: End of project
For each Community Assembly, you will need at least one facilitator, ideally two. Facilitators maintain radical inclusivity, active listening, and trust so that all voices are heard and valued equally. They keep the discussion focused and structured and prevent it from becoming unwieldy which is absolutely crucial for a successful assembly.
Recommendations:
Connecting with the Community and Allies
Relevant teams: Alliance Building, Outreach and Integration
Before you attempt to bring a community together in Assembly, you need to actually familiarise yourself with that community. This will help you to select an assembly question that matters to the people around you, and to design an assembly event that is appealing to your local community.
Think: Who makes up the community in question? Where are they? Who are the obvious future participants? Who are the less obvious ones? Which communities are hidden from you? Where are the community connections that already exist happening? Are those connections deliberate or organic/cultural? Who are the influencers, the stakeholders, or the ‘Elders’ within this community?
Whilst we are connecting with the community, we need to connect with ourselves as well. We need to ask ourselves what assumptions we carry about the community we are trying to reach. We must challenge our own blind spots and prejudices at every opportunity, and continue to do so throughout the process.
It is also vital to develop active listening skills, so that when you are engaging with others in your community, you are taking time to understand them, their needs and their wants, rather than trying to push your own agenda.
To help you better connect with your community, take a look at the following modules (downloadable as Google docs) in the Trust The People programme:
- Personal Processing - This module encourages you to think about your identity, your biases, and your relationship to society.
- Engaging Communities - This module supports you in reaching out to others and forming relationships founded on trust.
- Hold meetings in open and oft-frequented places (e.g. a local pub or cafe), so that many can easily participate.
- Be visible and open to conversations – find ways to bring those around you in.
- Attend existing community events – if relevant, you might run a stall.
- Contact existing community groups and connect to their issues and experiences.
- Organise events such as seed swaps, ‘free’ markets, community meals, music evenings, Empathy Circles or Cafes.
In the same phase of your assembly planning process, you want to put your feelers out to local organisations and see if any of them are up for organising an assembly together with you. Working together with other organisations will not only increase the diversity of your audience but will also bring new ideas to the event organising process that you might never have thought of on your own.
Dare yourself to reach out to a group that you have never been in touch with before. XR groups are most commonly in touch with unions, environmental and faith groups or unions. How about getting in touch with a local racial justice or LGBTIQ+ group?
Assembly Framing, Scope and Topic
Relevant teams: Your local group and ally organisations
The exact framing and scope for the assembly need to be agreed upon before any promotional work can occur. The destination and legitimacy of the results of the assembly should be discussed and decided upon prior to convening the assembly, and it is important that all assembly participants are made aware of this information before the assembly begins.
An Assembly for Sharing and Community Building
If, for example, you are planning to host an assembly designed to bring community members together to discuss issues that are important to them in the spirit of creating community bonds and finding common ground, then the framing and scope are as follows:
Framing: The event is open to all members of the community to provide space for discussion around local issues.
Scope: No decisions are being made, so the scope is limited and does not extend beyond the sharing of ideas and feelings. The ideas and issues generated in the assembly should be fed back to the community through social media and serve as a starting point for future conversations.An Assembly for Discussing a Specific Topic and Generating Ideas
If you are convening an assembly which focuses on specific issues and where what is discussed will be shared beyond the local community with an external body, such as a council, then the scope would be broader. Say, for example, a local sustainability group advertises an open assembly on their social media channels to discuss how the local council can act after declaring a Climate and Ecological Emergency, then the framing and scope would be as follows:
Framing: The event is open to anyone who chooses to participate to share their ideas on what the council can do.
Scope: The ideas and issues generated in the assembly could be published on the local group’s communication channels (e.g. their Facebook page or their newsletter), and also be emailed to the local Councillors asking them to take the suggestions to the next Council meeting.
An Assembly for Making Decisions and Proposals
Assemblies can also be convened to ask for the opinions of members of a group and to make decisions. Say, for example, a local group calls an assembly to discuss whether they join with a larger group for a day of action or create their own one locally, and they advertise it to all members through every channel of communication, then the framing and scope are as follows:
Framing: The event is open to the members of the group so they can share their ideas on what they would like their group to do in the action.
Scope: The assembly has the legitimacy to make the decision on behalf of that group, and the decision made during that assembly will be reported to the group and acted upon. The assembly, however, would not have the scope to make decisions beyond their own group. If, for example, that same group holds an assembly to decide if they, as a region, should combine with another region in the same manner, then the results of that assembly would be fed into a larger decision-making process that would affect other groups within the region as well.
Once you have decided on your assembly question or topic, make sure to display it clearly on your promotions materials and the assembly itself for all to see.
A good question is worded such that it is:
- in everyday language,
- not too long,
- broad enough to allow for free discussion, but not so broad that a structured conversation around it is difficult.
Assembly Planning
Choose the venue
- Assemblies are usually held in public spaces like town squares or outside prominent places like a city or town hall. They are designed to be as open as possible so that members of the public can easily join in. They are also held in community centres or other public buildings, particularly during the winter.
- Assemblies can be located outside (or inside) somewhere that may link to the issue being addressed by the assembly. For example, if the assembly is looking at the effects of climate and biodiversity breakdown on the agricultural industry, an assembly outside the local National Farmers Union, for which the process working group has invited the key members, is a way of forcing a response.
- All assemblies should be held in venues that are fully wheelchair accessible.
Online Assemblies
Holding your Community Assembly Online is potentially a good way to be more inclusive especially in rural areas where face to face assemblies could potentially mean long commuting to the assembly or it might be easier to attend an online assembly for parents.
In recent years Zoom has become the most common software in usage for meetings and assemblies. Here is some guidance for holding Community Assemblies via Zoom:
Advance Preparation
In the spirit of ‘radical inclusivity’ pillar of Community Assemblies and in accordance with Extinction Rebellion Principles and Values, check the Extinction Rebellion Principles of Inclusivity to ensure the Assembly is optimising access across diverse needs.
Zoom Settings Management
To create a Zoom link and publicise it everywhere, check Extinction Rebellion guidance for Zoom set up and promotion.
In your Zoom account ‘Settings’ on the left, under ‘My Meetings’, click on the meeting you are facilitating. Make sure the following settings apply:
- Waiting Room, if set up so that participants are not automatically admitted.
- Once you have opened the session, pop up messages at the top of your screen will tell you that participants are in the Waiting Room. Just click on ‘Admit’.
- Once you have started the session, you can allow late arrivals to jump straight in, rather than going to the Waiting Room. To allow immediate entry for late-comers, click on ‘Participants’, then select the 3 dots, bottom right, then select ‘Enable Waiting Room’. This will (counter-intuitively) disable the waiting room, allowing people to join without you having to Admit them. NOTE: this option will only work if you have created a Zoom registration link and selected both Passcode and Waiting Room when you created the Zoom meeting.
- Meeting Entry without waiting. Start meetings with participant video off, as they may be eating, or not be ready to join fully for whatever reason; this respects participant privacy. Participants can change this during the meeting.
- Mute participants upon entry. Automatically mute all participants when they join the meeting. The host may control whether participants can unmute themselves.
- Chat. Allow meeting participants to send a message visible to all participants
- Auto saving chats. If you wish to capture the chat, maybe as a way to get people to leave their emails for follow up, etc, you can automatically save all in-meeting chats, so that hosts do not need to manually save the text of the chat after the meeting starts.
- Co-host. Allow the host to add co-hosts. Co-hosts have the same in-meeting controls as the host. A technical facilitator managing breakout rooms will need to make the other facilitator(s) co-host.
- Non-verbal feedback.
- Participants in a meeting can provide nonverbal feedback and express opinions by clicking on icons in the Zoom ‘Participants Panel’ or typing ‘Stack’ in the Chat. The Tech Facilitator can explain that process.
- Facilitators should also explain the rationale for and use of hand signals.
- Breakout room.
- Allow host to split meeting participants into separate, smaller rooms
- The Tech Facilitator can manage timings here
- Click on the ‘Breakout Rooms’ icon on the bottom bar of your Zoom
- Choose how many people can go into each room [3 or 4 is a good number; maximum 8 people] For randomised room entrants, select ‘automatically’ to let Zoom select participants at random to go into different rooms.
- Select a time; e.g. 5 mins.
- Share screen.
- In the host controls, click the arrow next to ‘Share Screen’ and click ‘Advanced Sharing Options’. Under ‘Who can share’; choose ‘Only Host.’ If needed, this can be changed back to allowing others to screen share. Select your booked Meeting.
- Access details are the same as booking the meeting. REMEMBER to check if you’re already logged into another Zoom account. If so, you need to log out of that one to log into the Zoom account where the Community Assembly is booked. Go to the avatar top right, sign out and then sign into the correct account.
- Closed captions options.
- Anyone that's D/deaf or partially deaf will need these running from the start of the meeting. At the bottom of your screen, select closed ‘CC/Live Transcript’. You or others can always ‘Hide Subtitles’ if you don't want to see them,
- OR ask once everyone's arrived, if anyone wants them running. If no one says yes, they can be turned off. You need to be a Host to turn CC/Live Transcript on/off.
- Computers or Laptops are best for online Zoom meetings, but participation can happen on smartphones too.
- Tech Facilitators need to be on Computers or Laptops, as you can’t always create Breakout Rooms on phones. You should be aware of the different options participants are viewing from, as the layout may differ depending on what device they are using.
Ask people in advance via promotions who have used Zoom before to sign in 5 minutes before the start time, and those who have not used Zoom before to sign in 10 minutes early; this allows time to work out how to use the buttons on their screen.
Penn State has an excellent guide on using Zoom for circulation to facilitators and / or participants in advance, in order to familiarise teams with options available.
Zoom Facilitator Roles
Ideally for an online Community Assembly, have facilitators with different roles, e.g.:
- Group Facilitators who ensure inclusion of participants
- Assembly Note-takers
- Technical Facilitator(s) to manage the breakout rooms, muting people, monitoring chat questions. While it isn't essential, this role helps the group facilitator focus on discussion and deliberation. They may also manage tools, such as Slido, or other digital support platforms.
How to run a Zoom Assembly
The process of running an Online Community Assembly is pretty much the same as one that you would use for an in person Assembly. Break out rooms will be used for the deliberation phase. Please find more information in the Quick Start Guide section of this manual.
In-depth Plan with Timings
One Month To Go:
- Agree time, date and venue.
- Book venue and any necessary equipment such as a PA system or kitchen equipment.
- Think about back-up venues in case of any issues nearer the day, especially if it is being hosted outdoors.
- Create an event page, e.g. on Eventbrite, so you get an idea of what attendance to expect. Ideally, it would allow people to express if they need British Sign Language (BSL) interpretation or childcare so you know if it’s worth investing in those things.
- Organise hosts and facilitators, along with others to take appropriate roles such as:
- Organising play area
- Refreshments
- Meet and greet team
- Media and messaging (to document and share during and after the event)
- BSL interpreter (if needed)
- Identify and invite stakeholders and influencers in the community.
- Invite your MP and local councillors.
- Print posters, leaflets, etc.
- Think about advertising:
- Make a list ahead of time of all those relevant to your area and decide which are worth pursuing.
- Ask people where they look for events.
- Try a few places and get feedback on where people see the information.
- Many people read their community newsletter or free paper but not the local paper.
- Find out where the important information such as local bin days and recycling is routinely published and try those first!
Two Weeks to Go:
One Week to Go:
- Check in with all crew - Make sure you know who is responsible for:
- Bringing equipment for the play area
- Refreshments supplies
- Ways to capture contact details for future events
- PA equipment etc
- Check all roles are still covered.
- Agree a running order with the host and facilitation team, and circulate it to all crew.
- Reshare on social media.
- Ask interested parties to share within their own networks, perhaps challenge everyone already wanting to attend to bring one or two people along with them on the day.
- Ask people to share with those they think should be involved.
- Ask people to identify places where the information should be shared to reach those less likely to see it.
- Re-check there are no issues with the venue that might affect the event such as road works etc.
One Day to Go:
One Hour to Go:
During the Assembly:
After the Assembly:
Community Assemblies - a Quick Start guide!
Hand Signals
Assemblies maintain inclusivity and ensure all voices are heard equally by using hand signals to facilitate the discussion.
Point (or ‘I would like to speak’)

When someone in the group wants to say something, they should point their index finger up and wait for the facilitator to let them have their turn in speaking. It is vital that people do not talk over anyone else and wait for their turn. If someone, who has not yet said anything, puts their finger up to speak, whilst others have spoken a lot, then the facilitator should give that person priority over the ‘stack’ (the queue or order of speakers based on the order they raised their finger to speak).
Online consideration: If people do not have their video turned on, they can type STACK in the chat or use the raised hand in the participants’ panel, or say ‘stack’ for their name to be stacked.
Wavy Hands (I Agree)
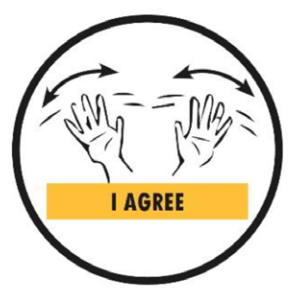
The ‘wavy hands’ signal of approval is used to show agreement or support for something someone has said. If everybody erupts into a forest of waving hands during a breakout session, for example, the note-taker can see that this is one of the more popular points made and it will become one of the key bullet points fed back to the main meeting room.
Online consideration: If people do not have their video turned on, they can use the ‘clapping hands’ icon under ‘more’ in the participants’ panel, or write ‘AGREE’ in the chat.
Clarification
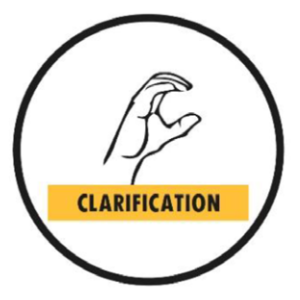
If someone says something that is unclear, people can hold their hand in a ‘C’ shape as the ‘clarification’ signal. The facilitator will then pause the discussion giving the person who made the signal the opportunity to ask a question to clear up any confusion.
Online consideration: If people do not have their video turned on, they can write ‘Clarification’ in the chat, or unmute and say ‘Clarification' and their name.
Speak up
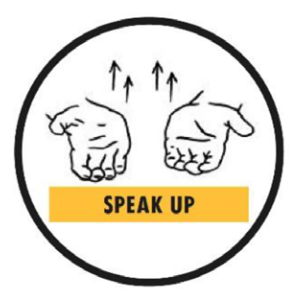
If someone is speaking too quietly or they cannot be heard, others can ask them to raise their voice by raising and lowering their hands with palms open and facing up.
Online consideration: If people do not have their video turned on, they can write ‘Speak Up’ in the chat, or unmute and say ‘speak up’ or use the ‘thumbs up’ icon in the participants panel. If using this second option you will need to explain to the whole assembly what the thumbs up icon means so they know to increase their volume if speaking.
Direct Point

If someone has directly relevant information to what is being said, then they can make the ‘direct point’ hand signal and the facilitator will let them provide that information immediately after the person speaking has finished. The direct point signal is not an excuse to jump the queue just to make a point. It is important that people do not abuse this signal as otherwise it can make all present lose trust in the process.
Online consideration: If people do not have their video turned on, they can write Direct Point or DP in the chat, or unmute and say ‘Direct Point’ and their name.
Technical point

If someone has information that is immediately relevant to the running of the meeting, they make a ‘technical point’ signal by making a ‘T’ shape with their hands. This is only to be used for concerns external to the discussion that need to be addressed immediately e.g. “We only have ten minutes left” or “I am the note taker and I need the loo so can someone else take over?” The facilitator should stop the discussion to address the technical point.
Online consideration: If people do not have their video turned on, they can write Technical Point or TP in the chat, or unmute and say ‘Technical Point’ and their name.
Round Up

Facilitators need to ensure that no one speaks for more than necessary (two minutes is a suggested maximum amount of time as it encourages people to be concise). If someone has been speaking for two minutes (or whatever the set amount of time is), the facilitator makes the ‘round up’ hand signal by repeatedly making a circular motion with their hands (as if they a tracing a ball). This must be done sensitively, but firmly as it ensures that no one person dominates the meeting.
Online consideration: If people do not have their video turned on, they can use the ‘time’ icon under ‘more’ in the participants panel.
Speak up
If someone is speaking too quietly or they cannot be heard, others can ask them to raise their voice by raising and lowering their hands with palms open and facing up.
Online consideration: If people do not have their video turned on, they can write ‘Speak Up’ in the chat, or unmute and say ‘speak up’ or use the ‘thumbs up’ icon in the participants panel. If using this second option you will need to explain to the whole assembly what the thumbs up icon means so they know to increase their volume if speaking.
Temperature check
Jiggle the fingers on the palms of both hands at a level that corresponds with feelings. If hands are pointed upwards and jiggled, this suggests support. If they are held horizontally, this suggests people are ambivalent, and if they are pointed downwards, then this suggests that people do not support something. A temperature check can be used to quickly check the feelings of the group.
Roles
Each assembly needs:
Lead Facilitator (Ideally two with a gender balance)- They are responsible for the overall running of assembly, timekeeping, and the delivery of all relevant information.
- They facilitate the discussion using hand signals, ensure no one dominates, keep an eye on the time, maintain radical inclusivity and active listening, and adhere to the ‘Inclusivity Statement’.
Assembly Notetaker
They are responsible for recording the results of the feedback/integration phase of the assembly and for feeding the assembly results into wherever they are destined to go. They might, for example, need to send them to the local Council to demand action, or feed them into an online organising platform. The destination of what is generated in assembly needs to be clearly defined before the start.
Each breakout group needs:
FacilitatorThey facilitate the discussion using hand signals, ensure no one dominates, keep an eye on the time, maintain radical inclusivity and active listening and adhere to the ‘Inclusivity Statement’.
Notetaker
They summarise the most popular points, ideally as bullet points, aiming to boil them down to 2-5
key points or ideas from the discussion. They look for wavy hands to record agreement.
Structure
There are three main phases of a community assembly, these are the input phase, the deliberation phase, and the integration/feedback phase.
Input Phase
This phase can be broken down further into the introduction and input, the latter of which can be of varying lengths according to the purpose of the Assembly.
Ideally, the input phase should be around 30 mins in total. However, if a speaker is attending or it is important for those present to learn about a subject, then the input phase may take longer.
Introduction
- Start on time.
- Lead facilitators introduce and explain the hand signals, so that they can be used throughout all parts of the assembly.
- They then introduce the assembly agenda, including where the results of this assembly will go.
- They then talk through the three pillars (radical inclusivity, active listening and trust) and ask for help from the crowd to remove any barriers to engagement that may be identified, before reading out the Inclusivity Statement:
“We value all voices equally in the assembly, as the aim is to hear the wisdom of the crowd gathered here and not to have the assembly dominated by individual voices or groups. We recognise that confident speakers are not always right and that those who are not confident speakers will often have the most useful ideas or opinions to put into the discussion. This is why we value all voices equally and we ask you to do the same. We do not tolerate any calling out, abuse or shaming and should conflicts arise in this way. We welcome all people but not all behaviours.”
Input
This can be as simple as the lead facilitators framing the question for discussion and explaining why the assembly has been convened.
Or it can involve a longer and more in-depth input section such as a live panel of experts, or a video input.
The Input should be balanced and factual – if research is being done to provide context, consider how you will keep it impartial.
A badly planned input can skew a deliberation and deliver unwise answers.
Testify
Invite people to take the microphone for two minutes maximum and share their feelings about what has brought them to join the assembly or action that day.
In an open public assembly, this section can be drawn out as long as people volunteer to speak.
It opens the space for people to connect emotionally, but be carful to ensure it is not used as a ‘soap box’ on the issues about to be discussed.
Ideally ask for a woman to speak on the microphone first (It has been shown that this will greatly increase the level of engagement of female participants. The rate of engagement and uptake for males isn’t affected in the same way), and allow as much dead air as is necessary for people to build up the courage to come and talk.
Be strict with timing but ensure that the people speaking are supported and made completely safe in their sharing.
Ideally work with two facilitators so that one facilitator ‘guards’ mic and keeps stack, whilst one sits in front of the speaker with timer and gives ‘round up’ hand signal as they approach 2 mins.
Deliberation Phase
Main Deliberation
- Before people go into groups a lead facilitator clarifies the discussion topic or question, including making clear how many points are to be fed back from each ‘breakout group’ (usually 3-5 points depending on the size of the assembly – the larger the assembly, the fewer the points).
- Lead Facilitators then divide the assembly into ‘breakout groups’, ideally of eight. Facilitators need to try and ensure this is roughly the size of each group and encourage people to sit in groups with people they don’t already know.
- Each breakout group has one facilitator and one notetaker as explained above.
- Clarify the duration of the deliberation (discussion in breakout groups) phase, and stick to timings throughout the assembly as many people who are attending have work or family responsibilities that have to be respected.
- A deliberation phase should last around 30 minutes (5 minutes can be allocated to introducing the phase, and groups should have 25 minutes to discuss their ideas).
- Recap the hand signals before putting groups in breakout groups.
Breakout Groups
In the breakout groups, it is good practice for the facilitator to restate the discussion topic or question and for the note taker to write it down. This enables people in the group to refer back to the original point for discussion to make sure the group stays focused and on subject.
It is also good to start by going around the group and stating names, and making space for anyone to highlight any barriers to engagement that they may have that the small group can work together to try to work around.
The breakout groups will have a set amount of time to discuss the topic, as outlined by the lead assembly facilitators beforehand – a good amount of time is 25 mins.
10 minutes before the end of the deliberation phase, the lead facilitators should notify the breakout groups that they have ten minutes left, and should request that the breakout group note takers feed back their summary of the discussion to their groups, so that they can identify which key points they will be feeding back to the main discussion. It is also a good idea for the lead facilitators to remind the breakout groups how many points they will be feeding back.
Integration Phase
Feeding Back
- The lead facilitator calls the breakout group note takers to the front of the assembly (they should ask the name of each note taker before they feedback so that they can thank them at the end).
- The lead facilitator should request that as the note takers feedback their key points, the crowds use wavy hands to signal their support for the points raised.
- Each note taker then feeds back the key points as the main assembly note taker records the points as they are fed back, noting down which ones get the most approval from the entire assembly. It’s nice to do this on a whiteboard or a large piece of paper so that the assembly participants can see it.
- The assembly note taker then feeds results of the assembly to wherever they are destined to go (e.g. sending them to the local council to demand action, or posting them on a community online organising platform etc.). This destination is determined prior to the assembly and will have formed part of the framing of the process in the Input phase.
Finishing Up
- The lead facilitators express gratitude for the breakout group facilitators and note-takers, and for everyone who participated.
- If there is a need to vote on the results of the assembly, you can do a ‘Temperature Check’. The lead facilitators read out the different options to be voted on and the members of the assembly cast their ‘vote’ using ‘wavy hands’ for the option they like the best. The assembly note taker and lead facilitators watch for the most wavy hands and that gets taken forward.
- ‘Shout Outs’ are an invitation for those gathered to call out brief notifications such as upcoming actions or events. These should be short and arranged with the facilitators beforehand if possible. This should take no more than 10 minutes.
- The lead facilitator summarises the results of the assembly if necessary, and thanks everyone for participating.
Dealing with Difficult Interactions
Sometimes when you are running assemblies, or doing community work in general, you might have difficult interactions with people. Whilst there is no easy way to overcome these, here are some suggestions:
- Refer to the line from the inclusivity statement: We welcome all people, but not all behaviours.
- Move in when people are interjecting, challenging or talking too much, stating that radical inclusivity means we need to have time for everyone and equal sharing/hearing time.
- Thank them for their input and seek the positive intention of their behaviour (what are they seeking to achieve that is positive?)
- Remember, discussions can be won by people who make the most noise. Your job is to ensure all voices are heard.
- Explain the situation & encourage a quick round-up: “I am conscious of time and our agenda - what is the final point you want to make?”
- If someone interrupts, state the importance of ensuring people are listened to without interruption.
- Offer to talk to the person exhibiting difficult behaviour in more detail during a break or afterwards. If you need someone to behave differently it can be an expression of Radical Inclusion to connect with them in a break or afterwards to keep in relationship with them.
- Sometimes with someone who is very unconsciously in need of attention and can’t be satisfied with a short interaction, avoiding eye contact may keep them quiet or let them know they have been talking for too long.
- If necessary, overtly clarify the objectives of the session again and what is needed to achieve those objectives.
- In our Engaging Communities module we have a document on how to deal with conflict when engaging with strangers, which uses methods from Non-Violent Communication (NVC) - it is worth reading to prepare for community assemblies.