How to contribute to the Rebel Toolkit
A new vision for the toolkit has arrived!
- Welcome to the Rebel Toolkit!
- Contributor Guidelines
- Not in a Working Group but want to add your resources to the Toolkit?
- Contributing - The Technical Side
- Top Tips and Updates
- Practice editing
- Editing Pages
- Adding Images
- Resizing Images
- Embedding a video
- Book Cover Designs for Rebel Toolkit
- Links within RT
- Links to pages outside of the RT
- Adding a Google document
- Same page two + contributors
- Extra Markdown Hints
- Extra HTML tips
- Contact the Rebel Toolkit team
Welcome to the Rebel Toolkit!

What is the Rebel Toolkit?
A one stop shop for individual Rebels and members of Local and Community Groups. Containing everything you need to know in order to learn more about XR, get training and advice, set up and run a group, take action with XR and more.
What will you find on the toolkit:
✔️ Yes:
- Resources for people who are already involved in XR- 'internal facing resources'
- ‘How to’ guides
- Useful tools
- Answers to common questions
- Examples of things that have worked and why
- Action Packs from UK circles
❌ No:
- Public facing resources (this is what the website is for)
- Non XR resources (although you may find links to these)
- Resources that are only useful to one individual group and can't be shared to others.
- Anything not ok to display to the whole world! (especially personal identifiers)
- Anything against our Principles and Values
Navigating the Toolkit
The organisation of this toolkit is like a library, with Shelves, Books, Chapters and Pages. Using the Search box above will search all of them. Search Tips.
Who maintains the Toolkit?
The Rebel Toolkit as a whole is curated and published by the Local Group Support team. Circles who have specialist knowledge write their own pages of the toolkit.
If you have any questions, feedback or suggestions, need a new book created, or a page deleted, or want to join our team, there are 2 ways to contact us.
- On Mattermost, the Rebel Toolkit Reception channel in the UK Team
- By email at: LGsupport+rebeltoolkit@extinctionrebellion.uk
We are always looking for people who are passionate about sharing with and learning from each other to join us - if that's you, get in touch!
Contributor Guidelines
Vision
To create an easy to navigate and relevant one-stop-shop for Local Groups, Community Groups and individual rebels to find the information and support they need.
Intro
Engagement and enthusiasm for utilising the Rebel Toolkit (RT) for all XRUK work is key to maintaining this vision. From actions to design, from training to volunteering, the Rebel Toolkit being the key repository for this information, will allow it to be the go-to guide for the movement.
Historically there was a huge amount of valuable resources within XR UK, but they are spread all over the internet - Google docs, XRUK Cloud, XRUK website etc. A project during 2023-24 brought all of the resources into one place and refreshed the RT. These will now be maintained and curated by the Rebel Toolkit team (which is a sub-circle of Local and Grassroots Support).
The aim is to maintain these resources as focused, relevant, accessible, up-to-date and tailored to the right audience.
Using Shelves, Books, Chapters, and Pages
The RT is structured just like a real bookshelf, full of real books. Please ensure that your content effectively uses the chapter/pages system to break down the topic into chunks. Each chapter & page should have a logical name as these will be displayed in the contents page of your book, and in the sidebar when navigating the book itself.
You don’t HAVE to use chapters if your book is short. If it’s 7 pages or less, it probably doesn’t need chapters.
A good example is the ‘Action Network for XR’ book.

Book titles and covers
It is also important to choose a name for your book that communicates what the topic covers, in as few words as possible.
If you change the name of the book, it changes the URL and if you have linked to it from elsewhere (XRUK website, or an email footer perhaps) - that link will break. But note that book URLs are independent of what shelf they sit on.
Book covers need to be created with certain criteria in mind - more information is available here.
Audience
The audience for the RT ranges from people completely new to XR to experienced Local Group coordinators looking for guidance to full-time XRUK team members. Please remember that the Rebel Toolkit is publicly accessible to anyone on the internet, so don't include anything you wouldn't tell your nan!
Please ensure that you don’t use XR jargon, abbreviations, or make assumptions about users’ technological abilities. Use simple language, short sentences, and short paragraphs.
Links to documents outside of Rebel Toolkit
Links to documents external to the RT should be minimised. It is preferable that information is written within the RT. Only use a link to something external to the RT if this is absolutely necessary and the page cannot be recreated on the RT or if you are linking to an external website.
If you have to link to external docs please use Karla font, no italics, clear layout and in the case of Google docs, edit the URL - make sure that after the last ‘/’ which normally says /edit or /view, replace this with /preview.
There are two ways to create hyperlinks when editing the RT:
Linking to other books & topics
We are striving to reduce duplication of information. Therefore, if your team needs to include elements of the work of another team within your pages, please link directly to those pages, rather than writing your own section in your book.
For example, if in a section describing Outreach methods it is relevant to talk about fundraising, you should talk to the Fundraising team and/or view their current content. They may already have suitable guidance, so you can link directly to this.
If those pages do not yet exist, talk directly to the team who you think should be providing the content or contact the RT team for guidance. Do not create content that over-reaches your team's mandate/responsibilities.
Wiki-style contributions
The original vision of the RT was modelled on a ‘wiki’ style design - where everyone in the movement could share resources, instructions and ideas. Whilst an amazing vision, lack of curation meant that huge swathes of the RT were left out of date, duplicated, or linked to documents which no longer existed.
We still appreciate the vision of the Toolkit as a sharing space, so there are various ways that individuals and teams can add content to relevant shelves or books. These options will be offered in relevant parts of the RT and some teams can be given direct access to maintain certain areas that compliment their team's responsibilies (their mandate).
Maintaining quality of the RT content
All teams who have direct access to contribute to the new RT must keep their content up-to-date. Ideally someone within that team should take on the role of updating the RT regularly. As the initial phase of updating the RT ends, a larger RT team will be created with various roles from daily proof-readers checking new content, to long-term curators/librarians and maintenance of close links with UK circles.
Sense check for your content
A checklist for deciding if your content a appropriate for the toolkit:
1. Is it for people not yet connected to XR ?
If yes, consider adding to the XRUK website
2. Is it for rebels, rather than people who are not (yet) in XR?
If yes, Rebel Toolkit is the right place
3. Is it aimed at a small group of rebels maybe within an XRUK circle?
If yes, it could go on the UK circles section of the RT which will only be viewable by logging in.
Access and Inclusion
Access and Inclusion should be considered in everything we do, and that includes in the content everyone here is adding to the Rebel Toolkit. Please read this guide which has been written by the Disabled Rebels Network.
We all need to consider making the content itself accessible, by using clear layout, no italics etc.
Any content written for the RT relating to LG spaces, meeting facilitation, handing zoom calls or planning actions etc should also consider the guidance provided.
Stay in touch!
If you want to meet with us again during the process of updating, or when you think your updated info is complete, please contact us.
The conversations with all the different teams should help us develop a more nuanced and detailed view of what needs to happen to make the RT a fabulous resource for the movement.
What we are aiming for is to reduce any duplication in content. So we may contact you again if we identify overlaps and repetitions.
Not in a Working Group but want to add your resources to the Toolkit?
The Rebel Toolkit is a resource for everyone, built by our rebels. Therefore, if you are a Rebel in a Local Group, a Community Group or in anyway involved and you feel like you have something to add, then please let us know!
What to Add?
So your group has done something cool!
- Have you used a tool or resource in an exciting way?
- Have you created something new you would like to share?
- Have you tried something that worked well or maybe didn't work as expected?
- Have you done something which resulted in a step forward?
We want to hear about it all! If you have brought your MP to the table, dropped a banner, used a Peoples' Assembly to define your strategy, embedded your group into your local community... The list goes on!
How to Add?
Simply send your resource to the Rebel Toolkit team and let us know:
- Who it was made by (the name of your group, not an individual's name)
- Why you think it would be useful for other groups
- How we can contact you if we have questions, or think it isn't an appropriate resource for the toolkit.
What to put in the resource?
- Who are you?
Are you writing about your Local Group or about your Affinity group? Maybe it is something you have done as an individual citizen or something you have done in collaboration with another community.
Let us know who you are and how we can connect with you if we have questions. Importantly, please use public email addresses or your mattermost handle rather than your private contact!
- What is the resource you are sharing?
This will decide where on the Toolkit you will want to put your resource; it's often not as clear cut as "which working group did it" since an action may belong on the actions shelf or it may belong on the political shelf due to its effects.
We recommend asking yourself "what is the key take away?" Is your resource focused on how you planned the action and carried it out or is it focussed on how you can use actions to forward your political campaign?
This will also likely change how you will write your article.
- What happened?
To start off your resource, summarise what happened and what the article will be about at the top of the page. Let us know what aspect you will be focusing on, what happened and what the result was in brief.
Know that your audience is likely to be rebels from other groups who may be interested in trying out what you did in their area or building on your ideas; so you want to let them know what is in your article or resource.
- How was it planned and organised?
This is where we start to go into a lot more detail since this is what groups need to know if they want to replicate or build upon your success.
So think about how long it took to plan, what had to be in place, who was involved, how many people were involved. Did you need to make connections outside of your group? Did you need specific skills like carpentry or first aid? If you chose a location, how did you make that choice; what was involved in the thought process? Did you have any contingency plans in place?
What about the idea itself, where did that come from, was it changed at all in the planning process? If your resource is on an organisational structure, how did you write the proposal, how did you identify the gap and how did you land on a mandate?
- How did it go down?
Let us know what happened. Timings, hiccups, strokes of luck, how much went as planned and how much just fell into place.
- What was the result?
Why do you consider this a success? Did it change a dynamic in your group? Did you make a splash in the media? Did it result in a step towards a larger goal? How do those involved feel about it now. How was it received in your group and outside it?
Or are you sharing this resource because it wasn't a success? Were key mistakes made? What mess did it make and how, if at all, have you managed to clean it up?
Vitally, what did you learn!
- What would you have done differently?
Here you can start to add your ideas and suggestions. Do you feel like you could have done it better? How would you adapt what you did to different situations?
Things to Remember
The number one thing to remember is that this is a public platform, so please treat it accordingly!
- Don't put your private contact details into your submissions; we would love to know who to contact for advice if we we want to replicate what you did but for your security it would be better to use your mattermost handle or a generic email such as your Local Group's address.
- Don't refer to rebels by name in a resource.
Contributing - The Technical Side
Editing, Markdown, images, links etc
Top Tips and Updates
A page to help our work as editors of the Rebel Toolkit, with some top tips that have come to light to help save us time by avoiding common issues. Also if any major changes related to software or changes in advice for editors will be posted here.
Top Tips
No1.
When you edit it page, please always 'save' afterwards, even if you don't make an edit - otherwise it creates a draft and this can get messy when multiple people are editing a page.
No2.
Try to edit a page all in one go - this really helps the proofreaders in the Rebel Toolkit team as they can see all the changes in one go.
Practice editing
Sandbox
You can practice editing pages in the Sandbox - to view this book you need to be logged in to the Rebel Toolkit - click 'Log in' at the top right and use your Hub log in details.
Basic Markdown code
The Rebel Toolkit uses something called 'Markdown' to create things like title in larger font, bold, bullet point lists and more.
Creating different sized titles use the 'hash'
#(space)A big title
this becomes
A very big title
###(space)A regular sized title - we use this a lot
Regular sized title - we use this a lot
#####(space)Used for a sub-heading
Used for a sub-heading
**(no space)Bold text**
Bold text
Go here to see a page in the 'sandbox' with an example of all of this.
Editing Pages
The Rebel Toolkit was originally designed and a 'wiki' - a collaborative space for any rebel with a Communications Hub login to add and update. But over the years it got out of date and repetative with no overal vision to hold it together.
So from Sep 2023 onwards, the overall Rebel Toolkit has been curated by the Rebel Toolkit team within the Local Group Support circle.
You can apply to the Rebel Toolkit team to edit certain books or pages if they contain guidance that your role or circle has mandate over. You can then have access to maintain a particular shelf, book chapter or page.
More details of this change can be found here.
Note that the Rebel Toolkit is visible to everyone on the Internet. Please do not publish personal email addresses, Mattermost invite links or Zoom call details that include the passcode, or links to documents containing such things.
It is discouraged to link to external documents (eg Google documents) and encouraged to have as much content written directly on the toolkit as possible.
Signing Up and Logging In
In order to edit the content on this web site, you need to be logged in.
The user accounts on this web site are tied to the accounts on the XR Communications Hub.
To sign up to the Rebel Toolkit, click the 'Sign up' link at the top of the home page. Make sure you click on the SIGN UP WITH UK HUB button first and ignore the name, email and password fields on the Sign Up page. You will need your Hub user name and password, unless you are already logged in to the Hub.
Logging in subsequently is done also with your Hub user name and password. Click on LOGIN WITH XR UK HUB on the Log In page.
Note that this web site is visible to the general public on the Internet, and is indexed by Google and the other search engines, so:
- Don't add anything that should not be visible.
- If you don't want your full name to be visible as an editor, change it by going to 'Edit Profile' on the menu top right.
Please do not include any email addresses unless they are already public on the Internet. This also applies to links to, for example, Google Docs containing email addresses, or other sensitive material.
Editing Pages
This web site runs on a software package called BookStack. Their home page is at https://www.bookstackapp.com/. We have our own copy of BookStack running on one of our servers in Switzerland.
The user documentation is at https://www.bookstackapp.com/docs/. We won't duplicate that here, but we will add things which are specific to this site or need extra clarification.
BookStack supports two different page editors called WYSIWYG and Markdown. We have chosen to use the Markdown editor for this site. Note that the BookStack demo referenced on their home page, while good for gaining an understanding of BookStack, is configured to use the WYSIWYG editor. This is a site-wide setting and can't be adjusted per user, because the pages are stored in a different format by the two editors.
To edit a page:
-
You need to sign up and log in, and request edit access to a specific pages or pages from the Rebel Toolkit team
-
Then go to the page you want to edit.
-
Click the Edit button
On very wide screens a sidebar will appear on the right hand side which includes an Edit link.
On medium width screens a sidebar will appear on the left hand side which includes an Edit link.
On narrow screens, you have to click the Info tab at the top of the page to make the sidebar appear.
The editor accepts both Markdown and HTML. You may find that the page that you are editing is in Markdown or HTML or a mixture of both. For example in Markdown a bold word is indicated like this: **bold words** (rendered as 'bold words'). In HTML, you get the same effect with <b>bold words</b> (rendered as 'bold words').
For information about Markdown see: https://daringfireball.net/projects/markdown/basics and https://daringfireball.net/projects/markdown/syntax. You may wish to get yourself a summary of the Markdown codes by searching on the Internet for 'Markdown cheat sheet' -- there are lots.
See the Markdown Hints page for more information about Markdown.
For plain text content, no special markup is needed. Put a blank line between paragraphs.
It is a good idea to keep a copy of your text yourself locally in case it gets lost, through computer failure or user action. This can done by clicking in the editing area and doing Ctrl-A (Select All), Ctrl-C (Copy), then open Notepad, Ctrl-V (Paste), Ctrl-S (Save) and choose a place and name for it. These are the instructions for Windows. It will be similar for other operating systems.
When you have made your changes, make them visible by clicking Save Page in the top right hand corner.
Creating New Pages
If you have edit access for a whole book or chapter, you can create a new page by going to the Book or Chapter where you want the new page, and clicking New Page in the sidebar. You can change the order of pages by clicking Sort later, which lets you set the exact order you want.
If you do not have this edit access and would like to add new pages, or sort the pages differently, please contact the Rebel Toolkit team.
Start your page with a sentence that gives some more detail as to what the page may be about in addition to the title. The first line or two appear in the book contents lists and on search results, so this makes it easier for readers to find the page they want.
Split your text into multiple pages if necessary. If pages are too short, it is hard to find things using find-in-page in your browser, as you have to do it separately for every page. If the pages are too long, they become hard to take in. Also on a long page, you may have so many headings that the Page Navigation on the left (wide screens only -- on a narrow screen it is on the Info tab) becomes taller than the height of a typical screen.
Headings
A way to stop the Page Navigation getting too long is to make headings at the lowest level which don't appear in the Page Navigation by just using a short bold paragraph, like the one above, which looks like a heading but just uses bold markup **Headings**.
Shelves and Books
Please contact us if you would like a new book creating and adding to a shelf.
Adding Images
To add an image to a page:
- Prepare a suitably-sized image. Most photos need their resolution reducing for publishing on the web. See the [Resizing Images](/books/about-the-rebel-toolkit/page/resizing-images) page for instructions.
- Click in the text at the point where you want the image to appear.
- Click the "Insert Image" button in the editor above the main text pane.
- Either:
- Drag your image from Windows Explorer (or the equivalent for your computer) into the grey area top right where it says "Drop images or click here to upload", OR
- Click on the grey area top right where it says "Drop images or click here to upload", and select an image.
- Click on the image you have just uploaded
- Click 'select image'.
- The Markdown code to display the image will appear in your page.
You can also drag an image file directly into the main text area of the editor. However this not recommended because the image will be given a numeric name, and not the name of the file it came from. If you have done this, you can rename any image via the "Insert Image" button mentioned earlier: click on the image, edit the name and click SAVE. Images can be deleted via the same screen using the dustbin icon.
Please try to use sensible names for your images so that they are easier to manage.
The default markdown code put the image left aligned and makes it 'clickable'.
If you prefer not to have the image open with a click, then you can simplify the markdown to
 - where the 'alt-text' can be a description of the image (for people with visual impairments who use screenreaders)
If you want the image to be centred on the page, then you can use a bit of html instead
<p style="text-align:center"><img src="IMAGE-URL-HERE" alt="ALT-TEXT-HERE"></p>
The XR Global Media Library has images that can be downloaded at the right resolution.
If adding from another source, it is important to ensure that all images are used legally.
Resizing Images
Why use smaller images?
- It saves on energy! Every pixel uses energy to be stored and shared so the smaller the image the less energy you use.
- They take up less space on a page. Pages can be quite long at the best of times so why not make them colourful but also quick to browse!
OK, so how do I do that?
Not a tech whizz (yet)?
If you have an image to put on a page on the Rebel Toolkit, you may need to resize it in order to get it to display at the correct size on the page. This involves reducing the resolution of the image, ie. reducing the number of pixels in the width and height.
You do this on your computer before uploading the image to the Rebel Toolkit.
Notes for Microsoft computers:
You can see the dimensions of an image by hovering your mouse over the name in Windows Explorer.
- For an image on a web page, right-click and select View Image Info (in Firefox), select Inspect and hover over the image element (in Chrome). In most cases you will want an image between 200 and 600 pixels across.
Notes for Computers with the Paint app:
An easy way to resize an image on a Mac is to open the file using Paint.
-
Click on the Tab Image on the toolbar at the top of the screen. A drop-down menu will appear with the option to Adjust image. Click on that and choset he amount of pixels you want it to have. 200 Width will make the image take up aboutz a third of the width of a page - to give oyu an idea. This is usually small enough to see but not so big that it takes up lots of room. (You can also use Preview in much the same way)
-
Once you have resized the image click on the tab File in the Toolbar at the top. Click on Save As and put it into a file where you might find it again easily.
-
Now you can add a page in the Toolkit and insert an image which is smaller.
Tip: It is a good idea to make a copy of the image and resize the copy.
There are numerous tutorials available on how to resize images, and a selection is listed below.
Note:
Many of the tutorials are trying to get you to download a piece of software or to use a particular web site.
You do not need to install any new software or to use a web site or online service*
Whether you use Windows, a Macintosh or Linux, your computer already has the software you need to resize images. The list below only covers Windows.
*Linux is more tricky, and you may actually want to install some software.
Tutorials for Resizing Images
Windows
-
https://www.howtogeek.com/354015/how-to-resize-images-and-photos-in-windows/ Ignore the "Third Party App" sections and use Paint.
-
https://tencomputer.com/resize-photos-in-windows-10/ Ignore the "Method 2: Download" section and use Paint.
Mac
Using Preview to resize an image tutorial. Youtube video link. You can skip the first 40 seconds where he explains why you may want to change the size of an image.
Embedding a video
Embed a video
This is what you get if you go to YouTube, click share and copy the embed code:
<iframe width="560" height="315" src="https://www.youtube.com/embed/hV8r0I5f1LQ?si=M8Qq8aVS7S-1euWV" title="YouTube video player" frameborder="0" allow="accelerometer; autoplay; clipboard-write; encrypted-media; gyroscope; picture-in-picture; web-share" referrerpolicy="strict-origin-when-cross-origin" allowfullscreen></iframe>
This is what it looks like but with the p tag added around it to centre it. And the title changed:
<p class="align-center"><iframe width="560" height="315" src="https://www.youtube.com/embed/hV8r0I5f1LQ?si=M8Qq8aVS7S-1euWV" title="The World in Flux" frameborder="0" allow="accelerometer; autoplay; clipboard-write; encrypted-media; gyroscope; picture-in-picture; web-share" referrerpolicy="strict-origin-when-cross-origin" allowfullscreen></iframe></p>
Book Cover Designs for Rebel Toolkit
Book covers on the Rebel Toolkit are 440x250 pixels in size.
Here is an example

Because the Rebel Toolkit is viewed on a computer screen, tablet and phone, the 'safe' area for any text on the graphic should be similar to the example above.
If you design using software (Adobe, Affinity etc) that can utilse layering - here is a template that you could use to guide your designing.
Obviously all other considerations for accessibility and XRUK design style should be followed.
If you need help with a book cover, please contact the RT team with a brief explanation of how you would like your book cover to look.
Links within RT
You can use markdown to create links within the Rebel Toolkit using a combination of square and curved brackets e.g.
[View the Media and Messaging shelf](https://rebeltoolkit.extinctionrebellion.uk/shelves/07-media-and-messaging)
which will then look like this...
Click here for view the Media and Messaging shelf
The URL (web address) of a shelf, book or chapter in the Rebel Toolkit is based on it's title.
The same applies for pages, BUT this can cause problems if you make a link to a page and then the page gets renamed or moved to another book. But for pages (and even any part of a page) you can actually pick up a link that won't change even if the page title does or even if this whole page is moved elsewhere.

-
Go to the page you want to make a link to
-
Highlight a piece of text by double clicking on a word. The word gets highlighted.
-
A pop-up box appears - in that pop-up box you will see the unique address of the page or paragraph.
For example the address of this page is https://rebeltoolkit.extinctionrebellion.uk/link/463. So you can make a link like this: Links to pages in Rebel Toolkit which will continue to work even if the page is moved.
Links to pages outside of the RT
A sensible distinction between internal (links to other parts of the RT) and external links to other websites, forms, social media etc is to make the external links open in a new tab.
The way to do this is with a little bit of html:
<a href="LINK" target="_blank" rel="noopener noreferrer">TEXT</a>
just copy that on the page you are editing and add your URL where it says LINK and the words you want to appear as the hyperlink itself where it says TEXT
Adding a Google document
If you have something useful in a Google document which you would like to make available on the Rebel Toolkit, you can't upload it directly. You have a choice:
Turn the google doc in to a RT page
If possible, especially with more 'evergreen content' it is best to convert the content from the Google doc into a Rebel Toolkit page, ie. make a page on the Rebel Toolkit containing all the text from the Google document. Some people prefer to make a file in Notepad (or equivalent) on their computer and do all the work on that before pasting it in to the editor on the Rebel Toolkit. The formatting needs to be done in accordance with the Editing Pages instructions.
Link to the google doc
If the Google document has a lot of complicated formatting, you can just make a short page on the Rebel Toolkit with a description of the document in a few sentences and a link to the Google document. You can put links to several documents on one page if they are related. Bear in mind that the Rebel Toolkit is visible to everyone on the Internet: do not include links to any document with confidential information, eg personal email addresses.
The URL of the google doc can be made more secure by replacing the info after the last / with the word 'preview'. e.g.
Change this : https://docs.google.com/document/d/1jqyCjGkfMrIFmUrFAZpwaHjFk0bYtcPkLhN_IGF-T5I/edit
Into this : https://docs.google.com/document/d/1jqyCjGkfMrIFmUrFAZpwaHjFk0bYtcPkLhN_IGF-T5I/preview
Same page two + contributors
For those that may be working on a doc at the same time as another Rebel.
- If at the top of the page you are working on you see an image like the one below pop up at the top right-hand corner then we strongly advise that you work on a separate page. There is a possibility that when you save someone loses some of their work.
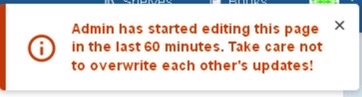
-
If more than two people are contributing to the same page at the same time a similar box will appear, all red, and it will name the other user.
-
The advice is still the same - save your work elsewhere as there is a possibility that when someone saves the work gets lost.
Generally, we recommend working on the Toolkit from a separate doc rather than directly onto the Toolkit. This is advisable because it means you have access to the original doc as back-up.
Extra Markdown Hints
Markdown is used to make headings, bold, bulleted lists etc on the Rebel Toolkit pages.
This page contains tips for formatting your pages.
For basic instructions on using Markdown, we recommend The Markdown Guide or search online for Markdown. Here is a fairly comprehensive set of basic Markdown syntax. If you are looking for more detail, here are some links to tools to make editing easier.
Tables
In addition to classic Markdown, BookStack supports the Markdown Extra extensions, see https://michelf.ca/projects/php-markdown/extra/. This provides a number of extra facilities in addition to the original Markdown, in particular support for tables. Here is a quick example of how to insert a table.
| Item      | Value |
| --------- | -----:|
| Computer  | $1600 |
| Phone     |   $12 |
| Pipe      |    $1 |
This renders as:
| Item | Value |
|---|---|
| Computer | $1600 |
| Phone | $12 |
| Pipe | $1 |
Link on an Image
To put a link on an image, so that you can click on the image to go to another page, just use some image markup instead of plain text as the link text in square brackets [](my-destination-page.htm)
For example, this [](/books/engaging-our-rebels/page/rebel-ringing) renders as:

Floating images to right or left
The Markup Extra specification says that you should be able to add class attributes to image markup, but it doesn't work in BookStack. You need to put the image in as HTML as below if you want to float an image with the text wrapping round it. You can also use align-left and align-center.
<img src="/uploads/images/gallery/2020-08/thumbs-150-150/RebelRingers.png" alt="Rebel Ringers video" class="align-right">
Horizontal Rules in Dark Mode
Horizontal rules like this:
don't show up in BookStack Dark Mode. There is a link to turn Dark Mode on and off near the top of the sidebar or Info panel on the home page. This is a mistake in the BookStack default style sheet in Dark Mode where the horizontal rule is dark grey (#222) on a dark grey background.
Comments
You can add comments to be seen by subsequent editors of the page, but which will not appear on the final rendered page after the Markdown processing. There is no explicit mechanism for comments in Markdown, but we can make use of the reference-style link syntax like this:
[Comment]: # (you can put any message for editors here.
It can span more than one line)
Not to be confused with the BookStack comment facility, which is turned off.
Extra HTML tips
You can use both Markdown and HTML with editing Rebel Toolkit pages.
You can learn more HTML from various website or YouTube videos, but here are some simple bits of HTML code that might be useful on the Rebel Toolkit:
Bold
<b>Write your bold text here</b>
This will look like:
Write your bold text here
Which is the same as using the Markdown of a double asterix (like this **)
**Write your bold text here**
Write your bold text here
Drop-down expanding text box
Example
Detailed textUsing this code you can create the drop-down content box shown above:
<details><summary><span style="color: blue;">Put your title here</span></summary>
Then add your longer text here in the drop-down section. You won't be able to use markdown because it's inside html, but you can use other html to help lay out this, e.g. <b>BOLD</b> or a <br>line break
to continue with more content on a fresh line. End with
</details>
Complete code to copy:
<details><summary><span style="color: blue;">Title</span></summary> DetailedText</details>
Note: On this page the use of a 'backtick' is used (one of these `) around parts of the page to allow you see the code.
Comments
You can either use this mechanism to hide some html temporarily or to add comments to be seen by subsequent editors of the page, but which will not appear on the final rendered page.
<!-- Write your comment here. You can use this over multiple rows and it will all be hidden as long as you end with -->
Contact the Rebel Toolkit team
Contact the Rebel Toolkit project team:
-
On Mattermost, the Rebel Toolkit Reception channel in the UK Team. It is a public channel, so you can join yourself to it.
-
By email we can be found at LGsupport+rebeltoolkit@extinctionrebellion.uk.