Other Online Tech Tools
Commonly used digital tools which aren't covered in the other books on the Tech and Data shelf.
- Movement Calendar and Events Map
- How to find events using the Calendar
- How to find events near you using the Map
- Adding Calendar Events - Submit a Form
- Adding Calendar Events - Calendar Editor
- Sharing Events, Calendars or Maps
- Local Group Map
- Applying for and using extinctionrebellion.uk email accounts
- Applying for an @extinctionrebellion.uk email account
- Logging in to your XR email account via Webmail
- Logging in via an external email client
- Using Email Folders
- Plus addressing
- Forwarding and filtering @extinctionrebellion.uk emails
- Email account queries & help
- Importing and exporting contacts from webmail
- The Vault
- Hide your phone number from others using Telegram
- WhatsApp Security & Privacy Settings
- Tools for scheduling meetings: When2Meet & LettuceMeet
- Eventbrite
- Creating your event: first steps and basic info page
- Creating your event: Main Details Page
- Creating your event: Tickets, Payouts and Refunds
- Creating your event: Order Confirmation and Order From
- Creating your event: Publishing and finding your event in your Eventbrite account
- How to send an update email and how to access your attendee list
- Making simple QR codes
- Big Blue Button and Jitsi
- Big Blue Button Basics
- Automatic Closed Captions in Big Blue Button
- Big Blue Button Room Settings
- Jitsi Meet
- Zoom
- The basics of participating in XR Zoom meetings
- Getting started on Zoom and troubleshooting
- Zoom Advice - Hosting Meetings
- Creating Zoom events which require registration
- Rebel Toolkit
- Protect yourself from 'phishing'
- Artificial Intelligence (AI)
Movement Calendar and Events Map
How to:
- find events of interest near you
- add events
- share events, calendars or maps
How to find events using the Calendar
Click here to access the calendar on TeamUp. You can view it either in a browser, or in the TeamUp App on a mobile device.
Below is a summary of the basic uses of the tool. For a full guide, see the TeamUp documentation.
Event Summary
Hover your mouse pointer over an event and you will see a summary of the event information.
Event Details
Click on an event title and you will see all the event information.
Note particularly the Register Link box and the small icon to the bottom right of it. Click here and a new tab will open for you to contact the event coordinator or register for the event.

Searching/Filtering Events
You might want to see just events related to a particular topic or group or location. Simply enter text into the Filter box (where it says 'by keyword').
If you enter any word, it will show all events with that word somewhere in the event information.
If you want to search for a phrase, enclose it in quotes, for example, "dirty water". Otherwise, it will find events with either word in it - "Dirty" OR "Water" - which is probably not what you wanted.
You can also search for icons in the events - some common icons are displayed below the filter box, and you can copy these from there, for example, drumming. 🥁
You can also search for events flagged as related to a specific Region/Nation (or UK-wide events) and events that involve specific Action Support roles.
Calendar Views
There are multiple ways of viewing the calendar information:

Usually the 4 Weeks (grid) view, or the Agenda (list) view are used.
Date Range
Depending on the view you have selected you will have the option to pick a display date range, you can always return to a view based on today by clicking the Today button.

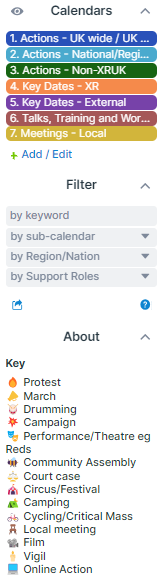
Sub Calendar
Select one or more of these as appropriate:
- Actions - UK-wide/UK Significance: These need to be passed by Actions Carousel and have UK-wide locations and/or media impact. E.g. Dirty Water, Insure our Survival.
- Actions - National/Regional/Local: The majority of Actions will fall into this category. Coordinated by Local Groups, Communities or temporary Action teams. E.g. Protests, Occupations, Marches, Rallies, Vigils, Pickets.
- Actions - Non-XRUK: These take the form of collaborative, allied organisation and/or Sister Movement actions. E.g. Fossil Free London, Housing Rebellion.
- Key Dates - XR
- Key Dates - External E.g. World Cup Final, Local/National Election.
- Talks, Training and workshops: Events usually hosted online although some are face to face, E.g. Online training, Film showing.
- Meetings - Local: Mostly social and organising events in a town or community, E.g. XR Local Group meeting, Climate Cafe.
Please note that secret events are not included in the public view.
How to find events near you using the Map
The events map shows events across the whole UK.
It's helpful to bookmark this on your phone for use during Outreach.
Finding Events
On a mobile device click the down arrow to see search options

On a desktop or mobile device click the down arrow again to see full search options
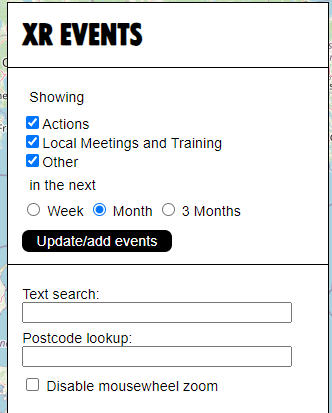
Zoom in to your location by postcode
In the 'Postcode lookup' box, type in the first part of your postcode and the map will zoom to display at least two events centered geographically on your location.
Searching/Filtering Events
You might want to see just events related to a particular topic or group or location. Simply enter text into the 'Text Search' box.
If you enter any word it will show all events with that word somewhere in them.
If you want to seach for a phrase, enclose it in quotes "dirty water" Otherwise it will find events with either word in it "Dirty" OR "Water" which is probably not what you wanted.
You can also search for icons in the events eg drumming 🥁
Some common icons used in events are:
🔥 Protest
📣 March
🥁 Drumming
💥 Campaign
🎭 Performance/Theatre eg Reds
🍄 Community Assembly
⚖️ Court case
🎪 Circus/Festival
⛺ Camping
If you have already used the postcode search and then use the text search, you may need to manually zoom out using the arrows in the top left of the screen to display the search results on the map.
Event Summary
Hover your mouse pointer over an event to see the event title.
Event Details
Click on an event title or pin to see the details.
A button will display to CONTACT / REGISTER for the event if details have been added in the calendar entry.
Adding Calendar Events - Submit a Form
You can submit entries to the Movement Calendar here
Alternatively, you can request that the information is added by your area’s calendar admin (this may be your Regional Gardener, M&M Coordinator or someone nominated from your group or community).
Visit the list of current Calendar Admins to find the Admin for your Region, Nation or group (requires a hub login).
Updating / Correcting Calendar Events
Please make sure details are accurate to avoid publishing incorrect information.
It is the responsibility of the group/person submitting the form to make sure that any changes are updated in the calendar (either by submitting a fresh form with comments that this is an update, or by contacting a Calendar Admin, or by contacting the Admin Team using the links below)
Calendar Mattermost Reception | Email: mov.calendar@extinctionrebellion.uk
In addition, if you require an update to a UK action/event where the change of info might impact other teams, contact the M&M and email team ASAP via
M&M Mattermost Reception or Email: mov.comms@extinctionrebellion.uk
Adding Calendar Events - Calendar Editor
Adding Calendar Events - Directly in TeamUp
If you only rarely add events to the calendar, it is probably easiest to just complete the calendar form.
If you regularly add events for your group/team/community then you will be assigned a private edit link for the calendar, which allows you to create and edit events.
List of current 'local' calendar admins for direct support (you'll need a Hub log in to access this).
If you are interested in becoming a Calendar Admin for your area, contact the Calendar Team here: Calendar Mattermost Reception | Email: mov.calendar@extinctionrebellion.uk
Once you have your personal edit link, simply open TeamUp using your personal edit link, click on a date when you want to add an event and a popup will open prompting you to add information This next section explains tips for each of the fields to help get your event found easily.
Example event
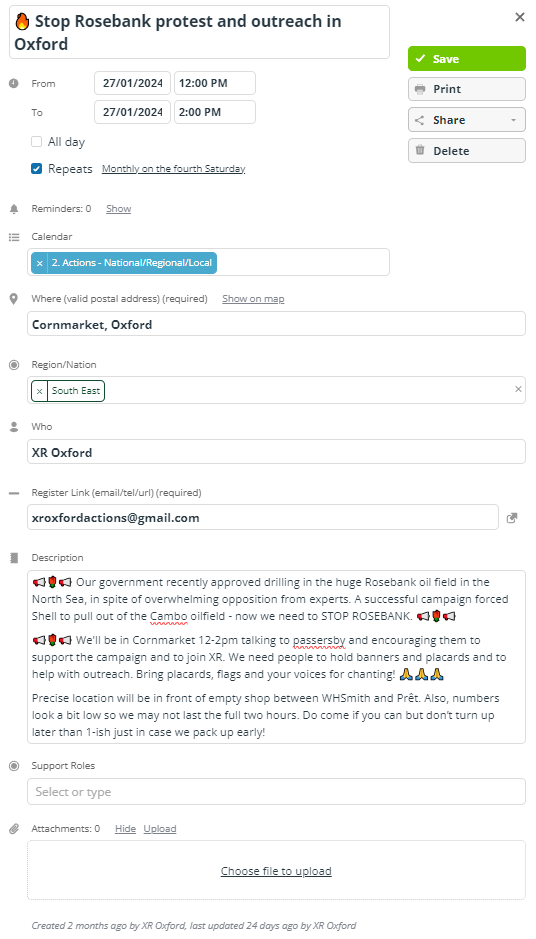
Event Title
This is what a user will see first, so keep it short, descriptive and ideally include an overall location. We also suggest using some of these emoticons as the first characters, so that users can visually see what type of action it is (this has been added to the Key in the Calendar itself as well):
- 🔥 Protest
- 📣 March
- 🥁 Drumming
- 💥 Campaign
- 🎭 Performance/Theatre eg Reds
- 🍄 Community Assembly
- ⚖️ Court case
- 🎪 Circus/Festival
- ⛺ Camping
- 🚲 Cycling/Critical Mass
- 🪑 Local meeting
- 📽️ Film
- 🕯️ Vigil
- 💻 Online Action
Some teams have also decided on a specific emoticon to flag their events and allow for easier filtering eg ☄️for XR London.
Dates & Times
Events can be scheduled as all day, or include start and end times.
Repeating events can also be created, for example a meeting that is held on the third Tuesday of every month.
Sub Calendar
Select one or more of these as appropriate:
- Actions - UK-wide/UK Significance: These need to be passed by Actions Carousel and have UK-wide locations and/or media impact. E.g. Dirty Water, Insure our Survival.
- Actions - National/Regional/Local: The majority of Actions will fall into this category. Coordinated by Local Groups, Communities or temporary Action teams. E.g. Protests, Occupations, Marches, Rallies, Vigils, Pickets
- Actions - Non-XRUK: These take the form of collaborative, allied organisation and/or Sister Movement actions. E.g. Fossil Free London, Housing Rebellion.
- Key Dates - XR:
- Key Dates - External E.g. World Cup Final, Local/National Election
- Talks, Training and workshops: events usually hosted online although some are face to face, E.g. Online training, Film showing, Outreach Stall, Block Printing
- Meetings - Local: Mostly social and organising events in a town or community, E.g. XR Local Group meeting, Climate Cafe
Where (full address please)
If a specific location is known (and you are happy to share it publicly) then put this in here.
So that integration with the website map will work, a full address with postcode is required. Don't add anything else like "around the back of" or a W3W location (these details should go in the description).
If you only want to specify a vague location, use a Town name.
For online local meetings, add the Town name here so that the meeting will show up on the map and nearby rebels will find it, and specify that the meeting is online in the 'Description' box.
Further address location information can always be included in the 'Description' field, see below.
Region/Nation
Choose from the drop-down list of Regions/Nations or select UK Wide. This field is to make it easier for teams to filter events and ensure they are publicised across their area where appropriate.
Who
Put a general team name in here, for example XR London, XR SE. You can put several names in here if collaborating with others. Don't put an individual's name.
Register Link
This can be a URL, an Action Network event form, an email, a link to a Facebook event - basically some way for rebels to contact you if they are interested. Only add the primary link in here - if there is more than one way to register or contact you, add these in the description box This button will display in the event on the map.
Description
Use this field to explain the event, add hyperlinks, embed images, etc.
- Include any specific details about the meeting point - remember a first time rebel may be nervous about meeting and may not know others attending. For example "By front of Ghandi statue in Parliament Square" is better than "Parliament Square"
- Don’t add links to secure or private chats or anything that you wouldn’t want the police to know.
- Do try and include a call to action.
- We suggest the Action Network signup link is included again here along with any other links for people to contact you to find out about your event. The key thing is to aim to engage a new rebel and get them connected to channels where they will see activity and get responses to any questions. This is in addition to adding a single link in the Register/Contact us box.
- It is possible to insert images (e.g. a poster for your event) by using the 'Insert Image' button at the top of the 'Description' box.
Support Crews
Please select all the support roles applicable to this action. This helps publicise actions that need say Outreach or Stewards to those teams so they can help support the action. Adding support crew this way doesn't guarantee their availability and you should still contact Actions Support
Updating / Correcting Calendar Events
It's fine to add a placeholder event whilst details are finalised so rebels at least save the date (but add that details to be added later in the description) .
Please make sure details are accurate to avoid publishing wrong info.
It is the responsibility of the group/person with calendar access rights to make sure that any changes are updated in the calendar directly.
If an update or correction relates to a UK action/event where the change of info might impact other teams, contact the M&M & email team ASAP:
M&M Mattermost Reception | Email: mov.comms@extinctionrebellion.uk
If you have any problems, you can contact the Calendar team via:
Calendar Mattermost Reception | Email: mov.calendar@extinctionrebellion.uk
Sharing Events, Calendars or Maps
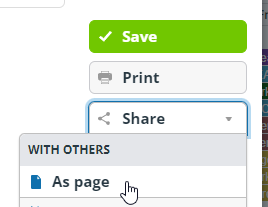
Sharing an Event from the Calendar
From within an event details window, click 'Share' and then 'As Page'. This will give you a webpage with all the event details on.
Sharing More of the Calendar
This is a useful feature if you want to share a pre-filtered version of the calendar with your teams, maybe in your newsletters.
Simply add ?keywords=xxxxx (where xxxxx is the filter you want to apply) to the end of the url you intend to share:
- Basic Calendar url (to add as a hyperlink in your email)
https://teamup.com/kswyi17ixzj7f9i7fu - Work out what words or icons in the Filter box frind your team's events eg
Midlandsif you are trying to find events with Midlands in them - Add
?keywords=Midlandsto the end of the basic Calendar urlhttps://teamup.com/kswyi17ixzj7f9i7fu - So we get a specific url for the Midlands events
https://teamup.com/kswyi17ixzj7f9i7fu?keywords=Midlands
The London events would be https://teamup.com/kswyi17ixzj7f9i7fu?keywords=London
This is one of the reasons it is useful to add your Region as a keyword somewhere in your events.
Alternatively, you can generate a link to share a version of the calendar with filters, a view and date ranges etc. To do this click the small button just below the 'Filter' box.

Embedding Calendars in your own Webpage
TeamUp provides a easy tool to create the code to embed a filtered version of the calendar in your own webpage
Sharing a personal map from within Action Network
By adding a hyperlink in an Action Network email you can send rebels a link that will open the map centered on their postcode with a zoom to show at least two events. If they have no postcode a UK map will be displayed.
The specific code to enter in the url box is this https://eventmap.extinctionrebellion.uk/#{{ZipCode|default:'55.141209,-3.240964'|truncatewords:1,''|upcase}}/6/quarter/action,local,external//?no_rewrite=true (note code modified to allow insertion in both HTML and drag & drop Action Network email editors)
Use this code as is. Action Network will do the work just before sending out the email of taking the rebel's postcode and embedding the start of it in the email that goes out.
Sharing a specific Location Map link
If you want to send a link to a map centered on a specific location (useful to add to your local group newsletters) then simply add /#xxxx to the end of the basic map url https://eventmap.extinctionrebellion.uk where xxxx is the start of your location postcode.
So https://eventmap.extinctionrebellion.uk/#OX16 would share a map centered on OX16 and zoomed to display at least 2 events
Sharing a specific Actions only Map link
If you want to send a link to a map just showing Actions (useful to add to Action Planner group newsletters) then simply use this link.
So https://eventmap.extinctionrebellion.uk/#53.988395,-1.977539/6/quarter/action// would share a map centered on UK and showing only Actions in next 3 months.
Technical Information - Map URL structure
The map URL fragment (the bit after the #) consists of the following elements, separated with slashes:
- Latitude,Longitude (of the map centre).
- This may be substituted for a full or partial (Outward) postcode. If you use a full postcode, eg PO381NL then it will work out that it should zoom in on PO38. Zoom level is ignored if a postcode is given.
- This may also be substituted for TWO lat longs separated by a colon. For example:
https://eventmap.extinctionrebellion.uk/#55.141209,-3.240964:56.141209,-1.240964/6/week/action,local,external// - This will load the map panned and zoomed to show the highest zoom level possible while both lat/long points are both visible. This is intended for use in iframes on local or regional websites, or other links where someone wants to ensure a whole area loads in view right away.
- Zoom level:
- numeric 3-19
- Time span:
- week
- month
- quarter
- Categories to show:
- action
- local (includes Talks, Training and Workshop events where these have a physical location)
- external (same as the 'Other' filter option)
- Options
- minimal (small control), (this is the default if the map is opened on a mobile device)
- extra (big control),
- nowheel (disable mousewheel, recommended for iframe embedding).
- Search term
- the search term to filter by, if any. Nb. emoji will be encoded as UTF8 bytes.
- the search term to filter by, if any. Nb. emoji will be encoded as UTF8 bytes.
When the map is moved or settings changed, the URL updates. If you link to the page using a fragment that follows these rules, it will use those settings. This is ideal for embedding in iframes or including in emails etc.
Local Group Map
Designed to help locate and contact any local XR group in the UK

The Local Group Map can be viewed directly or via the XRUK website
The use the map:
- The key on the right allows you to select a nation or region.
- and/or use the +/- buttons on the top left to zoom in
If you want to add or update your Local Group's information (contact email or social media links) please email map@extinctionrebellion.uk
The map on the XR Global website takes information from our map (updated approximately monthly) - you don't have to request updates independantly to the global team as we are providing info to them to keep their map aligned with ours.
Applying for and using extinctionrebellion.uk email accounts
Applying for an @extinctionrebellion.uk email account
This page explains which groups are eligible for XR email addresses, and how groups can apply.
Is your group eligible?
The following types of group may be issued with @extinctionrebellion.uk email addresses :
- region/nation groups
- local groups
- region/nation working groups
- local working groups only if they are demonstrably large, active and well organised - otherwise they should use a 'plus address' folder on their parent group address (see below)
- UK level working groups
Addresses cannot be issued to:
- individuals
- affinity groups
- any groups lacking a corresponding record on the Communications Hub (see below)
Is your group on the 'Communications Hub'?
Addresses can only be issued to groups whose existence has been recorded on the XR UK Communications Hub since we1 use the Hub to verify requests. If your group is not yet listed you should ask your 'Group Admin' or the 'Group Admin' of your parent circle3 to help with this.
Are you personally on the 'Communications Hub'?
The applicant should be personally listed on the Hub as holding a core role2 in the group requesting an email. If you're not yet listed you should ask your 'Group Admin' or the 'Group Admin' of your parent circle3 to help with this (more here).
How to apply
If you're happy that you/your group meet the above criteria please make your request with a message to this chat channel (on XR's Mattermost).
If you need an address urgently but are unable to immediately fulfil all the above criteria, please ask for advice in the above channel anyway: we may be able to find a workaround.
Footnotes:
- Who is 'we'? Your-group@extinctionrebellion.uk email addresses are administered by the Digital Discussions Applications Team
- A 'core role' would be any of 'External Co-ordinator', 'Internal Co-ordinator' or 'Group Admin'.
- 'Parent circle': For local groups, the 'parent circle' would be your regional group
This page has been contributed by the Digital Discussions Applications Team. February 2023.
Logging in to your XR email account via Webmail
- In your browser, enter the URL https://kennebec-lon.krystal.uk:2096/ that was provided with your login details into the location bar. You should see a screen like the one pictured below. Note that many organisations use identical looking log-in screens, so make sure you've entered the correct URL to get here.
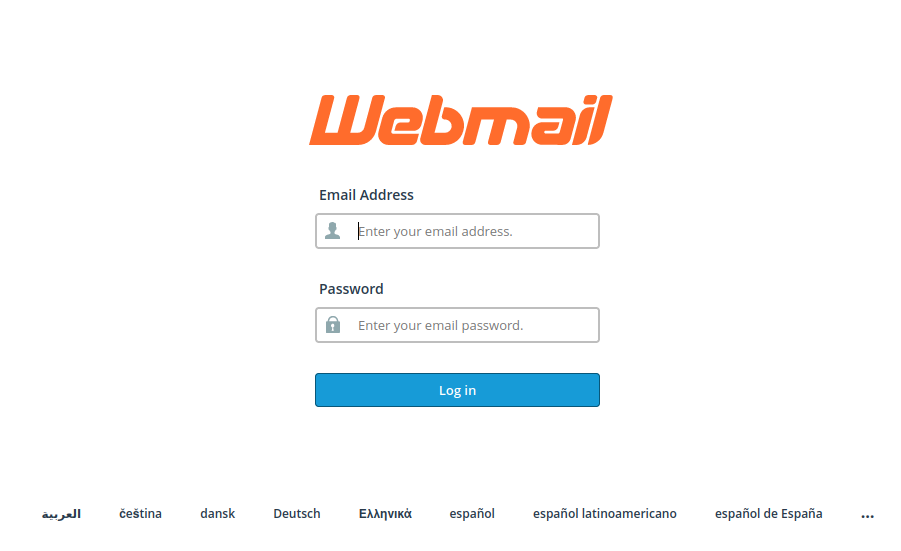
- Enter your email address. Do not enter a plus address here (e.g. trumpton+outreach@extinctionrebellion.uk; see this page for more on plus addresses), just enter the main address (eg: trumpton@extinctionrebellion.uk).
- Enter your account password.
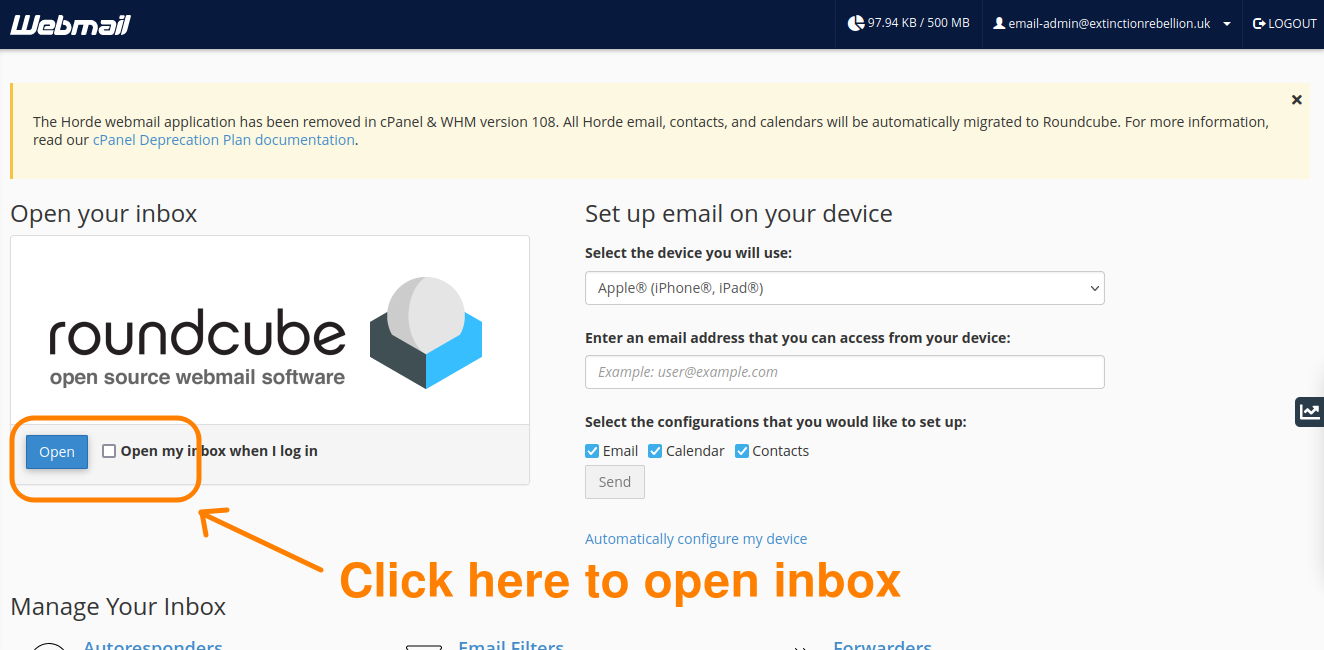
- If you don't immediately see your inbox, click on 'Open' under 'Roundcube'. You may wish to select the 'Open my inbox when I log in' tick box in order to skip this step in future.
This page has been contributed by the Digital Discussions Applications Team.
Logging in via an external email client
The most secure way to access your email account is by using the webmail interface via your browser (see this page). This avoids mail being unnecessarily downloaded to your device which could be a problem should your device ever find itself in the wrong hands! If you find handling the login details for webmail difficult and/or time consuming, please consider using a password vault such as KeePassXC or Bitwarden1 which are capable of automatically filling in login page details.
However, if you do need to have external access, here's some guidance on how to set it up on various services...
iOS for iPhone/iPad/iPod and
MacOS Mail.app and
Windows Live Mail
- Log into your @extinctionrebellion.uk or @rebellion.earth email account2 webmail from the device upon which you want to set up external access (see this page)
- You should see a page with 'Webmail' written at the top left. If not, then you're probably in the 'RoundCube' webmail interface, in which case click on the 'CP Webmail' button at the bottom of the left menu to get back to the main CP Webmail page.
- Go to the bottom of the CP Webmail page (with 'Webmail' at the top) and click on 'Configure Mail Client' under 'Other Webmail Features'.
- For iOS for iPhone/iPad/iPod and MacOS Mail.app: Click on the "IMAP over SSL/TLS" link to start the automated set-up on your device.
- For Windows Live Mail: You can choose between IMAP (sychronised) and POP3 (non-sychronised) set-up options. Microsoft describe the difference here. Unless your device is likely to be the only one accessing the email account you'll probably want to use IMAP. Click on either "IMAP over SSL/TLS" or "POP3 over SSL/TLS" to start the relevant automated set-up.
Mozilla Thunderbird
Assuming you already have Thunderbird installed on your computer, Mozilla provide instructions for setting up account access here. Check our "Find the 'mail client manual settings' from your @extinctionrebellion.uk email account" section below so that you know what to enter into Thunderbird.
Gmail
Please consider whether you really want to give Google access to your XR email account. Whilst Google security against intruders is good enough, the problem lies within. Google harvests your (and your correspondent's) data. Gmail is free because you are the product. But if you must...
Note that Gmail doesn't provide IMAP access (only POP3), so changes made on your device (eg: deleting an email) will not automatically be sychronised with the main @extinctionrebellion.uk (C-panel) account and vice-versa.
1) Receiving via Gmail
To set up receiving your @extinctionrebellion.uk mail in your Google account:
- In a new browser tab open your Gmail account
- Click on settings 'cog' icon near avatar
- From the 'quick settings' menu click on 'See all settings'
- Click on the 'Accounts & Import' tab
- Next to 'check mail from other accounts' click on 'Add a mail account'
- In the pop-up box enter your full @extinctionrebellion.uk email address and click 'next'
- On the next page the only available option (POP3) is already selected. Click 'next'
- On the next page: Enter your full @extinctionrebellion.uk email address as your username
- The pop server name box should contain 'kennebec-lon.krystal.uk' and the drop-down '995'
- Tick the 4 boxes as per your requirements and confirm
- When the box disappears you should now see your @extinctionrebellion.uk email address next to the 'check mail from other accounts' section of the 'Accounts & Import' tab. Or the box may say "You can now retrieve mail from this account. Would you also like to be able to send mail as xxxxx@xxxxx?", in which case you may want to click 'Yes, I want to be able to send mail as xxxxx@xxxxx'
2) Sending via Gmail
To set up sending your @extinctionrebellion.uk mail from your google account:
- In a new browser tab open your Gmail account
- Click on settings 'cog' icon near your avatar
- From the 'quick settings' menu click on 'See all settings'
- Click on the 'Accounts & Import' tab
- Next to 'Send mail as' click on 'Add another email address'
- In the pop-up box entitled 'Add another email address that you own' enter the name that you want to be shown on outgoing mail and your @extinctionrebellion.uk email address
- Leave the 'Treat as alias box ticked' and click on 'Next Step'
- On the next page, change the entry in 'SMTP' server to 'kennebec-lon.krystal.uk'
- Select port '465' from the drop-down menu
- Enter your full @extinctionrebellion.uk email address in the 'username' field
- Enter your @extinctionrebellion.uk password in the next field
- Click on 'Add account'
- You should get a confirmation message saying that an email has been sent to your @extinctionrebellion.uk address. Log in to your @extinctionrebellion.uk account and follow the instructions in the email from Google.
If the above information hasn't worked, it's worth checking that the suggested entries haven't changed since this guidance was written. See the section below.
Find the 'mail client manual settings' from your @extinctionrebellion.uk email account:
The 'mail client manual settings' is the information, specific to your XR email account, that you may need in order to set up external access (Eg: if requested by a provider for whom we've not already given instructions). To find this information (our server URL and port numbers etc):
Option 1
- Use this only if your account is very new
- Log into your @extinctionrebellion.uk webmail account (see this page)
- The very first email that you recieved when the account was set up should contain relevent 'email configuration settings'
- If you can't find that mail, or if your account is a few months old, try option 2.
Option 2
- Log into your @extinctionrebellion.uk webmail account (see this page). You should see a page with 'Webmail' written at the top left. If not, then you're probably in the 'RoundCube' webmail interface, in which case click on the 'CP Webmail' button at the bottom of the left menu to get back to the main CP Webmail page
- Go to the bottom of the CP Webmail page (with 'Webmail' at the top) and click on 'Configure Mail Client' under 'Other Webmail Features'
- You need the details in the blue box under 'Mail Client Manual Settings'
Footnotes
- XR-UK also hosts it's own version of Bitwarden (a.k.a. The Vault) upon which your group could store it's passwords. See this page for more info.
- @rebellion.earth accounts: When setting up access for an old @rebellion.earth email account please just read '@rebellion.earth' in place of all references to '@extinctionrebellion.uk' on this page
This page has been contributed by the Digital Discussions Applications Team.
Using Email Folders
This page shows how to create and use email folders for your @extinctionrebellion.uk account1 via our 'Roundcube' Webmail interface. However, if you're accessing your emails via a third party app using IMAP (not POP3), then you'll be able to carry out these operations via that software also, and changes made there will automatically be copied into the Webmail account.
Why use folders?
Folders allow you to organise your mails. Our Webmail comes with some folders already created. These are:
- Inbox
- Drafts
- Sent
- Spam
- Deleted items
- Archived
You may want to create extra folders for various reasons such as:
- to group together all mails that relate to a specific campaign/issue
- to group together mails being dealt with by specific activist
- to facilitate the sorting of incoming mail by using plus-addressing
- to facilitate the sorting of incoming mail by using filters
How to create Folders in Webmail
- Firstly you'll need to log into Webmail.
- From within Roundcube, click on the 3 dots next to your email name, and then on 'Manage Folders'.
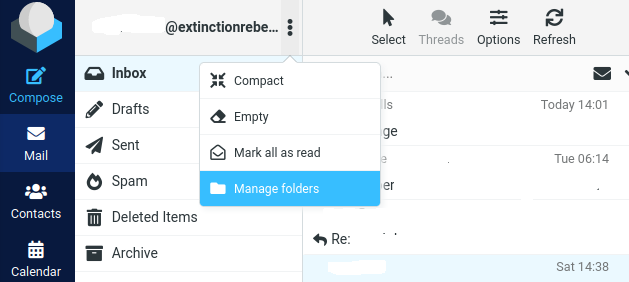
- With the 'Folders' tab selected (under 'Settings'), click on 'Create'.

- Enter the folder name (Eg: Outreach) and click on 'Save'.
NOTES:
- The information on this page also applies to older @rebellion.earth emails. Just read @rebellion.earth wherever @extinctionrebellion.uk is mentioned.
This page has been contributed by the Digital Discussions Applications Team.
Plus addressing
What is 'Plus-addressing'?
If your group might benefit from separate addresses for different working groups or campaigns, this can be achieved by using something called 'plus addressing' which permits variations of your main email address to be sent to different folders.
For example, let's assume that Trumpton local group holds the trumpton@extinctionrebellion.uk address. Their outreach team could use trumpton+outreach@extinctionrebellion.uk . The team would still log in to the main Trumpton account, but rather than their mail being mixed in with everything else in the inbox, it would all be grouped together in the 'Outreach' folder.
In other words, any incoming mail with a 'plus address' that matches a folder name will jump the main 'inbox' and instead be added directly that folder.
Prepare your account for plus addressing
Before giving out your 'plus address' you need to manually create a folder within 'Roundcube' called (eg:) 'outreach'. You'll then be able to invite people to mail to (eg:) trumpton+outreach@extinctionrebellion.uk, and mail to that address will land in the (eg:) outreach folder.
If no matching folder has been created then 'plus address' mail should land in the main 'Inbox' folder. Automatic creation of folders when receiving 'plus addresses' is possible, but we disable that feature by default on account set-up (to avoid the risk of spammers creating havoc in your folder structure).
Sending from a plus-address
Assuming that you want to be able to send from your plus-address as well as receive mail into it, you'll need to set up an additional 'identity' for your account. In order to do this:
- From within Roundcube: Click on the settings (cog) icon in the left hand column
- Select the 'Identities' tab and then click on 'create' (top row, right)
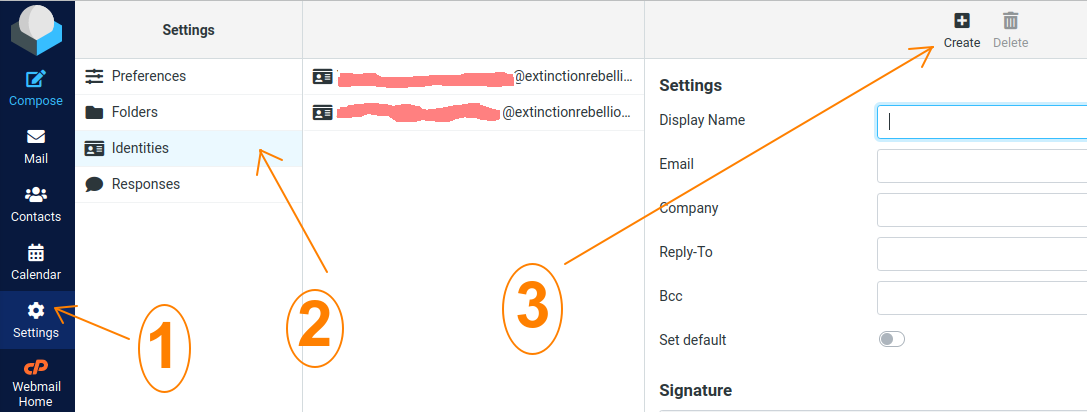
- Enter the display name for your plus-address account (eg: 'Outreach Team')
- Under 'Email' and 'Reply-To' enter the plus-email address (eg: Trumpton+Outreach@extinctionrebellion.uk)
- Click on 'Save'
Now when you go to compose a new email the plus-address will be amongst the available identities to send from. Click on the default email address that is automatically showing in the 'From' field. In the drop-down menu, select the plus-address identity that you want to send from. The 'Reply-To' field will automatically be updated.
This page has been contributed by the Digital Discussions Applications Team.
Forwarding and filtering @extinctionrebellion.uk emails
This page describes methods of forwarding all, or just certain types, of email onwards from your @extinctionrebellion.uk email accounts1. This is an alternative to accessing your mail directly, either via Webmail or via an external email client
Why forward?
Forwarding can permit mail from your @extinctionrebellion.uk email account to be sent to any other email account that your group uses so that all mail is combined in one place. However it has the disadvantage that any replies to emails from those places will not then be from your @extinctionrebellion.uk email account. You might want to consider doing things the other way around, setting your non-xr account to forward into your xr account. For instructions to do that you'll need to check the help pages of your other email provider.
Forwarding can also act as a method of disseminating emails to various different addresses, but if doing that you'll need very clear agreements about which members of your team are dealing with which emails or things may get very confusing! This feature is probably most useful for allowing group members who aren't actively involved with responding to emails to nevertheless be able to monitor ongoings and keep abreast with incoming news.
Forwarding vs Filtering
Forwarding is more basic than filtering. It's used when you don't want to keep copies of forwarded email in your @extinctionrebellion.uk email account, whereas filtering can send mail onwards whilst also retaining mails in your @extinctionrebellion.uk inbox (or any other folder of your choice). Filtering can also sort emails according to (eg) subject line content or plus-address name, and send mails to different places accordingly.
How to set up 3 scenarios (A to C) is set out below:
(A) Forward all incoming mail to one or more other email accounts
If you don't need a copy of the incoming mail to remain in your @extinctionrebellion.uk email account then the easiest way to set up forwarding is as follows:
- Log in to your accounts 'Webmail Home' page. See this page if you're unsure how to do this.
- You should now be on the 'Webmail Home' page of your account which should look like this:
 If your account automatically enters the 'Roundcube' inbox page upon login, click on the 'CP Webmail Home' button in the left menu in order to return here.

- Click on the 'Forwarders' button,
- On the 'Forwarders' page click on the 'Add Forwarder' button,
- Enter the email address you want to forward to into the 'Destination - Forward to Email Address' text box,
- Check that you've typed the email correctly!
- Click on the 'Add Forwarder' button,
- Repeat steps 4-7 for any additional email addresses that you also wish to forward to.


(B) Filtering: Forward mail whilst retaining copies in your @extinctionrebellion.uk inbox
- Follow steps (1) and (2) in section (A) above.
- Click on the 'Email Filters' button.
- On the 'Email Filters' page click on the 'Create a new filter' button.
- In the 'Filter Name' box enter a description for your filter. Eg: 'Forward all to our Protonmail account'.
- Under 'Rules' click on the left-hand drop-down menu. It displays 'From' as default: Click on 'Any recipient',
- You can leave the right-hand drop-down menu as is. It displays 'Contains' as default.
- Click into the text box below the drop-down menus and enter your @extinctionrebellion.uk email address.
- Under 'Actions' click on the drop-down menu. It displays 'Discard Message' as default: Click on 'Deliver to Folder' instead. A text box will appear below.
- Click on the 'Browse' button to the right of the text box, and select 'INBOX' (or whichever folder you want the incoming mail to be stored in).
- Click on the '+' button to the right of the screen on the 'Actions' line to add a second action.
- A new drop-down menu (default 'Discard Message') will appear. This time select 'Redirect to Email'.
- Enter the email address that you want mail to be forwarded to into the text box.
- If you want mail to be forwarded to any additional addresses repeat steps 10-12.
- Click on the 'Create' button.

(C) Filtering: Forward only selected types of email
Filtering provides endless possibilities for automatically sorting your incoming mail. This example just looks at how to selectively forward in conjunction with using plus-addressing.
Let's assume that you want to use a plus-address for your Outreach working group (eg: yourgroup+outreach@extinctionrebellion.uk) to automatically forward to the private email of one of the working group members (eg: 'Amber'), and that you have already created a folder called 'Outreach' in which to store copies of forwarded mail. All other incoming mail is to go to the inbox folder as normal:
- Follow steps (1) to (3) in section B above.
- In the 'Filter Name' box enter a description for your filter. Eg: 'Forward Outreach-WG to Amber'.
- Under 'Rules' click on the left-hand drop-down menu. It displays 'From' as default: Click on 'To' 2
- You can leave the right-hand drop-down menu as is. It displays 'Contains' as default.
- Click into the text box below the drop-down menus and enter your @extinctionrebellion.uk email plus-address (eg: yourgroup+outreach@extinctionrebellion.uk)
- Under 'Actions' click on the drop-down menu. It displays 'Discard Message' as default: Click on 'Deliver to Folder' instead. A text box will appear below.
- Click on the 'Browse' button to the right of the text box, and select (eg:) 'Outreach' (or whichever folder you want the forwarded mail to be copied to)
- Click on the '+' button to the right of the screen on the 'Actions' line to add a second action.
- A new drop-down menu (default 'Discard Message') will appear. This time select 'Redirect to Email'.
- Enter the email address that you want mail to be forwarded to into the text box (eg: ambers_private@her_domain.com)
- If you want mail to be forwarded to any additional addresses repeat steps 8-10.
- Click on the 'Create' button

NOTES:
- The above information also applies to older @rebellion.earth emails. Just read @rebellion.earth wherever @extinctionrebellion.uk is mentioned above.
- 'To' is used here rather than 'Any recipient' because otherwise mail sent to yourgroup@extinctionrebellion.uk and cc-ed to yourgroup+outreach@extinctionrebellion.uk would be caught by the filter and only go to the Outreach team, missing the main inbox. Using 'To' does mean that any mail cc-ed or bcc-ed to the Outreach team will not get to them automatically (will need to be forwarded manually by whoever checks the main inbox), but this will generally be better than such mail skipping the main inbox.
This page has been contributed by the Digital Discussions Applications Team.
Email account queries & help
If you need help with your XR email account, and you can't find the answer within this chapter of the Rebel Toolkit please contact us either:
- On XR Mattermost chat (preferred): https://organise.earth/uk/channels/ddat-email-accnt-requests
- or via email: email-admin@extinctionrebellion.uk
Importing and exporting contacts from webmail
If you want to import contacts to Roundcube, you can use a CSV file (such as can be produced by Excel).
Roundcube requires specific column headings in the CSV file, to match either MS Outlook, Thunderbird or Atmail.
These are:
MS Outlook 2010
- Anniversary
- Assistant's Name
- Assistant's Phone
- Birthday
- Business City
- Business Country/Region
- Business Fax
- Business Phone
- Business Phone 2
- Business Postal Code
- Business State
- Business Street
- Car Phone
- Categories
- Company
- Department
- E-mail Address
- E-mail 2 Address
- E-mail 3 Address
- First Name
- Gender
- Home City
- Home Country/Region
- Home Fax
- Home Phone
- Home Phone 2
- Home Postal Code
- Home State
- Home Street
- Job Title
- Last Name
- Manager's Name
- Middle Name
- Mobile Phone
- Notes
- Other City
- Other Country/Region
- Other Fax
- Other Phone
- Other Postal Code
- Other State
- Other Street
- Pager
- Primary Phone
- Spouse
- Suffix
- Title
- Web Page
Thunderbird
- Birth Day
- Birth Month
- Birth Year
- Display Name
- Fax Number
- Home Address
- Home Country
- Home ZipCode
- Mobile Number
- Nickname
- Organization
- Pager Number
- Primary Email
- Secondary Email
- Web Page 1
- Web Page 2
- Work Phone
- Work Address
- Work Country
- Work ZipCode
Atmail
- Date of Birth
- Home Mobile
- Home Zip
- Info
- User Photo
- URL
- Work City
- Work Company
- Work Dept
- Work Fax
- Work Mobile
- Work State
- Work Title
- Work Zip
You do not have to include all the fields.
Note that spaces and letter case are significant.
The Vault
The Vault is a password manager hosted by XR using BitWarden/Vaultwarden software. It is a place for XR groups to securely store and share the passwords to their online accounts.
What is a password manager?
A password manager is a tool that lets you store all of your passwords together in a safe place. Browsers such as Firefox have this facility. It allows you to generate and securely store passwords that are very strong (e.g. cj*XknvKPgg9b5) because they are not guessable but you don't have to remember them. Instead, you have to know the one master password to access them. This makes life easier for you and much harder for hackers.
You can store lots of passwords, even ones you created years ago if you wish. And you can also store other codes like bike locks and notes you don't want to lose or leave lying around. That said, XR may not be around forever, so our servers will not be the best place for storing important personal information such as bank account logins!
Using our XR Vault you'll be able to access passwords from each of the XR groups that you're involved with as well as your own private storage area.
How do I join the Vault?
Ask your XR group's Group Admin to send you an invite to your group's organisation in the Vault. If your group doesn't yet have an organisation see here
-
Check your emails. You should have received an email:

-
Click on Join Organization Now.

You will see:
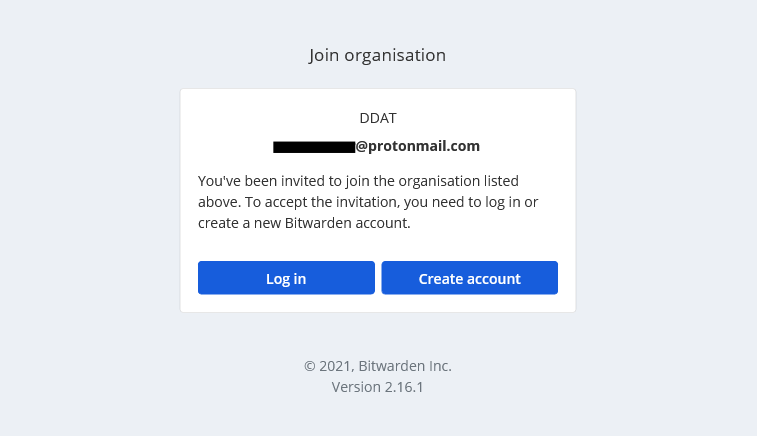
- Click on Create account
You will see:
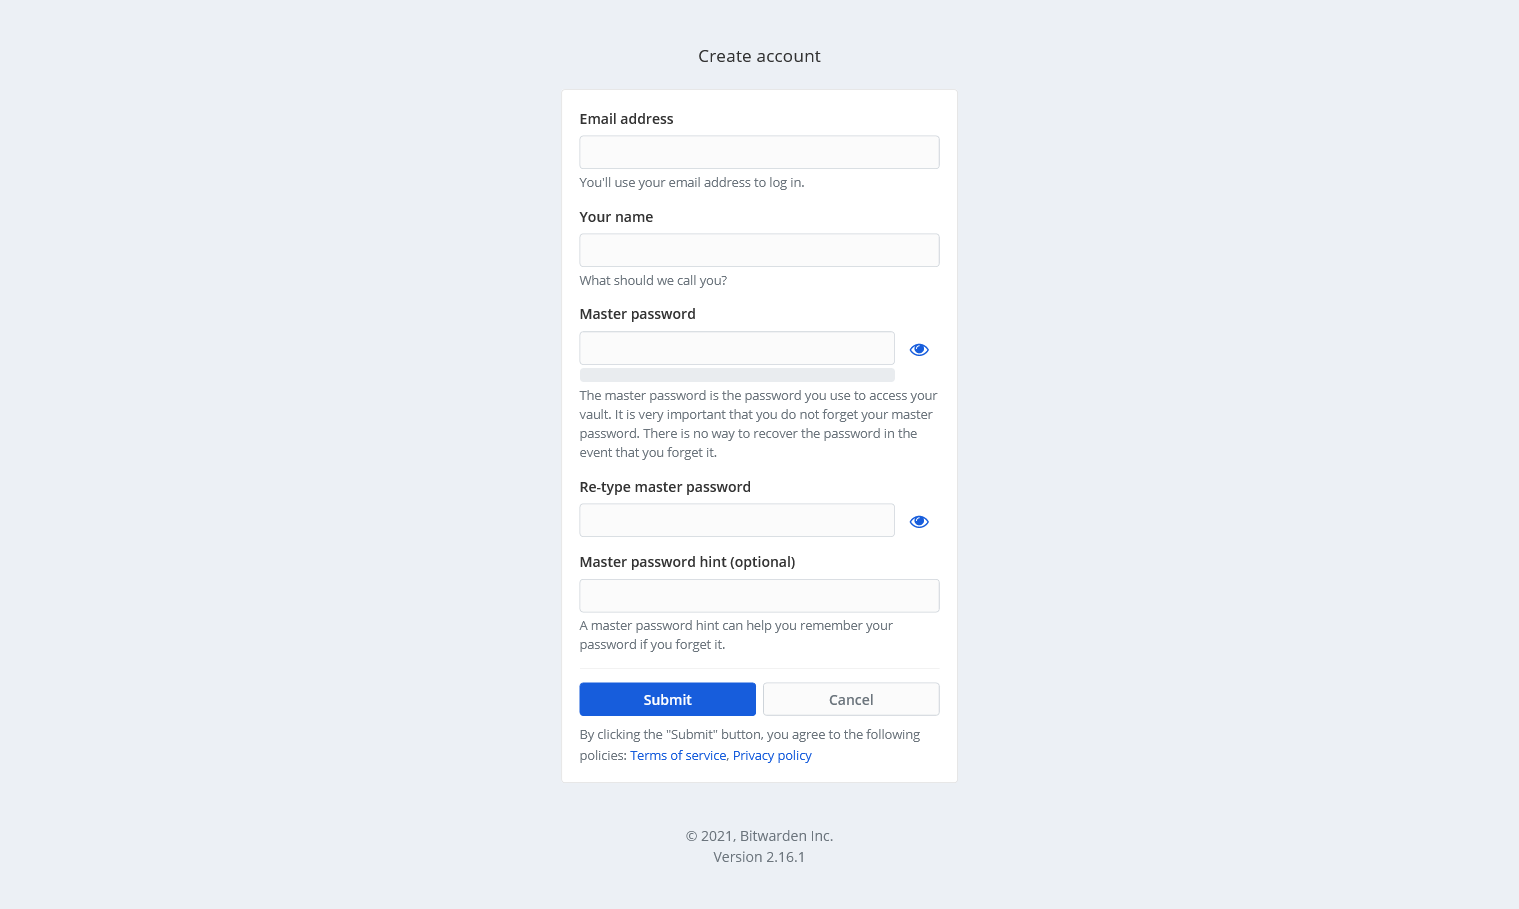
-
Fill in your email address and name (an alias is fine)
-
Create your password [minimum of 12 characters]
It is important to choose a master password that is really hard to guess (the Vault will tell you whether it is a strong password or not) and you shouldn't use this password anywhere else. If there's any chance that you might forget this master password, make sure to record it somewhere safe. See also Don’t get locked out of your vault account below
Type your master password then click Submit.
- You have now created an account on the Vault and can begin to use it to store your passwords.
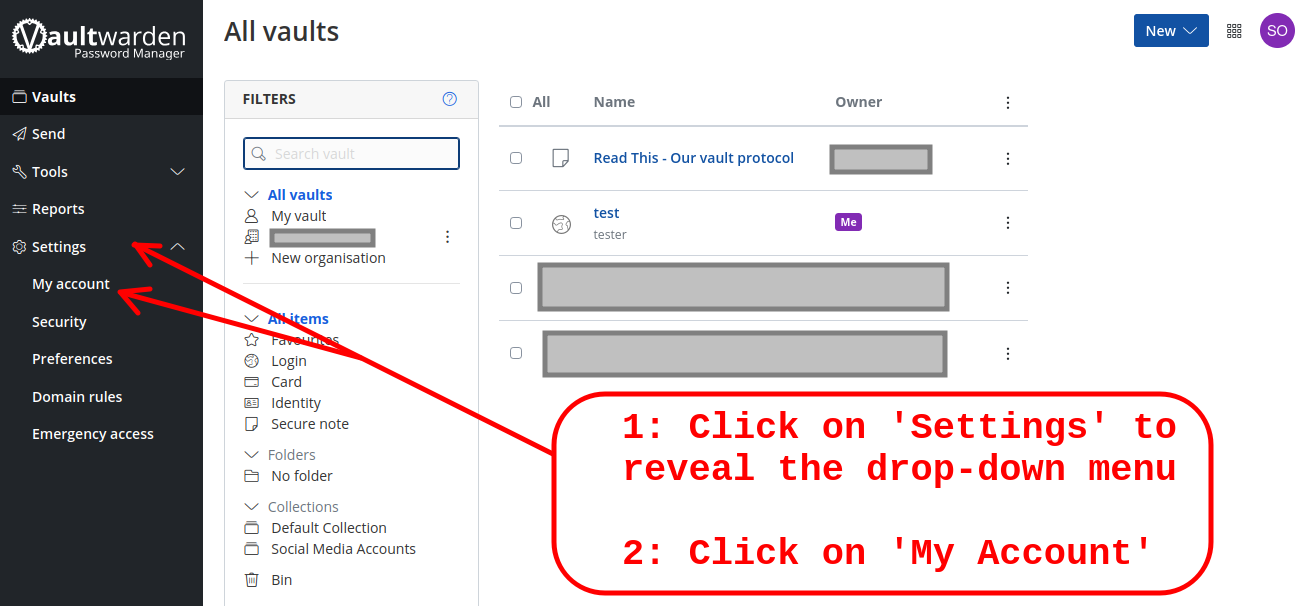
If you want access to the passwords shared by your group you need to do some additional steps:
-
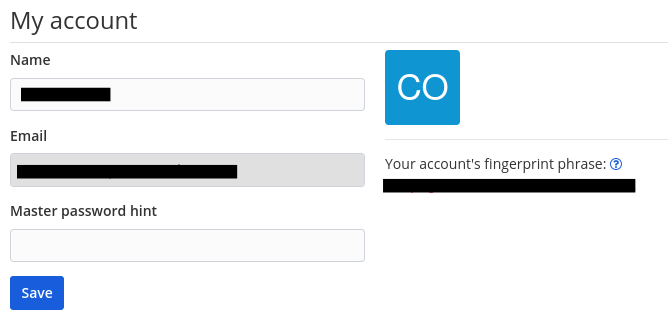
From your Vaultwarden homepage click on Settings in the left side menu, and then on My account

-
Under the My Account section note down your account's fingerprint phrase. This will be a string of five random English words (e.g.
alligator-transfer-laziness-macaroni-blue).
-
Send this fingerprint phrase to your group admin. This will help them to identify you and give you access to the group's passwords.
What if my XR group isn't already using the Vault?
If you want your group to be able to use the Vault, have your group's Secretary, Internal Coordinator, External Coordinator or Group Admin get in touch with the Digital Discussions Applications Team using this Mattermost channel. They can then create the Vault organisation and give you access so you can begin sharing passwords within your group.
How do I access the Vault?
Accessing the vault via the web interface
The most straightforward way to use the Vault on your computer is by simply going to it's web page. Enter https://vault.extinctionrebellion.uk/ into the URL bar of your web browser and you'll be presented with the login page.
However, it is more convenient to use, and more secure, to install a browser extension (see next paragraph).
Accessing the Vault via laptop or PC (web browser extension)
For regular users of the Vault on laptop or PC it's very worthwhile to take a moment to install the Bitwarden browser extension.
To install one of these:
- Go to the Download part of the Bitwarden website and scroll down to the Web Browser section:
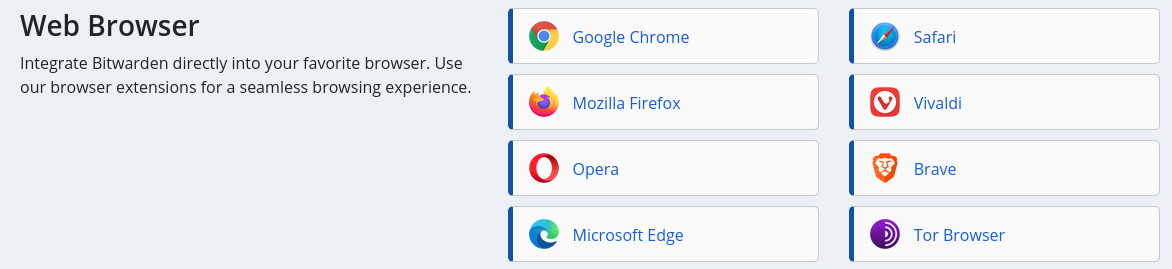
-
Click on the browser that you are using and install the extension.
-
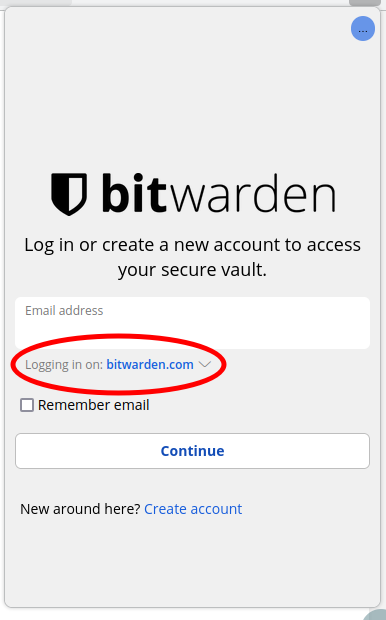
You should now see a small shield icon at the top-right of the browser window:

If you click on this the following screen should pop up:

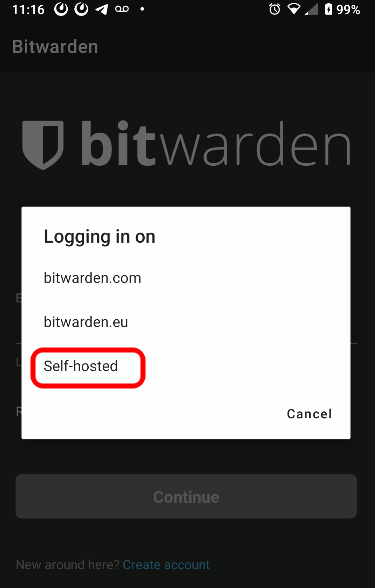
Click on the
Logging in ondrop-down menu (circled in red) and selectself-hosted. -
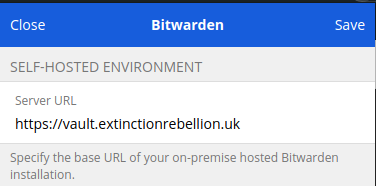
Under
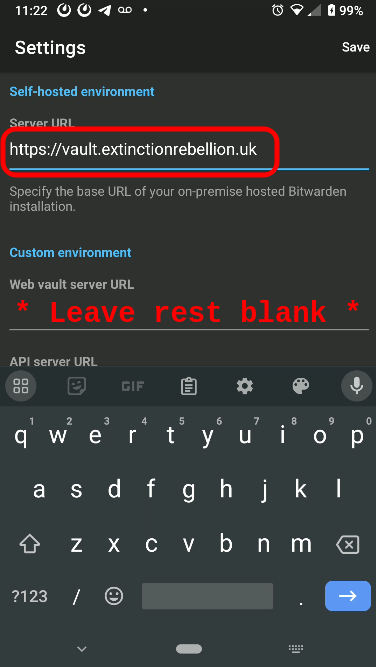
SELF-HOSTED ENVIRONMENT, set theServer URLfield tohttps://vault.extinctionrebellion.ukand clickSave. You can ignore (leave blank) the fields under the 'Custom Environment' heading
-
Click
Log in, enter your email address and master password and then clickLog in(top-right corner).

What doesn't work for laptop/PC access
Don't use Bitwarden's Desktop Apps. These apps (available for installation on Linux, MacOS and Windows) do not work properly with our self-hosted Vaultwarden software (tested April 2024). We don't believe this to be much of a problem since there are so many other ways to use the Vault
To access the Vault on your mobile device:
-
Install Bitwarden from either the Google Play Store or Apple App Store
-
Open the app. You will see a screen that looks like this:

-
Click on the
Logging in ondrop-down menu (circled in red above) -
Select
Self-hosted

-
Enter
https://vault.extinctionrebellion.ukin theServer URLfield (circled red below) and then clickSave(top right of screen). You can leave all the other fields blank

-
Back at the log in screen enter your email address. You may wish to select
Remember meto avoid repeating this step. Clickcontinue -
Enter your vault password in the
master passwordfield and click onLog in with master password
Using the Vault
The following instructions are mainly describing use via a laptop/pc web browser extension, but similar operations are also available via mobile devices and via direct web access
Adding new passwords
To add new passwords to the Vault for either new or existing accounts:
-
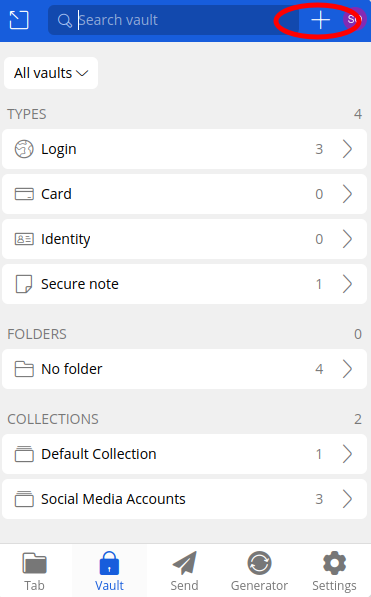
Click on the small shield icon at the top right of your browser window and log in if necessary:
-
You should see a screen like this:

-
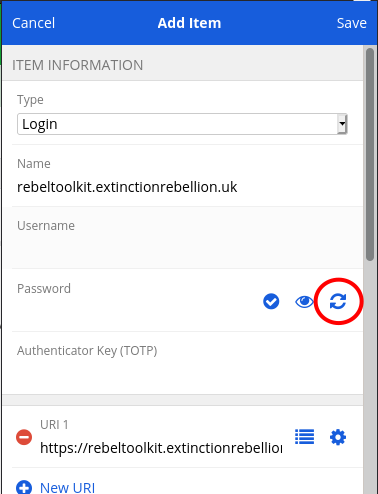
Click on the + icon in the top-right corner (circled in red). You should see a screen similar to this:

-
Enter your username and password. If you want to generate a random secure password (strongly recommended!), click on the generate password icon circled in red.
-
Click Save (top-right).
Filling existing passwords
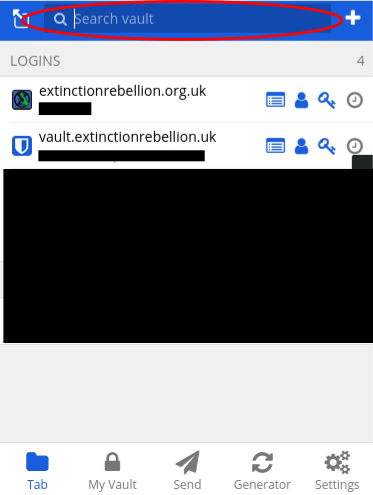
To access the information in the Vault when you want to log in to a website:
-
Click on the small shield icon at the top right of your browser window:
-
You will now see a screen like this:

-
If the correct account appears under LOGINS then click on it and the username and password fields on the website page should automatically be filled.
If the account is not there then you will need to search for it in the search bar circled in red. Once you have found the correct account you will have to copy and paste the username and password into the website.
Accessing your password history
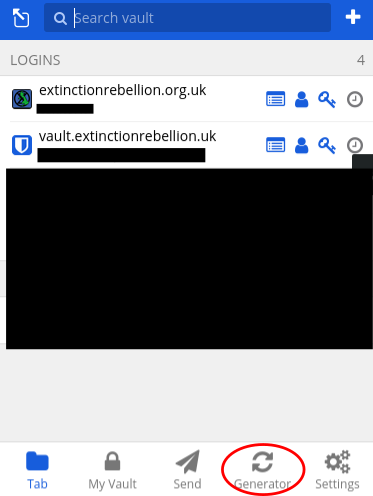
If you generate a password and forget to save it to the Vault, you can retrieve it:
-
Click on the small shield icon at the top right of your browser window:
-
Click on Generator (circled in red):

-
Click Password History to access previously generated passwords.
Sharing passwords
All this is documented in Get Started with Organizations in the Bitwarden docs. Be aware that our Vault is a self-hosted installation, and there are no charges for using it - always use our Vault, rather than the commercial Bitwarden one.
Vault management (for Vault owners)
This section is for those with 'owner' status for a vault
Granting access to a vault
If your vault account has 'owner' status for your group's vault then you are able to invite other members. To do this log into your account using the website https://vault.extinctionrebellion.uk and follow these steps:
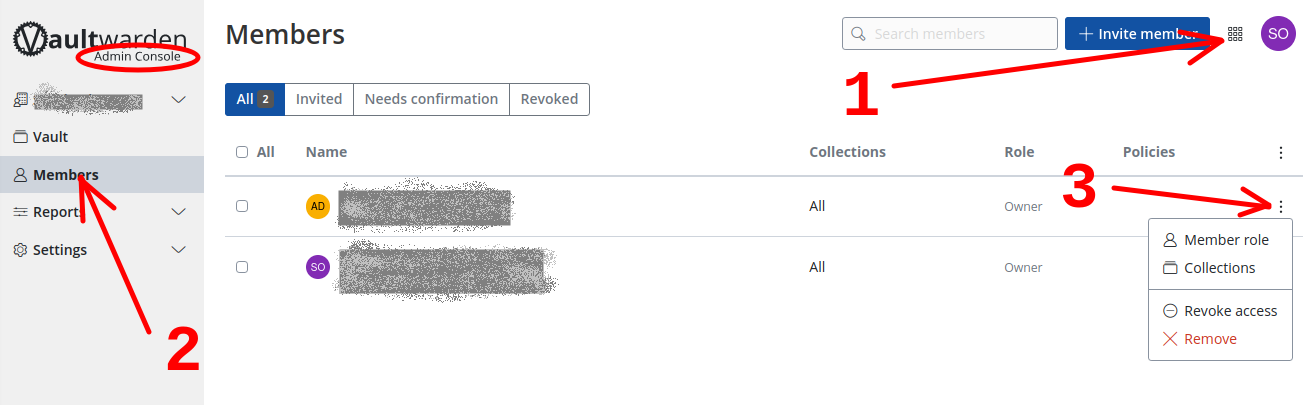
- Click on the 'cube of cubes' (dice) button to the left of your avatar and select
Admin Console, or click directly onAdmin Consoleat the base of the left menu - In the left hand menu click on
Members - Click on the
Invite Memberbutton
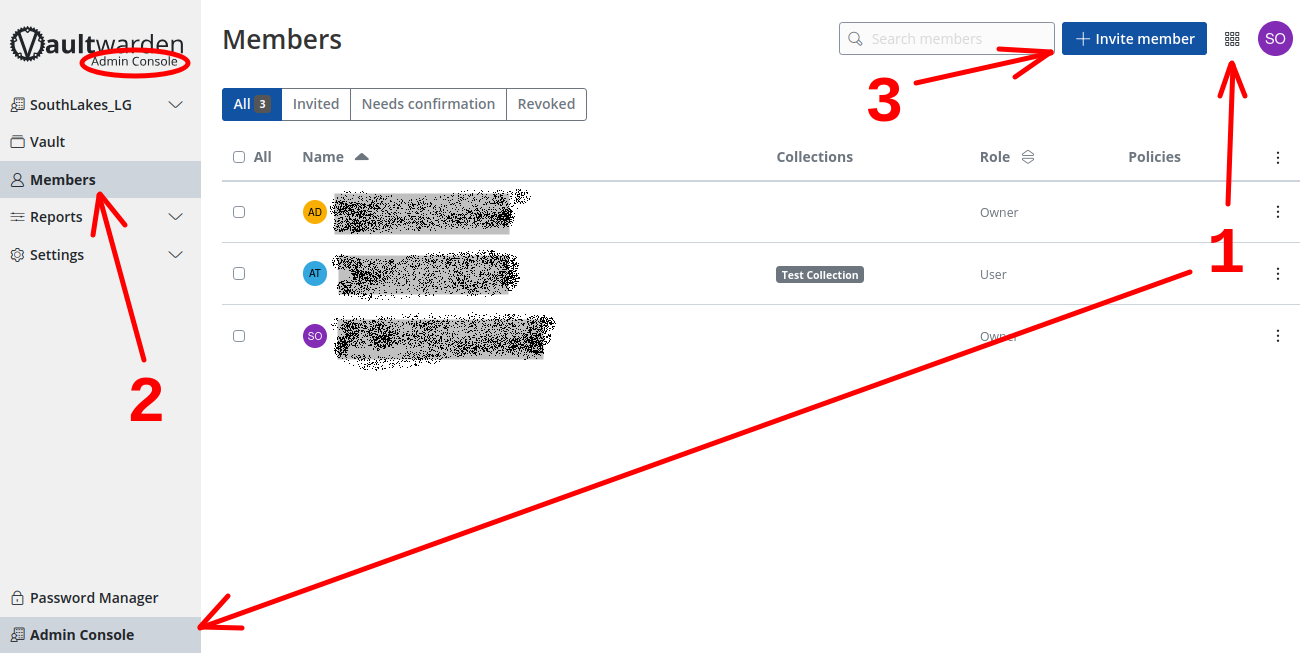
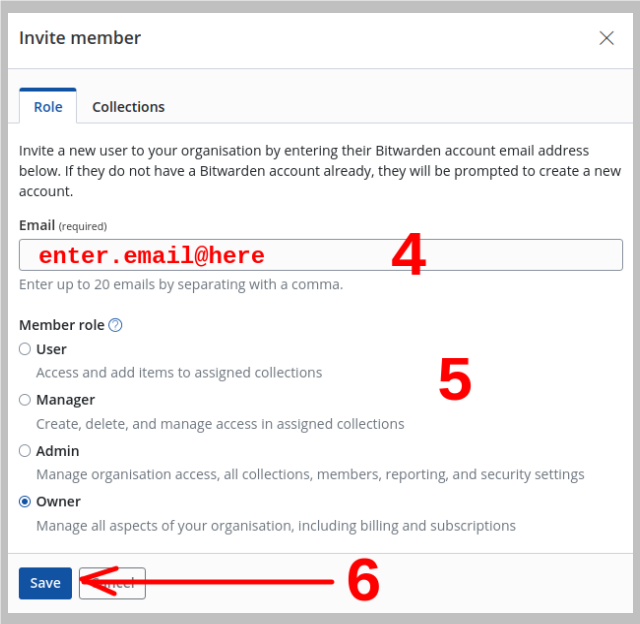
- In the pop-up, enter the email address of the person to be invited
- Select the member role / status as appropriate. If the person is a well known & trusted member of your group then it's probably best to make them a fellow 'owner'. Having a number of owners helps avoid access to the group's vault from being lost
- Click
Save
Back on the members page you should now see 'Invitation sent' next to the email address of the person you've invited.
- You may wish to prompt that person to check their emails and accept the invitation. Send them this link help with the next steps: https://rebeltoolkit.extinctionrebellion.uk/link/1064#bkmrk-how-do-i-join-the-va . If they leave it too long (about 10 days??) then the invitation may expire. If they already have an XR Vaultwarden account then they can just log into that in order to accept the invitation, otherwise they'll be requested to set one up. Once they've logged into their account (new or existing) and accepted the invitation then they should send you their account's 'fingerprint phrase'
- At this stage you should see a 'Needs confirmation' label next to the new member's entry on the members page. Click on the '3 vertical dots' to the right of their entry
- Click on
Confirmin the pop-up menu - In the 'Confirm User' pop-up, compare the displayed 'fingerprint phrase' with the one that the new member sent you. If they're identical then click on
Confirm
Removing access
If someone loses their phone, gets arrested, or has their devices compromised, you should remove their access as soon as possible.
You (as a vault owner) can remove someone's access to the group, or change which collections they have access to, by logging into your account using the website https://vault.extinctionrebellion.uk and accessing the 'Members' page as follows:
- Click on the 'cube of cubes' (dice) button to the left of your avatar and select
Admin Console, or click directly onAdmin Consoleat the base of the left menu - In the left hand menu click on
Members - Click on the '3 verticle dots' to the right of the person concerned
- Click on 'Revoke access' (temporary) or 'Remove' (permanent) as appropriate

What to do if someone leaves your group
If the person has had access to important passwords, you should assume they have a copy of them. So, as well as removing them from your group on the Vault, you should also CHANGE ALL THE PASSWORDS they had access to.
Don’t get locked out of your Vault account!
If your password is lost then there is no way to regain access to your account (it is designed to be secure after all). Any passwords that you’ve stored in your personal areas will be lost, although it will be possible for you to be re-invited to any shared group vaults after setting up a new account. If you were the sole ‘owner’ of a group’s vault then control of that will also have been lost, although others in your group (who you’d previously granted access to) should still be able to gain access in order to retrieve passwords.
So it’s best to take precautionary measures to ensure you never lose control of your vault.
These might include:
-
Use a master password that you’re sure you won’t forget (but which is still complex enough to be secure), or storing the master password somewhere safe
-
Set up a password ‘hint’ to be emailed to you when needed (but only do this if you can think of something cryptic enough that it wouldn’t help anyone else guess your password)
-
If your account is the ‘owner’ of a group’s vault, invite a second trusted group member to also be an ‘owner’, and make sure to nominate someone to replace you if you leave the group
-
You can nominate someone to be an ‘Emergency Contact’. This facility allows you to designate and manage trusted emergency contacts (who must also have XR Vault accounts set up), who can request access to your vault in a case of lost password. If you lose your password you then ask one of your emergency contacts to request access to your account. You will get an email to notify you of the request, and you then grant permission for them to proceed. When selecting your emergency contact, do consider that they will potentially have access to all group vaults to which you’ve been invited
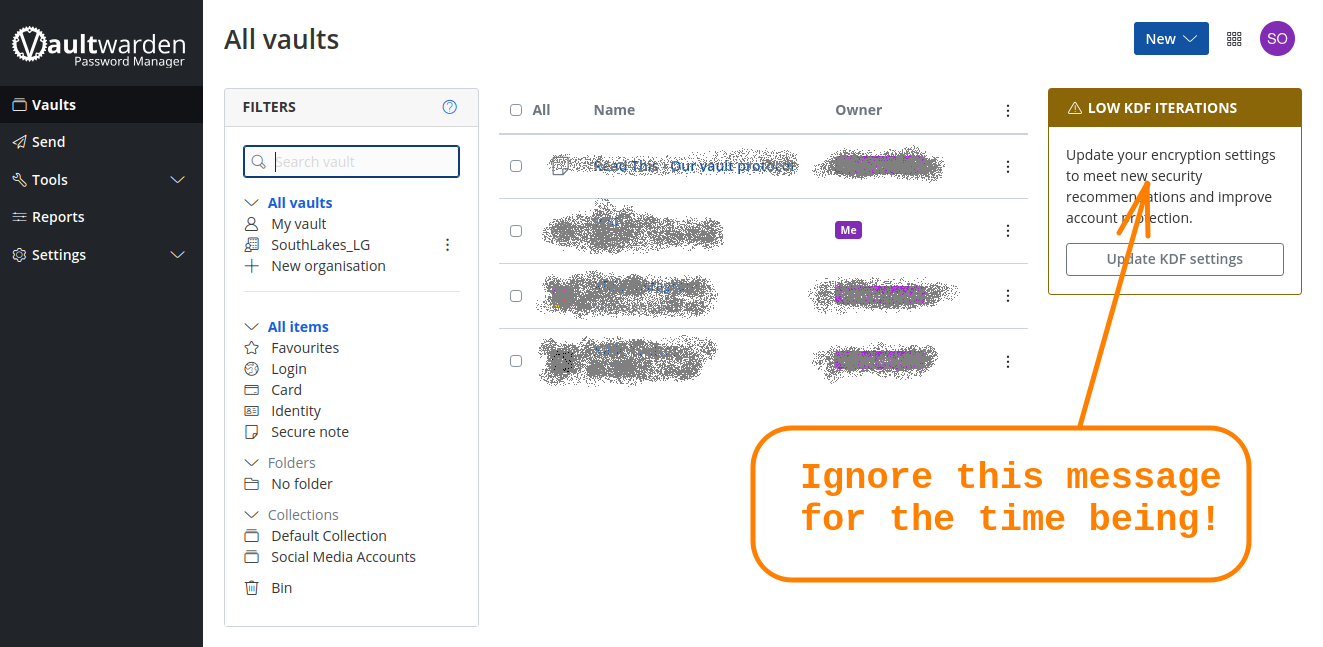
"Low KDF Iterations" warning
Following an update to the Vault software in August 2024 you will probably start seeing a "Low KDF Iterations" warning displayed on your main password manager page. Our advice is to please ignore the message for the time being. DDAT are considering whether any action actually needs to be taken, and will aim to draw up instructions on how to proceed if so.
Where else can I find information?
Hide your phone number from others using Telegram
By default, when you join a Telegram channel your phone number is visible to all others in the channel.
This can lead to you being contacted by spammers, including on other platforms like WhatsApp. The Direct Message facility in Telegram can be used to contact someone without involving their phone number.
The settings in Telegram can be changed to hide your phone number. The steps are almost exactly the same on a phone as a desktop or laptop.
- On a desktop app - click the three horizontal lines in the top left of the Telegram window
- On on iphone - click settings 'cog' icon in bottom right
[ ]
]
Click Settings

Click Privacy and Security
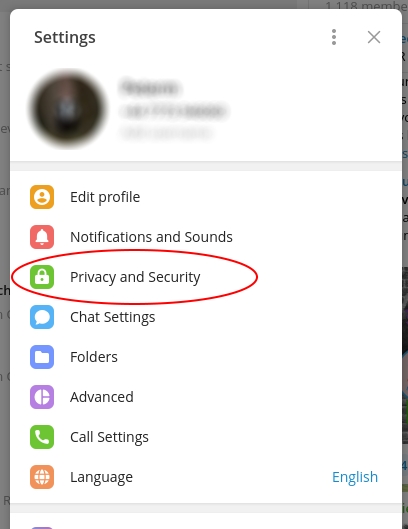
In the Privacy section click the text to the right of Phone number, change the setting to Nobody or My contacts depending on who you trust.
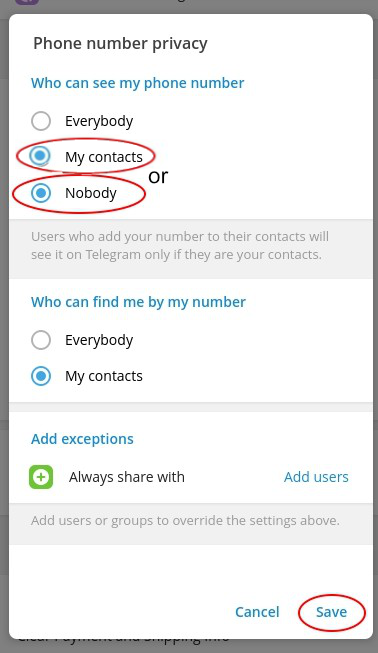
You will then see an overview of your setting, and note that there are a few other settings that could also be changed.
Then Save
This page has been created by Extinction Rebellion UK Digital team.
- Learn more about XR UK here on the Rebel Toolkit
- Visit the XR UK website
- Donate to XRUK
- Visit the XR Global website
WhatsApp Security & Privacy Settings
Group Settings
Group Permissions
- Members can: Edit group settings – Switch Off.
- Members can: Add other members – Switch Off.
- Admins can: Approve new members – Switch On.
- Group admins - Limit the number of group admins to as few as possible, but should be at least 2.
Other Settings
- Advanced Chat Privacy – Turn on. This stops people exporting the chat, and media is not automatically downloaded to the phone – BUT importantly it can still be manually downloaded (more info).
- Disappearing messages - Turn on disappearing messages. Max period 4 weeks. Less if possible (more info).
- Chat lock - Turn on Chat Lock, to hide the chat, and only make it visible after a biometric check (more info).
Main App Settings
Privacy
- About - Set to Nobody.
- Last seen and online - Set to Nobody.
- Profile photo - Set to Nobody.
- Links (profile) - Set to Nobody.
- Groups - Set so only your contacts can add you to a group. If an admin who isn't in your contacts wants to add you, they will need to send you an invite.
- App Lock, Enable, timer to 1 minute, and switch off “Show content in”. With this switched on Biometrics are required to access the WhatsApp app.
- Default message timer - Set to 7 days.
Profile
- Name - Change to something else, rather than your real name. NOTE: If someone has you saved in their phone contacts then this won’t change the display name on their phone.
Chats
- Chat backup - Switch off Backups (more info). If you need your WhatsApp chats backed up then switch on Backup Encryption (more info). WhatsApp Backup is Not recommended.
Key Points
- Implementing all the above points does not guarantee privacy.
- Data is still gathered by Meta. So for example Meta records time, date, phone number, IP address, MAC Address, Your ID, Contact, Location and will hand this info over to the authorities.
- Phone number cannot be hidden from other contacts in a group.
- If one person in a group is backing up the chat, then they are a weak link.
- The process you have for admitting a new person to a group is very important. Do you make the group very open where anyone can join, or do you have a system where someone is vouched for before they are admitted to the group?
Also see 'Choosing a messaging platform'.
Tools for scheduling meetings: When2Meet & LettuceMeet
Free tool to help groups decide which times suit them to be together.
Note: Whilst both When2Meet and LettuceMeet are easy to use, Lettucemeet is easier to use on a mobile device than When2Meet. Lettucemeet also allows you to sign in and see all of the polls you have created, so it may be more useful if you need to do a lot of scheduling.
Filling in a When2meet
- Open up the poll by clicking on the link you were given.
- Type your name into the ‘Your name’ in the ‘Sign in’ section to the left of the screen. Remember this (i.e. the exact spelling and whether you use upper/lower case letters) as this will allow you to return and edit your availability.
- You don’t need to fill in the password, although you can if you want (but if you do, you need to remember it if you want to edit your availability later).
- Click the ‘Sign in’ button.
- Click and hold as you drag your cursor across the pink section to show when you are available.
- If you want to turn a cell back to pink, click over it again.
- When2meet saves instantly saves your selections.
- You can return to the same link again if you want to edit your availability.
- Video from 3m30s - 6m25s
Filling in a LettuceMeet
- Open up the poll by clicking on the link you were given.
- Click the green 'Add Availability' button to the above right of the chart.
- Click and hold as you drag your cursor across the chart to show when you are available. The chart will turn the times you are available green.
- If you want to turn a cell back to 'unavailable', click over it again.
- If there is an arrow to the right of the chart, it means there are more dates to scroll along to, so ensure you don't miss these.
- When you have added your availability, click 'Next' (where you previously clicked 'Add Availability'.
- Add your name, or, if you have a Lettucemeet account, click 'Already have an account?' to connect this poll to your account.
- You can return to your account to edit your availability.
‘Reading’ a When2meet or Lettucemeet
- Open up the poll by clicking on the link you were given.
- You will see that as more people fill the poll in, areas on the date/time field on the right side of the screen will become darker and darker green. These are the ‘hotspots’ which indicate where the most people are available.
- If you put your cursor over any area of the field, the names of the people available/not available will appear to the side of the chart (left on When2meet, right on Lettucemeet).
- Video from 6m20s to 7m30s
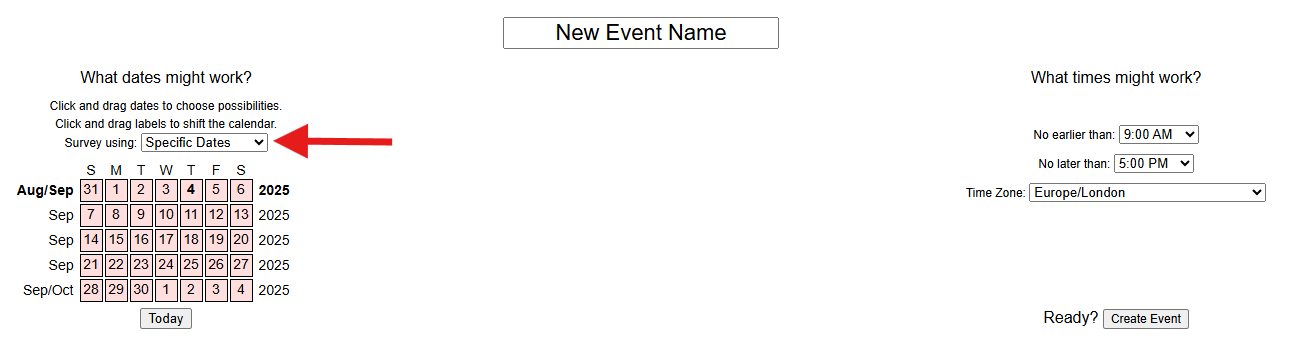
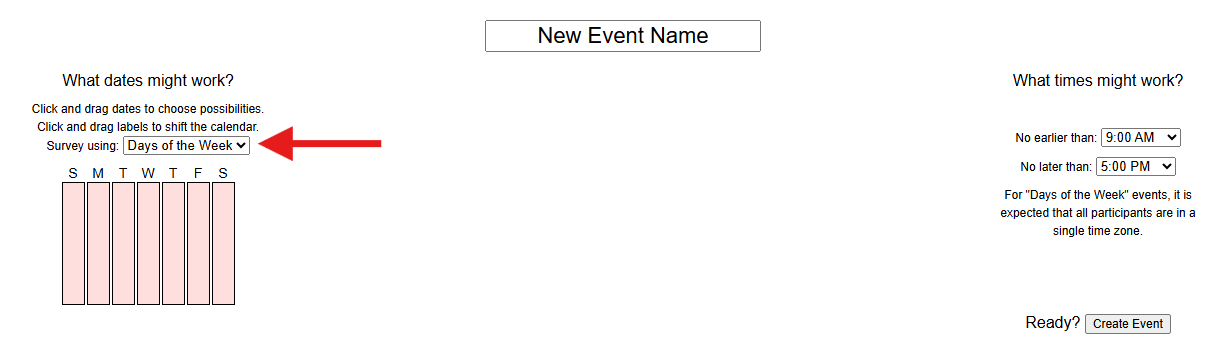
Setting up a When2meet
- Go to When2meet.com.
- Type your event name (this could be the name of the group you are trying to bring together) in the ‘New Event Name’ field at the top of the screen - do this carefully - it can’t be edited once you have done it. If you make a mistake, no worries, you can just start a new one in another browser window.
- Go to the ‘What dates might work?’ section in the left half of your screen. Select which dates you want to include in your poll by clicking on them. The dates you have selected turn green. Click them again to deselect them.
- The default setting is ‘Specific dates’ meaning the poll will be for the dates you have selected, but you can select ‘Days of the week’ to create a generic poll for days of a week without specifying dates.


- Move across to the ‘What times might work?’ on the right side of your screen. Here, you can choose the number of hours your poll will span. The ‘No earlier than’ field indicates the start of the poll window, whilst the ‘No later than’ field indicates when the end of the poll window will be.
- Select the time zone, if needs be.
- Click the ‘Create event’ button when you are ready. But remember, once you have done this, you won’t be able to edit your event, so if you have made a mistake you will just have to start again and make a new poll.
- You will be taken to another page where you can send a link by email or message.
- Give people a deadline for people to complete the poll by so you can convene the meeting with appropriate notice.
- It’s also a good idea to bookmark the poll so you can revisit it and see who has filled it in and identify ‘hotspots’.
- Video from start up to 2m30s
Setting up a Lettucemeet
- Go to lettucemeet.com.
- Click 'Meet' in the top right hand corner.
- Select all of the days you would like your poll to cover. As with when2meet, this can't be edited afterwards, so double check you have selected the right days (and that today isn't still selected). Use the arrow to the right of the calendar to view the following month, if needed.
- Click 'Let's Meet' in the top right.
- Type your event name in the 'Name your meeting' field, and add more info to the 'What's your meeting about?' field, if you like.
- Fill in the Move across to the 'What times would you like to meet between?' section, choose the number of hours your poll will span. This will be the hours respondents can enter the availability between.
- Leave the 'What type of meeting' field set to 'Group'.
- Click 'Create'.
- Click the 'Share' link above the right of the calendar- this copies the share link to your clipboard so you can paste it into whichever channels you need to share it in.
- Use the 'Add availability' button to add your own availability by following the instructions above.
Eventbrite
A well-recognised ticketing system for paid-for ticketed events, charging a fee for each ticket sale. There is also a free option for free events.
Reasons to use Eventbrite could be:
- you want to charge for tickets to your event (Eventbrite will do all the payment processing securely)
- you want to invite non-XR people to your event (and therefore don't want to use XR's Action Network email list)
You can set up email responses and pre-event reminder emails with info for ticket holders and also set limits to numbers of tickets at different prices.
Creating your event: first steps and basic info page
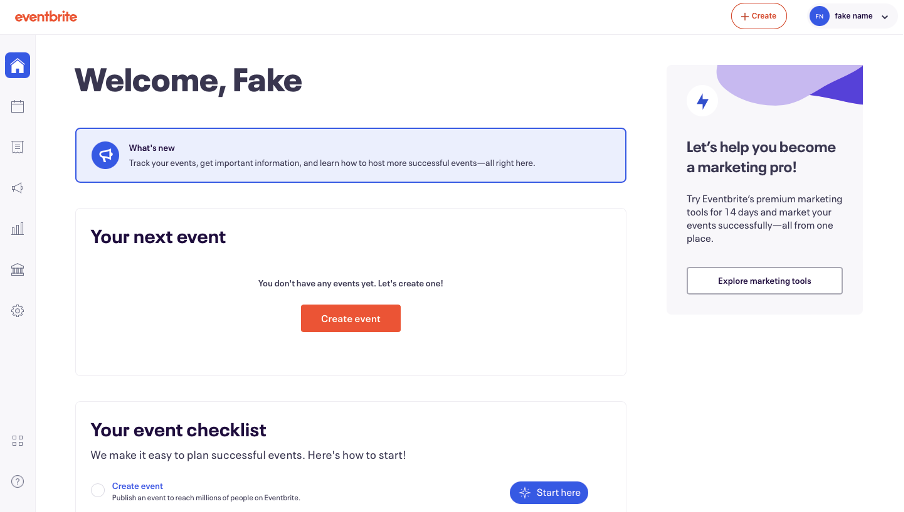
You can create an Eventbrite account by following this link www.eventbrite.co.uk and clicking sign up in the top right corner.
You will then be asked to enter an email, name and password. We recommend you use an XR email address. We recommend that you do not use a personal Eventbrite account to create events for XR.
Once you have made your account, you will be able to create an event: click the button ‘Create an event’ that is now on Eventbrite’s top bar.

If this is the first time you made an event, it will ask you several questions about how you will use the website. This will help set up the tools that Eventbrite has.
You will be then taken to this page, where you can click the orange ‘create event’ button that is now in the middle of the screen and the top bar.
Editing the event - Basic info page
From here, you will then land on this basic info page. This is a scrollable page, scroll down to see the three main sections, which are Basic Info, Location, Date and Time.
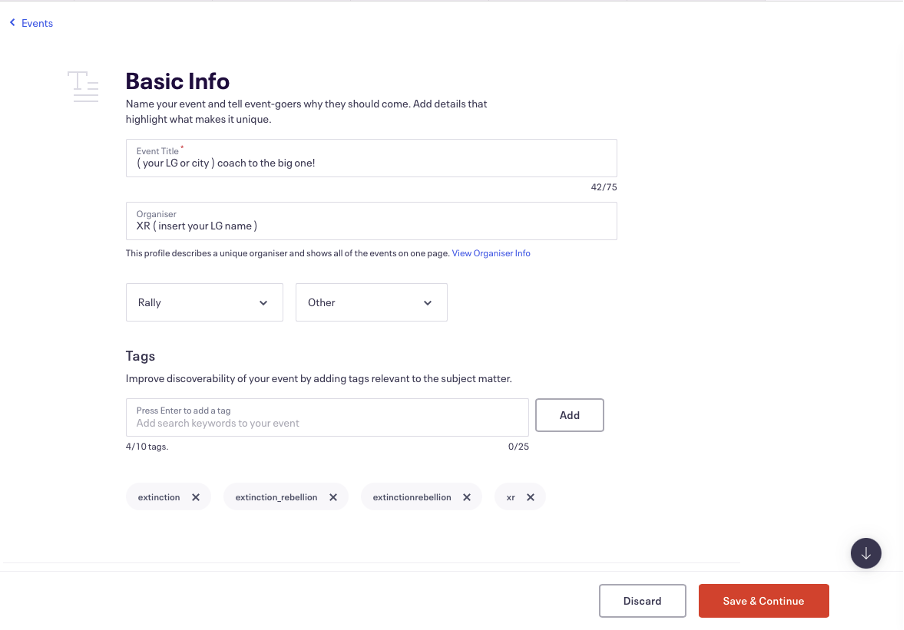
Add an ‘Event Title’.
You then need to add the organiser’s name. This could be your Local or Regional/National/Commmunity group name, such as XR Midlands. Don’t put your real name down for security reasons!
You will then need to decide what type of event it is in the drop box, in our example above, we have chosen 'rally'.
You then should add some tags: this helps people find the event when they are searching on eventbrite. Examples you could use are, Extinctionrebellion, XR, Extinction_rebellion, climateactivism. You can choose up to 10 tags.
Location

Now scroll down to the 'Location' section to add the address/location of your event. If your event is online you can select online as an option. If you do not know the address yet or it is still to be agreed click ‘to be announced’, as you can always edit this later.
Date and Time
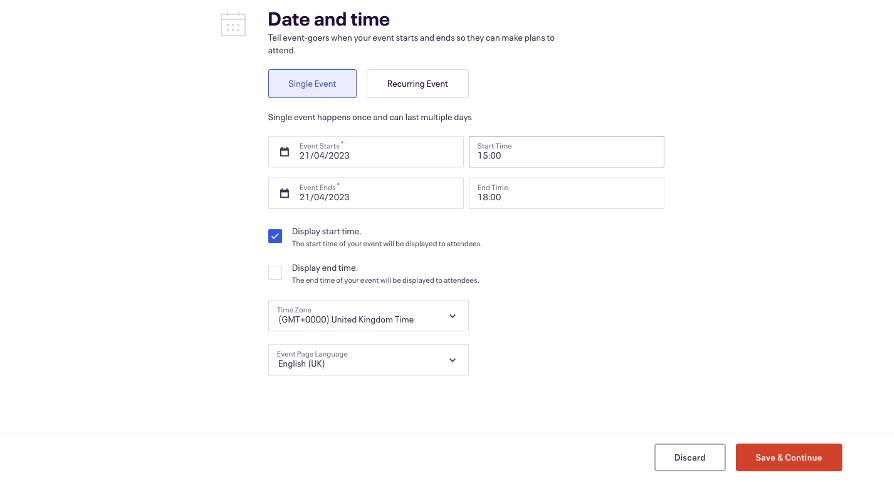
Scroll down again to the Date and Time section and specific when the event is, and if it is a reccuring event. You can also choose if you display and start and end time when it is a live published event.
Once you have filled in the above details, click 'Save & Continue' to save your work. This does not publish the event. It just saves it.
You will then be sent to the main page to manage your event. This page has 4 main sections: Basic Info, Detials, Tickets, Publish. These sections can be found on the left sidebar.
Eventbrite has a very useful and extensive support section on their website as well as prompts all the way through the process.
The rest of this guide covers a more simple step-by-step approach to the main features of Eventbrite for ease of use.
Please note that Eventbrite sometimes changes its policies or costs. We will do our best to keep this guide updated, correct, and relevant.
Creating your event: Main Details Page
Once you have followed the instructions on the previous page, you will be taken to this page, where you will be asked to go into more detail. This information will make up the main page people see when they click on the link to your event.

Main Event Image
First you can add a picture. This picture should be attention-grabbing but also informative. You can use https://extinctionrebellion.aktivisda.earth/en to make a good graphic. Once you have a graphic you can upload it by clicking ‘upload image’.
Summary
In the summary, you should include key but short details about the event, as you only have 140 characters.
Description

In the description you can give more details and go into more depth. You can include information about your event, locations, timings and also why people should come!
Include information about your refund policy (see later sections) and an email so people can contact you for questions about the event .
You could add more images or videos if desired.
Once finished click save.
Creating your event: Tickets, Payouts and Refunds
New costs since 2023s Big One
Since the big one, Eventbrite has since added new costs for paid-for events. These are for each event, so if you have two events, you will have two fixed fees to pay.
26-100 tickets have a fee of £7.99 per event (probably affecting bookings for 1 large coach).
101-250 tickets have a fee of £19.99 per event (probably affecting bookings for 2+ large coaches).
Ulimtied tickets- £34.99 per event.
This is in addition to the per-ticket processing fees, which are still charged as a percentage of each ticket.
See More information about the changes here.
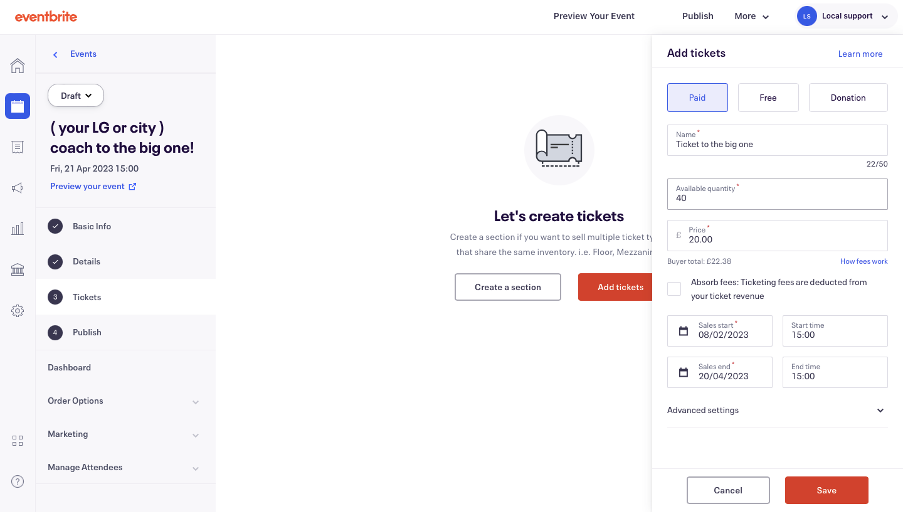
First click ‘Tickets’ on the left of your screen or 'Add tickets' in the middle of the screen, on the event dashboard page. This will open up a section to the right on your screen.
If your event is free to attend, select the 'free ticket' box, or if it's paid click the 'paid' box.
In the ticket name, Give it a name, such as 'Coach ticket to The Big One'. If you are offering different types of ticket you can specify those here, eg 'Coach ticket to The Big One- child'
For the available quantity add the amount you have capacity for. You can break up that capacity across multiple ticket types if needed.
It is important that you do not select ‘absorb fees’ when setting up the event, as this will mean you will be paying for the fees even if the ticket gets refunded, this will affect your payout from Eventbrite.
Make sure the currency is set to £ pounds and the country is set to the UK. Eventbrite payment processor should be automatically set.
You will then need to enter the time period the tickets will go on sale and an end time to stop selling tickets.
Once you have entered the name, amount of tickets, price of tickets (inclduding free) and time length for the sale of tickets, click save.
The payout from tickets sales
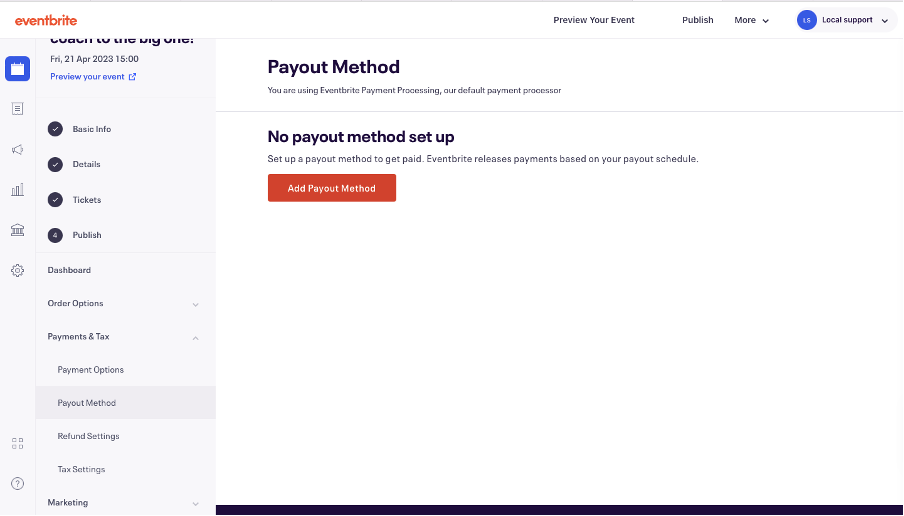
To withdraw the money paid for your ticket sales, on the event dashboard/edit page and once you have set tickets up, go to the left-hand sidebar, click ‘Payments & Tax’ and then 'Payout Method'. From here click ‘Add Payout Method’. This will then ask you to enter your bank account details.
Once you have entered your bank account details you will be sent the page below. To change the payout schedule click ‘Payout Schedule’ on the left side of the screen.
You can now chose from the following payment options:
- total amount 3 days after the event
- weekly on Wednesdays
- twice a month on the 1st and 15th
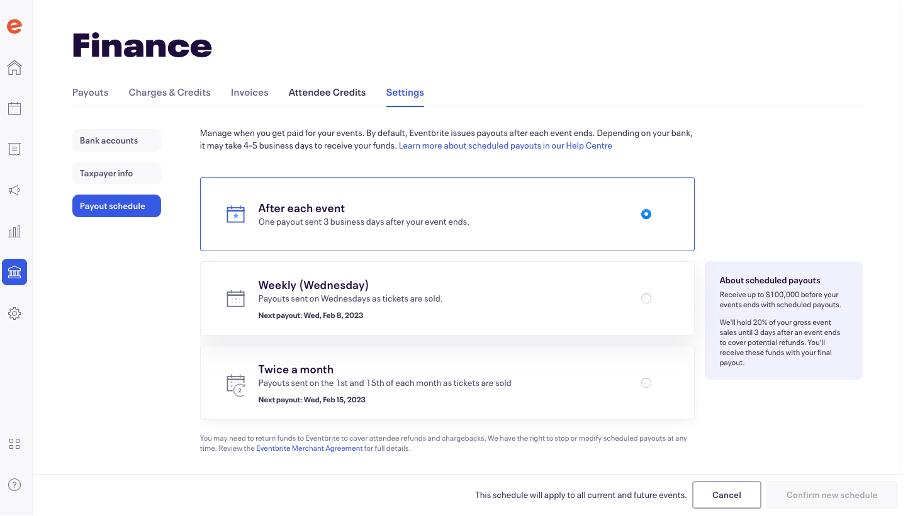
However if you chose either of the second two options, Eventbrite will hold back 20% of the ticket sales until after the event. But you may still want to withdraw some of the funds- it could be useful if someone has paid a big deposit and can't wait until after the event to be repaid. On the negative side, multiple withdrawals makes keeping track of the accounting a bit more complicated.
Eventbrite charges VAT, so we don’t need to change or edit the tax settings.
Refund policy
You need to select a refund policy, which must be on your event page. Refund policies may not be changed retroactively. We recommend setting this to 'On a case-by-case basis'. This means that if someone wants to ask for a refund, they can email in with their order number and a possible reason why. Setting up auto refunds puts you at risk of bad actors or being left in a financially difficult situation.
You will get an email notification if someone asks for a refund. You must respond to this within 3 days, and the email from Eventbrite will tell you how to process the refund.
By default, fees are not refunded on orders. This means that the attendee will receive a refund for the amount they paid minus the Eventbrite fees. There are a couple of exceptions: If the refund is made before the charge has settled (usually within 24 hours), the original charge will be completely voided. If the refund reason is "COVID-19", "Duplicate order", or "Event cancelled or postponed", the fees will be refunded as well.
If there are enough funds in your event balance to cover the refund, then Eventbrite will use those to pay for the refund. If there aren't enough funds in your event balance to cover the refund (because you have withdrawn some of the money), you have two option:
- You can add funds to your event. This option is best if you need to issue multiple refunds or partial refunds.
- If you don't add funds to your event, Eventbrite will ask for a debit or credit card to pay for the refund. This option is best for individual refunds, and you must refund the complete order this way.
To find out how to set the refund settings, go to the left-hand side bar on your events dashboard, then click ‘Payments & Tax’ and then click ‘Refund Settings’. You will need to select ‘On a case-by-case basis’ and click ‘Save’.

How to issue a refund
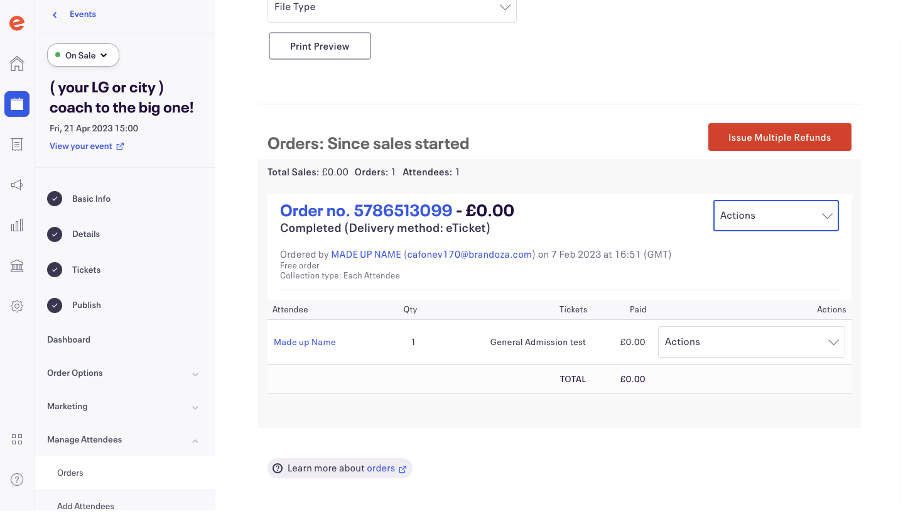
Go to the left-hand sidebar on your event dashboard, click ‘Manage Attendees’ and then ‘Orders’. To issue a refund, you will need either their name, email or order number. You can then use the search bar to search for this information. Press enter on the keyboard to generate the report.
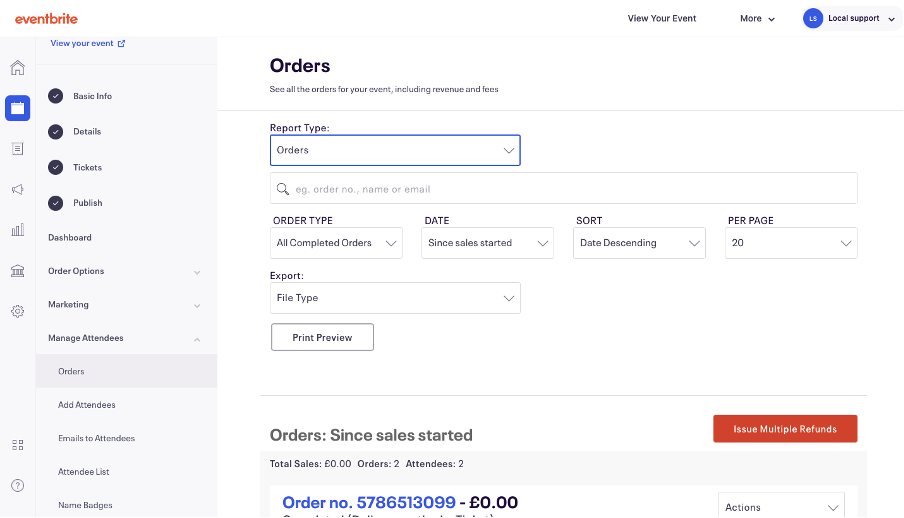
Once you have found the order to be refunded, on the right side of the order information, click ‘Actions’, and on the drop box menu that opens select ‘Issue Refund’. Then fill out the refund details, including the refund reason, which tickets you want to refund and the amount you want to refund (this should be 100%, unless the purchaser has asked to donate some of the cost of the ticket). Then click continue, add any 'Notes to the buyer' and then click 'Issue Refund'.
Creating your event: Order Confirmation and Order From
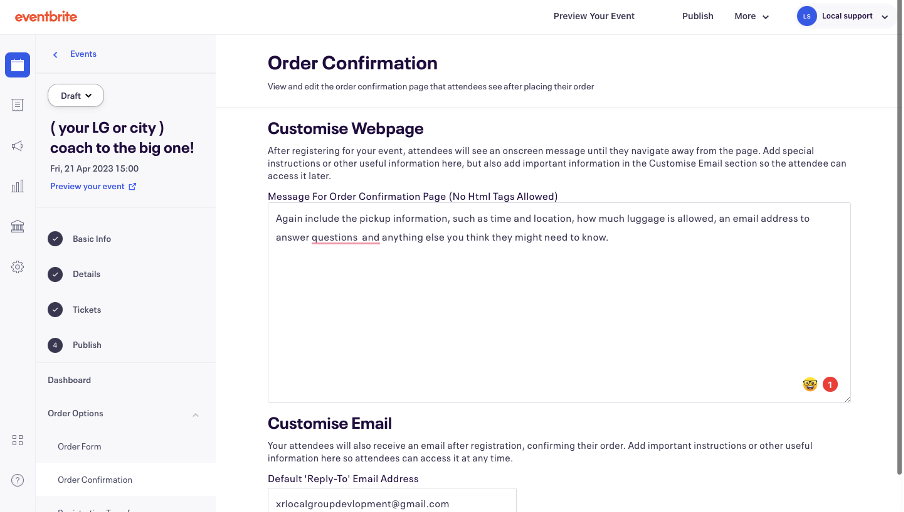
Once someone buys a ticket, they will be shown an order confirmation page. It’s helpful to include some basic information, including event accessibility, timings, and an email so people can ask questions.
You should then also put this information on the email confirmation that people will receive.
To edit this page, on your event dashboard go to the left bar and click ‘Order Options’ and then click ‘Order Confirmation’. Then you can add details to the the confirmation webpage and the email confirmation in the boxes below. Make sure to use the XR email you used for the account and public enquiries, in the 'Default 'Reply-To' Email Address' box.
Once you have added the text you want, click ‘Save’ at the bottom right-hand of the screen.
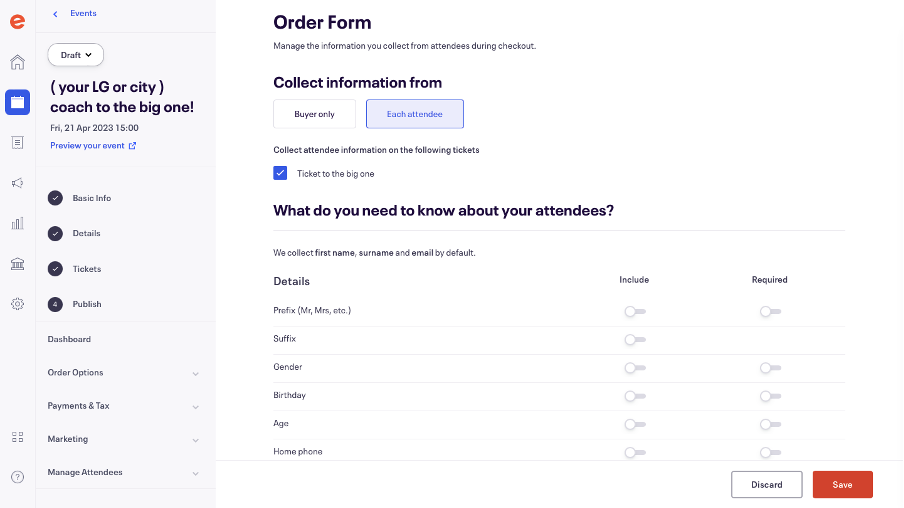
Order form
You can choose to ask more questions during the order, such as phone numbers. Eventbrite automatically collects full names, and email addresses, this can not be turned off. We recommend keeping the settings standard as you are unlikely to need to collect more than names and emails: do not collect more data than you need to. However, you may want to change the settings so it collects information on each attendee, as if a rebel books two tickets, then you only have the information for that one rebel. By collecting for each attendee you can easily track attendees on the day of the event. This will also mean you can email important updates to all attendees and not just to the person who made the booking.
To change this setting, you need to click ‘Order Options’ on the left hand side bar, then click ‘Order Form’. Then under “Collect information from’ click ‘Each attendee’ and then click 'Save' on the bottom right.
Creating your event: Publishing and finding your event in your Eventbrite account
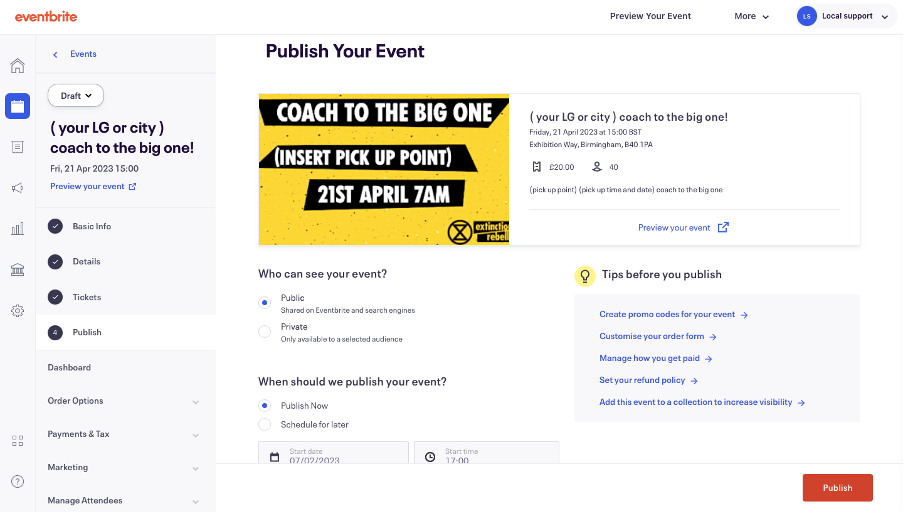
Once you are happy to publish your events, and have double checked all the text, information and settings are correct, then you can publish by going onto the events dashboard. Then clicking ‘4: Publish’ on the left hand side bar. This will give you an option to preview the event, as well as being able to decide if you want to publish straight away or schedule publishing for later. Once you are happy click ‘Publish’ on the bottom right corner.
XR Volunteer Agreement and GDPR
Eventbrite has the ability to let you email ticket holders directly through Eventbrite. This functionality is only meant to be used to send email relating to that specific event. This does not mean you can then use this function to email about XR, just about the event you are organising.
Everyone who has access to the data from Eventbrite should sign the XR Volunteer Agreement here : XR Volunteer Agreement
You should only share data on a needs basis to rebels who signed the above agreement and dispose of any data you stored after using it.
Find out more about GPDR here : GDPR and Personal Data
How to find your event in your Eventbrite account
Log in and then click on the icon in the top right hand corner- which will be your account email or name. Then click ‘Manage my Events’. From here you can find all the events you are planning.
You will be taken to this page, which will list your next event. Click the 3 dots on the right hand side of the event title, and this will open up several options. ‘Copy URL’, can be used to share your event, and ‘Edit’, which takes you back to the event page, and you can use the same process as when making your event. Just make sure to click save on each page or setting you edit.
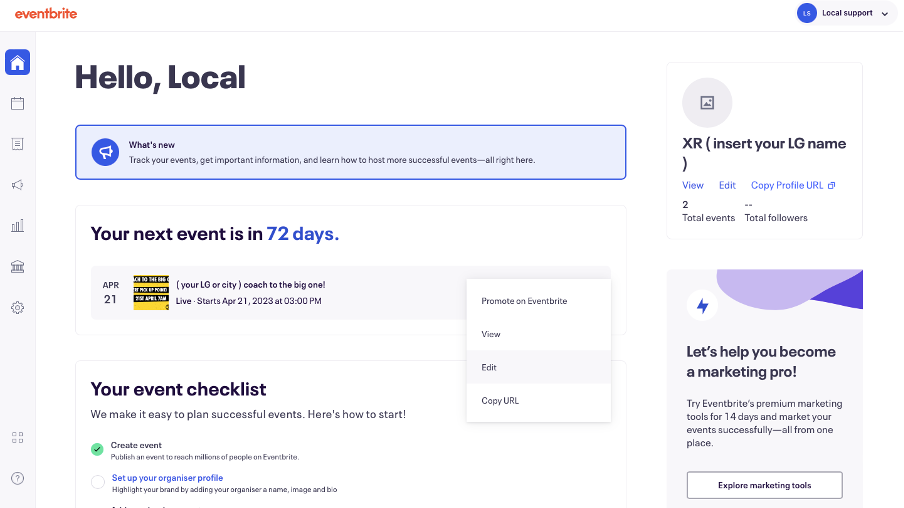
If you are running more than one event, you may need to click the calendar icon in the left sidebar, which says ‘Event’ as you hover over it with your mouse. Click this, and it will take you to all your upcoming events. This page will also tell you how many tickets are have been bought and the amount of money raised. Clicking your event will take you to the event dashboard.
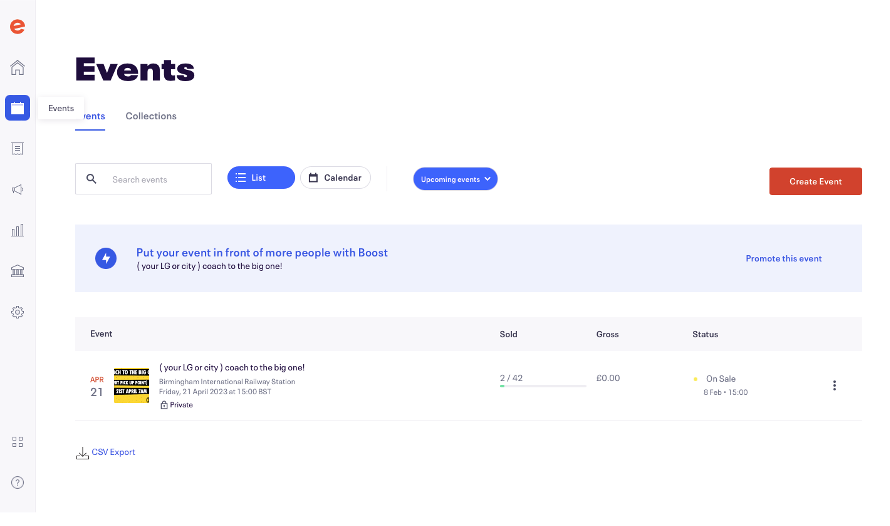
The event dashboard will also tell you about ticket sales, page views, and links to share the event.
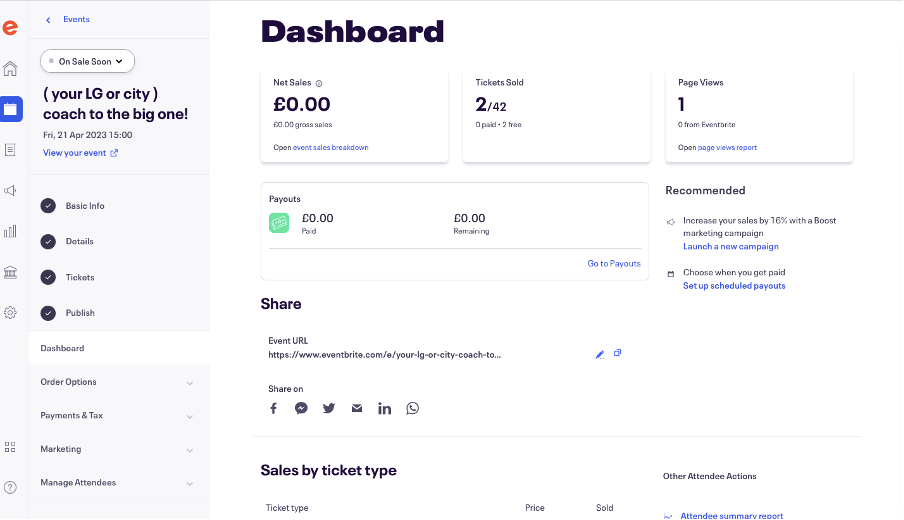
How to send an update email and how to access your attendee list
Sometimes you may need to send an update about your event, such as changes to the time or place. There is also an automatic 2-day reminder email that Eventbrite sets up to remind people about the event.
To send an update email to your ticket holders, you need to go to the Event Dashboard (as described on the previous page), and on the left-hand side-bar, click ‘Manage Attendees’, which will open a new menu on the page, then click ‘Emails to Attendees’ in the left sidebar.
To send a new email click the orange ‘Create New Attendee Email‘ button on the right side of the screen.
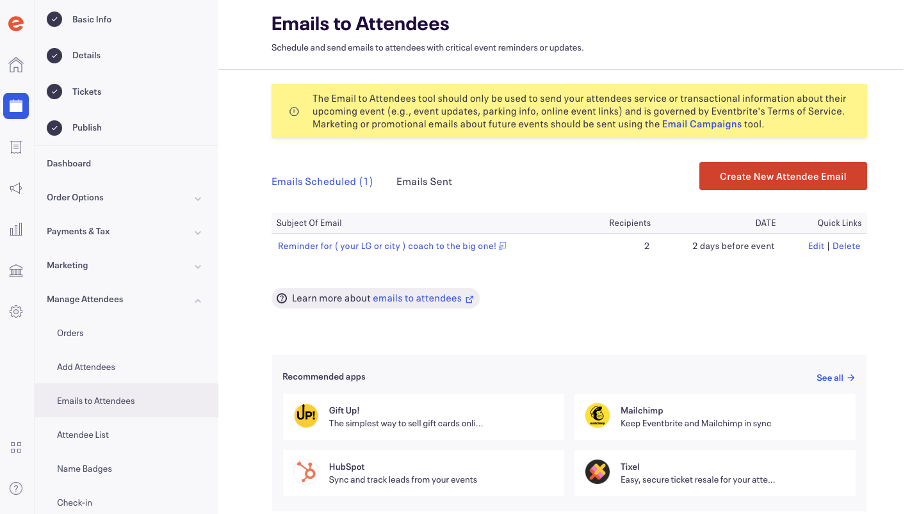
This will then open a new page where you enter the name of your group; your reply to an email address; and the subject title of your email. To send to all ticket holders, select ‘All Attendees’ in the ‘To’ drop-down menu. Then you can add your text in the large text box labelled ‘Message’.
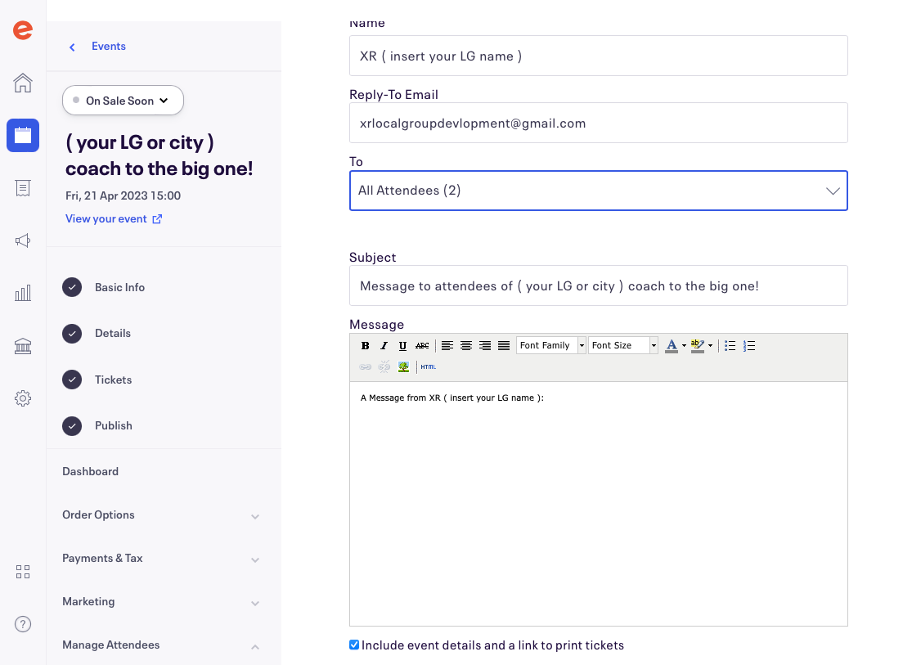
Once you’re happy with your email, you can send a test to your own email, to make sure you are happy with how the email looks, or for someone else to proofread the email. Enter your email (or your proofreaders email) in the ‘Send Test Message To’ text box and click ‘Send Test’. Then you can review if the email looks good.
Then you can either schedule the email for a specific day and time, or send the email straight away. Once ready click ‘Send Now’ to send the email straight away or ‘Save’ if you choose to schedule the email.
The email must be about the event onnly, with no other updates or email shout-outs.

How to access your attendee list
Accessing your attendee list can make it easier on the day to track who has and hasn’t turned up, and to an extra layer of security so that only people who are meant to be there are at the event. This can be done by ticking people’s names off against the list as they arrive at the event. There are also options to use your phones to check people into the event with an app, but on paper is a simple way to keep track.
To download the attendee list, on your Event Dashboard, go to the left sidebar, click ‘Manage Attendees’ then click ‘Attendee List’. This will then take you to a new page and give the option to ‘Download List as a PDF” button, click this and it will open a new tab with your attendee list.
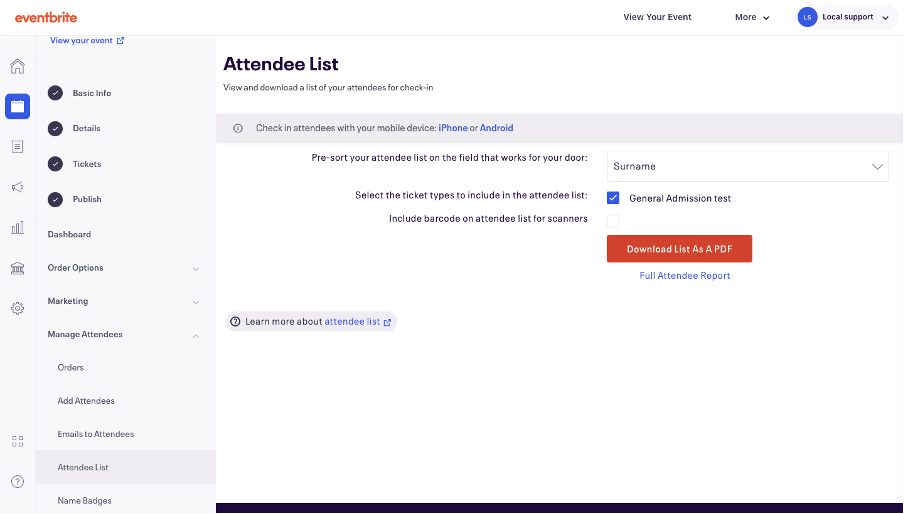
Your attendee list should look something like the image below, which you can then print off or save. Remember to safely shred or dispose of this list once you are done with it. Only people who have signed the XR Volunteer Agreement and need to see this information should have access to this list.
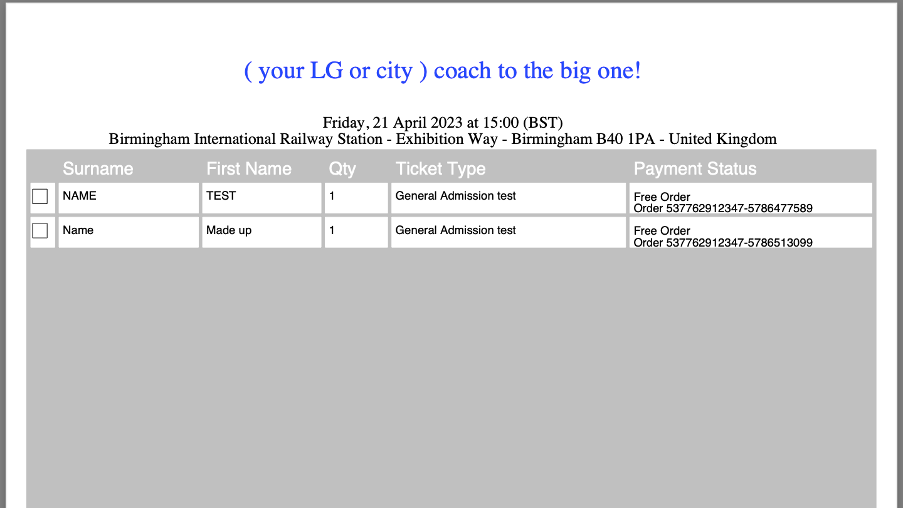
Making simple QR codes

This is a QR Code. When you scan it with a QR code scanner app on a smartphone you can quickly get to a website, online document, or anything else with a URL. Here’s how to make one:
-
Copy the website URL you want the code to take you to- eg: https://docs.google.com/document/d/1ETk_vHQ8meD5xcFWn4v3jKqK8P8sjGGdra774KeYVks/edit?usp=sharing
-
Go to https://xrb.link/ to shorten the URL.
You need to do this because long links (like the one above) make complicated QR codes, which are harder for phones to scan. Without URL shortening, a long URL would create a very detailed code like this, which is harder to print well on a small flyer. Below takes you to the same place as the much simpler QR code at the top of the page but it's messy and might get blurry and unscannable if it was printed small.

- Copy the Long link into the white box:
- Click shorten and your shortened link will appear.
-
Click copy.
-
Go to any of the many free QR code creation websites Eg:
- Aktivisda (XR's own software)
- QR Code Monkey
-
For all these options above the process is the same, you enter the URL that you want to turn in to a QR code and there will be an option to create and download a QR code.
-
It's best not to use any tracking offered by these sites - as it can sometimes put a expiry time on your QR code and stop it working. If you need tracking - contact that Data Insights and Analytics team on their mattermost reception here
-
And that’s it, you have simple QR code which you can put on your leaflets, stickers and posters so people can get to your sign-up sheet, website, fundraider, Facebook page or whatever you want!
Big Blue Button and Jitsi
Alternatives to using Zoom
Big Blue Button Basics
BBB is at meet2.organise.earth
Choose Big Blue Button because:
- it's free to use,
- gives unlimited time,
- you can run as many meetings as you like at the same time,
- it sits on our XR secure servers (so more secure than Zoom),
- AND runs on renewables!
Zoom is the most commonly used video conferencing tool, however it doesn’t belong to XR so isn’t secure. If your topic of discussion is extremely sensitive and you don't want any interception then you should NOT be using Zoom. Zoom can view recordings of meetings and view messages and access links sent via Zoom chat. Big Blue Button is XR’s own video conferencing tool and more secure than Zoom. BBB is held on our XR secure servers and runs on renewable energy.
A short presentation comparing Zoom and Big Blue Button is available here.
A recorded video of the above presentation is here.
Online Safety in Big Blue Button meetings
Consider online safety - simple, practical guidance here.
How to Use BBB Video
If you prefer visual learning to the instructions below, you can watch this video guide to learn the basics of using Big Blue Button.
Requesting a BBB Account
The advantage to having an account for your XR group is that anyone (irrespective of whether they have a Hub log-in or not) can access a BBB meeting. Once you have an account, you can create as many 'rooms' as you like within your account (giving each room a name such as Anchor Group, M&M, Actions etc) and each room has a unique URL. You copy the URL for the room and send that with the date and time of the meeting. Then attendees click on the link at the start of the meeting, add their name and the BBB will open in a new Windows tab. So a Local Group can have a BBB account and then run their XR meetings even if not everyone present is on Mattermost & the Hub.
To get an account:
- Email: bbb@organise.earth
Email from your XR group's email address and not a personal email address. In your email, include which group you are in. Once the account is created, you will be emailed the account details. Your group's email address will be the login/sign-in name and you can change the password to one of your choice.
Joining a call
When you click the link to join the call you will be asked
to connect your audio and webcam. Select Microphone, and check that
if you speak you hear yourself coming back through your device. Don't
worry, no one else can hear this!

Welcome to BBB! This large Welcome screen takes up most of the window, but if you click the whiteboard symbol in the bottom right corner it will go away and there will be more space to see other people on the call. Down the left-hand side you can see who else has joined, and if they are connected to video and audio, and the Public Chat area.
If you can't see the columns on the left, look for the little person
icon in the top left corner and click that to open up the sidebar.
In the main window, you will see buttons at the bottom, and this is where you can control your Audio and Video. Click the microphone to mute or unmute yourself.
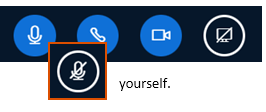
The button that looks like a video camera is to turn on your webcam.
Like your audio, when you first use the 'log in to the meeting', there will be a pop-up window
where you can choose your settings, and you will see a preview screen. Your camera should be automatically detected your camera, so unless you want to choose a
different webcam, just click Start Sharing.
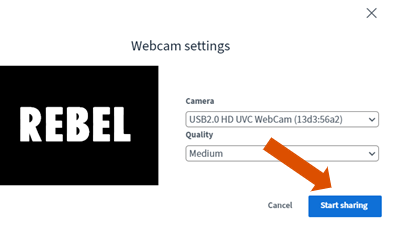
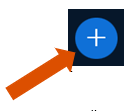

Once screen
sharing begins it will give you a delightful "rabbit hole" effect of
windows within windows - don't worry, once you switch to a different
tab or window this will disappear - just don't use the BBB tab to
open the website you want to share, or you will automatically come out
of the session!
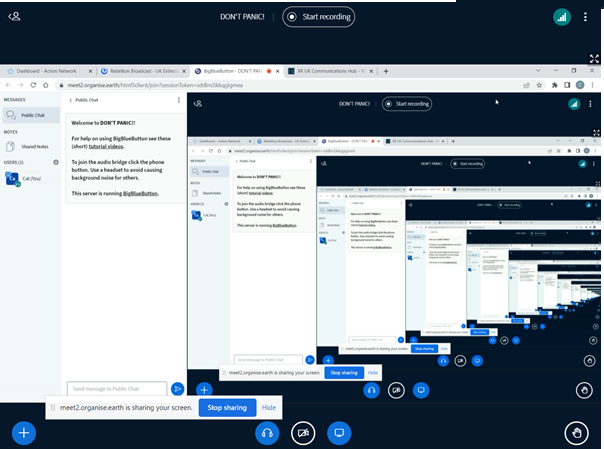
Note that you cannot screen share on a mobile device.
There are a few other options if you click the three vertical dots in the top right of the window.
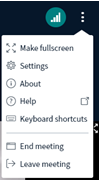
At the end of the meeting you can go here to End meeting or Leave meeting - or you can just close the tab in your browser and you will have left! Once everyone has left the meeting, even if no one clicks End, it will automatically finish.
You can have a meeting on BBB for as long as you like, there is no time limit.
Big Blue Button on a Mobile
As with using BBB on a computer, when you log in you will need to confirm your microphone and camera settings - it will detect them automatically from your device, so you don't need to change anything. Your phone may also ask you to 'Allow' BBB to use your microphone and camera, click 'Allow' to both of these.
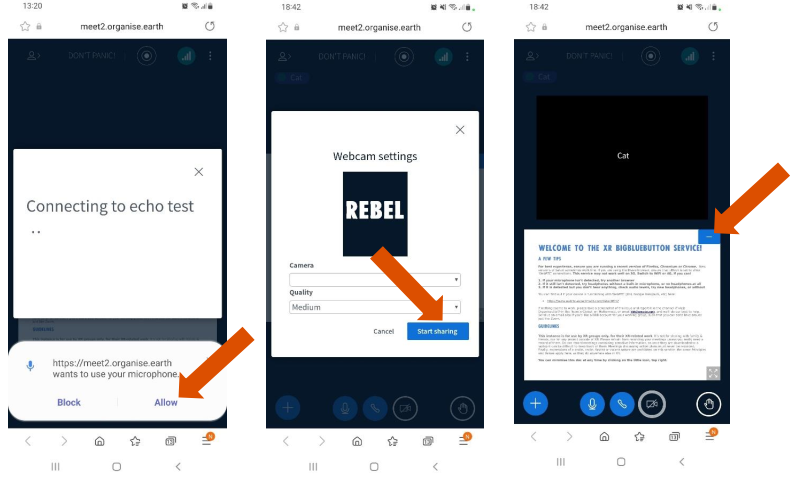
Get rid of the Welcome screen to make more space to see the other folks on your call!
To pull up the list of the other people on the call and the Public Chat, click the little person icon in the top left of the screen. Click the same icon to minimise this column so you can see who you are speaking to again.
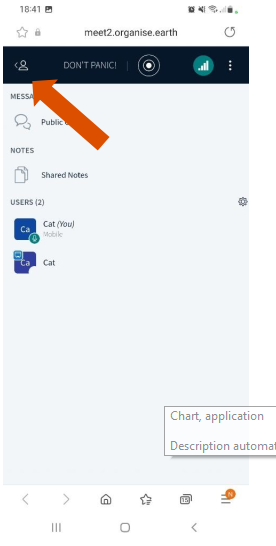
Click on the three vertical dots on the top right hand of the screen, or close the internet browser to leave the call.
Automatic Closed Captions in Big Blue Button
Background
BBB introduced automatic closed captions in version 2.6. Both options for manual and automatic closed captions exist which can be confusing.
The automatic transcription is only available for browsers that support Speech Recognition (Google Chrome, MS Edge, and Safari). If you join with non-supported browsers, you will see a warning at the bottom of the join audio dialogue - "Your browser doesn't support speech recognition. Your audio won't be transcribed".
Please note that Windows 11 now offers on-device closed captioning that may be more appropriate for your needs. Check this out on the Rebel Toolkit closed captioning page or Microsoft's documentation page.
Another option is to use Jitsi Meet.
Using Automatic Closed Captions
There are two aspects to Automatic Closed Captions:
- The option to have your words as a presenter/contributor transcribed.
- The option to view transcribed words.
To have your spoken words automatically transcribed you need to select the option when connecting to the meeting. You cannot do it once in the meeting, however you can leave the meeting and rejoin to select this option.
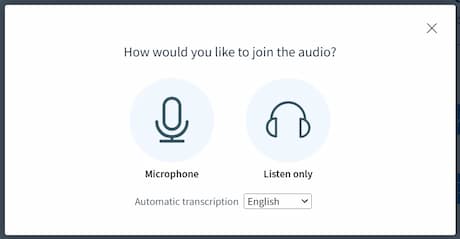
Selecting the correct language is important as it helps the translation engine.
This option is not available on iPhone or on Android, as per the screen shot below:
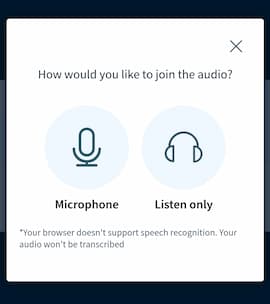
To View captions on a Desktop/Laptop computer
When one or more users have enabled transcription, a CC button will appear. To view the transcriptions for those with ‘CC’ in their “who is talking” icon, press the CC button.
The ‘CC’ button is in the bottom left of the BBB screen.
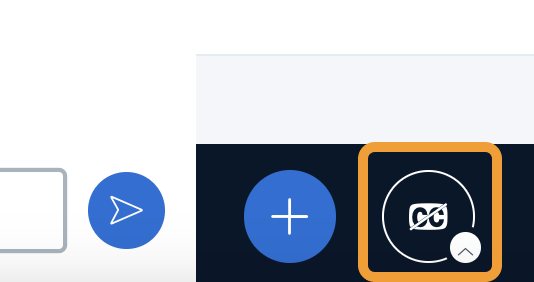
To View captions on Mobile device
For mobile devices, the ‘CC’ button acceible via the three dots menu at the top right corner. Then select "Start closed captions".
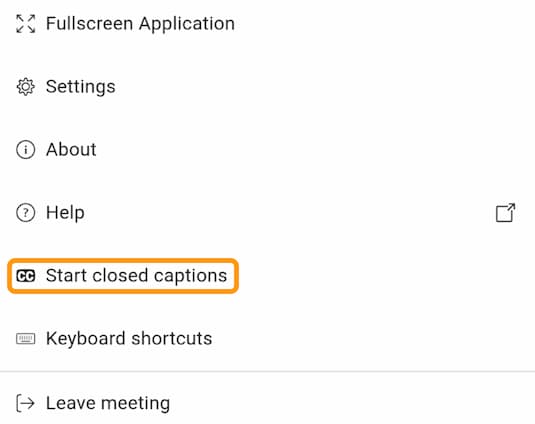
Maximum Confusion – Manual and Automatic Closed Captions Together
It is possible to have both Manual and Automatic Closed Captions. Manual closed captions is where someone manually types the words of the speaker into the meeting captions. This is mostly used for translations. Below shows the ability to enable the viewing of the two different kinds of captions. The left hand CC option is for viewing manual captions. The right hand CC with the up arrow is for viewing automatic captions.
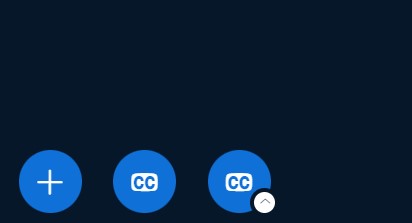
Manual Closed Captions info here.
Big Blue Button Room Settings
BBB Meeting Room Settings for Three Different Scenarios
Scenario 1. An open meeting, which anyone can join, especially people outside of XR.
Login to your BigBlueButton account
Either add a new room, or edit the settings of an existing room.
Go to settings. For an open access meeting make sure the following are set:
- Allow room to be recorded (optional)
- Require users to be signed in before joining. OFF
- Require moderator approval before joining. OFF
- Allow any user to start this meeting. OFF
- All users join as moderators. OFF
- Mute users when they join. ON
The setting in this scenario mute the users when they join to prevent interruption while a meeting is going on.
Scenario 2. A local group meeting where the attendee's will be known, but again is relatively open.
Login to your BigBluebutton account
Either add a new room, or edit the settings of an existing room.
Go to settings. For an open local group meeting make sure the following are set:
- In the settings, generate access code for viewers.
- Allow room to be recorded. OPTIONAL
- Require users to be signed in before joining. OFF
- Require moderator approval before joining. OFF
- Allow any user to start this meeting. ON
- All users join as moderators. ON
- Mute users when they join. ON
The setting in this scenario mute the users when they join to prevent interruption while a meeting is going on. The access code is generated for viewers to prevent anyone who have access to the link from joining unless they have access code.
Scenario 3. A secure locked down meeting.
Login to your BigBluebutton account
Either add a new room, or edit the settings of an existing room.
Go to settings. For a secure locked down meeting make sure the following are set:
- In the settings, generate access code for viewers and for moderators.
- Allow room to be recorded. OPTIONAL
- Require users to be signed in before joining. OFF
- Require moderator approval before joining. ON
- Allow any user to start this meeting. OFF
- All users join as moderators. OFF
- Mute users when they join. ON
NB: The setting in this scenario mutes the users when they join to prevent interruption while a meeting is going on. The access code is generated for viewers to prevent anyone who have access to the link from joining unless they have access code. Access code is also generated for the moderator and the moderator are required to approve viewers to join the meeting. This adds an extra layer of security to the setting of the meeting.
Jitsi Meet
We now have two different Zoom alternatives which are free for XRUK rebels:
- Jitsi Meet: meet.extinctionrebellion.uk (XRUK version)
- Big Blue Button: see the Rebel Toolkit page
Jitsi Meet is an open-source video conferencing platform that allows users to host secure online meetings through a web browser or mobile app. It supports features like screen sharing, chat, and meeting recording. We started working on Jitsi Meet mainly because of problems with subtitles/closed captions in Big Blue Button, especially on mobiles. It solves that problem, but documentation is still a work in progress.
How to use Jitsi Meet
This video explains most of what you need to know. We will update it with a more polished version soon.
The simplest way to create a meeting is to go to meet.extinctionrebellion.uk to create a meeting, log in with your Hub account, and then share the link to the meeting with other participants.
The controls should be reasonably familiar, but please have a look at the video if you are not sure, or come to one of our regular tech support drop-ins.
Accessing the XR UK Jitsi Instance
Method 1 – Using a Meeting Link
- Click the meeting link shared by the moderator.
- Allow camera and microphone access when prompted.
- Enter your display name, team and pronouns, as appropriate.
- Click Join Meeting.
Method 2 – Manual Join
- Go to the XR UK Jitsi homepage meet.extinctionrebellion.uk.
- Enter the meeting name.
- Click Join.
The screen images shown here were captured in Chrome on Windows 11; you may see differences in appearance (and possibly behaviour) on other platforms.
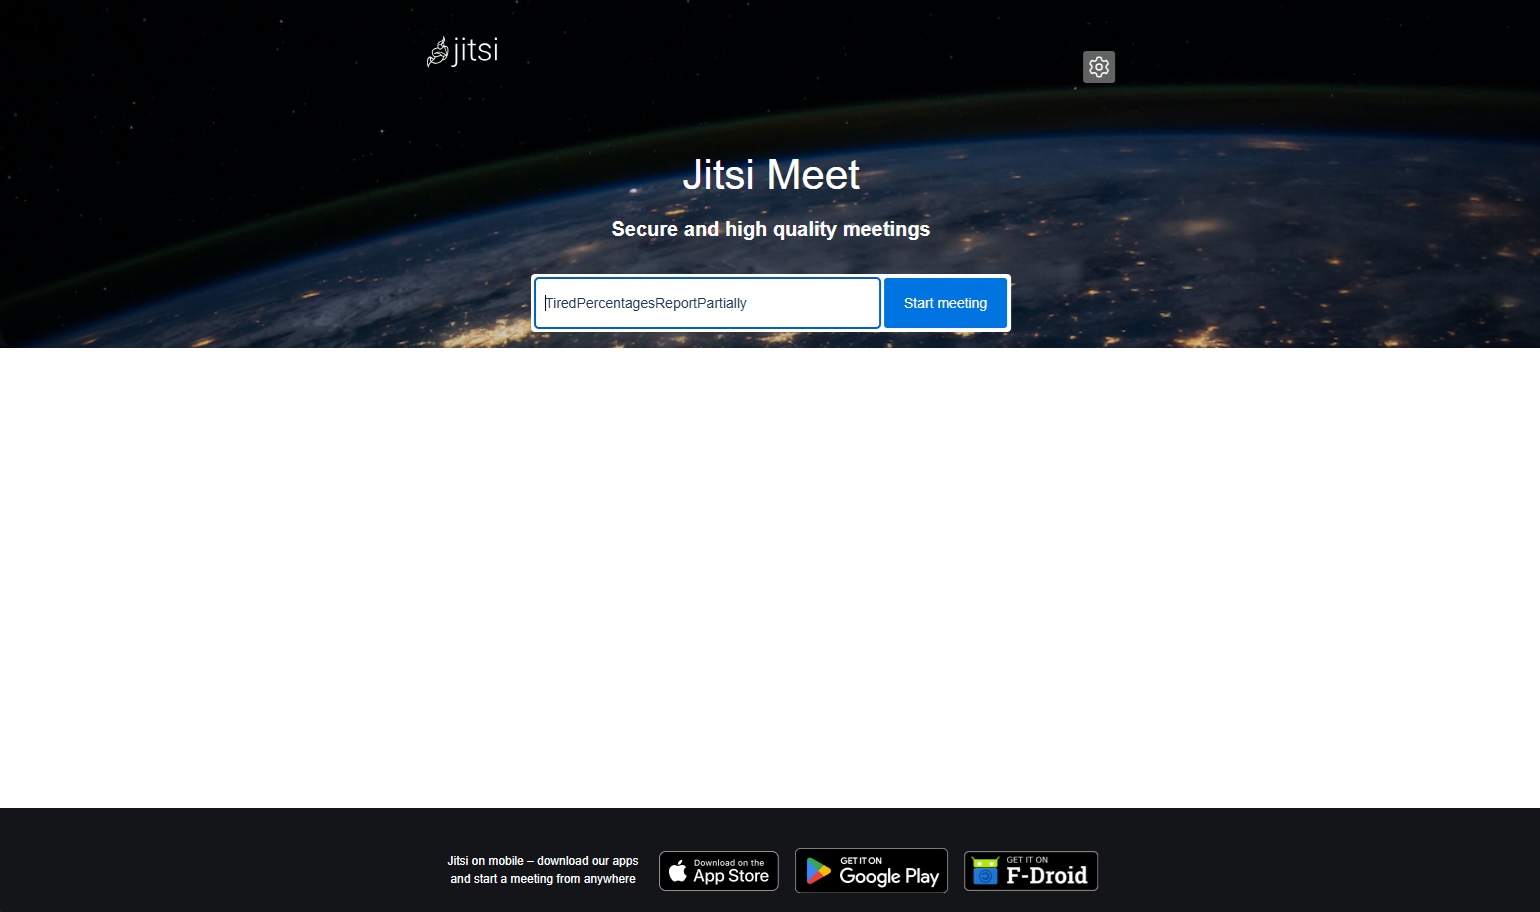
Each Jitsi meeting is identified by four words, which also make up the URL. These persist, so the same link can be used for regular meetings. The Join meeting screen shows these words, along with configuration tools and a device status message:
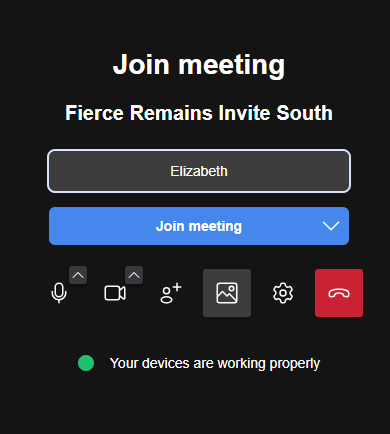
If you should arrive in a meeting before the moderator has started it, you will see the message below:
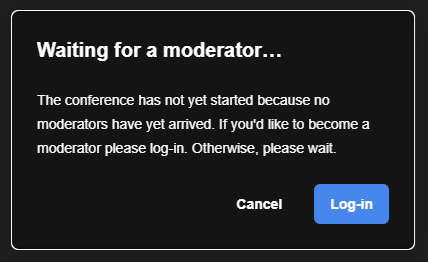
Simply wait, and you will be automatically joined to the meeting once it begins.
If you are the moderator starting the meeting, click Log-in, and enter your Hub credentials. Next you will be asked to choose which Circle the meeting is for, see example below:
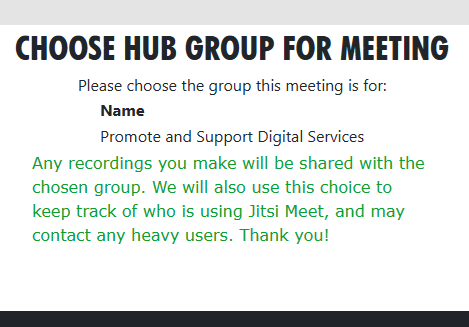
Note the message about recordings, then click on your choice of Circle (here only Promote and Support Digital Services is shown) and you will be returned to the Join meeting screen (but this time as a moderator). Click Join meeting again to start the meeting - if participants are waiting they will be added to the meeting too.
Note that a meeting can have more than one moderator; you can take on this role by opening Settings (on the More actions menu - three horizontal dots), choosing the Profile section, and logging in.
Typical controls in a meeting
Once in the meeting, the screen should look similar to the image below. Here the Chat window has been opened, showing the standard message that there is a 180 minute limit on all meetings (this is configurable, should it be necessary).
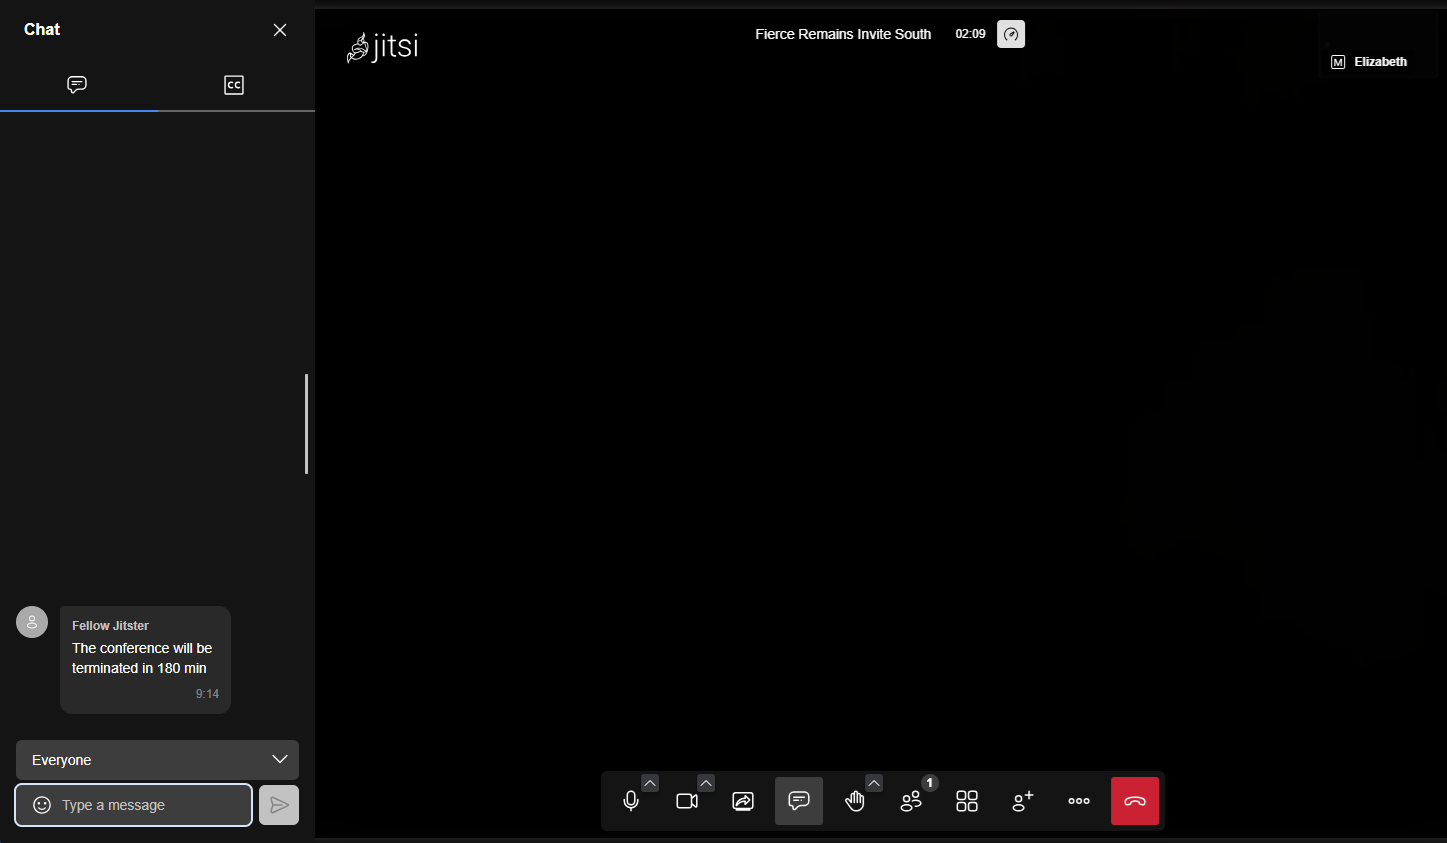
To turn on Closed Captions (subtitles), note the 'CC' symbol at the top right of the Chat window. Click on this to see the option to start subtitles, shown below.
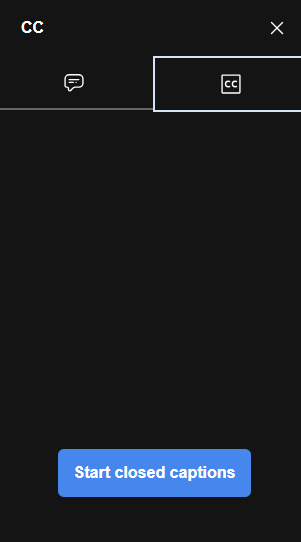
Click Start closed captions, but note that sometimes it may take a couple of minutes from the start of the meeting for the functionality to be ready. Usually you will see a message in the chat to this effect, and another message when subtitles are ready. Once you see the second message, a moderator will need to click the "Start closed captions" button, and then words spoken by any speaker from then on should appear as subtitles in the CC tab of the Chat window, as shown below.
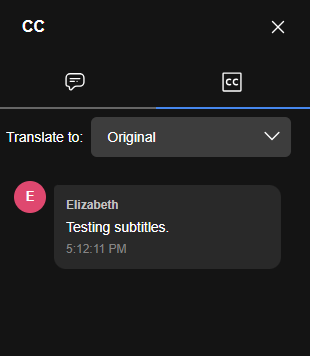
You can switch between the Chat tab (speech bubble icon) and the subtitle tab (CC icon) as required, during the meeting. You may notice the subtitle text correcting itself as people speak, this is expected functionality.
Control Functions
In the image above, from the left, you can see the following controls:
- Microphone - mute/unmute audio
- Camera - enable/disable video
- Share Screen - present your screen or window
- Chat - send messages to participants
- Raise Hand - notify the host you wish to speak
- Participants - view attendees
- Grid view - change the way participants are arranged on your screen
- Add participants - invite others to the meeting
- ⋯ More Actions - (see below)
- End meeting - leave or end the meeting
The image below gives you an idea of the options available on the More Actions (three horizontal dots) menu.
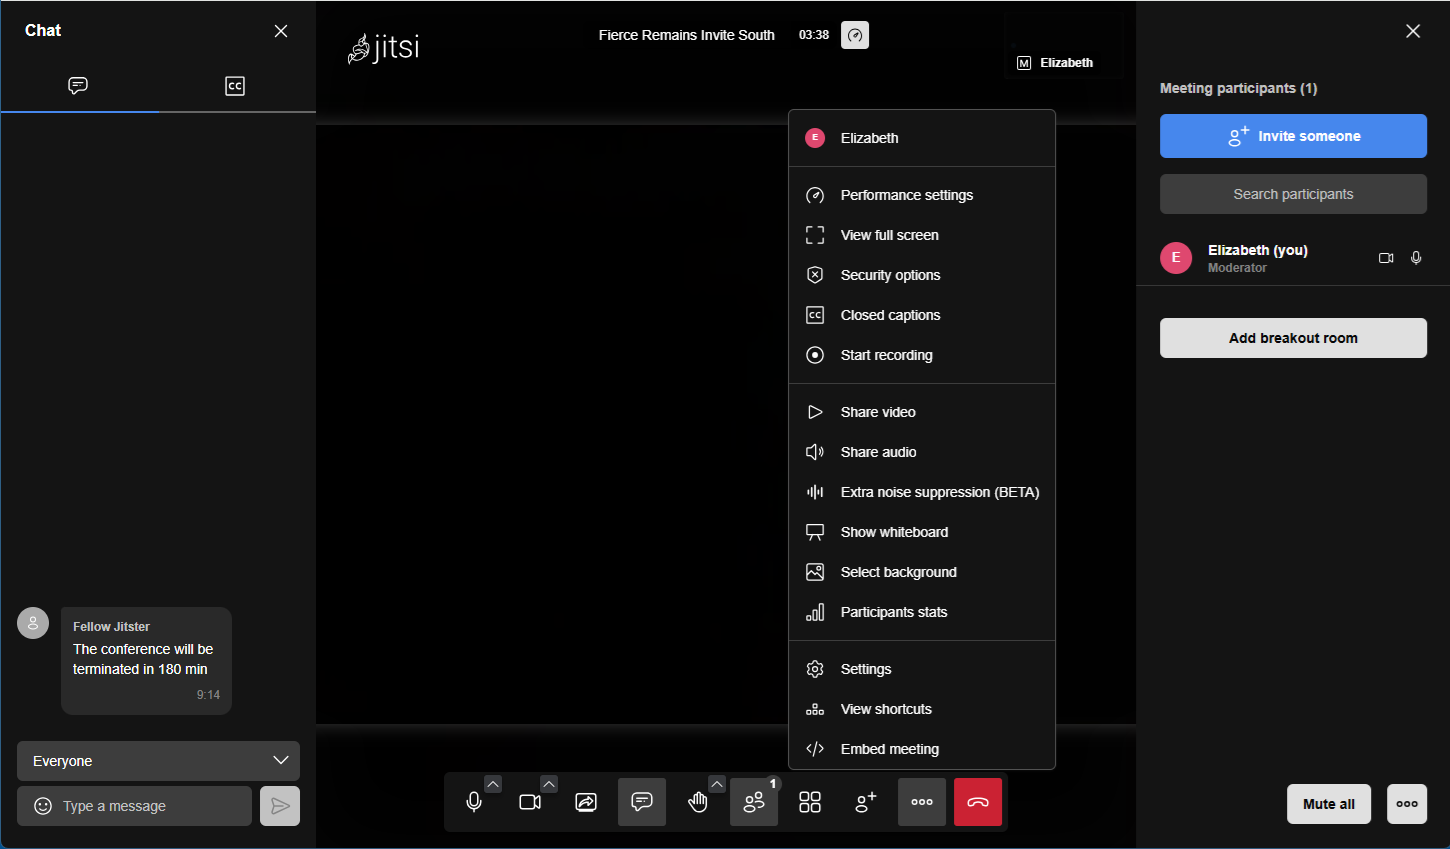
Jitsi automatically highlights the active speaker and shows participants in a grid or tile view.
Please use the mute button!
We strongly recommend that all participants mute themselves when not speaking - not doing this can cause problems with audio, and may take you out of the stack if you use the raise hand button.
Mobile phones
On a mobile phone you will need to rotate the screen (into landscape mode) to see the subtitles (or chat) at the same time as the people.
Also, if you don't need subtitles, consider using the app. You'll need to paste the whole meeting link (starting with https://meet.extinctionrebellion.uk/) into the app, not just the four words that make up the meeting ID.
The app allows you to screen share from mobile, and is a bit faster and therefore more stable. However, at the moment, subtitles don't work, so if you need subtitles you will need to use a browser as usual.
Inviting Participants
- Click Invite People or the information icon ().
- Copy the meeting link.
- Send the link through email, chat, or calendar invite.
Participants only need the link to join. The link to set up Breakout rooms is visible in the Participants view.
Chat During Meetings
Steps:
- Click the Chat icon.
- Type your message.
- Press Enter to send. Messages are visible to all participants in the meeting.
Screen Sharing
Both hosts and participants can share screens depending on instance settings.
Participant Management (Moderators)
Moderators can:
- Enable subtitles (see above)
- Mute participants
- Remove users
- Lock the room with a password
- Enable waiting room
- Start recording or streaming
These controls appear in the Participants panel or More Actions menu.
Basic Settings
Access via More Actions → Settings.
Available settings usually include:
- Display name
- Audio device selection
- Camera selection
- Language
- Background blur/virtual background
Ending the Meeting
To leave:
- Click the red hang-up button
- Close the browser tab
Moderators may optionally end the meeting for everyone:
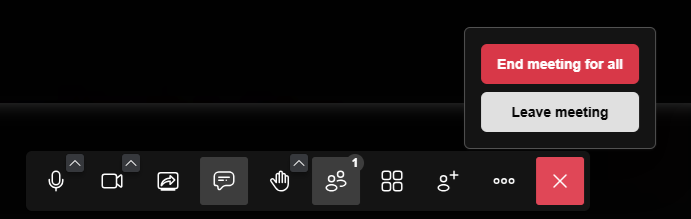
Common problems
Sound
If your sound is not working (especially if nobody can hear you), there are several things you can try.
Please make sure that:
- The browser is allowed to use the microphone.
- The web page is allowed to use the microphone (usually in the address bar).
- You are using the right audio input (try each possible input, either with the up arrow next to the microphone icon, or using the Settings page).
- Audio is not muted at the system level (e.g. on Windows, look for a crossed-out microphone in Control Panel sound settings).
- If necessary, restart the browser and/or reboot :(
Also, as above, please mute yourself when not speaking.
If this does not make sense, or you still can't get it working, please contact us!
Other problems
There is a list of common problems with Jitsi Meet and how to fix some of them on the known issues page.
Otherwise please contact tech support! Please use this checklist if possible when reporting issues with Jitsi Meet, which explains what we will need to know to be able to help you, and also explains some common problems.
Jitsi Meet vs Big Blue Button
Advantages of Jitsi Meet over Big Blue Button:
- Subtitles work, even if somebody is on a mobile phone.
- Subtitles are more secure and easier to set up than on Big Blue Button (with BBB you should use local captions if possible).
- Screen sharing works on mobile if you use the app.
- Does not require emailing XR Global to get an account, you can use your Hub account.
- Calendar on the Hub (see below).
Disadvantages:
- You need a Hub account to start a meeting in Jitsi Meet.
- Big Blue Button has better background blur/background replacement.
- XRUK's Jitsi Meet is a work in progress, especially the documentation, but we consider it stable enough to use for regular meetings.
- 2 minute delay from the first person joining until subtitles start working.
- Recording works, but you'll need to contact us within two weeks to get the recording file, or use the record to local file option (lower quality). We are working on this.
- Polls are turned off due to issues with mobiles.
- Subtitles work on a browser on mobile but not on the app on mobile; this is being worked on.
- It seems to be less stable than BBB with slow connections.
- We have had some stability issues more generally (mostly people's video freezing, occasionally people getting kicked out), we are working on it but it is significantly improved already.
In general, Jitsi Meet provides both security and accessibility at the same time, unlike Big Blue Button (which is secure as long as you don't use subtitles, and isn't accessible if anyone is on a phone) or Zoom (which isn't secure for XR purposes). So we hope most circles will eventually move their regular meetings to it. But there are some minor drawbacks, so some circles may wish to continue using Big Blue Button. Either is preferable to Zoom!
Note that meet.extinctionrebellion.uk is hosted by XRUK. There is also a separate XR Global Jitsi Meet which does not have working subtitles, and even a public site (which does not have subtitles either). We suggest you use ours!
Security basics for Jitsi Meet
You need a Hub account to start a meeting in Jitsi Meet.
Once a meeting has started, anyone can join: they do not need a Hub account. However you can control who joins the meeting by enabling the lobby, as in Zoom. You can also login after joining the meeting from Profile under Settings (on the menu), which will make you a moderator. You need to be a moderator to enable the lobby, to mute other people or remove people, to enable closed captions, etc.
While you can technically pick any meeting name, please use a randomly generated name by e.g. clicking on meet.extinctionrebellion.uk, starting a meeting, and sharing the link. Otherwise if you use a guessable meeting name you will need to enable the lobby and/or put a password on the meeting, every time you start the meeting. Thanks!
Note that a meeting ID (room name or unique meeting link) belongs to an XRUK circle. Once a meeting ID has been assigned to a circle, only people in that circle can start the meeting. However once it has been started, anyone can join (unless you set a password or enable the lobby).
Scheduling on the Hub
You can see current and scheduled meetings that belong to your circle on the Hub, on the Meetings page for your circle. If you join the meeting through the Hub, rather than just clicking on the meeting link, you are automatically logged in and made a moderator.
Group Admins can create or schedule meetings (e.g. to recur weekly). The Hub can also provide reminders on your Mattermost channel if you use Mattermost.
In the near future, we will use this information to try to ensure that the subtitles backend is available by the time a scheduled meeting starts, so that subtitles work immediately if the first person to join needs them, rather than having to wait the usual 2 minutes for the backend to boot up. However if a meeting starts on the hour we will not start subtitles up until the start of that hour, for cost reasons.
Your data and how to help us
Digital's servers (and sysadmins) know who is using Jitsi Meet, both which Hub account created the meeting, which circle they said the meeting is for, who joined etc. We will keep this information private, and delete it regularly, but we may reach out to you if you use Jitsi Meet regularly, especially if your circle is a heavy user.
We do not routinely keep transcripts, and any recordings you make will be shared with your circle on the Cloud, either manually on request (within 2 weeks!), or in future, through an automatic process. We will update this section soon.
If you need tech support, or have any feedback on what works and what could be better, please contact Digital.
Zoom
The basics of participating in XR Zoom meetings
Important Info
Zoom isn't secure as can give access to recordings, chat and live transcripts to the authorities. If discussing anything sensitive or spicy, don't add personal information to the chat and if you have the Closed Captions running, be aware that the Live Transcript will record everything that's said during the meeting which people can then save.
Comparing Zoom and the Big Blue Button
A short presentation comparing Zoom and Big Blue Button is available here
Using Zoom in a Session
When in Zoom, how do I mute myself / unmute and manage other Zoom settings?
Once logged into Zoom, you will want to ensure you are muted unless you are speaking.
See below image of the settings available in Zoom

In the above image you can see the Mute button on the bottom left-hand side of the Zoom meetings control panel.
- Mute myself - click the Mute icon to ensure you are muted.
- Unmute myself - click the mute button again to unmute.
- Turn camera on - click on the Start Video icon (when clicked you should be able to see yourself).
- Turn camera off - click on the Start Video icon again and you will no longer see yourself in the meeting and the video icon will be striked through with a red line.
Notes on when to keep yourself muted
- You need to be on mute unless you are asked by the Session facilitator to unmute. This is because background noise can cancel out the speaker's voice.
- In XR we use hand symbols to communicate to save ourselves speaking over one another, especially when there are many attendees (more on this later :))
When should I turn my camera off?
- Generally it is best to keep the camera on as this helps with engagement and feeling included, but do keep it off if that makes you more comfortable.
- There are times when it might be best to switch off, such as if you are eating or if something happens and it is not suitable for you to be on camera.
How do I write in the chat?
- Easy! - Click on the chat icon and a chat box will open either in the middle of your screen or on the right side of the Session window. In the chat box type the message you would like to send.
- You can use the arrow in the blue drop down box to select "everybody" or choose a name to send a privte message.
- Then click on the send arrow.
What must I do if I want to speak?
As mentioned earlier, to manage people speaking over one another, we have a method in XR for communicating whilst on Zoom and these are also used for in-person meetings - so, good to know!
- One finger up - means that you would like to speak/ ask a question.
Please note: - When you put one finger up to speak, you are added to a queue, as there may be a few people at one time who also want to communicate.
- Two hands up and wavy fingers- means that you are happy and in agreement with what has been said (this is the British Sign Language sign for 'cheering').
- Two hands down - means that you disagree or are unhappy with what has been said.
- Floating both hands in the middle centre-line means that you do not mind either way.


Getting started on Zoom and troubleshooting
Please consider alternatives first!
We are trying to move away from Zoom for various reasons (privacy, cost etc).
If possible, please use either:
- Our Jitsi Meet (you will need a Hub account), or
- XR Global's Big Blue Button (you will need to ask for an account)
If you have any difficulties with either, please contact XR Digital circle for tech support. Thanks!
Helpful YouTube videos on all things Zoom!
Tech support direct from Zoom
Zoom's technical support pages will always give you the most up-to-date information. If you need to learn the basics of using Zoom, go to their page Getting Started with Zoom Meetings.
Using Zoom on a computer- with Zoom installed
Downloading the Zoom app to your computer will give you more functionality than joining a meeting directly in your browser. There are two ways to join a meeting:
- Via a link Just click the link to join the meeting.
- Via a Meeting ID and passcode In your web browser, go to zoom.us/join. Enter the meeting ID provided by the host/organizer and click Join.
Then do ONE of the following:
- Launch the meeting on the Zoom app (if you've already downloaded it).
- or Click Cancel in the pop-up window, then click Download Now to download Zoom before joining.
- or Click Cancel in the pop-up window, then click the Join from Your Browser link (if you do not want to download Zoom before joining the meeting).
Using Zoom on a computer- via a web browser
- Click the meeting invite link you received from the host (the session facilitator/ person who invited you), for example in your email or calendar invitation.
- On your web browser (open up a new page from your internet browser, i.e. click on either Chrome, Firefox etc), a pop-up window will prompt you to open or download the application.
- In the pop-up window, click Cancel (do not download Zoom).
- At the bottom of the page, click the 'Join From your Browser' link.
Note: If you don’t see the link to join from the browser, the host may not have it enabled and you will have to join the Zoom Session by opening the Zoom client (app) or downloading it first. - In the pop-up window at the top-left corner of the screen, click Allow to allow Zoom permission for your microphone and camera.
- In the Your Name field, enter a display name.
(Optional) Select the Remember my name for future meetings check box. - Click Join. You will join the Session as a guest.
Using Zoom on a phone
If you want to join a meeting from an Android or iOS device, you must download the Zoom mobile app.
- If prompted, allow Zoom to use your microphone and camera.
- Enter a display name, then click Join.
- In the Your Name field, enter a display name.
- (Optional) Select the Remember my name for future meetings check box.
- If prompted, enter a meeting passcode, then click Join again.
Problems or Issues
The Zoom link is not working
This could be down to a number of reasons:
That you have pop-ups blocked.
- To fix this you need to go to the settings of your internet browser and is usually the same for all, look for 3 dots on the top right-hand side.
- Then click Settings → then Privacy and Security (Chrome) or Cookies and Site Permissions (Edge) and search for pops-up.
- Once you have found the pop-ups setting, click to allow pops-ups.
Try restarting and refreshing your computer.
Clear cache or browsing data
- Settings → Privacy, Search and Services → Clear browsing data (Edge)
- Settings → Privacy and Security → Clear browsing data (Chrome)
I cannot find the email for the Zoom Session for which I registered.
- Search for ‘XR' in your Spam folder.
- Find out if you have an issues recieving event emails.
- Register again - usually the link in on the thank you page and you can click from there.
Zoom Controls
When in Zoom, how do I mute myself / unmute and manage other Zoom settings?
Once logged into Zoom, you will want to ensure you are muted unless you are speaking.
See below image of the settings available in Zoom
In the above image you can see the Mute button on the bottom left-hand side of the Zoom meetings control panel.
- Mute myself - click the Mute icon to ensure you are muted.
- Unmute myself - click the mute button again to unmute.
- Turn camera on - click on the Start Video icon (when clicked you should be able to see yourself).
- Turn camera off - click on the Start Video icon again and you will no longer see yourself in the meeting and the video icon will be striked through with a red line.
Notes on when to keep yourself muted
- You need to be on mute unless you are asked by the Session facilitator to unmute. This is because background noise can cancel out the speaker's voice.
Zoom Advice - Hosting Meetings
Make a plan
- Send out calendar invites to everyone you expect to be on the call. Think about adding a meeting agenda so everyone understands the topics you'll cover and the order you'll discuss them.
- Consider Security. Is Zoom the right platform to be using for your meeting? If security of the participants is important then consider using Big Blue Button. This short presentation will help you decide on the right tool: Zoom and BBB comparison.
- Consider online safety - simple, practical guidance here.
Plan a rehearsal
- Try to schedule time with your presenters and stakeholders before the event to do a dry run. If you’re sharing slides or other documents during the call, load them all onto the host’s computer.
Set up early
- Give yourself plenty of time to set up your equipment and make sure everything works. Open documents you want to share before the meeting starts. Test any links you may want to open during the meeting beforehand. Don't forget to close any applications you won't be using.
Recruit a co-host
- If you’re the primary presenter as well as the host for a large audience conference call, you’ll want to enlist the help of a facilitator or co-host. This will give you an extra set of hands to help with any technical issues your attendees may experience. A co-host can also watch the moderator controls to make notes of any participants asking a question via chat and take care of administrative tasks, like muting participants or recording. To make another meeting participant a co-host, click 'Manage Participants' in the meeting controls at the bottom of the Zoom window, choose 'More' next to their name, and select 'Make Co-Host.'
Send a welcome message to attendees
-
If you’d like participants to use chat or other interactive features during the meeting, send them an email with welcoming instructions. You may also want to remind attendees to turn on their cameras and that they’ll be muted upon entry to the meeting.
-
If you want to re-send this email at any time, there are instructions here.
Mute participants upon entry
- Take action before the meeting starts to prevent disruptive noisy feedback when someone joins your meeting by muting all participants upon entry. You can allow participants to unmute themselves once they’re in the meeting. To enable this feature, click 'Manage Participants' in the meeting controls at the bottom of the Zoom window. Click 'Mute All' or click the drop-down menu next to 'More' and select 'Mute Participants' on Entry.
Prepare a greeting slide
- Let participants know that they're in the right session by making a welcoming Google slide or PowerPoint slide visible to them when they join the meeting.
Consider recording
- Recording your sessions enables you to reach others who couldn't attend. It also gives attendees a way to review the content that was covered.
More tips for a seamless zoom session
How to enable closed captions
- Anyone who is D/deaf or partially deaf will need these running from the start of the session, so turn this on before the session begins.
- At the bottom of your screen, select closed CC/Live Transcript.
- You or participants can always Hide Subtitles if you don't want to see them. Alternatively, once everyone has arrived, ask participants whether anyone wants them running. If they are not required, they can be turned off.
- You need to be the host to turn CC/Live Transcript on or off.

How to admit participants from Waiting Room / How to unlock it
- Once you have opened the session, pop up messages at the top of your screen will tell you that participants are in the Waiting Room. To let them into the meeting, click on “Admit”.
- Once you have started the session, you can allow late arrivals to jump straight in, rather than going to the Waiting Room. To do this,
- click on Participants
- select the 3 dots at the bottom right
- select 'Enable Waiting Room'.
- This will disable the waiting room and allow people to join without you having to Admit them individually. NOTE - this option will only work if you have created a Zoom registration link and selected both Passcode and Waiting Room when you created the Zoom meeting.
How to screen share
You may use this function to show slides etc but you will not be able to see your script
Watch Zoom support video on screen sharing
How to create break-out rooms
- Click on the Breakout Rooms icon on the bottom bar of Zoom
- Choose how many people can go into each room (3 or 4 is a good number)
- Click ‘automatically’ to let Zoom select participants at random to go into different rooms.
- Select a time e.g. 5 minutes.
Watch Zoom support video on use of breakout rooms
Creating Zoom events which require registration
If you’re planning to hold and advertise a meeting on Zoom please ensure that the meeting is set up securely to avoid unexpected guests.
See guidelines below on how to set up a recurring registration Zoom link or watch the support video for advice on how to:
- Create one Zoom registration link for multiple events,
- Edit the events (time/date),
- Add more events to the same link,
- Add a description for your event and brand it with an image and logo.
- Create a short link for your Zoom registration link to add to your publicity.
- Publicise your events across XRUK and XRGlobal.
To create a Zoom link which requires registration:
- Sign in to your Zoom account using a web browser: https://zoom.us
- In the navigation menu, click Meetings.
- Click Schedule a Meeting or edit an existing meeting.
- In the Registration section, select the Required checkbox.
- Click Save.
After scheduling the meeting, the Registration, Email Settings, and Branding tabs will appear.
To create a recurring Zoom link so you can use one Zoom link for multiple events:
- Sign in to the Zoom desktop client or via a browser: https://zoom.us
- On the Home tab, click Schedule. This will open a new window.
- Below the Time Zone option, select the check box next to Recurring Meeting.
- Edit the following recurrence options:
- Recurrence: Choose to have this repeat Daily, Weekly, or Monthly.
- Note: Scheduling a No Fixed Time recurring meeting must be done through a web browser.
- Repeat every: Choose how often the meeting should repeat, such as every 2 days, every 3 weeks, every 6 months. The Weekly recurrence option will also provide the ability to select which days of the week to repeat on.
- End date: Choose when to end the recurring meeting series. Choose 'By' to select the date for the recurring series to end, or 'After X occurrences' to choose how many recurrences in the series to create.
- Edit other meeting options as needed.
- Click Save
Extra info: click here
Rebel Toolkit
Searching the Rebel Toolkit
The Rebel Toolkit has a search function available from the box at the top of every page, or, on narrow screens, from the menu. Below is an example of this.
Search : nonviolent direct action
View result here - this picks up part of the RT where any of those words appear.
Contributing to the Rebel Toolkit
The Rebel Toolkit design, structure and style is managed by the Rebel Toolkit team, but the content is a collaborative piece of work. Many XRUK circles maintain and update their own content. Also any individual, community or local group could submit content to be woven into the appropriate book. More information can be found here.
Protect yourself from 'phishing'
Be more aware of ways hackers and scammers try to gain access to data by email, text, phone, WhatsApp etc.
NOTE: The world of spam emails and in particular email phishing is constantly evolving, but it's better for us to offer some advice rather than none.
What is phishing?
The practice of sending fraudulent communications that appear to come from a legitimate and reputable source, usually through email and text messaging. The attacker's goal is usually to:
- gain access to your email address and password.
- to install malware on your phone/computer.
- to steal sensitive data from you or your organisation.
- gain your bank or card details to be able to steal money.
How to protect yourself from phishing
If you come accross better video or written guides than we have here, please contact the Digital team with your suggestions.
How to Recognize a Spam & Phishing Emails
1. Examine the Sender's Email Address:
Spammers often use: Strange, misspelled, or unfamiliar email addresses. They might also spoof addresses to appear legitimate.
Legitimate addresses: Typically use the company's domain after the "@" symbol (e.g. info@example.com). A spammer might use info@exampie.com or info@example.co
2. Review the Subject Line:
Spam subject lines: Often use excessive capitalization, promise unrealistic offers, or create a sense of urgency.
Be wary of: Subject lines that are too vague or seem overly promotional. Examples include "Urgent! Update your information", "Get paid today!" or "Don't delete! You won a prize!".
3. Check for Errors in Content:
Grammatical and spelling errors: These are common in spam emails, especially those sent from non-native English speakers.
Generic content: Spam often uses broad, impersonal language and lacks specific details.
4. Look for Suspicious Links:
Hover over links: Before clicking, hover your cursor over the link to see the actual destination address. Be cautious if it's different from what you expect.
Avoid unknown links: Don't click on links from unknown or untrusted senders. Unusual requests for financial transactions, login details and requests to install software should be approached with extreme caution.
5. Requests for Personal Information:
Legitimate companies will not ask for your personal information, such as passwords, credit card details, or Social Security numbers, via email.
6. Be Wary of Attachments:
Unknown attachments: Avoid opening attachments from unknown sources, especially if they are unfamiliar file types like .HTM, .HTML, .EXE, or .PDF.
7. Offers That Seem Too Good to Be True:
Be wary of offers that sound too good to be true, as they are often used to lure you into a phishing scam.
8. Contact the Organization Directly (If Needed):
If you're unsure about a legitimate message, contact the organization directly via their official website or known contact information.
Don't respond to the email: If you suspect it's a scam, don't reply or click on any links.
Artificial Intelligence (AI)
Should I use AI for this?
Advice From XRUK Digital Team, January 2026
There are serious problems with Artificial Intelligence (AI). Read on if you are considering using AI for XRUK.
AI has environmental and ethical costs. Before considering how to use it safely, consider whether to use it at all. There are technical considerations too - assume anything you give it could be stored, exposed, or used to identify you or others. It also lies, sometimes by design.
This advice is about public AI services, whether free, or paid-for, which you can choose to interact with.
This advice is when, how and even if you should use AI in XRUK.
What is AI?
AI is the buzzword for computers simulating human comprehension, problem solving, decision making and creativity.
AI learns by analysing whatever information it finds on the internet and the way people interact with it.
There are software applications enabling anyone to chat with AI using a “chatbot” but many other applications use AI without us being aware.
Concerns about using AI
Ethical
Please follow the Pull the Plug campaign for much more on this.
- Energy and water use at the data centres, especially during AI training.
- Cultural bias e.g. white supremacy and capitalism.
- Automation of work will be used to dismiss many workers.
- AI development relies on low-paid workers globally to moderate content and refine outputs
- Almost all AI is purely profit driven for the few.
- Danger of untested and proven unsafe AI becoming integrated into our lives.
Security and risks to our work
- Platforms can track use and analyse content, and sometimes identify who is making a search
- AI can learn from the information provided to it
- XR work could leak, or be used to support prosecutions for intent or conspiracy
Legal
- Sharing internal personal data with AI may breach Data Protection law
- AI does not respect copyright.
- Processing any personal data needs to be legal, justified and transparent.
Accuracy
- AI is not reliable.
- AI can be used for trickery, fake facts (i.e. lies) and to impersonate a human.
Things to take in to consideration before using AI
- Can you reasonably do the work without using AI, if so what is the justification which balances the concerns above?
- Be careful what AI could learn. What could AI infer from your questions or information? And what if they knew all the questions everyone in XR was asking?
- How can you trust the outcomes to be fair, full and truthful? Check AI outputs for bias and completeness. If making decisions based on AI outputs – how can you check them in other ways?
- Have you permission to use personal or copyright material the AI has harvested or imitated? How do you record where & how you have got the information from? (XRUK has been threatened with lawsuits before about using copyright material. There are companies which specialise in making these threats.)
- Do not include any personal data in a query. Any information shared publicly or with AI must be completely anonymised.
- If we must use personal data externally – have we told people that’s how we are using their data and why, and did they agree to it?
- We still need justification for anyone’s personal data we hold in XR – even if the Internet or AI says its accurate and public. Talk with GDPR & Security about the data you want to hold, and do the data planning.
- If you think AI will help XRUK achieve its purpose – and you’ve considered points 1 - 6 above, then carry on. Check with GDPR & Security if you have any remaining concerns.
If you want advice about using AI in XRUK – please come to the Tech reception channel on Mattermost or reach out to tech@rebellion.earth
If you think you need to use AI for internal XR information, you could ask if Digital can run open source AI software. One example of this is the transcript & subtitling in our new Jitsi platform, running on our own servers – so we don’t leak meeting contents to Zoom (or whatever video meeting platform).