Social media guides
- Facebook Events
- Business Suite for Facebook and Instagram
- Bluesky
- Twitter / X
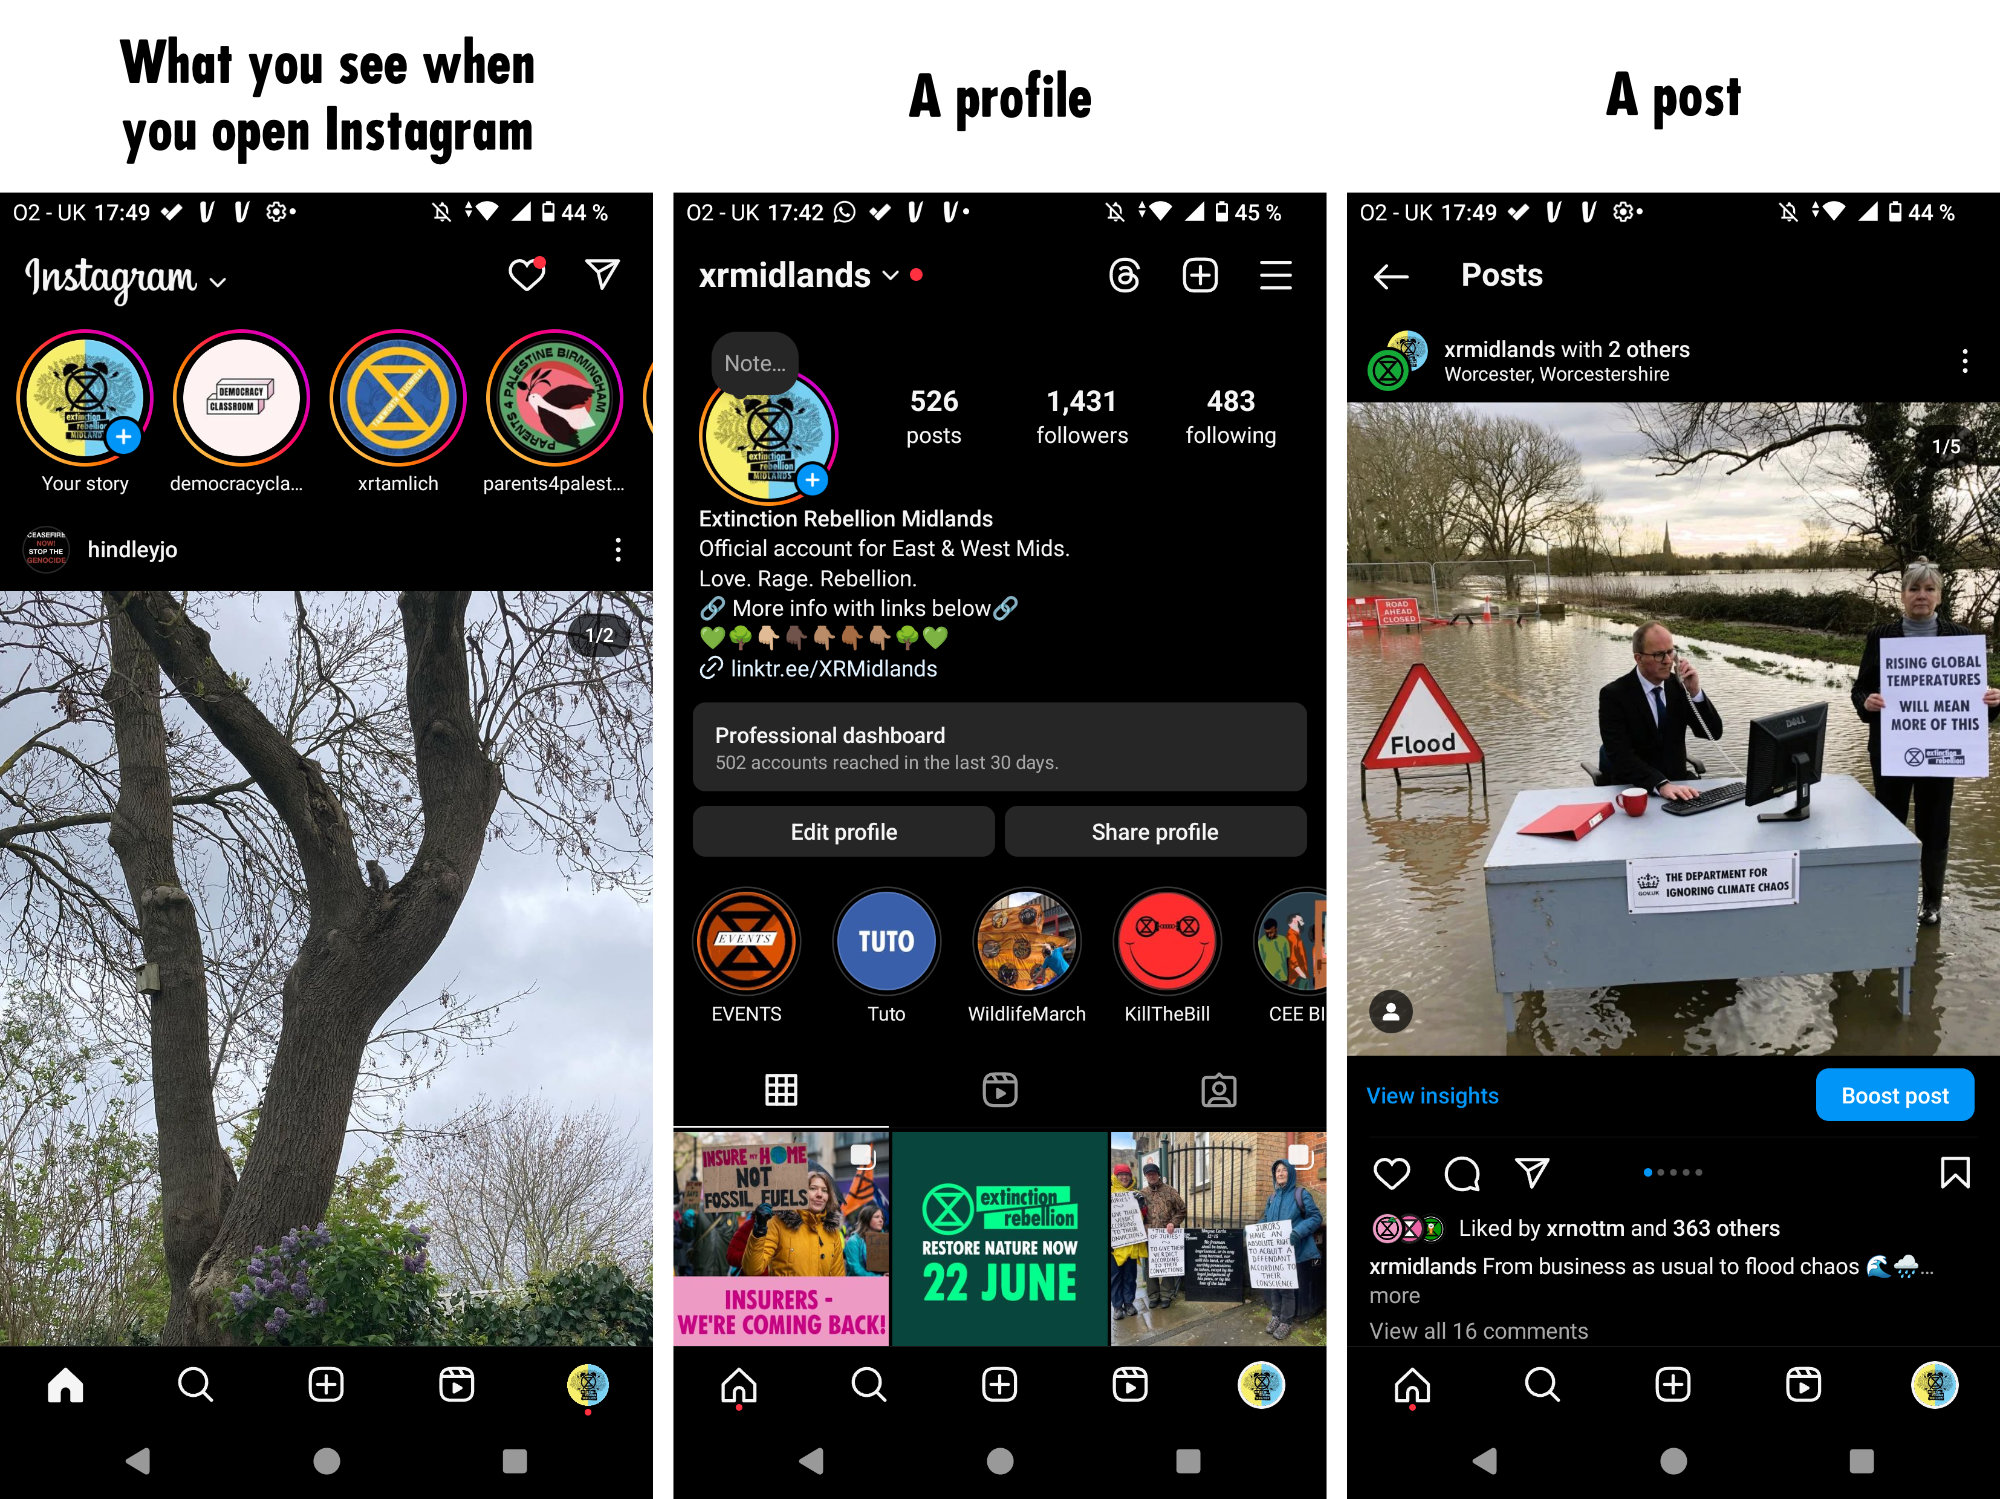
Instagram is a social media platform based on visuals (photos and videos). This page will detail everything there is to know about posting on Instagram, from the very basics to more advanced functions.
As a warm-up, here's what Instagram looks like:
Create a post
Read below for the detailed instructions or click here to watch a step-by-step video or scroll down to see some screenshots with basic instructions.
- Open the app on your phone
- Click the + button (either at the top of your screen or at the bottom in the middle)
- Take a photo or select one from your gallery
If your photo doesn't fit into the square format, click the double arrowheads symbol on the bottom left corner of your pic.
You can select more than one photo by clicking the square symbol underneath your photo, on the right hand side of your screen, next to the camera symbol. Once this function is activated, you can add up to 10 pictures to your post. Click on the ones you want to add in the order you want to add them to your post. Click again if you want to deselect one of them.
💡 When you add more than one picture, your post is then called a "carousel" because you have to slide laterally to see all the photos in your post. Carousels are valued by Instagram algorithm more than single photo post because spend more time on the app to watch all your photos. It's a good trick to get more visibility!
- Click the blue arrow on the top right hand side corner when you've chosen your photo(s).
- You can edit your photos if you want to (luminosity, saturation...). Move on by clicking the blue arrow again.
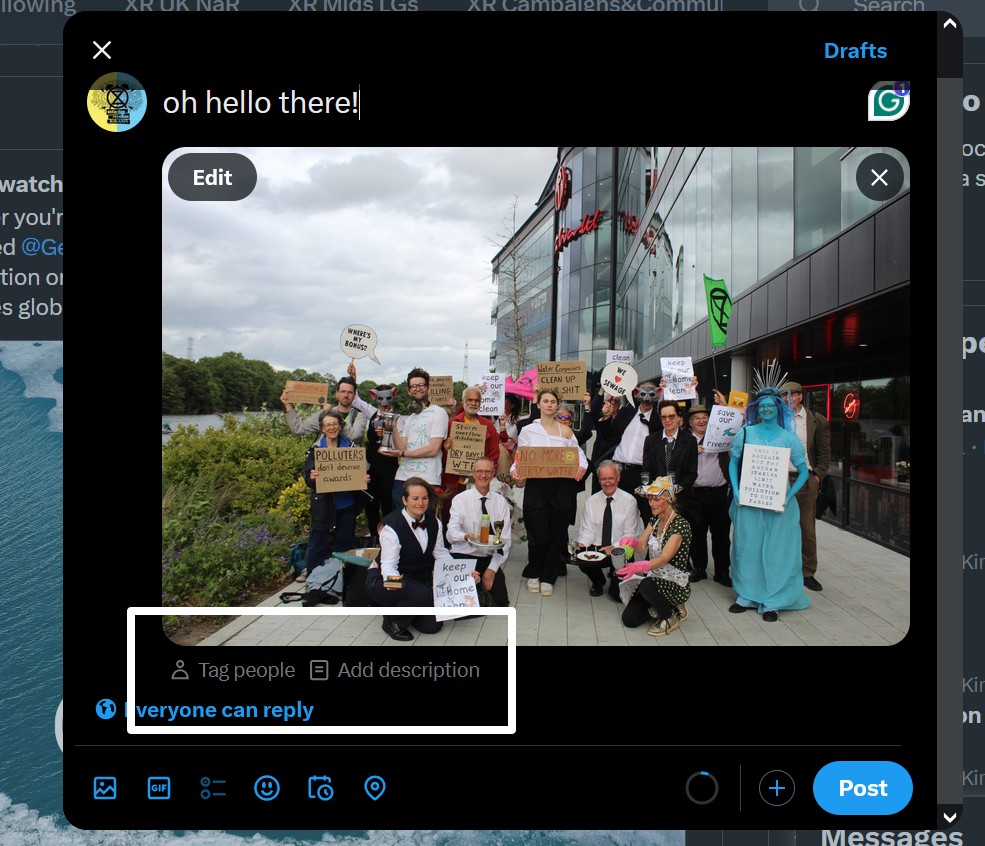
- Write the text for your post.
To help your post get more visibility, add some hashtags to it, preferably at the end so they don't make your text difficult to read. Pick hashtags relevant to your post.
For example: #ExtinctionRebellion #BetterWithoutBarclays (if it's an action against Barclays) #EndFossilFuels #ClimateAction
Don't invent hashtags! Try to use some that are already used by other people as they are more likely to be seen.
💡 Links are not clickable on Instagram, unless you put them in a story or in your profile.
- Tag other accounts
If you want to grab someone's attention, you can tag them on your photo. They will then get a notification and are more likely to see your post and share it.
- Add a location (if relevant to your post, completely optional)
How to make a simple post:

Read below or watch the step by step video.
A collaborative post will be shared on two Instagram accounts instead of one. It's not automatic: your request to collaborate on a post has to be accepted by the other account.
What's great about this option is that it'll give your post more visibility as it'll be shown to two communities. It's a good option if your local group is doing an action with another group. This way one person can get the Instagram post ready instead of posting separatly, so it can save you some time.
To create a collaborative post, do everything you would do for a regular post, then click "tag people or add collaborator". You'll see an option to either tag other accounts in the photo or "invite a collaborator".
Search for the account you want to add and invite them.
If it's the first time you're collaborating with someone, you can send them a private message beforehand as well so they are aware that you're going to send them a request and can accept it quickly.
Event reminder
Read below or watch the step by step video.
You can't create event on Instagram as you would on Facebook, but you can create a reminder for people to suscribe to.
Start by getting your post ready with all the info regarding your event (date, time, place etc.) then click "add reminder".
Write your event name and add the start time.
People seeing your post will also see a little insert at the bottom inviting them to suscribe to the reminder, and they will get a notification before the event start to remind them about it.
A story is a type of post that will exist for 24 hours then disappear.
Stories can be used to promote a regular post, to remind your audience of an event (for example: "We're meeting tonight at 7 PM"), for breaking news, for information you don't want to post permanently to your timeline, to interact with your followers etc.
You will find stories at the top of the Instagram app when you open it.
▶️ Watch the tutorial to learn how to create a story (2 minutes): https://youtu.be/uQk6AVo53_Q
This page will get you started with the biggest social media platform in the world.
📅 If you need help to create a Facebook event, please head here.
Landing page
This is the first thing you're going to see when you open Facebook on your computer (explanations below):

1. Logo & search bar
Wherever you are on Facebook, if you click this logo (white f in a blue circle) you will always come back to this page.
The search bar on its right will help you find pages, groups or events.
2. Stories
These vertical images are called stories. In fact, some of them might be short videos that will play once you click on them.
A story is a post that will stay on Facebook for 24 hours and then disappear.
3. Timeline
The top part of this area is dedicated to the creation of a post:
- click where it says 'What's on your mind' and write your text
- you can add photos or videos by clicking the green icon underneath
- then click the blue "post" button
If you're not here to post on Facebook, scroll down and you will see posts from your Facebook friends, from pages you follow and from groups you have joined.
4. Notifications & Profile
If you have new notifications, you'll see a red circle with a number inside.
💬 The speech balloon icon takes you to Messenger where you'll find your private conversation with other people.
🔔 The bell icon is for all your other notification, for example if someone wrote a comment on a post you created.
Last but not least, if you click on your profile picture (top corner on the right hand side of your screen) it will open a new menu with more options, as detailed below.
Menu
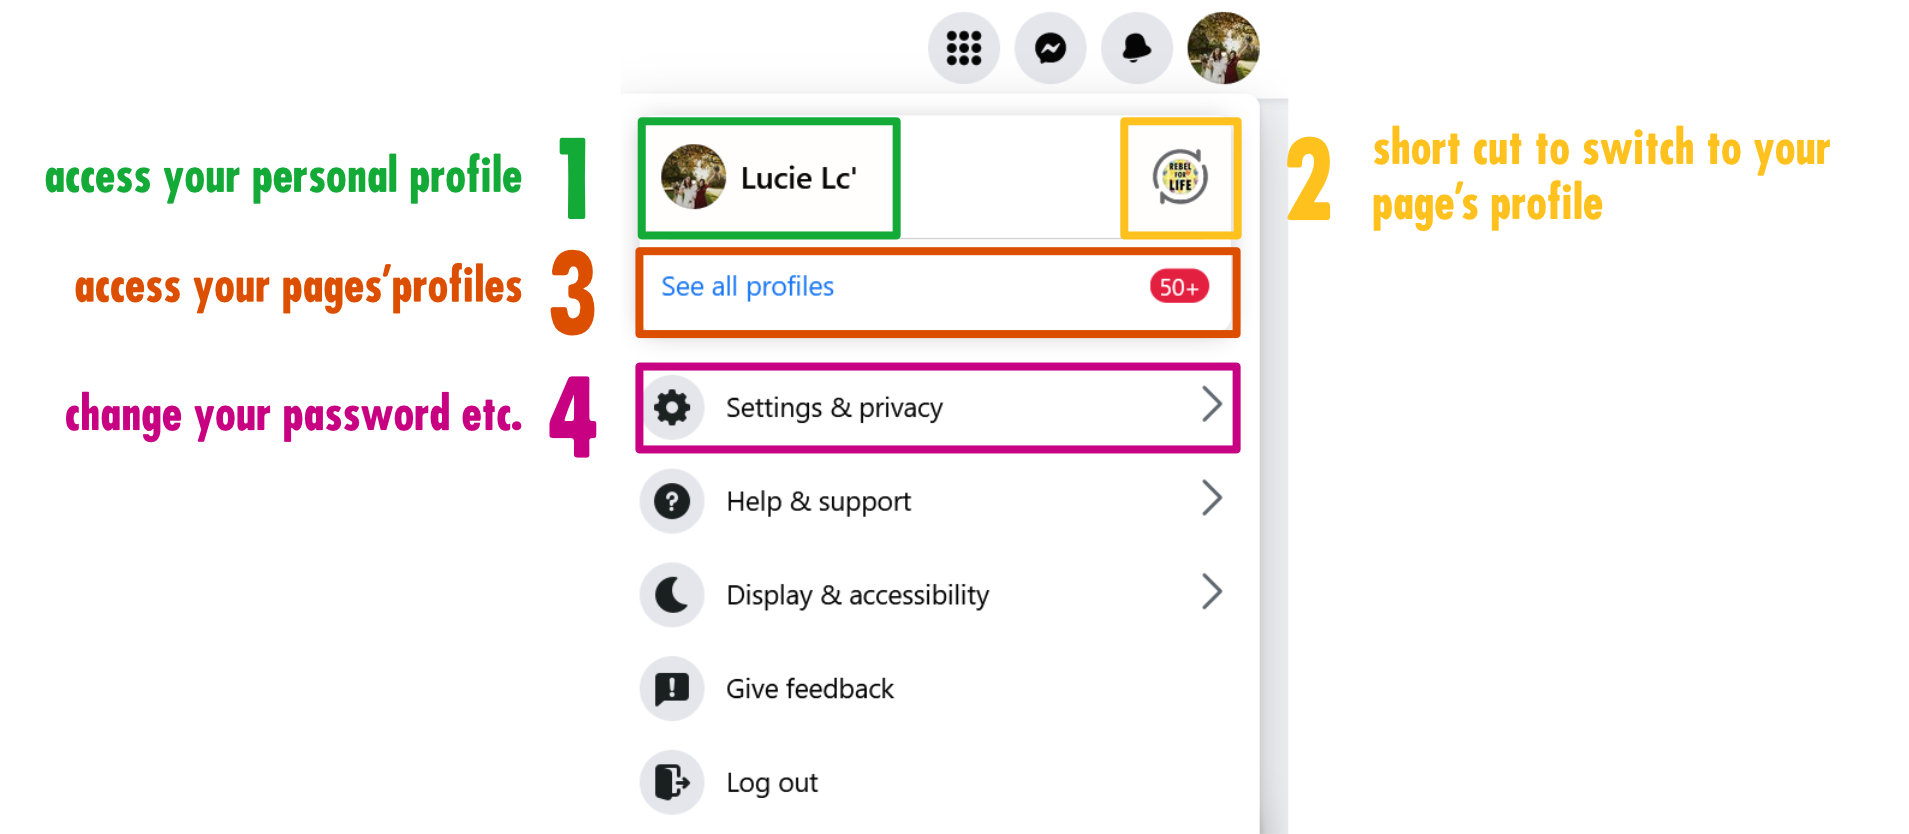
1. Access your personal profile
This is where you'll see your posts, your photos and videos...
2. Short cut to switch to your page's profile
If you have access to a Facebook page as an admin or moderator, click there to switch to your page's profile and "act as the page" (as well as on the page).
3. See all profiles
If you're an admin or moderator of multiple Facebook pages, you can switch between them by using this menu.
4. Settings & Privacy
⚠️ This is an important part: you can access various settings to protect your account (for example by setting a strong password), change the notifications you'd like to see etc.
Terms
We mentioned a few things that might not make sense for you yet. Here are a few explanations about what are:
- a personal profile
- a Facebook page
- a Facebook group
Personal Profile
On your personal profile you can change your profile photo, your cover (at the top), add a description about you etc. You can also create posts from there for your Facebook friends to see.

Some people don't like sharing about them on social media and that's fine. Just make sure to visit the settings and change them accordingly to how much you want to share (with your friends only, with your friends' friends, with any Facebook user...).
On the opposite, you might want to use your Facebook personal account to do some activism and be loud about things.
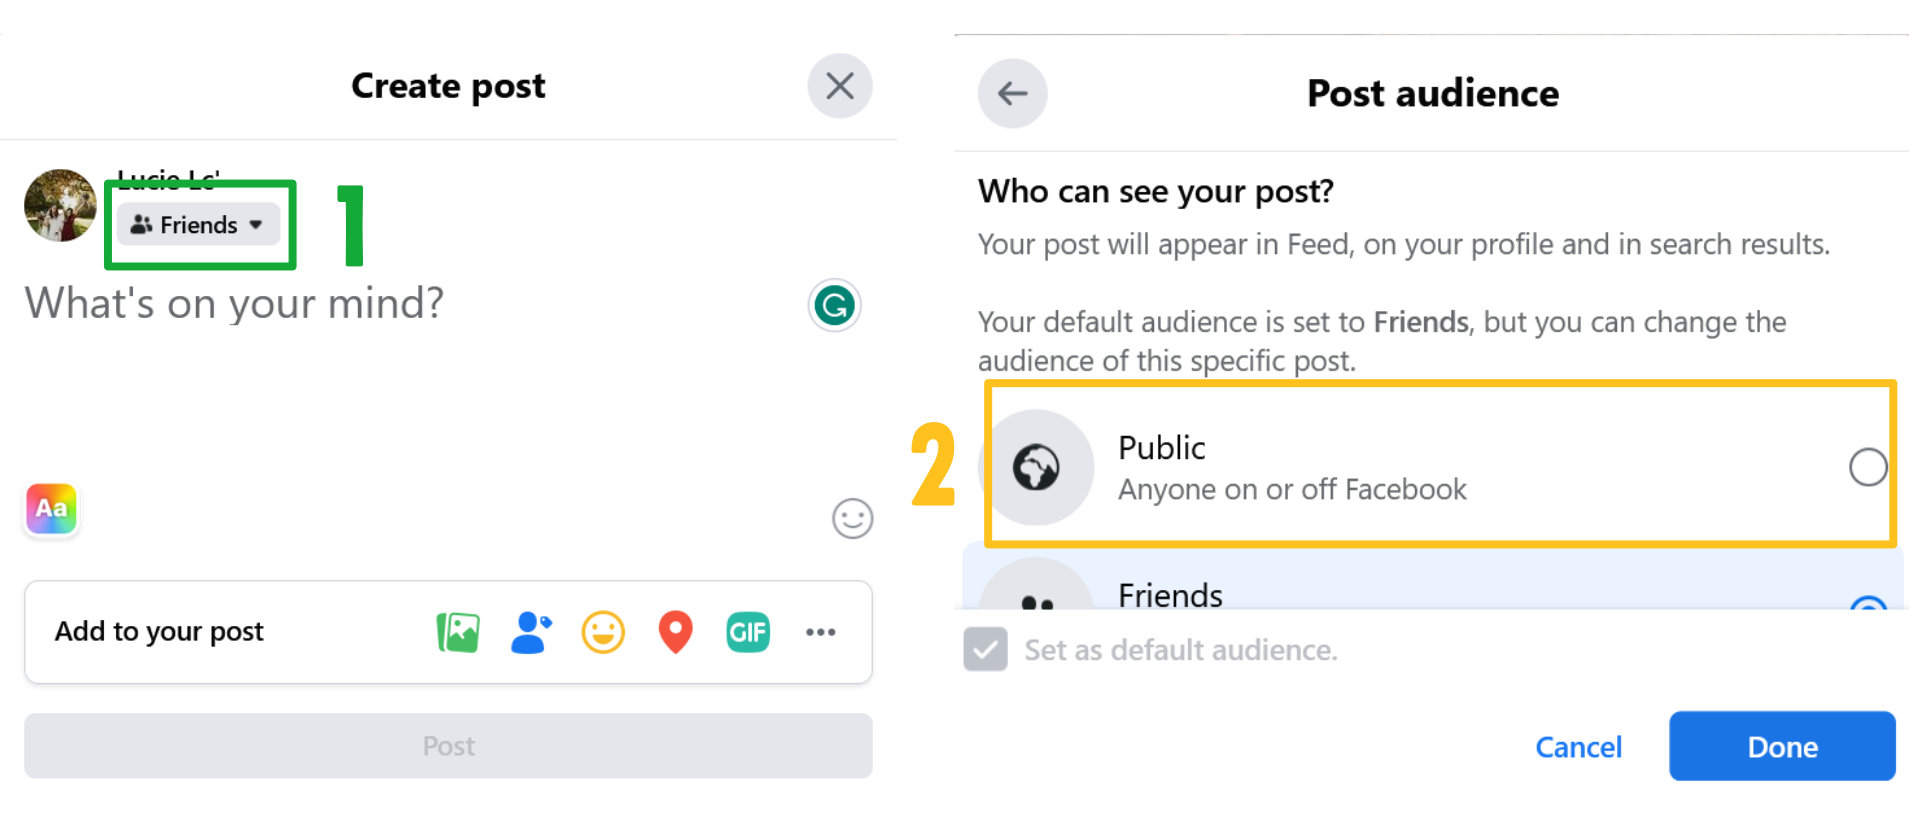
- Click the drop down menu
- Select the privacy option you'd like to apply
- public means that anyone visiting your profile, whether they have a Facebook account or not, will see your posts
- Facebook keeps in memory the latest setting you used, so be careful when you post that it's the appropriate one for the information you're sharing
Facebook Page
A page is like a display window for a business, an organisation, a club, a charity etc. Anyone can create a Facebook page to share their work.
A page is a public space (anyone can see it and read its posts) where the admins and moderators remain anonymous (you don't who the people behind a page are).
Pages look a lot like a personal profile, but instead of displaying the opinions of a single person, they will show the work of an organisation.
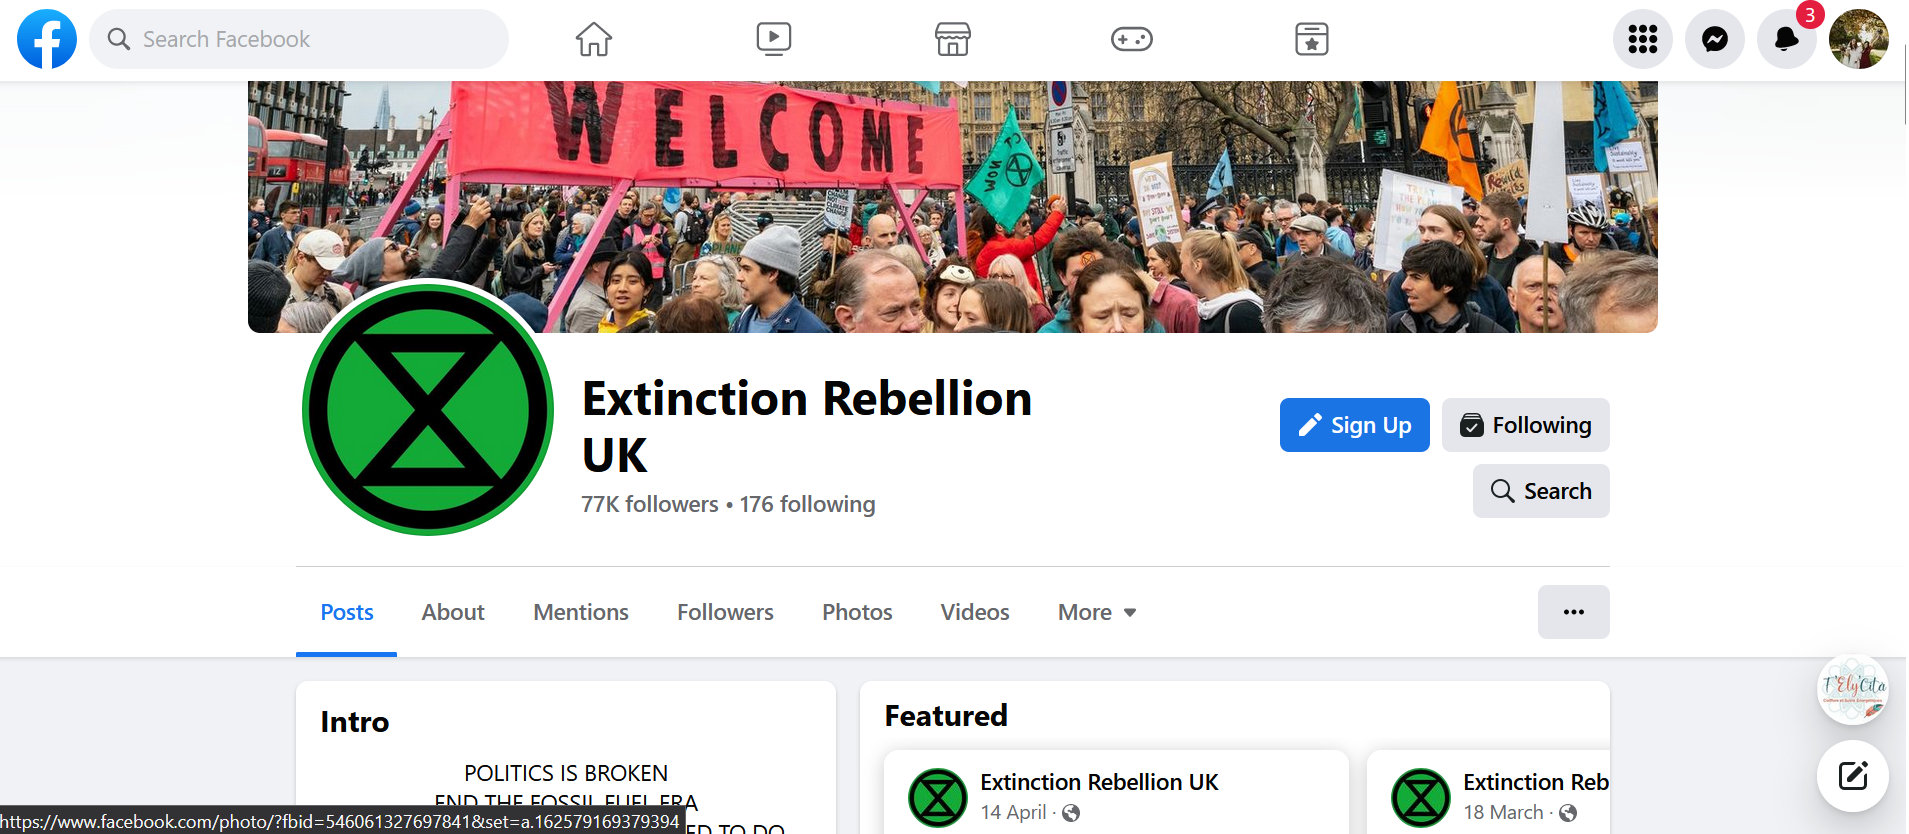
Pages have a profile picture (usually the logo of the organisation), a cover (big picture at the top), and if you scroll down you'll find their posts, starting with the most recent.
Under the cover, there are a few buttons which can be different from one page to another. On the XR UK one, you can click to sign up to the mailing list (blue button) or start to follow the page. Following a page means that you will see posts from this page on your timeline when you open Facebook.
Like, Comment, Share
You could say that's the Holy Trinity of social media.
These interactions are really good to give the posts more visibility (the more people interact with a post, the more Facebook will show the post to other people). This will benefit the page and help it gain more followers in the process, which can lead to more people joining XR "in real life".
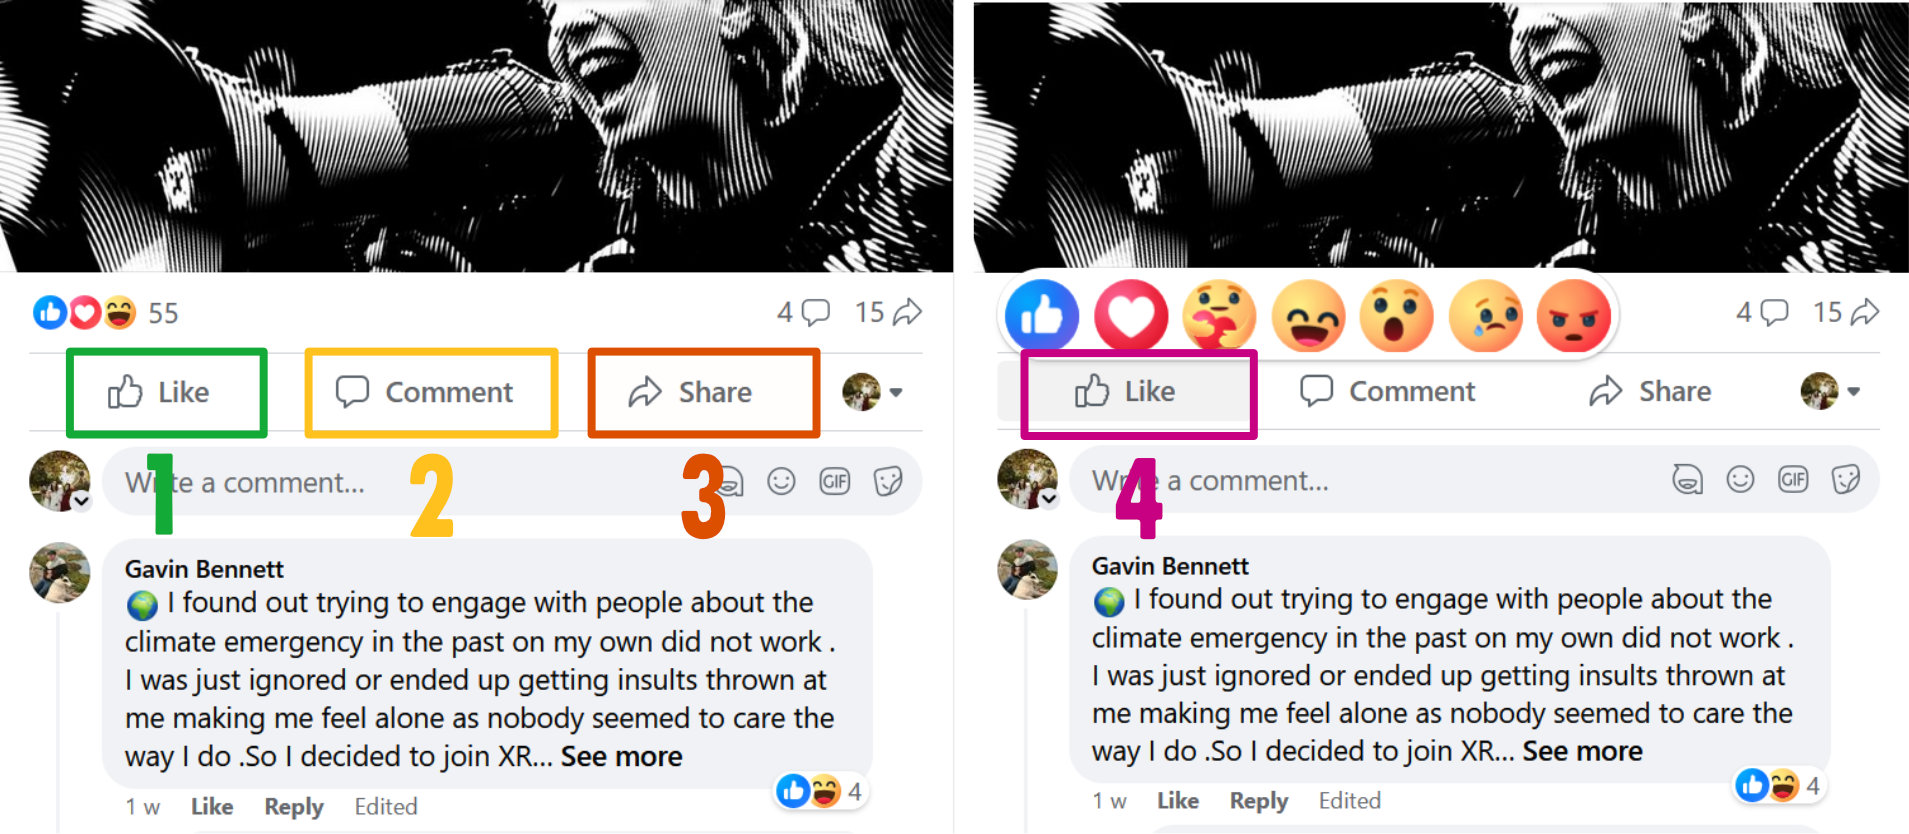
- Like: the easiest interaction possible.
- Comment: write your own comment (for example: "what a great action!") or answer people's comment (if they are asking a question for example, try to stay away from trolls, they don't need your attention, time and energy).
- Share: you can share a post to your timeline for your friends to see ("Share now" or "Share to feed" if you want to add a comment), or send it via private message to a specific friend.
- Reactions: to use these emojis to react to a post, hover (don't click) your pointer over the "like" button and they will appear above it.
💡 Look for your XR Local Group Facebook page, click "follow" and write comments under their posts when you see them to boost the visibility of the page, and maybe get more people to join your local group!
Facebook Group
Groups are community space. They can be private (you must be a member to see what's happening inside) or public.
Groups only have a cover photo, not a profile photo. If you're not a member, you will see a "Join Group" button underneath it.

They often have rules, for example: climate related posts only, don't sell items in this group etc.
Admins and moderators keep an eye on the group to make sure they are respected. The bigger the group, the more admins and moderators it'll need- to make sure it stays a safe space, doesn't become full of spam, to welcome new members etc.
Any members of the group can post on it and write comments on other people's posts.
⚠️ If you're a local group, we don't recommend using groups unless you have a good team of reactive moderators. Groups, especially public ones, tend to attract spammers who will post inappropriate content (which can be offensive).
⚠️ If you want to create Facebook events for your local group (to advertise your next meeting for example) you will need a page (you can technically create events in a group but they will be linked to your personal profile which is not ideal for security reasons).
Facebook Events
This page will teach you:
- how to create an event
- how to make another page a co-host for your event
- how to add an existing event to your page
For help using the rest of Facebook, head over to the Facebook page of the Social Media book
Create a Facebook event
Get your cover ready
Check this folder in case the cover you need is already there. Best to use something that already exist than reinvent the wheel!
If you feel crafty, head to Viz Gen / Aktivisda to create your cover. The correct Facebook event photo size has the dimensions of 1920 x 1005 pixels (a 1.91:1 ratio, or about 2:1).
💡 Good practice: centre your title so it looks better on the events menu (as shown below), avoid writing too much text (your text should be inside the event, not on the cover), make sure your text is easy to read (use a simple background, pick contrasted colours, for example black on yellow or white on dark blue).

Start creating your event
Watch the step by step tutorial or follow the explanations below:
- Switch to your page profile them go to your landing page (click the Facebook logo). Click here for a reminder on how to do this.
- On the left-hand side column, click the "events" button.
- Click the blue button "+ create new event".
- Add your cover icon.
- Give your event a catchy name (make it self explanatory, for example: XR Manchester Weekly Meeting).
- Set up a date and time (recurring events will be explained below), don't forget to add an end time so people will know how long your event is.
- Select "in person or "virtual"
- if it's in person, you can add an address ("add location")
- if it's virtual, you can add a link in "external link"
- in both cases, it's safer to repeat this information in the description of your event.
- Write the description ("what are the details"):
- What should people expect from this event? How to join? Will there be food? Is it accessible? Should they bring something?
- You can add emojis to create a better reading experience (but don't abuse them) by copy/pasting them from an outside source (Telegram, Word, an emoji bank...)
Recurring events
If you have regular meetings, you might want to set up your event as a recurring one to avoid having to create a new event each time.
Select "repeat event" in the menu.
Then select a frequency in the drop down menu.
If your event happens fortnightly, select "custom".
Now select all the dates when your event will happen.
If your event always happen at the same time, add the time to the first date then tick the box "Add this time to all dates", then click "add". Otherwise, add the times for each dates separately.
Co-hosting an event
Add a co-host to your event
A co-host is another organisation or local group that is co-organising an event with you. They will be able to modify your event, so make sure you're only adding trusted pages as co-hosts.
When you're in the process of creating an event, scroll down a little after writing your description and click "add co-host".
Write the name of the page(s) you want to add (for example: Extinction Rebellion UK) or their username (in that case: xrebellionuk).
A username is a unique name you will find when visiting a Facebook page and looking at the URL. It's what goes after facebook.com/
-
https://facebook.com/xrmidlands/ 👉 username = xrmidlands
-
https://facebook.com/xrUKTalksandTraining/ 👉 username = xrUKTalksandTraining
Some pages have not yet picked a username so they will have numbers as well in their URL.
💡 If you often create events with the same co-hosts, make yourself a spreadsheet with their usernames so you only have to copy/paste them insteas of writing down the name of each page every time.
⚠️ Be careful of selecting the right page. Sometimes Facebook is a bit cheeky and will pop a list on your screen (it might be a glitch, it could be fake pages too), as shown below:
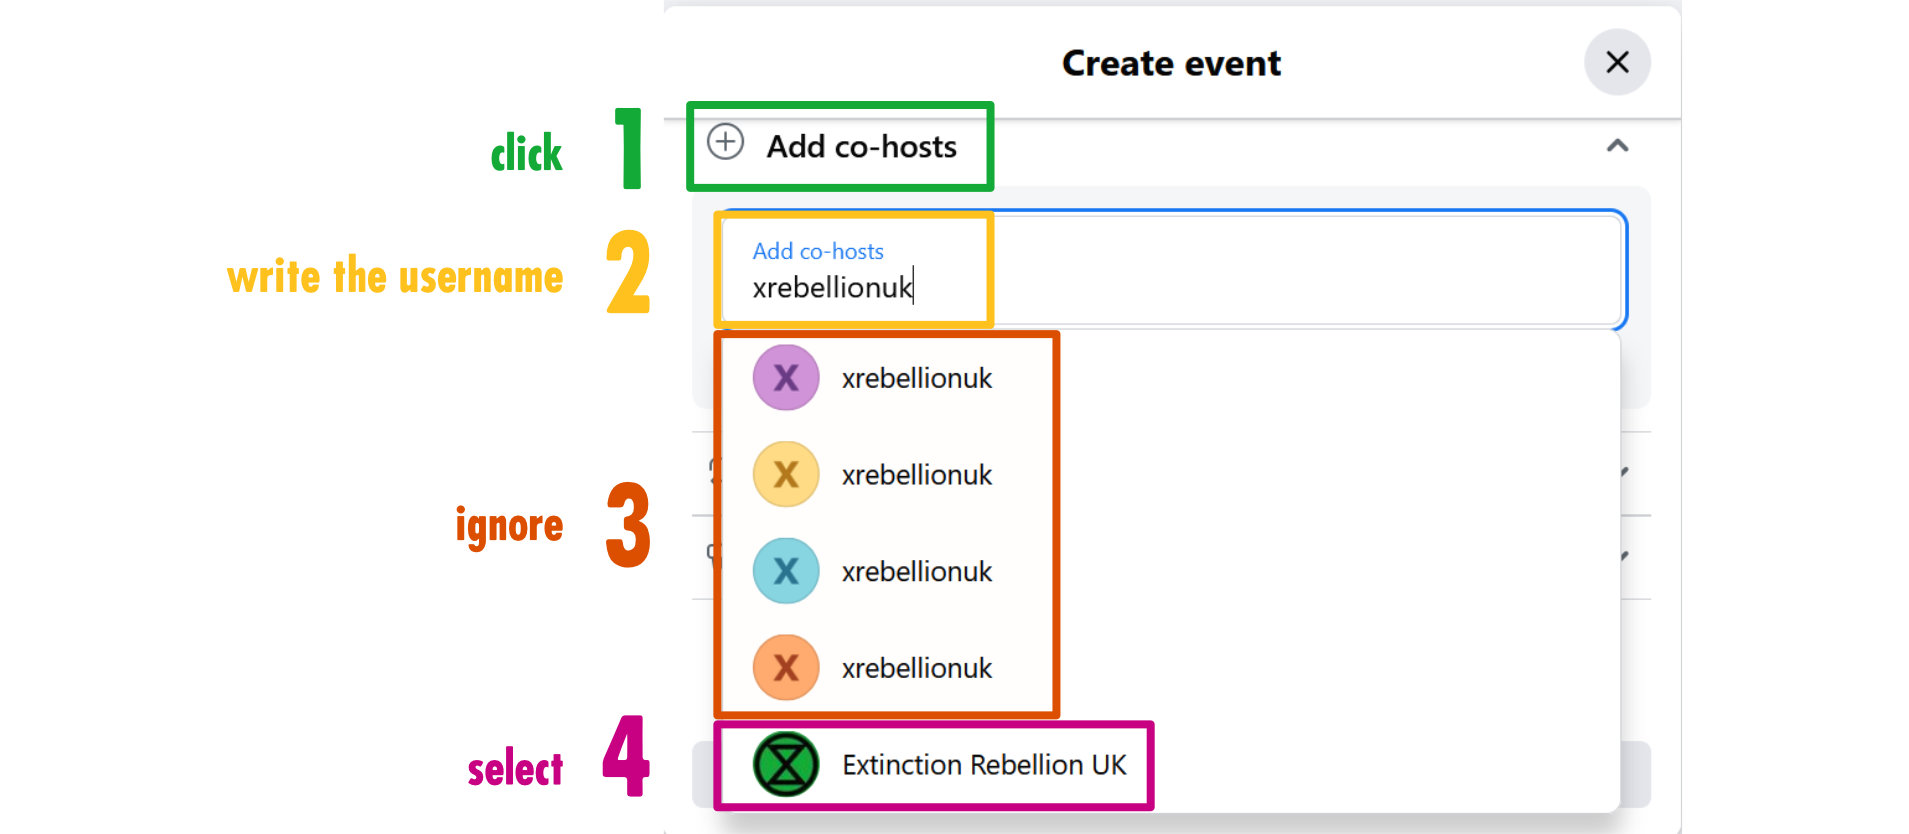
- Click add co-hosts
- Write the username or name of page
- Ignore the pages without the proper logo
- Only select the page showing up with the proper logo
- Repeat to add more co-hosts
Accept a co-host request
If you're lucky, you'll see a notification pop up on your page's profile if you are asked to co-host an event. Sadly that's not always the case. This is a glitch within Facebook.
When you send a co-host request to a page, copy the link of your event and send it via private message (or email, or via a chat if you know one of the admins). This way they will definitely be aware of it.
If someone sends you a co-host request, it'll will look like this:

You can then click "accept" or "decline".
Add an existing event to your page
If you've spotted an event you'd like to advertise on your page but you haven't been made a co-host, watch this step by step video tutorial, or read the explanations below.
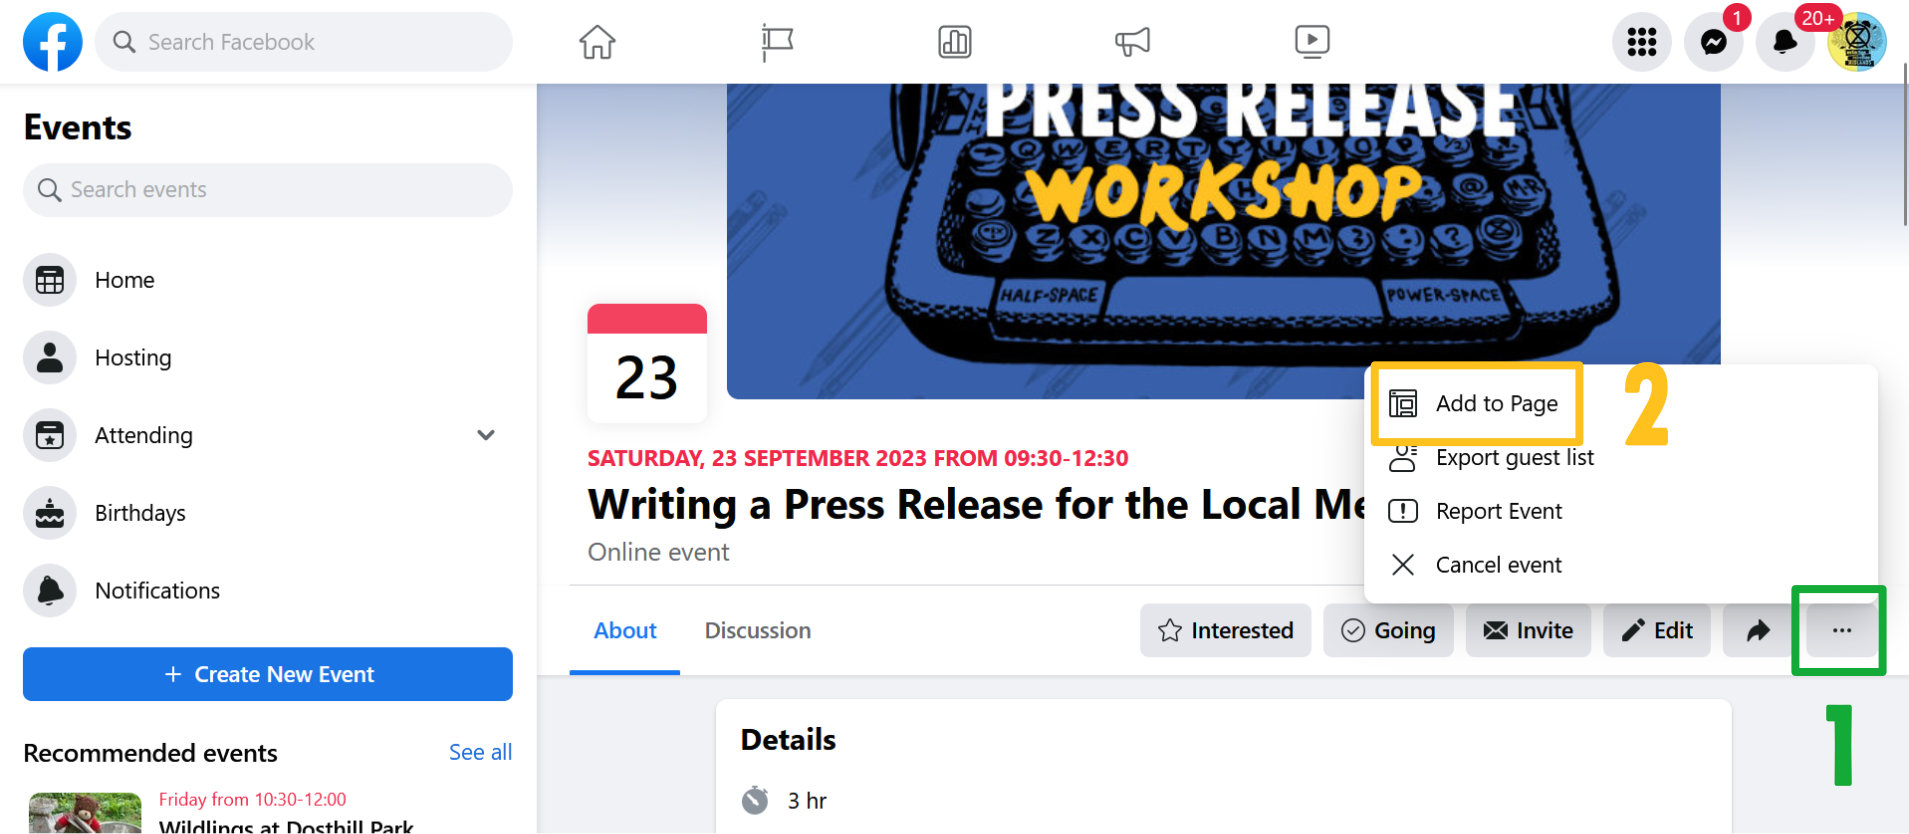
Head to the event you'd like to add, then:
- Click the 3 little dots on the right-hand side
- Click "add to page"
- Check it's being added to the right page then click "add event" to confirm
Business Suite for Facebook and Instagram
Meta Business Suite is a free tool that Facebook page admins can use to manage their pages and linked Instagram accounts. Note that you can't manage Facebook groups with it.
💡 A more detailed video tutorial is coming! We hope that the screenshots will help you navigate Business Suite for the time being.
There is a phone version of Business Suite but we're only covering the desktop version here.
🔗 Accessing Business Suite
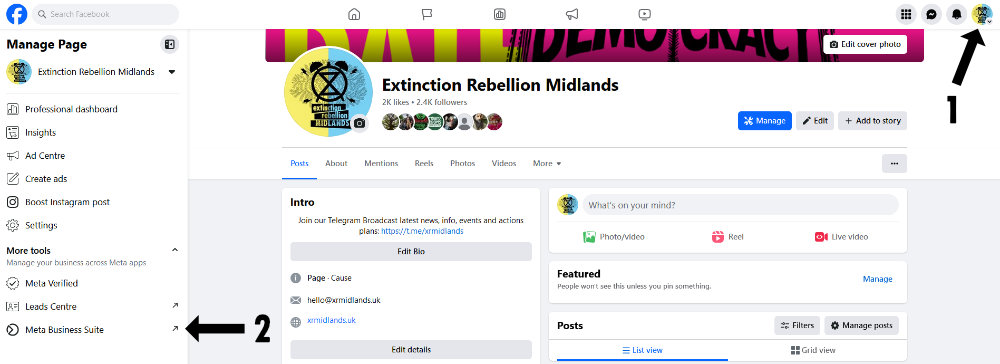
You can either follow this link: https://business.facebook.com or got to your Facebook Page and
- Make sure you're logged in as your page
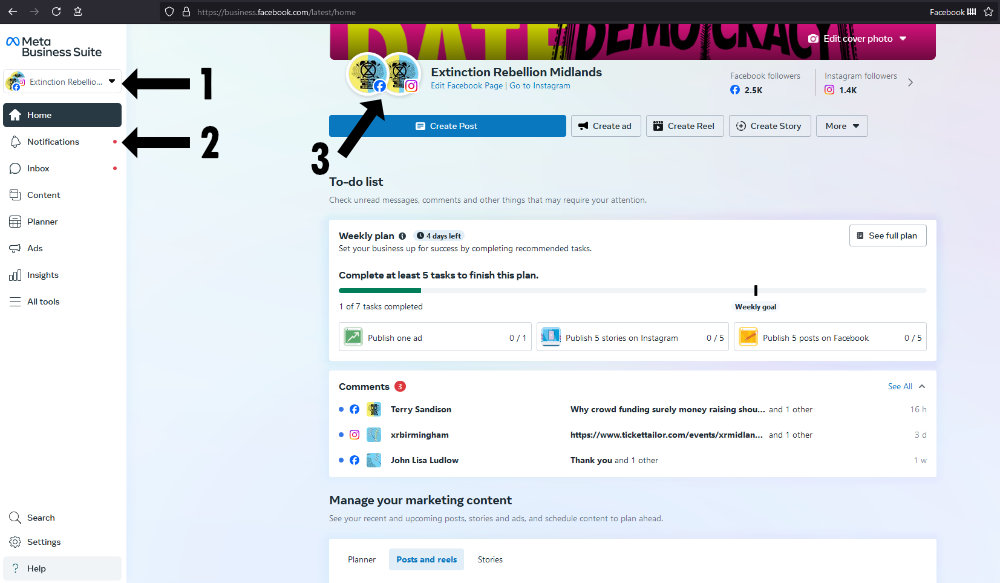
- Click on Meta Business Suite on the left-hand side column
🏠 Dashboard
The dashboard gives you an overview of your account.
From there you can:
- Switch between different accounts (if you're the admin of multiple Facebook pages)
- See where your attention is needed when there is a red dot (meaning you have new notifications such as messages, comments etc.)
- Check if your Instagram account is linked to your Facebook page
Link Instagram and Facebook
On the screenshot below you can see that there isn't an Instagram account linked (the logo remains grey). It can be because it hasn't been connected yet, a problem with the connection, or just because you don't have an Instagram account (which is the case here).
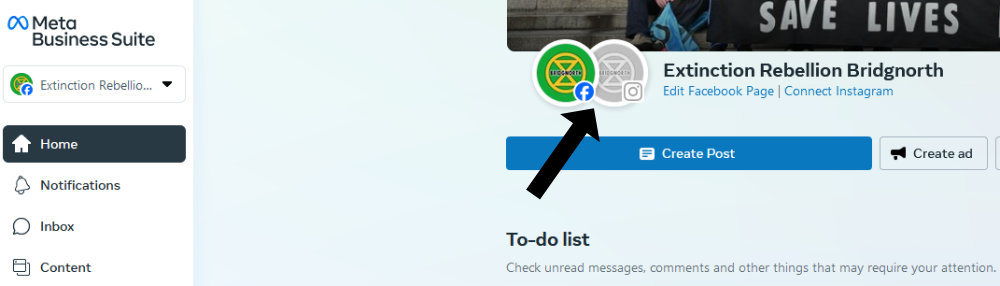
To link your Instagram account to your Facebook Page, click "Connect Instagram" (on the right-hand side of the two logos with the tiny Facebook and Instagram icons). Then follow the process.
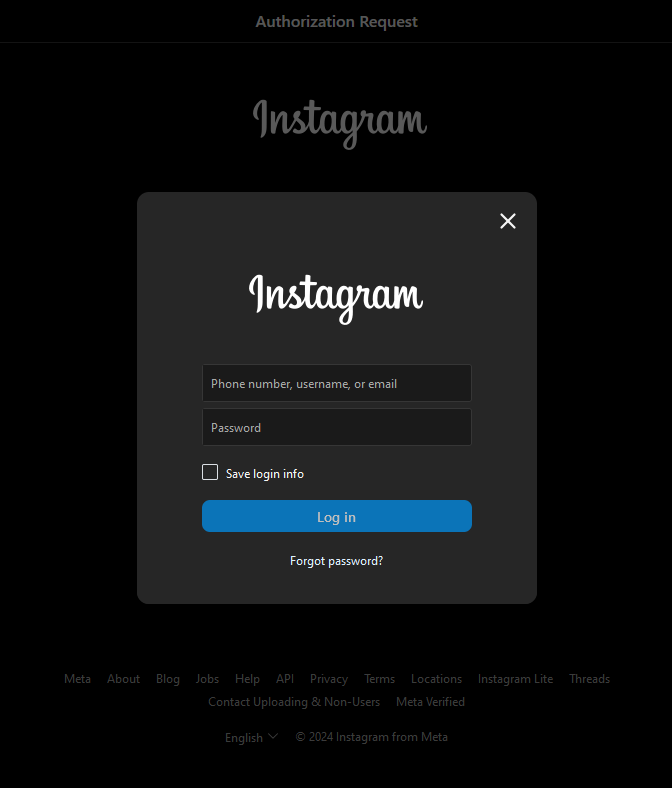
Click "Log in to Instagram" (blue button):

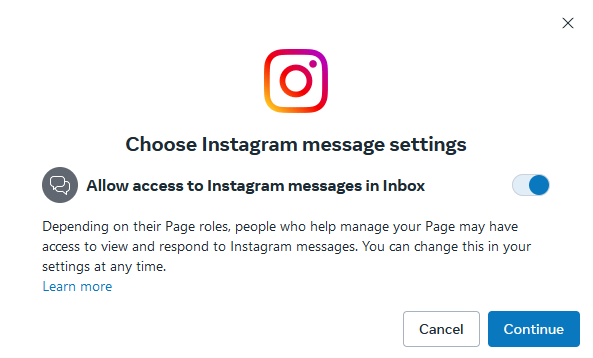
Tick yes for "allow access to Instagram messages in inbox":
Enter your login details (username or email + password).
⚠️ And we mean your XR account login details, not your personal one.
If you're stuck and need support, please contact @lucielc on Mattermost.
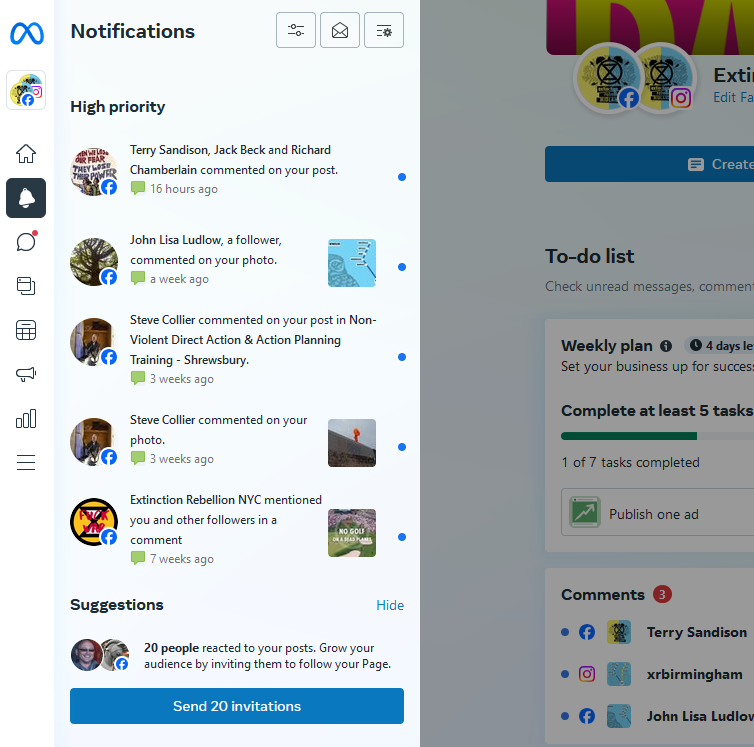
🔔 Notifications
To access the notifications, hover your pointer over the left-hand side column until it appears more detailed, then click "notifications" (bell icon).
That will give you an overview of the most recent interactions people had with your page.
From time to time, you will see a blue button that says "Send 20 invitations". If you click it, it will send a notification to 20 people who recently interacted with your page to invite them to follow it. This way you might gain more followers, yay!
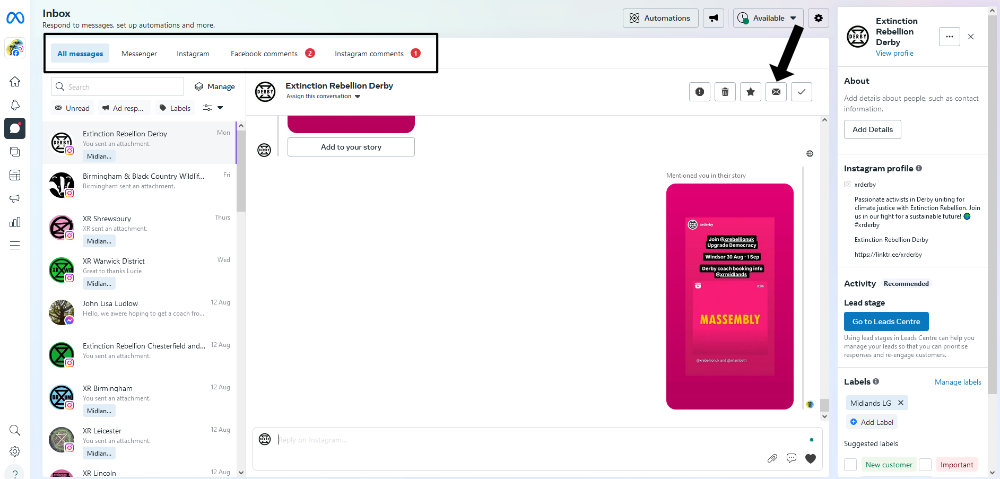
🗩 Inbox: messages and comments
A very important feature! Click the speech bubble in the left-hand side column.
This is the place where you'll be able to read, answer and manage your messages and comments. If you have a new message or comment, you'll see a red circle with a number in it in the horizontal menu.
Terms:
- Messenger: messages sent to your Facebook Page
- Instagram: messages sent to your Instagram account
- Facebook / Instagram comments: comments people have written underneath one of your posts
Manage messages
There is a search bar if you're looking for an old message from a specific person or account.
When you open a message, you can see more information about the person or account who sent it on the right-hand side of your screen.
💡 If you open a message but can't or don't want to answer straight away, make sure to click the little envelop icon above the conversation to mark it "unread" (this way you won't miss it next time you visit Business Suite, or someone else from your team can spot it and deal with it).
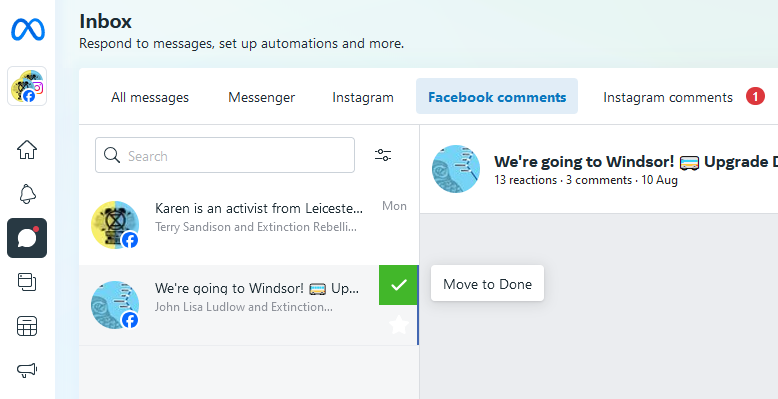
Manage comments
A good practice to keep your inbox tidy and up to date, is to tick the "done" box once you've answered and/or interacted with the comments people wrote.
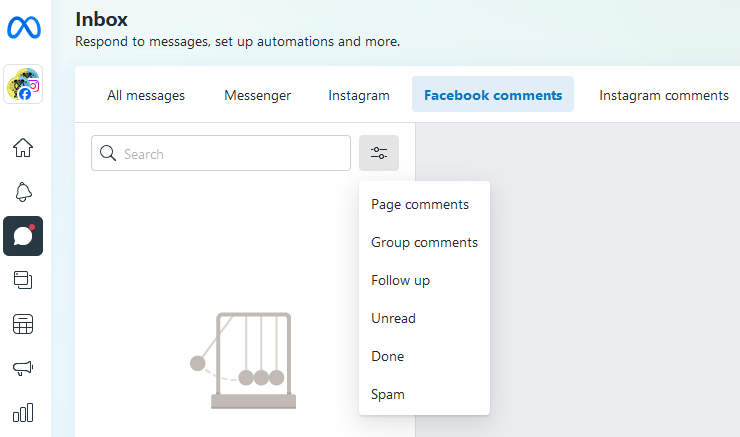
Don't panic if you clicked by mistake! Head to the filters menu next to the search bar, and click "done" and you will see appear all the old comments you've already dealt with.
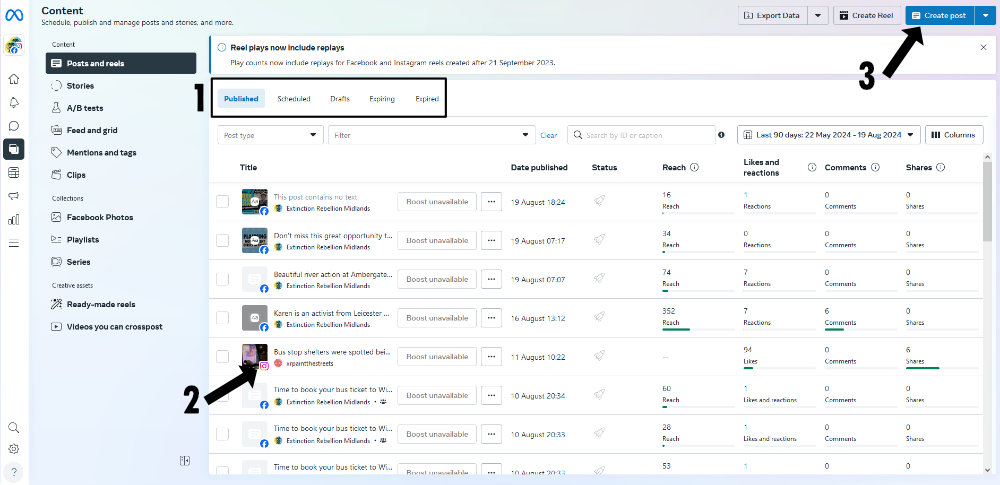
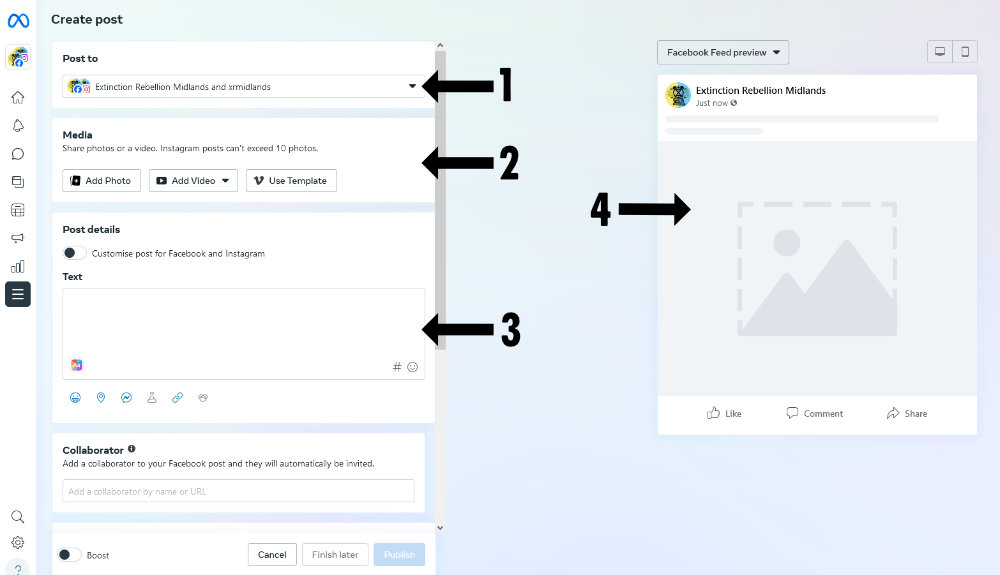
🗔 Create Posts
Click on "content" in the lefthand side column.
- Post to: select if you want to create a post for Facebook, Instagram or both (it's both by default).
- Media: add a selection of photos, graphics or a video to your post. Read this page for guidance on content.
- Post details: Write your text
- Preview: this is what your post will look like once published.
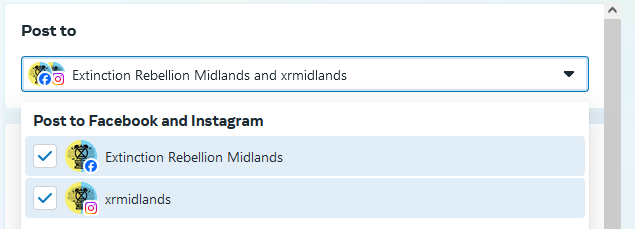
Select Facebook and/or Instagram.
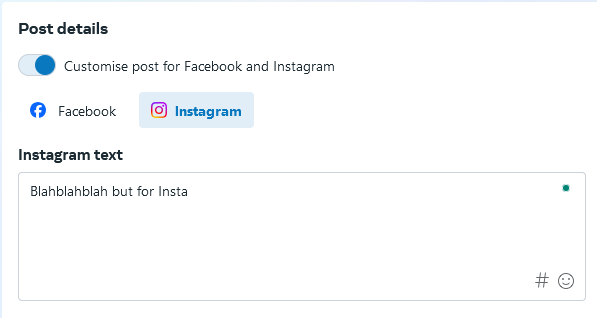
Keep in mind that these platforms have specific requirements so not all posts should be "mirrored". For example, links are not clickable on Instagram. Read below for more explanations.
Once you've written your text, you might want to adjust it to fit the requirements of both platforms. Tick "Customise post for Facebook and Instagram". You will see the Facebook and Instagram icons appear.
To edit the Facebook post, click the Facebook icon, and vice versa for Instagram. To keep the same example as earlier: if you have links in your text, delete them for Instagram (add them to your story or LinkTree instead).
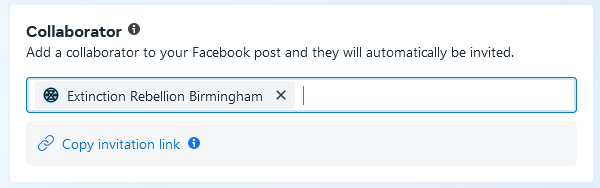
You can add collaborators to your Instagram post (note that if you do that you won't be able to add the scheduling option). Not familiar with collaborative posts? Read more about it here.
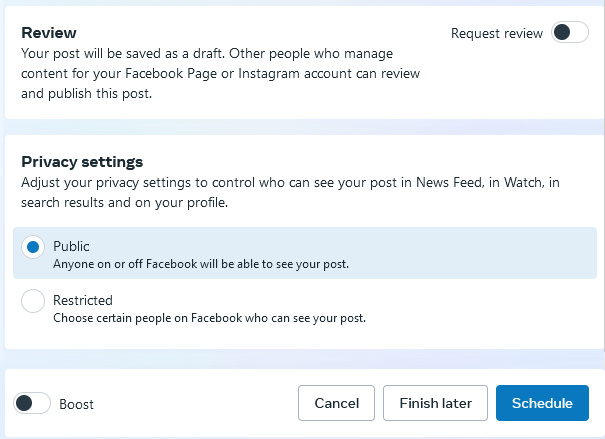
Post straight away or schedule for later (a great option if you want to schedule posts ahead when you have time to keep your socials active, posting regularly is key to reaching more people!).
The "active times" button will give you options for when your followers are more likely to be active and then might engage with the content you post. Note that this option is not always available.

It's now time to publish your post or save it for later.
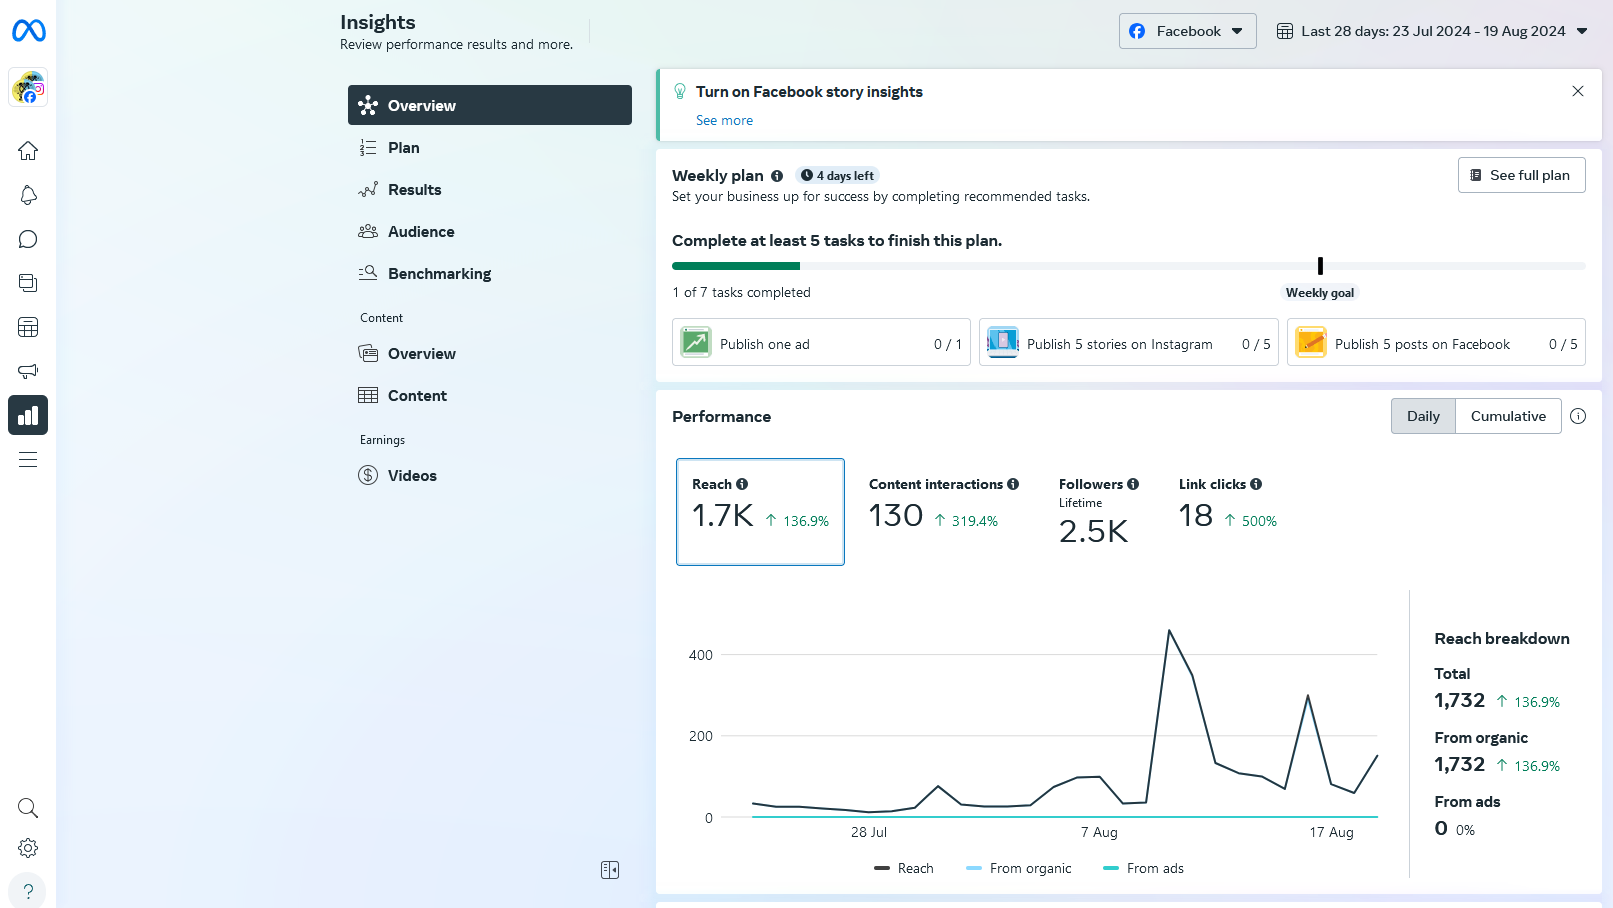
📊 Insights
If you like statistics, you'll enjoy this part of Business Suite!
This is the place where you'll learn more about your reach (how many people have seen your posts), engagement (how many interactions your posts received), your audience (demographics, location)...
If you have time, you can investigate the "Weekly Plan" that Business Suite created for you to keep you posting more content (which should in turn help you get a better reach and more engagement, theoretically).
⚠️ Creating content for social media is incredibly time-consuming so don't feel obligated to do more than what you're able to do time wise!
Bluesky
XRUK on Bluesky
Bluesky is a fast-growing social media platform. It is providing an additional (or alternative) space for those becoming disillusioned with X/Twitter - for a multitude of reasons.
Find us here:
If are setting up an account for a local group, campaign or community group - give us a like and a share so we can find you and add you to our 'starter pack' list.
How to verify your account
If your XR group has a website, you can use it as your handle, for example: https://bsky.app/profile/extinctionrebellion.uk or https://bsky.app/profile/xrmidlands.uk
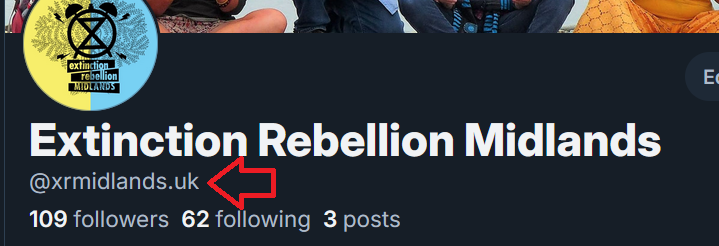
This is the equivalent of getting verified (like the blue tick on Twitter/X), and it's free.
Follow this tutorial to do it.
Leaving Twitter/X
Some helpful advice about how to securely leave Twitter/X (if you were considering that).
Twitter / X
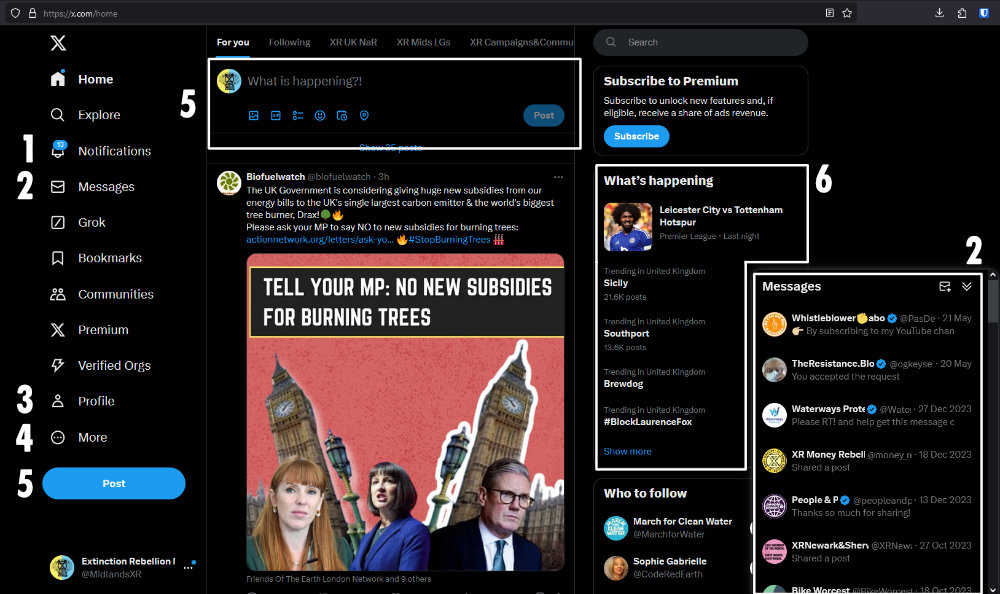
Homepage
We won't introduce the whole platform here, only the tools you might need.
- Notifications: other accounts have interacted with you (like, comments...)
- Messages: these are private, unless they are group messages (in that case they can only be read by group members)
- Profile: where you can see your previous posts, edit your profile picture etc.
- More: more options detailed below
- Post: create a post (ex tweet)
- What's Happening: was also known as Trending Topics, these are hot news and regularly change
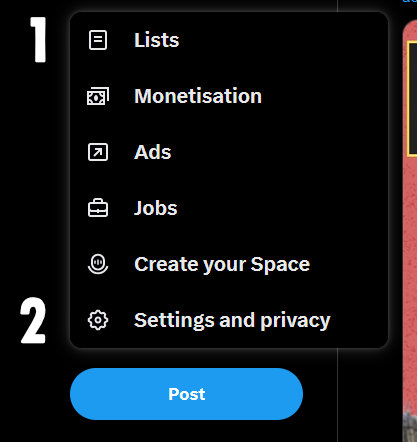
The 'More' menu
- Lists: a very useful tool to see posts grouped together (see info below
- Settings & Privacy: where you can update your account (for example change your password)
Create a post
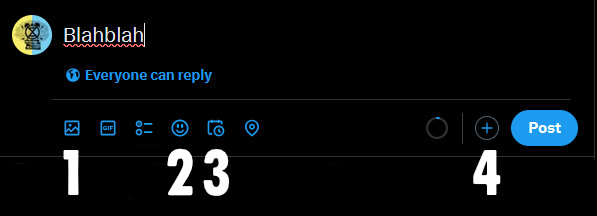
You can add up to 280 characters to your post, spaces included, so choose wisely! You won't write on Twitter like you write on Facebook, you'll need to get to the point.
- Add up to 4 photos or a video (both best in square format) to grab people's attention.
- Add emojis
- Schedule your tweet if you need to
- Create a thread (more explanation below)
Then press the blue button to post.
⚠️ You can't edit posted tweets (only delete them) so make sure to proofread your text before you click "post".
Photos & Videos
Format
You can post up to 4 photos per post, with a preference for square format but 16/9 (landscape) photos will work as well (portrait photos will look cropped).
Videos can be up to 2 minutes and 20 seconds long, and shouldn't exceed 512MB.
Photos are a great place to tag people whose attention you'd like to grab (like journalists). Plus, it saves you space in your post (note that some accounts restrict who can tag them so sometimes you'll have to tag them in your text rather than the photo).
You can tag up to 10 accounts per photo (to avoid spamming). Make sure to have list of handles ready as it'll make the task easier than browsing the list of existing accounts.
Description
You can add a description, sometimes called alt-text, to your photos so they’re accessible to even more people, including people who are blind or have low vision. Good descriptions are concise, but present what’s in your photos accurately enough to convey their context.
Create a thread
Sometimes what you have to say will exceed 280 characters so you might want to consider creating a thread. A thread is a succession of posts linked together. When you scroll on your homepage to read other people's posts, you might find a post from a thread. If you click on it, it will "unfold" the whole thread, which you can then read (click here to see an example).
💡 Threads are a great way of sharing bits of a press release to grab journalists' attention (don't forget to tag them in photos so they get a notification)
Note that once you've started a thread, you can add more posts to it as you go which is really handy when you're covering a live action!
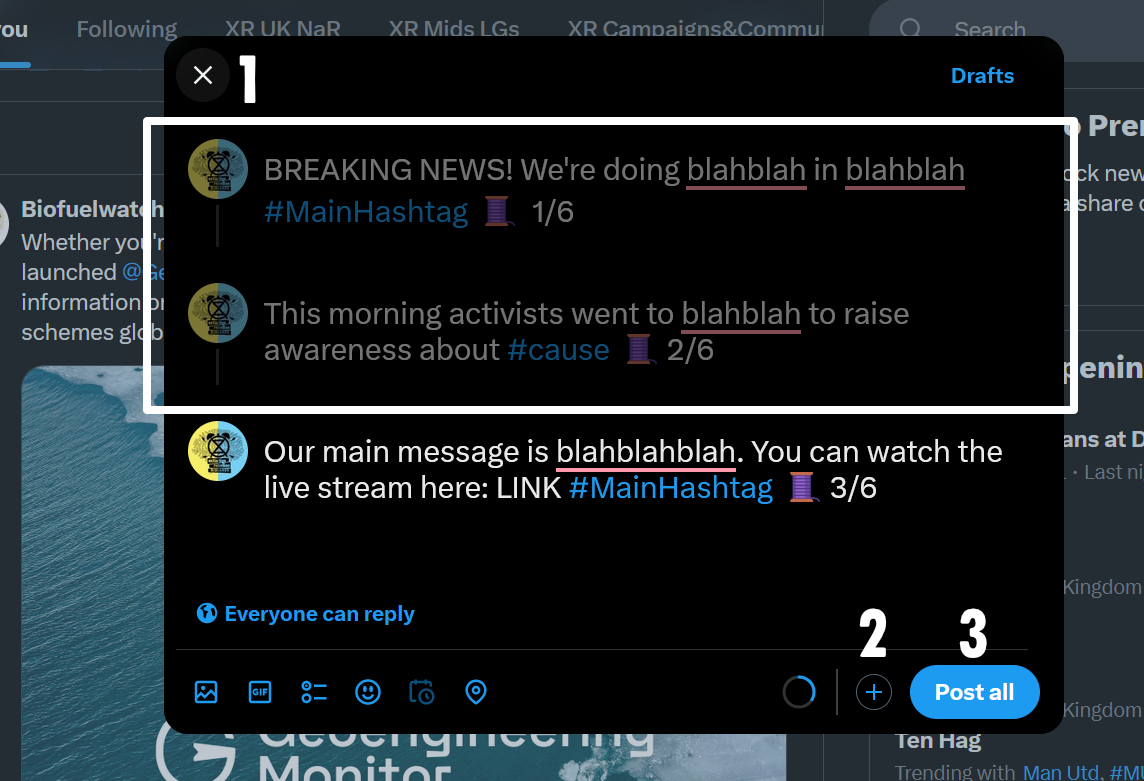
- Already written posts - as long as you haven't posted your thread, you can still modify those.
- Add more posts to your thread (no limit)
- Post your thread (you can add more posts to it later)
Tips for a great thread
- Add an image at least to the first post to grab people's attention.
- If you know how many posts your thread contains, add the info on each post (eg 2/5), alternatively, add the emoji 🧵 to all your post so people understand it's a thread.
- Write your posts so they contain complete sentences (avoid cutting a sentence in half between two posts). There is no limit to how many posts a thread can contain so just make more posts to fill all your text.
Lists
Lists are a useful tool of accounts that have something in common.
For example, XR Midlands has a list of Midlands Local Groups to spot posts from these groups more easily and engage with them to give them more visibility. You can have lists of accounts posting about a specific subject (eg climate change, racism, politics, cats...) which is useful when you want to know the latest news on these subjects (Twitter/X is a platform based on trending topics and breaking news rather than aesthetics or documentaries).
Here are some ready-made lists that might be useful to you:
- All the local groups in the UK
- All the UK Nations & Regions
- All the XR campaigns & communities groups
- All the XR Groups in the world
- If you spot missing accounts from those lists, please let us know
You can access your lists (and create your own) by clicking the ... (more) on the menu in the left-hand side of your homepage, then "lists".
You can "pin" the most important ones (click the pin 📌 on their left) , so they will show up at the top of your homepage.
 Click and then you will see posts (and reposts) coming from only those accounts.
Extra resources
- Leaving Twitter/X: Some helpful advice about how to securely stop using the platform.
- Turbocharge your Twitter account
- Twitter for campaigning
Creating an account
If you do not have a personal account, you can set one up on the LinkedIn homepage.
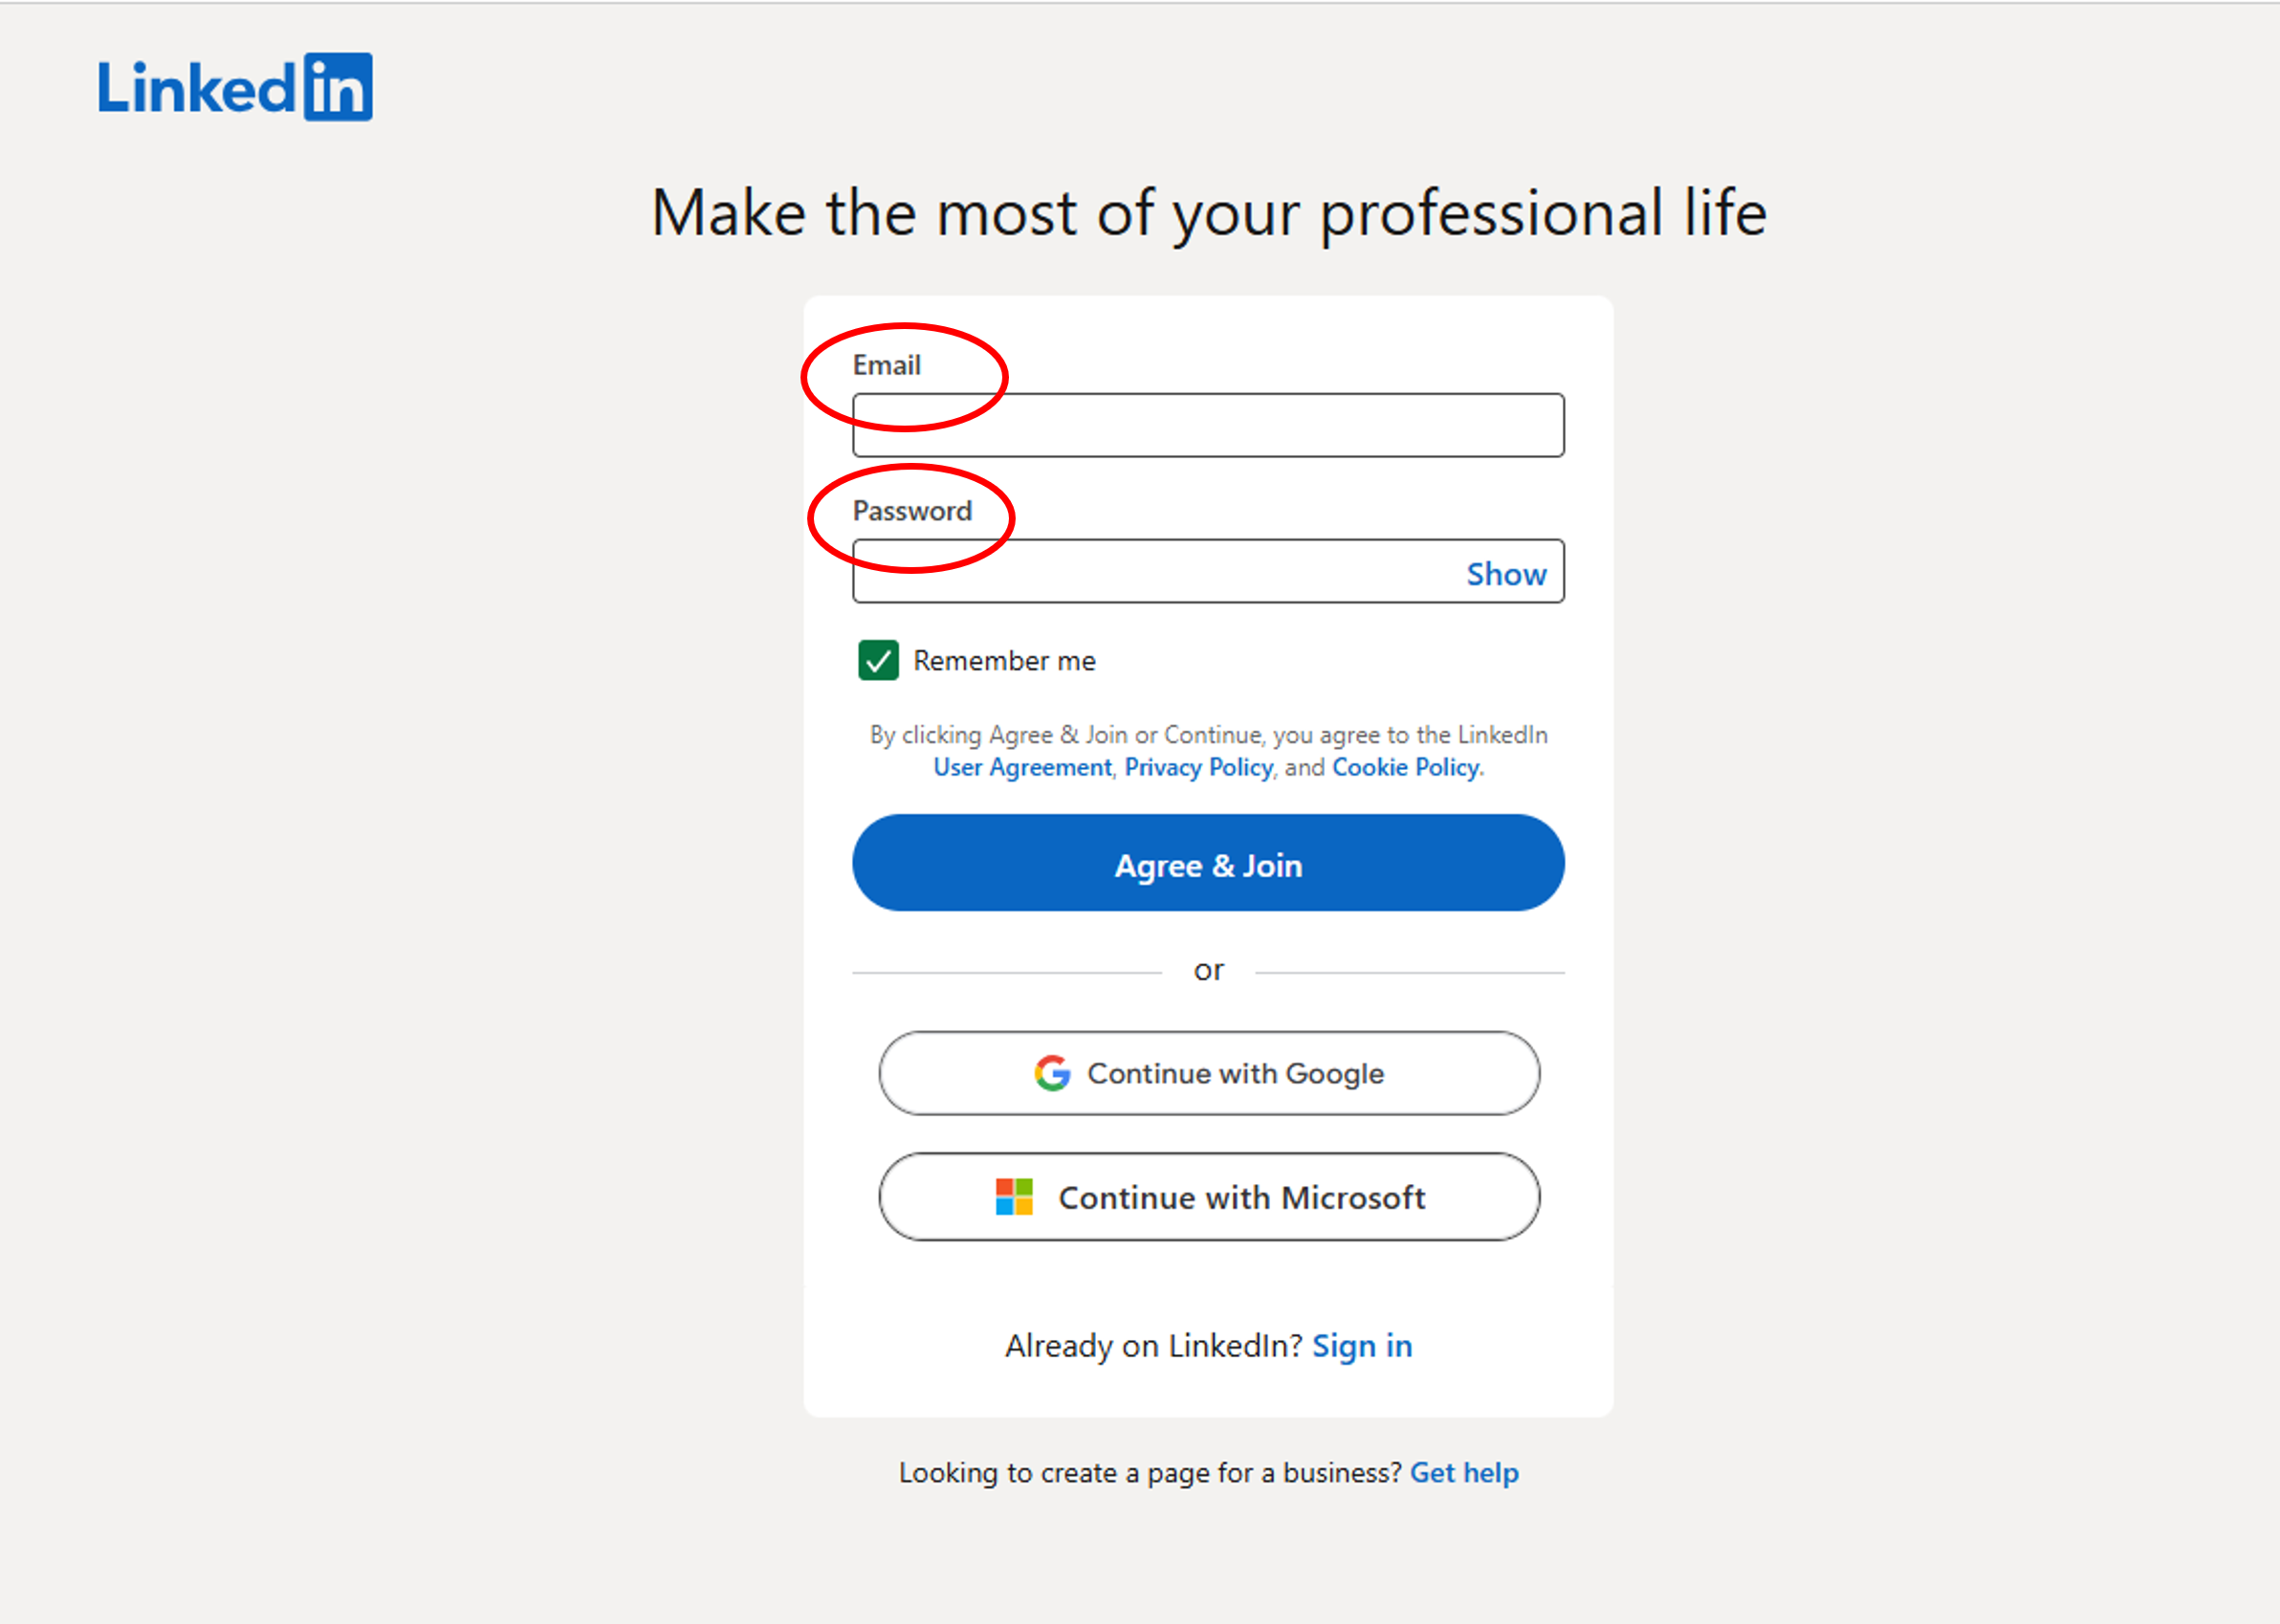
Choose your sign-in route: Google; Microsoft or Email.
If you choose Email this is the next screen:
You will be asked for your name, profession, last employer, location and some other information.
If you do not want to reveal these, you can sign-up using an identity you create. You must be able to confirm the email you use. Once you’ve been through this process you will have access to LinkedIn
Finding and posting to a company or person
To find a company, enter the name in the Search box on the top-left.
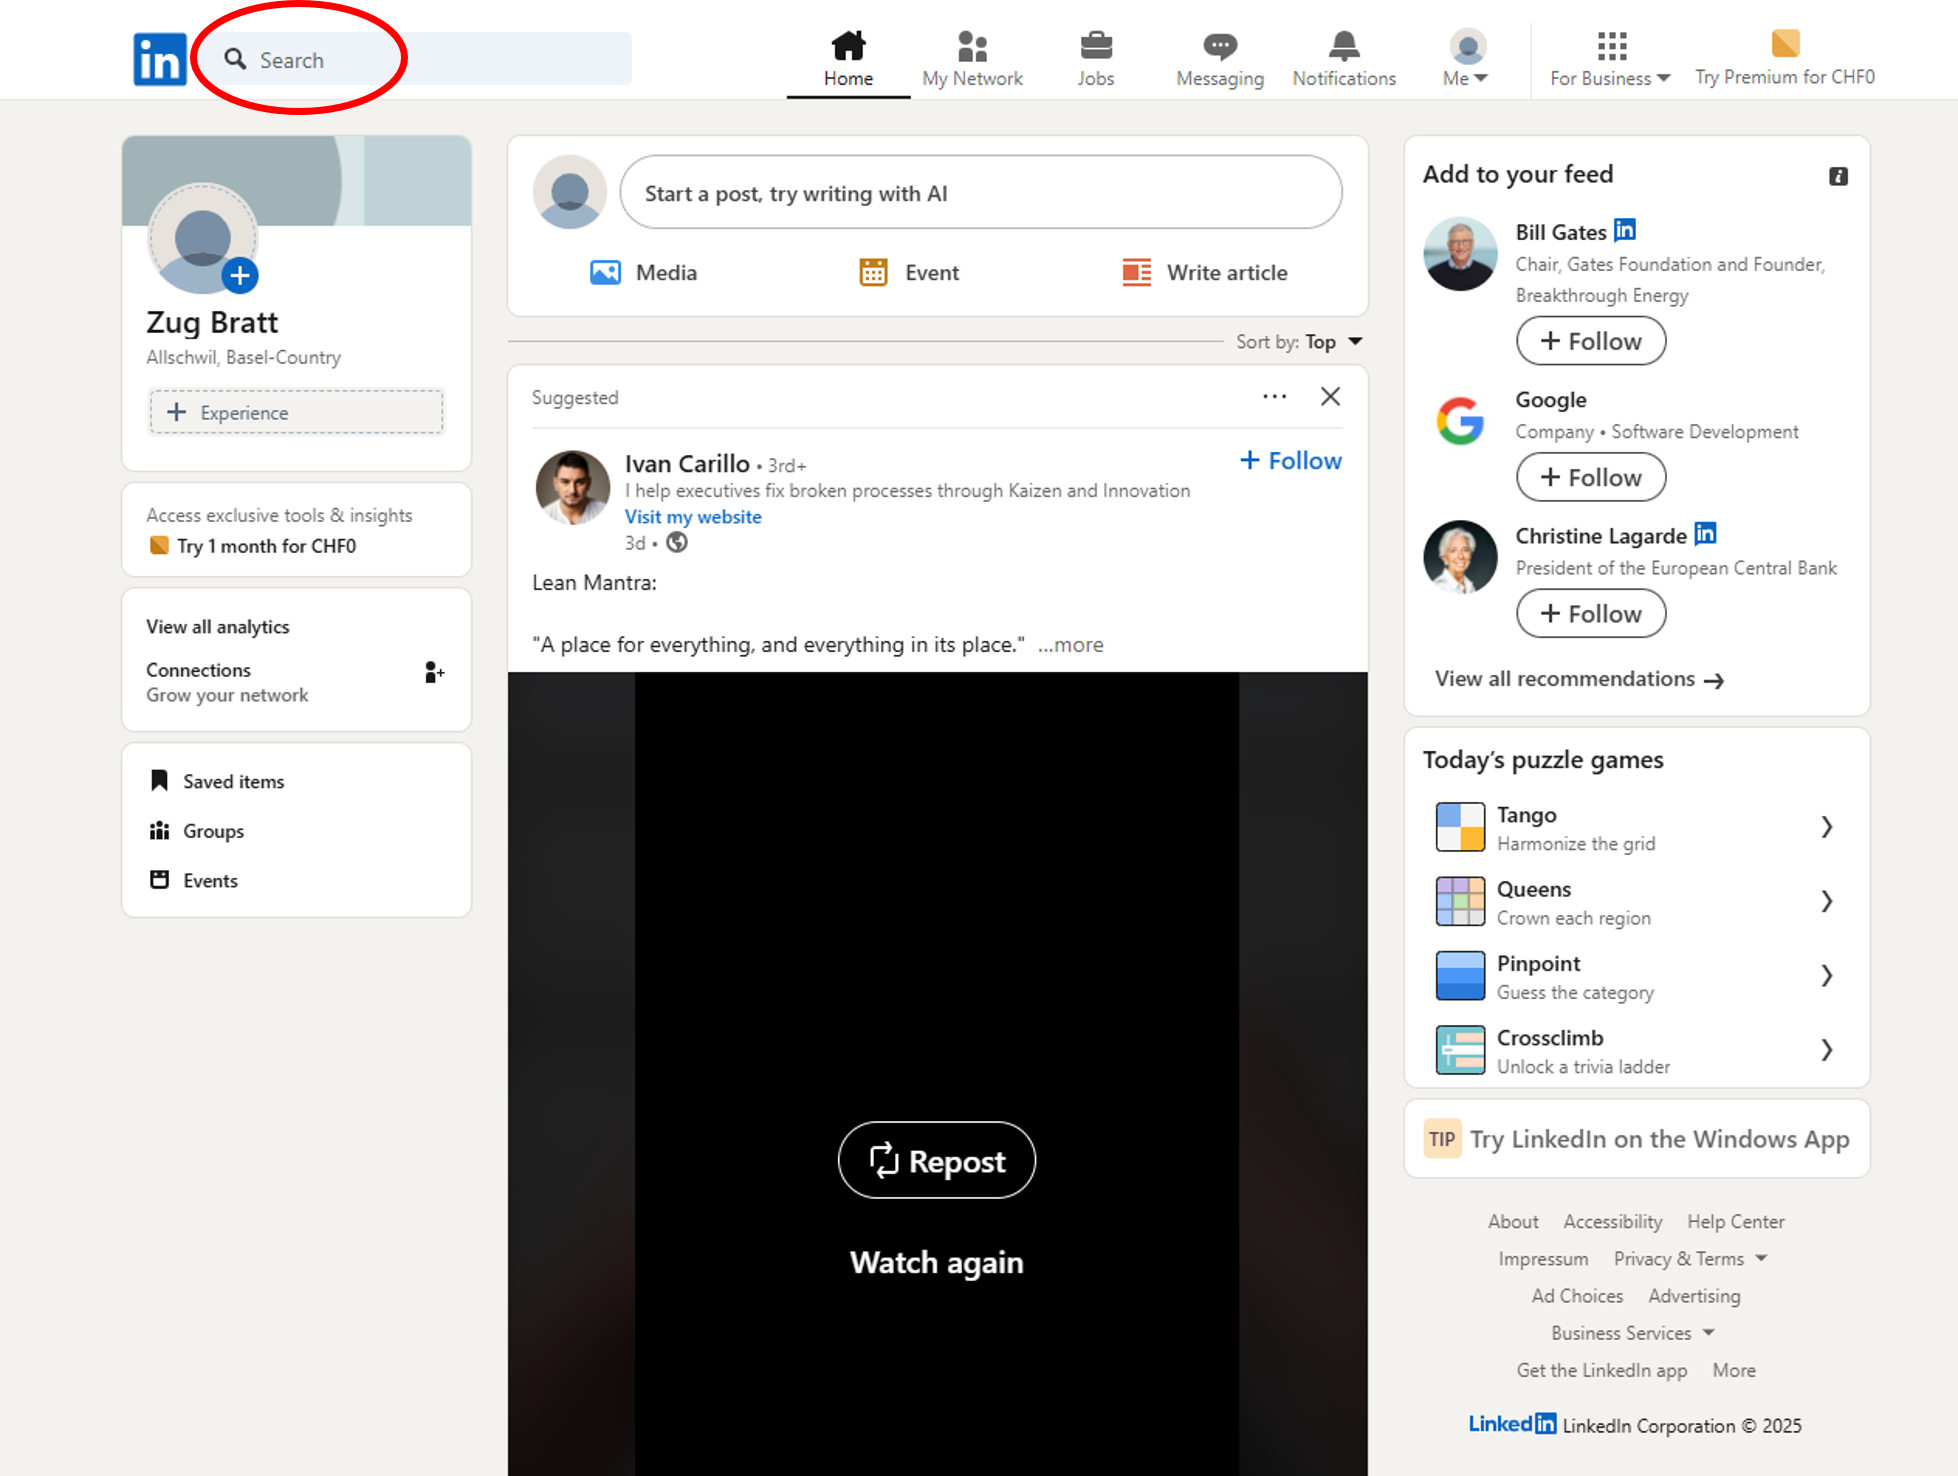
Unless you have been very specific, a number of options appear; choose and click on one.
Entering ‘Shell’ and selecting ‘Shell Energy’ leads to this screen:
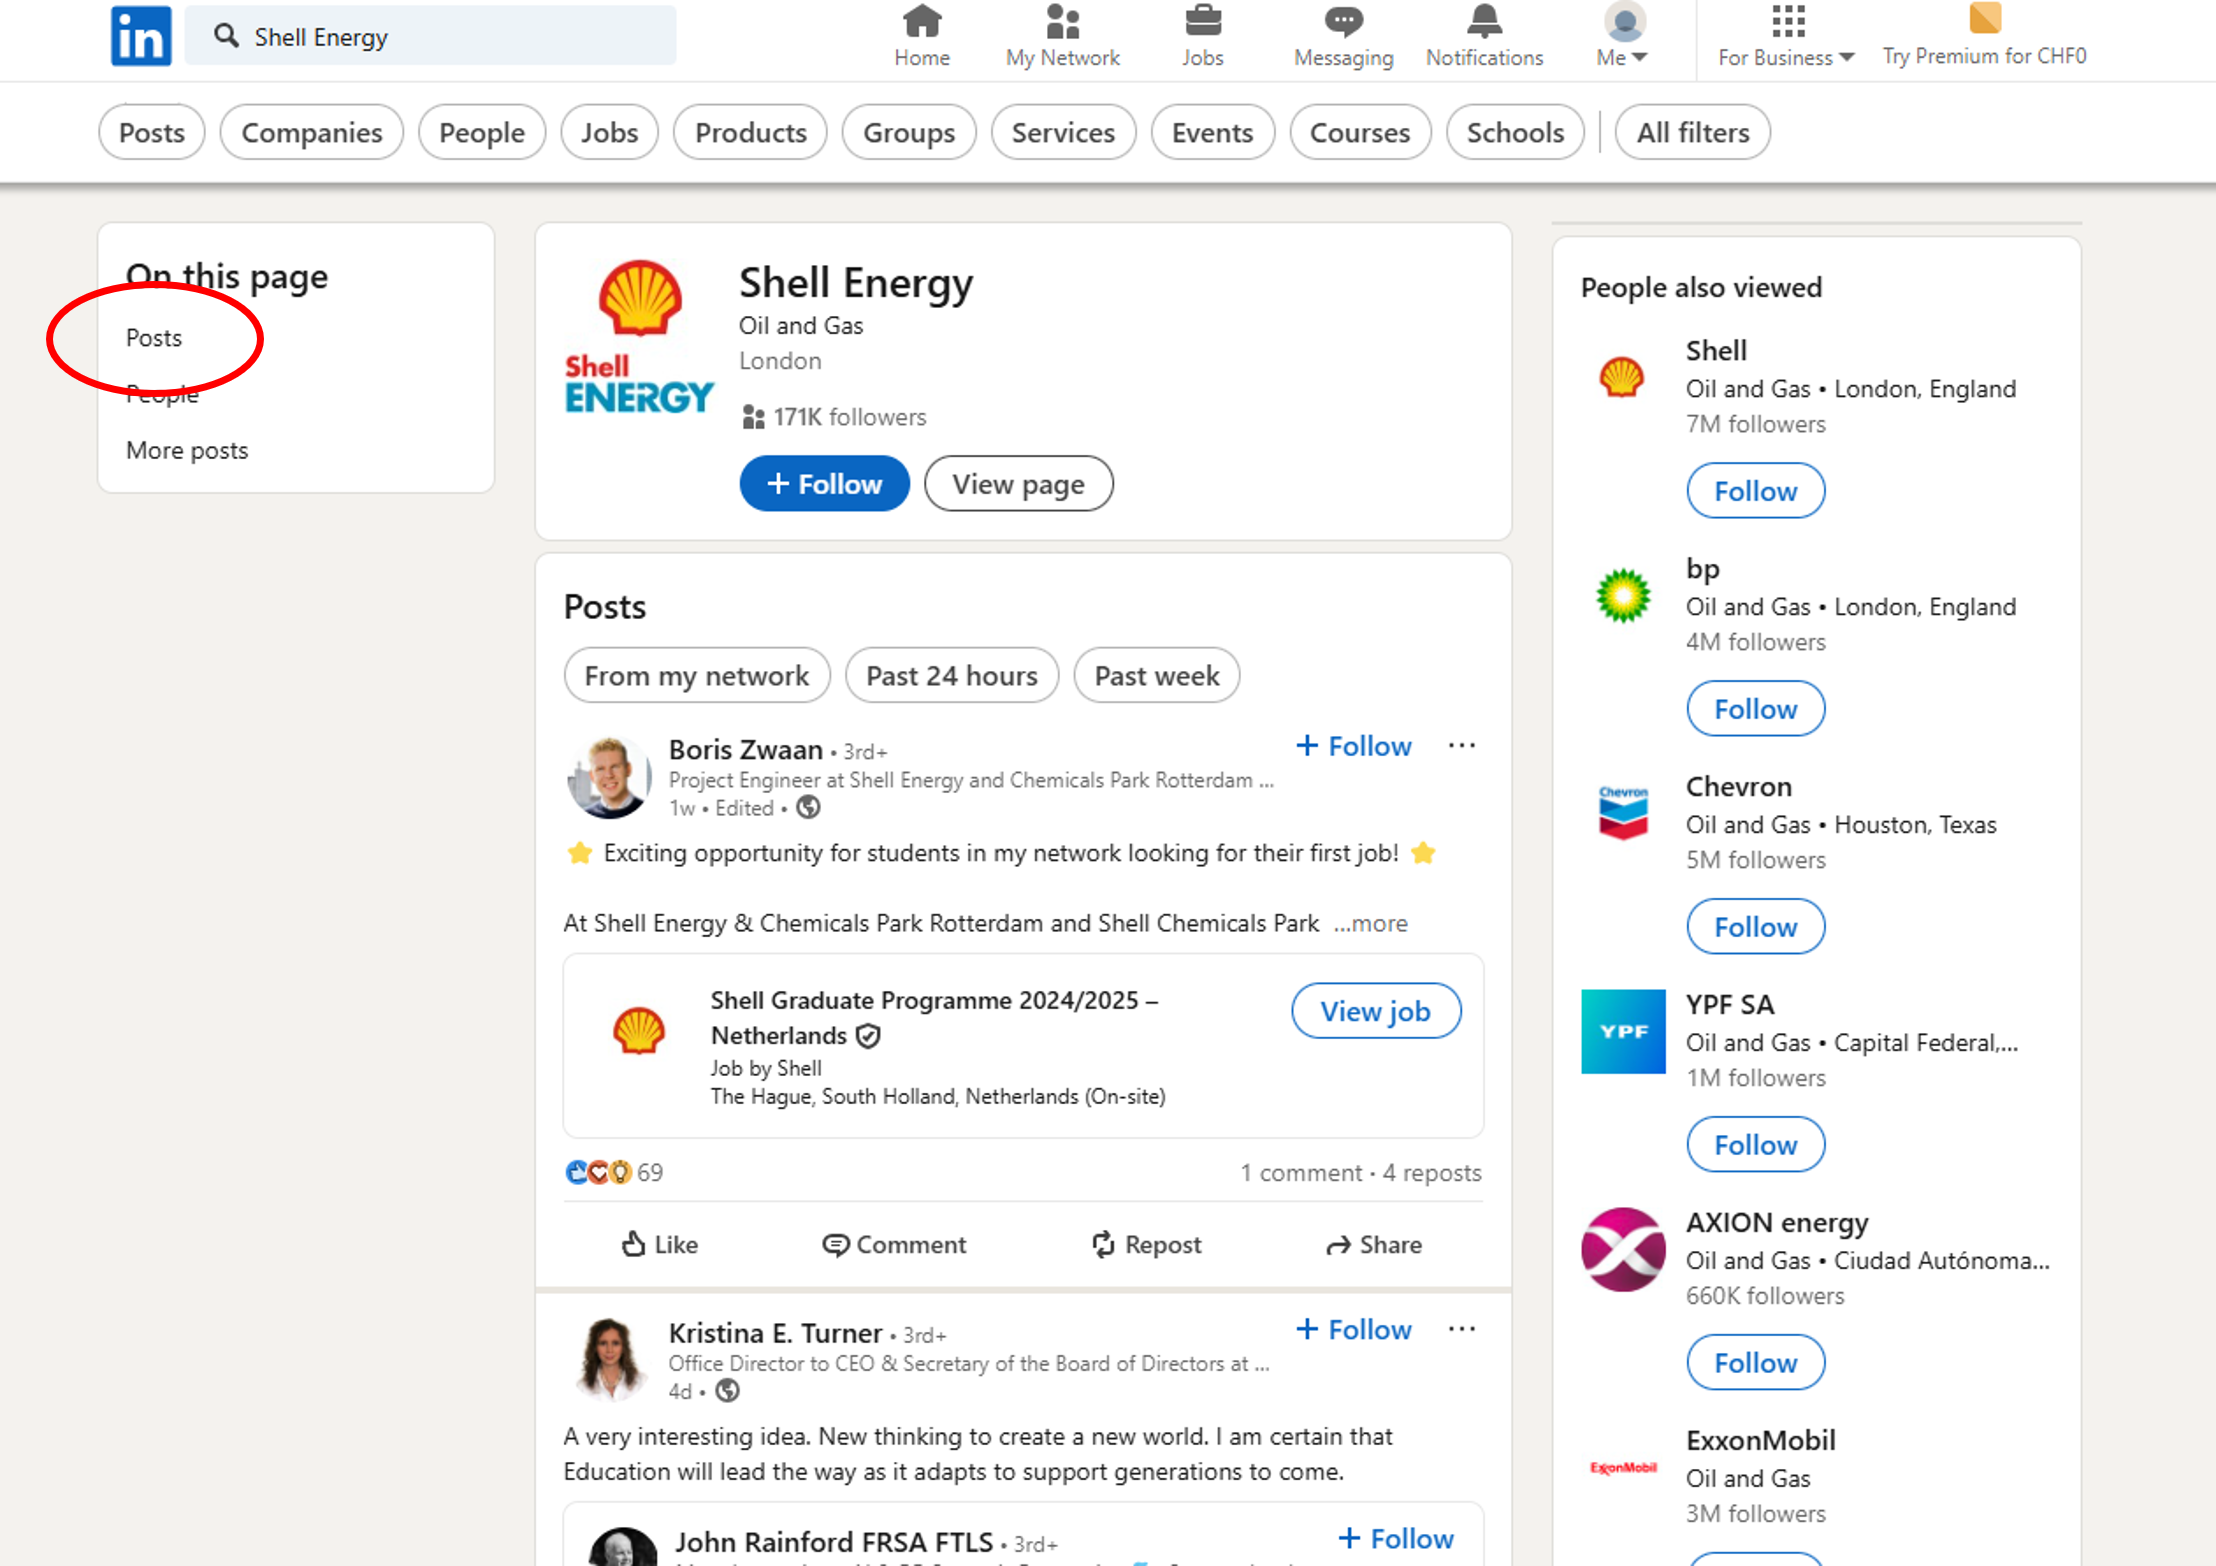
Click on ‘Posts’:
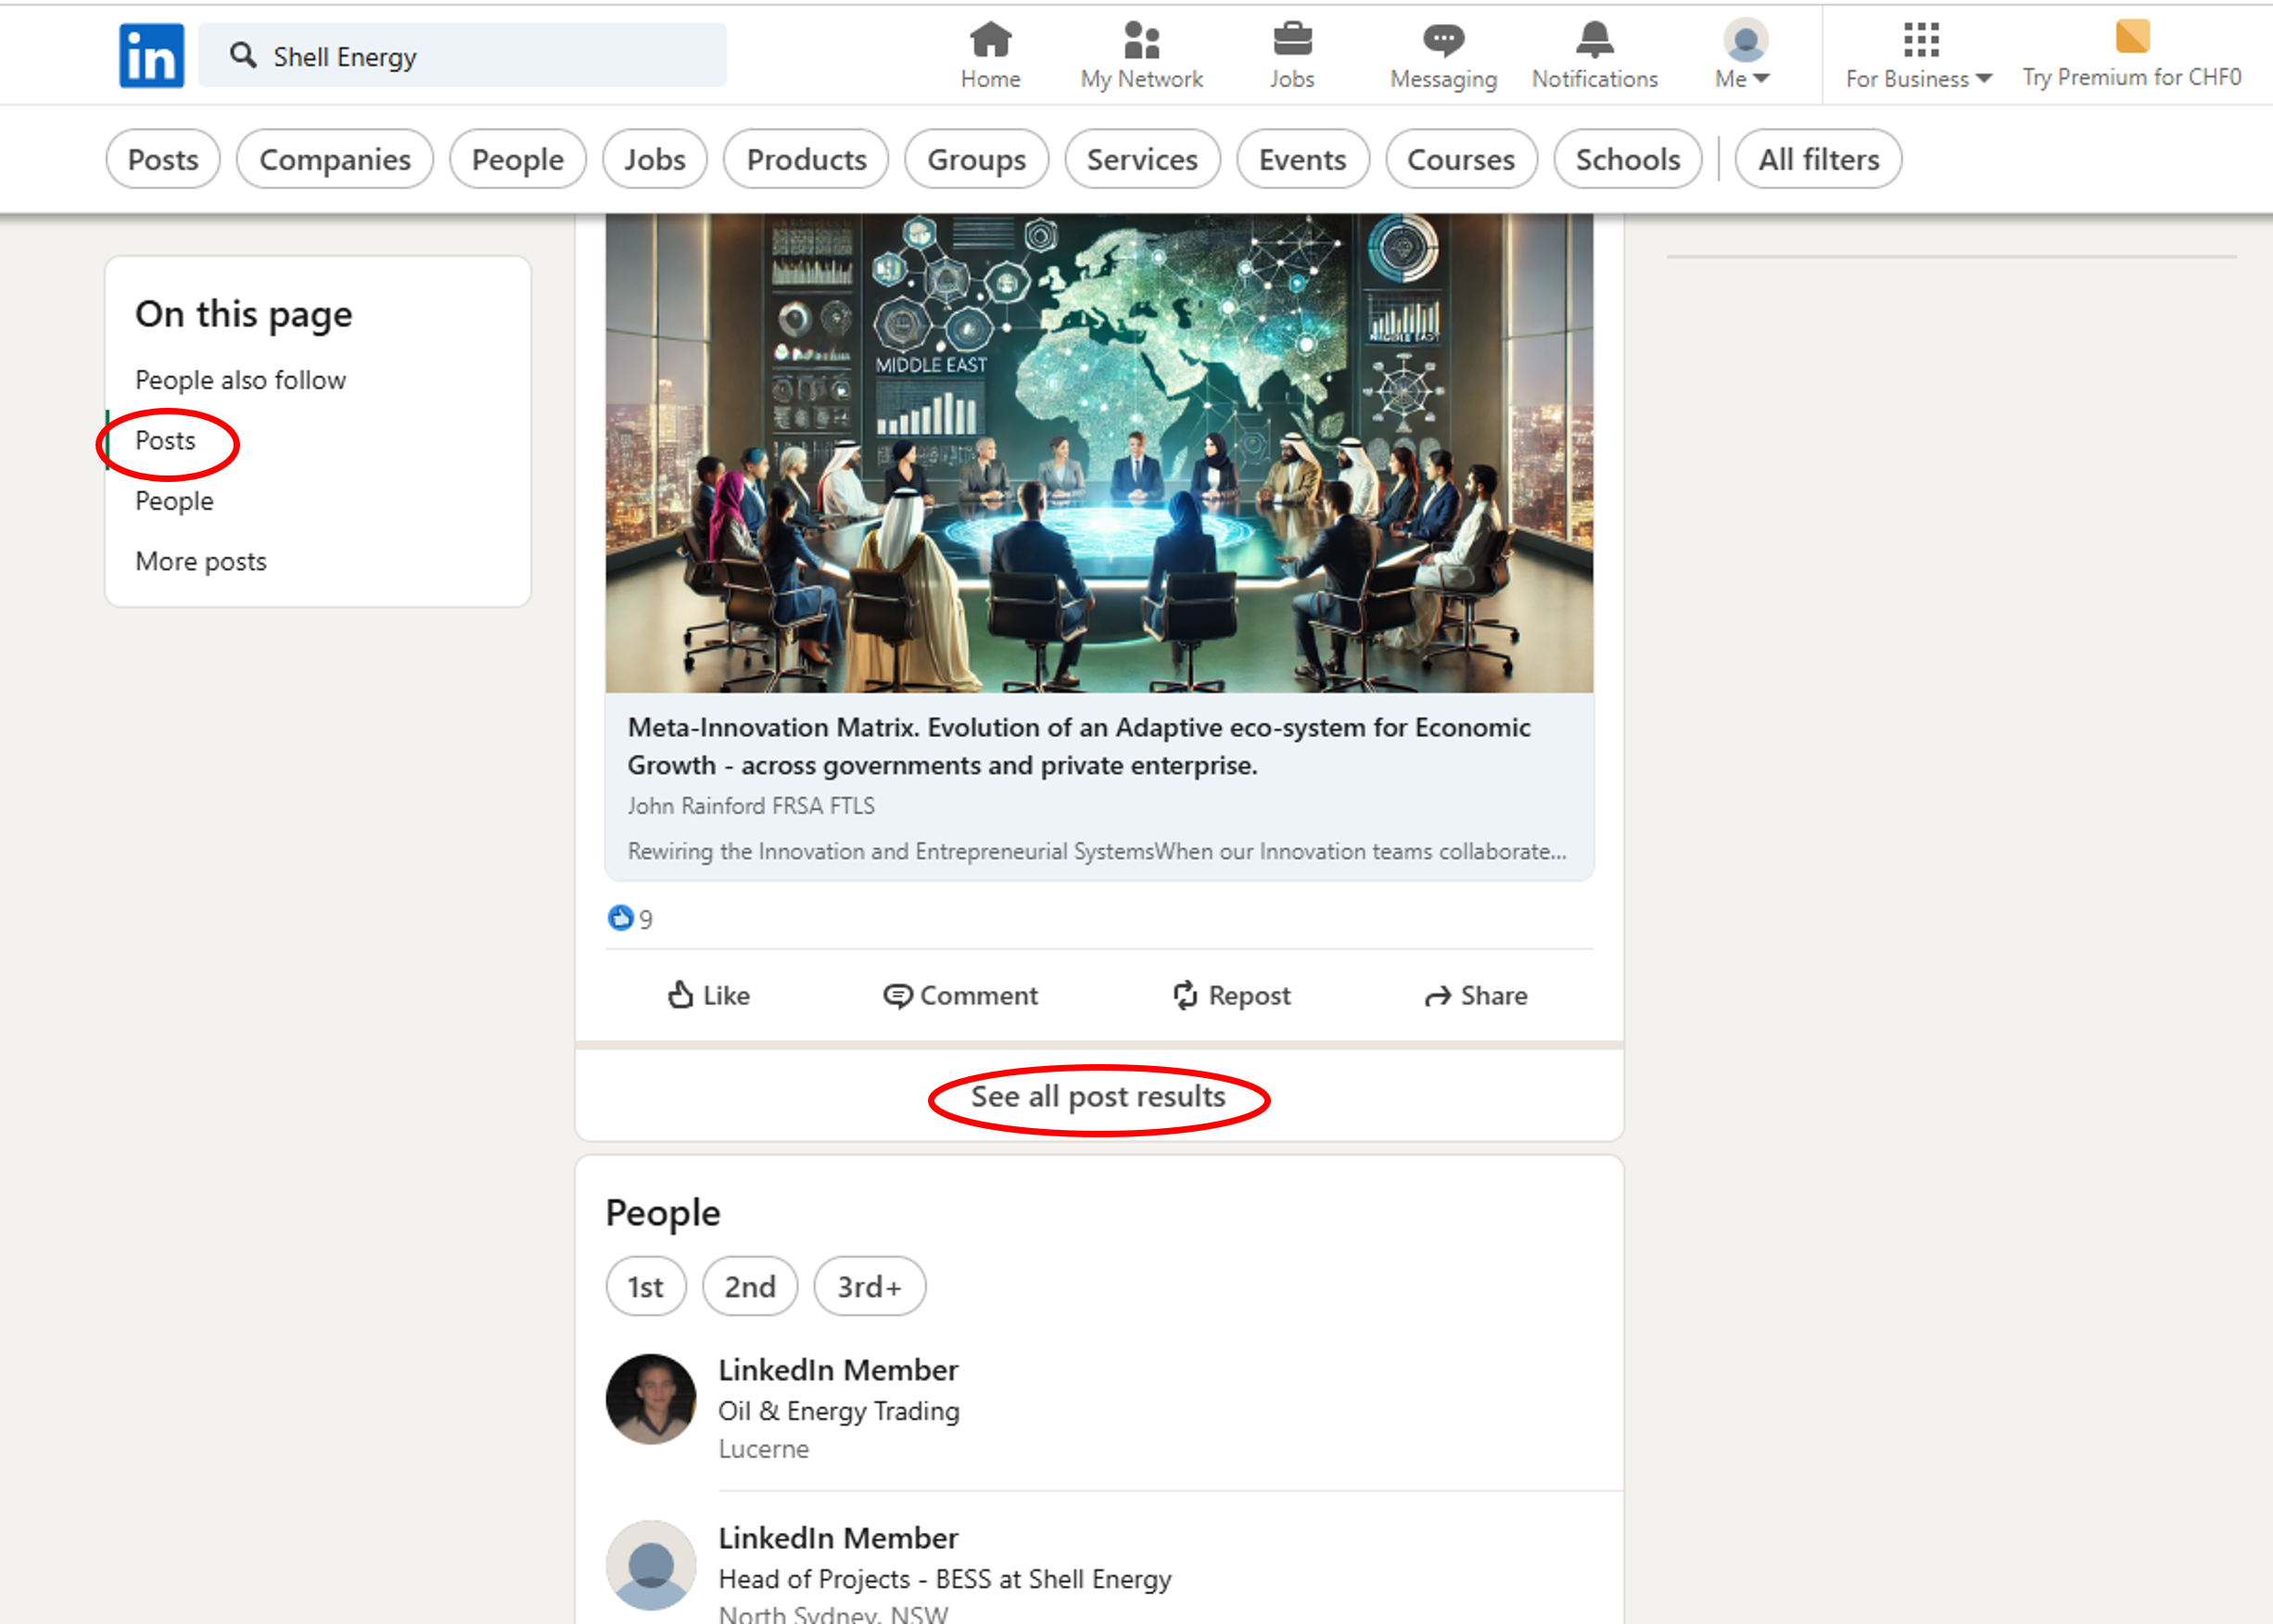
Scroll to last Posts of the displayed Posts, before it starts to show People.
Click on ‘See all post results’.
Scroll down until you find one that interests you.
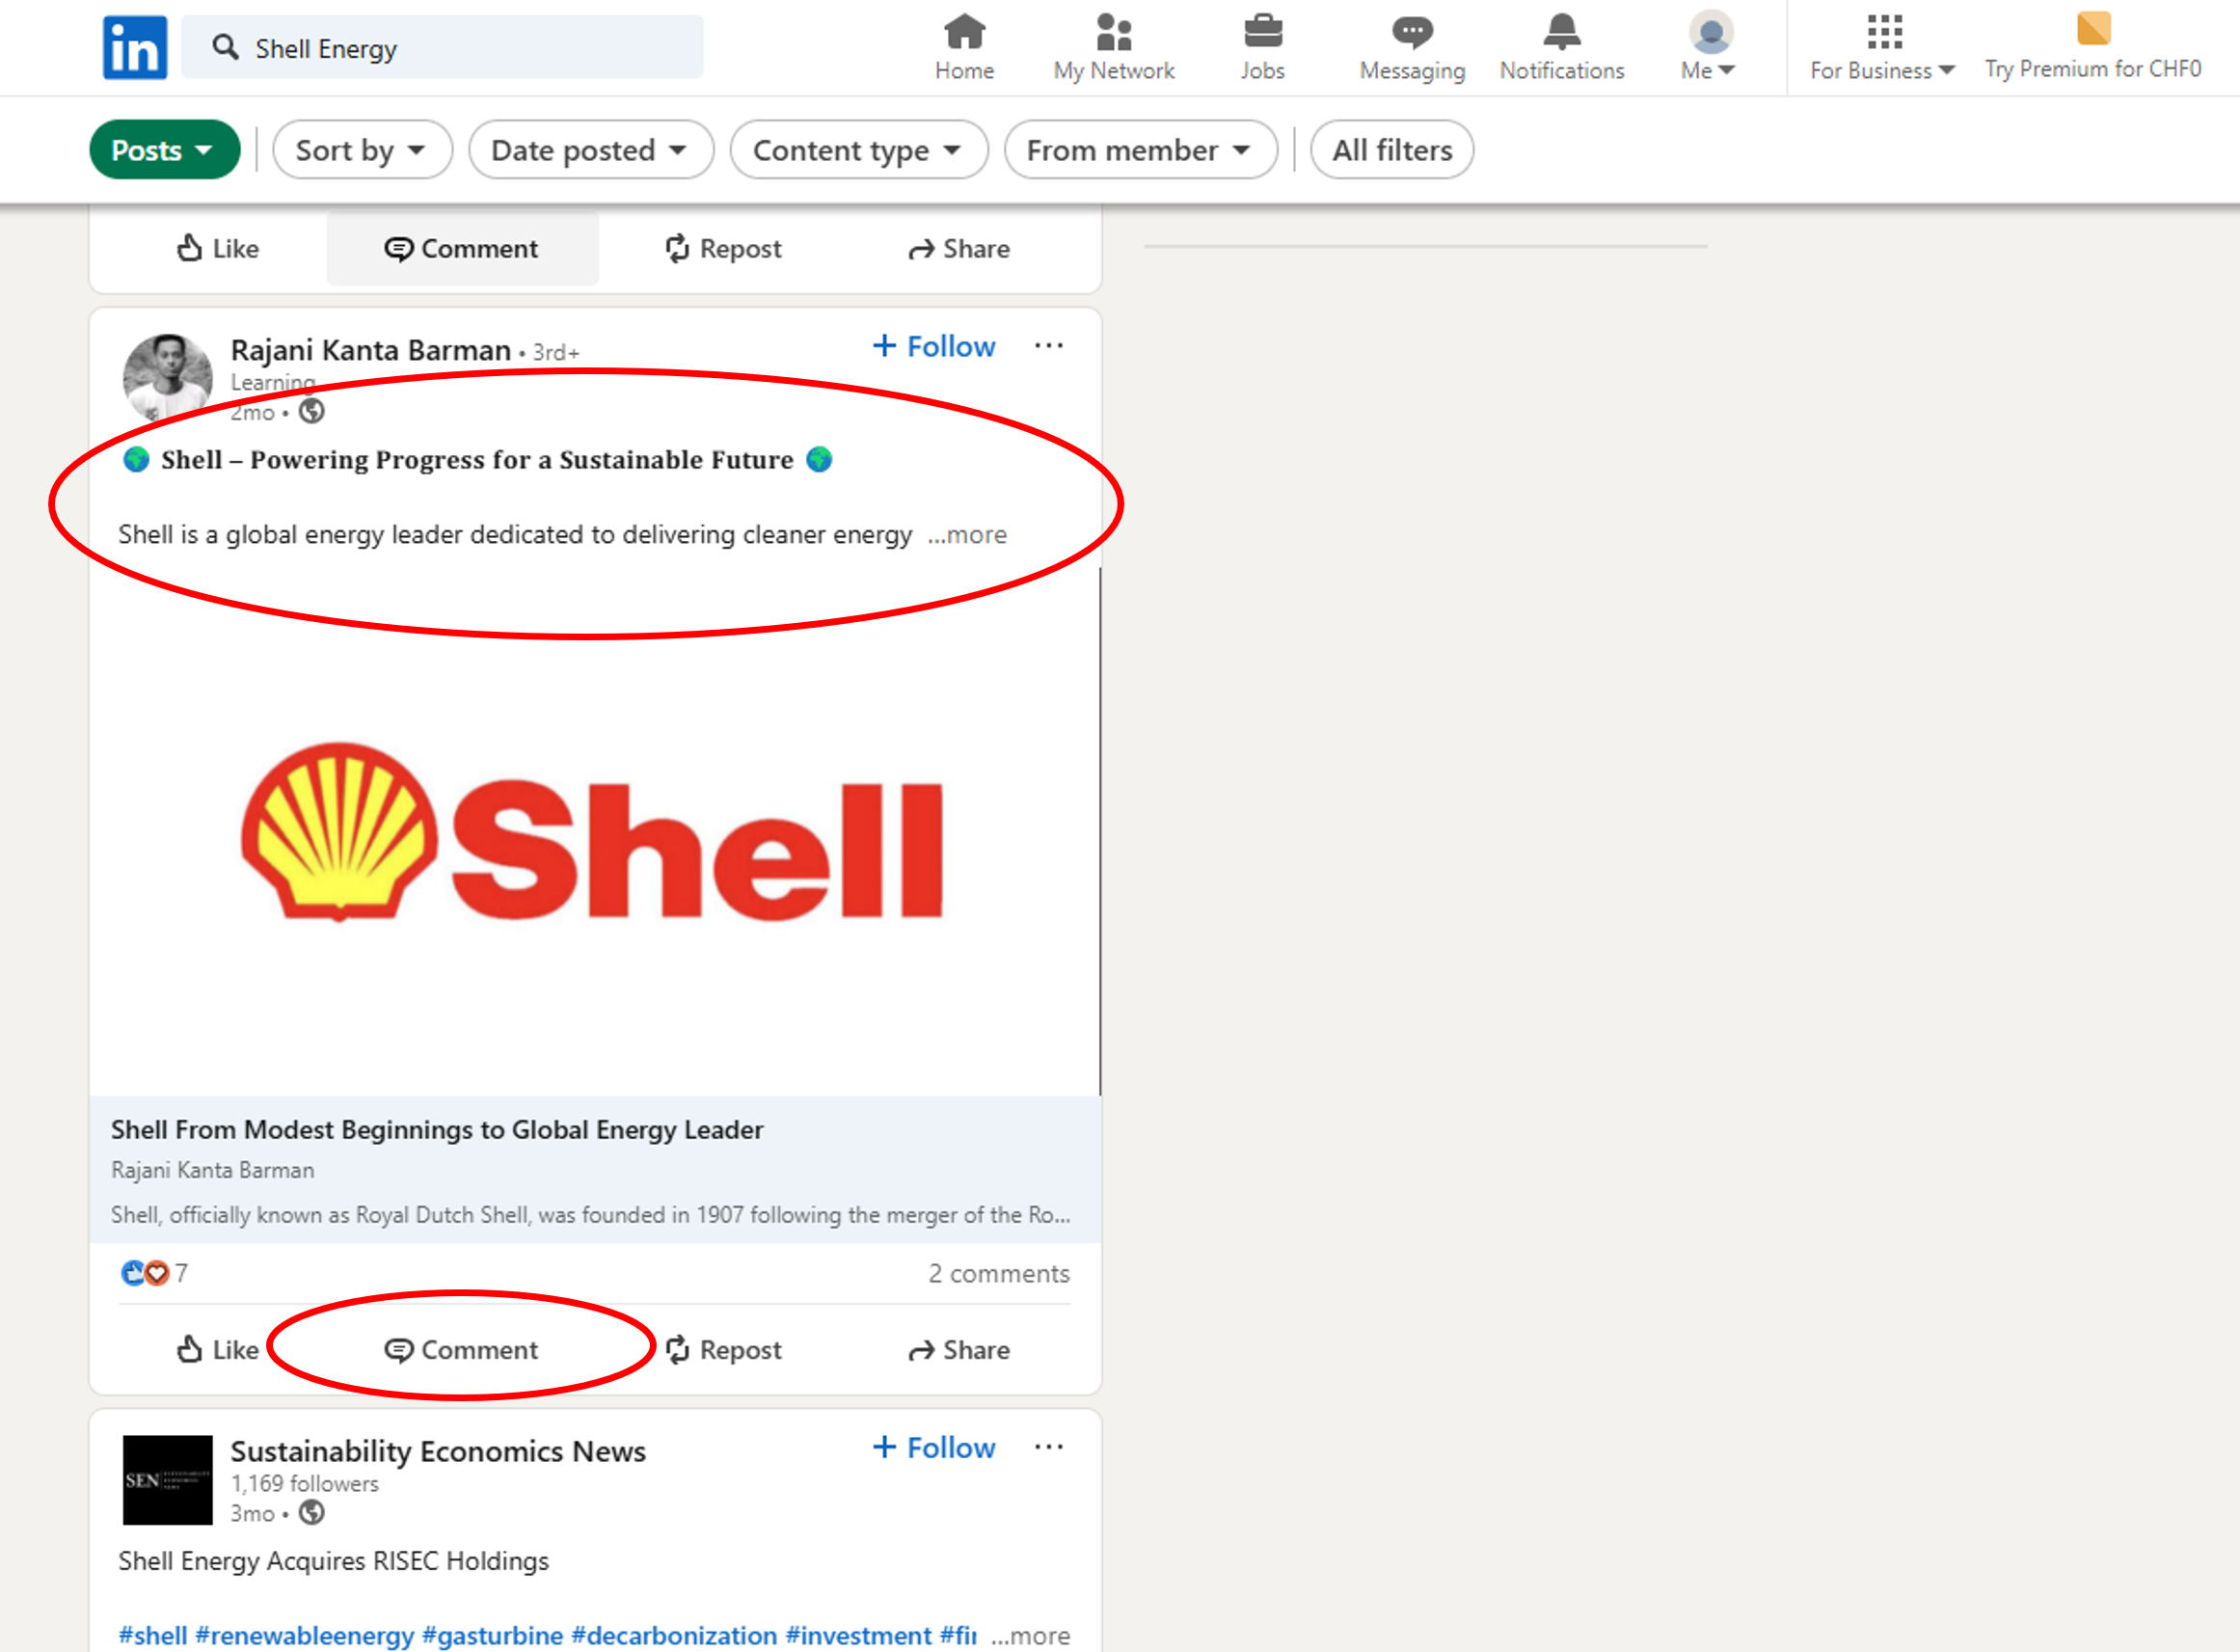
This Post is a boast about sustainable energy. Most posts give you a chance to post a ‘Comment’ as this one does (it is the default) but some restrict Comments to Connections and Followers.
More about LinkedIn
While our main use of LinkedIn is to post messages to companies or people, it has several other functions.
Connections
Members, including those with free membership, may invite a 1st-degree connection with any other subscriber who allows it (that is nearly all). Members with 1st-level connections can use InMail for personal messaging.
Posts/Articles/Comments
Posts are limited in format, length and links. However, you may also write Articles that allow much longer text, different fonts, and a number of pictures. LinkedIn encourages members to promote articles via Posts. Posts and Comments are promoted by LinkedIn’s algorithms. They are amplified if they contain links to other Linkedin members (using @Name, as on other social media sites) and if they are over twelve words in length. In any case, they stop being amplified after 24 hours of repost and commenting activity by others.
Creating an article
Articles allow you 110,000 characters of body text, a feature picture, a headline and a sub-headline. You can also insert more pictures, formats and links into the text. Then you can embed links to the article into LinkedIn Posts and Comments as follows:
- On the homepage of your LinkedIn account, in the centre column, there is a block for creating a Post. In this block are ‘buttons’ for ‘Media’, ‘Event’ and ‘Write an Article’.
- Click on ‘Write an Article’.
- The next page takes you through all the steps.
- Articles are not automatically promoted by LinkedIn, even to 1st-level Connections. They need to be promoted through Posts and InMails.
Networking
This is a short section for people who want to use Linkedin for more than one-way communication. There is a useful minority of LinkedIn members who use the platform for genuine debate and these may be worth engaging with.
LinkedIn works best for members who have a network, who post regularly and who get responses of significant length to their posts. Its algorithms monitor your influencing score or Social Selling Index.
You can see this in your Social Selling Dashboard when you are logged into your account.
Groups
There are also Groups you may wish to join.
For example, the ‘Climate Change - I care’ Group has 69,330 members.
You can start a Group simply by clicking on ‘Groups’ in the column on the left side of your Home page and then clicking on the button ‘Create Group’.
XR LinkedIn Accounts
Extinction Rebellion has a number of existing LinkedIn pages (to view these you'll need to have your own account):
- Extinction Rebellion UK
- Global Extinction Rebellion
- Extinction Rebellion Global
- Extinction Rebellion
- Extinction Rebellion Social Work
- Extinction Rebellion NL
- Extinction Rebellion France
- Extinction Rebellion Deutschland
- Extinction Rebellion Polska
Further Support
LinkedIn changes its functionality and permissions from time to time so the above is only for general guidance; it was written in Jan 2025.
If you want help with anything on LinkedIn, please contact Digital Rebellion at digitreb@extinctionrebellion.uk.