Group Admin Guides
This chapter is only relevant for people with the role of Group Admin.
- The XRUK Volunteer Agreement
- Inviting People to your Group
- Add and Edit Groups, Channels & Forums
- XR Groups, Roles and Mandates
- Role Tenure
- SOS Facilities on the Hub
- Setting up a New Group on the Hub
- Deactivating or reactivating someone's account
- How to create and use Forms on the Hub
- Behaviour and Good Practice
- Library (UK Cloud)
- How to set up a Telegram-Mattermost link
- Placeholder Hub Groups
The XRUK Volunteer Agreement
On this page:
- How to sign the Volunteer Agreement
- How to check other people who have access to personal data have signed.
What the agreement is for
The XRUK Volunteer Agreement is an agreement which must be signed by people who have access to Personal Data. That includes all Hub Group Admins, and anyone else anywhere in XRUK who has access to any individual's data (like mailing lists, other lists of people, details of who is attending an action, etc.).
Personal data includes email addresses, phone numbers, addresses, or anything which could identify an individual. It does not matter whether the person is in XR or not, if you have access to their data, you should sign the agreement.
Signing the agreement
If you are on the Hub, and you haven't signed the current version of the Volunteer Agreement, the following icon will appear on your Hub Home screen:
Click the icon to go to the Volunteer Agreement on Action Network.
If you are not on the Hub, you can go there directly.
What happens if I have not signed
When you login to the Hub, if you are a Group Admin, or have other elevated permissions, you will see this screen:
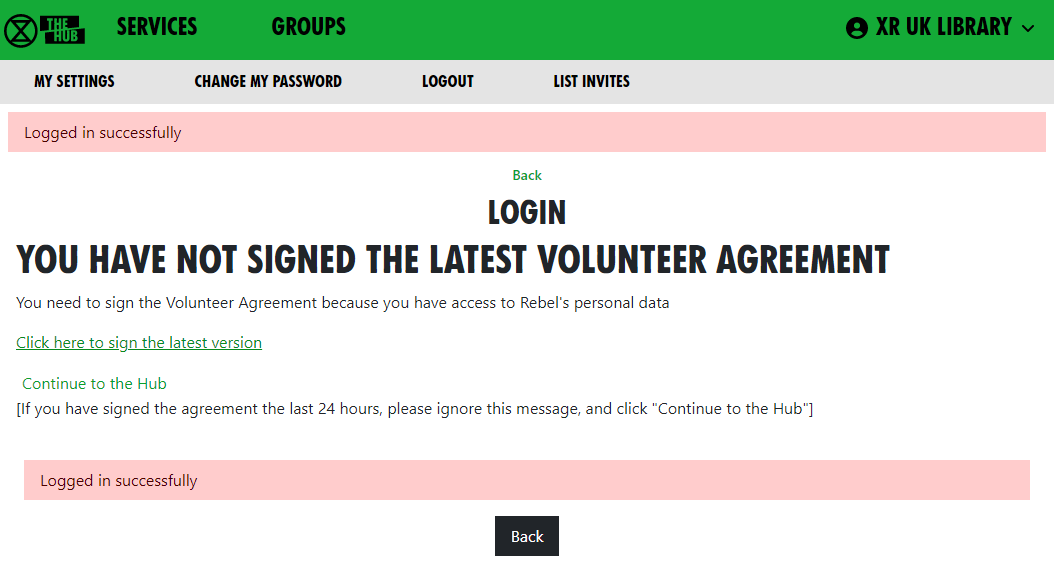
You should sign the ageement as soon as possible.
The Hub checks who has signed the agreement every night - so, if you sign, the Hub will not know about it until the next day. If you have signed today, so the Hub does not know, please click "Continue to the Hub".
What if I can't use my regular email address on Action Network
If, for any reason, you are unable or unwilling to use Action Network to sign the agreement with your regular email address, then copy the Volunteer Agreement from Action Network, paste it into an email, add some text to say you agree to abide by it, and send it to the "GDPR & Security" Team at dataprotection@rebellion.earth.
Checking if others have signed the agreement
Everyone in your group who has access to personal data (e.g. newsletter distributors, fundraisers, recruiters, Rebel Ringers, etc.) must sign the Volunteer Agreement. Please encourage them to do so.
Group Admins
If you are a Group Admin of a Group on the Hub, the "All Members" button will show you which version of the Volunteer Agreement your members have signed (if any).
You should ask anyone in your group who has access to anyone's Personal Data to sign it. If there is anyone in your group who has signed an older version of the Volunteer Agreement, they should sign the current version as soon as possible.
Administrators of groups not on the Hub
Action Network Admins can view whether people on their Action Network list(s) have signed the Volunteer Agreement by following these instructions.
If you are looking after Volunteers in systems outside the Hub, please contact the "GDPR & Security" Team at the GDPR & Security Mattermost Reception channel or by email: dataprotection@rebellion.earth. They can arrange for you to have access to the Hub, with special permission to look up email addresses to see if they have signed.
When you login to the Hub, your Home page will include this icon:

Click to go to this screen:
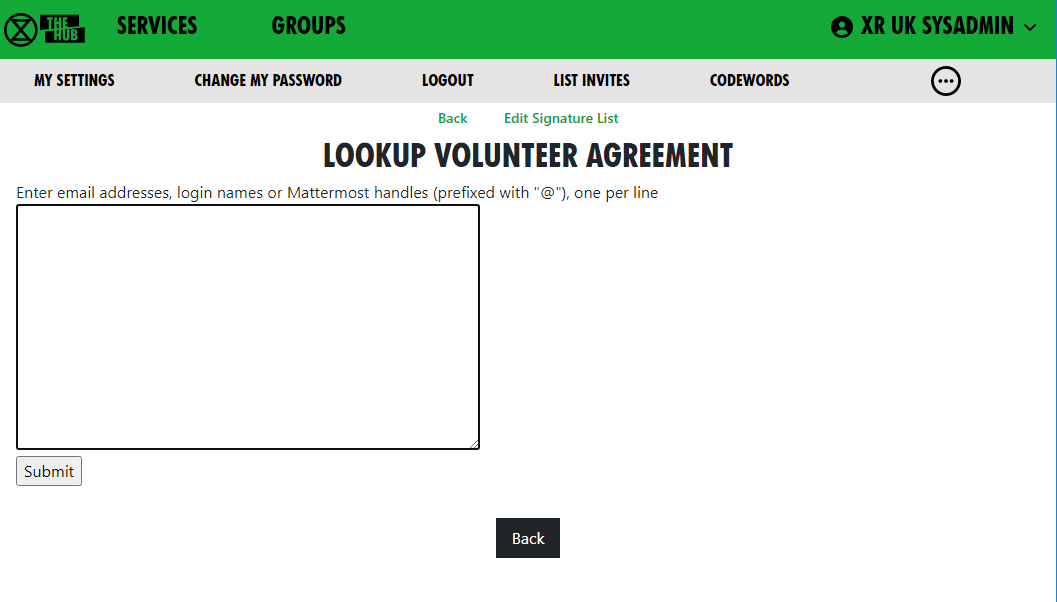 Enter one or more email addresses, one on each line, and click Submit, to see this screen:
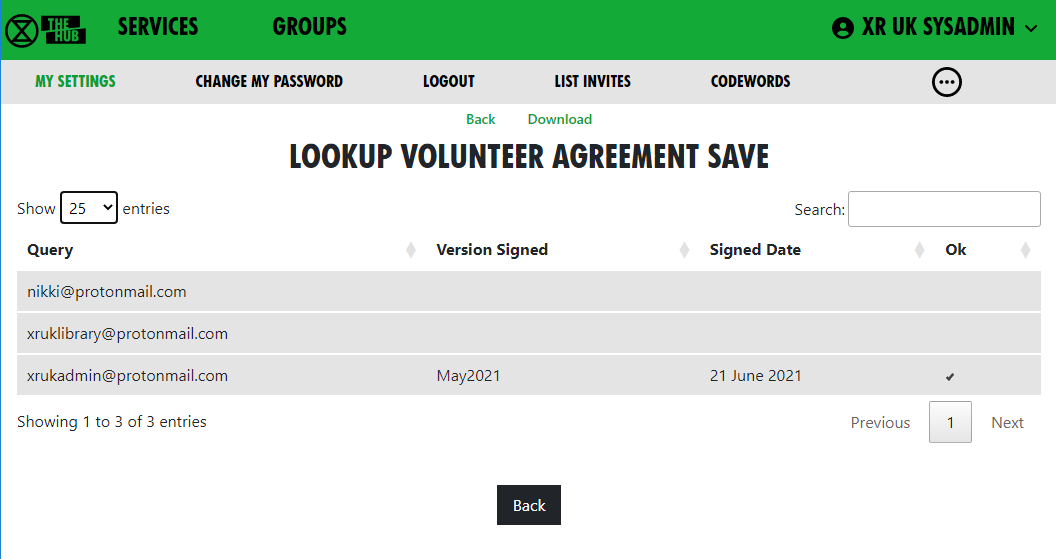 You see the email address or handle you entered, which version of the agreement they signed, when they signed it, and a tick under Ok if it is a current version. (The Volunteer Agreement may be updated from time to time, and, if the update is significant, people may need to sign the new version again.)
Updating the agreement
The Volunteer Agreement is jointly owned by the Pathway circle and the GDPR & Security circle.
GDPR & Security circle maintain the sections for Data Protection, Terms of Service, and Confidentiality. Rebel Pathway circle maintain the rest.
When we change this agreement in any significant way, there will be a new version in Action Network to sign. The new version will have a different flag on your record if you sign, and it will have a different date on the top of the page. Thus we know when people signed - and a record of what the form said at that time. This is for Data Protection record keeping.
Each circle will promote people to sign this form - and in that way encourage more rebels to know more about all the aspects here.
Inviting People to your Group
You should use the Hub to invite new people to your group. This is because an invite to the Hub sets people up correctly on all the XR services. You can also invite people to individual services, but then you would have to do all the work that the Hub could have done for you (e.g. inviting people to the right Teams, Channels, Cloud folders and Forums), so it is much easier to invite people via the Hub.
How to invite people to your group
Who is eligible to be added to the Hub?
We want to be as welcoming and enabling as possible of all new rebels who come to us enthusiastic to get stuck in. That said, the Hub is not a public space and a degree of caution should be exercised when inviting new people. Ideally, they should be known to and getting involved with your group.
If unknown people (e.g. from your area, but unable to get to meetings) request Hub invitations, please try to have someone meet them - a welcome to your group – before proceeding. This could potentially be via video chat if in-person isn’t possible. If a person seems unlikely to get involved locally but wishes to volunteer from home, then the Foundation Programme will likely be their best route in.
To get to the Hub, type - hub.extinctionrebellion.uk - into your browser address bar
To send a Hub invite
- select your group from the list of Groups
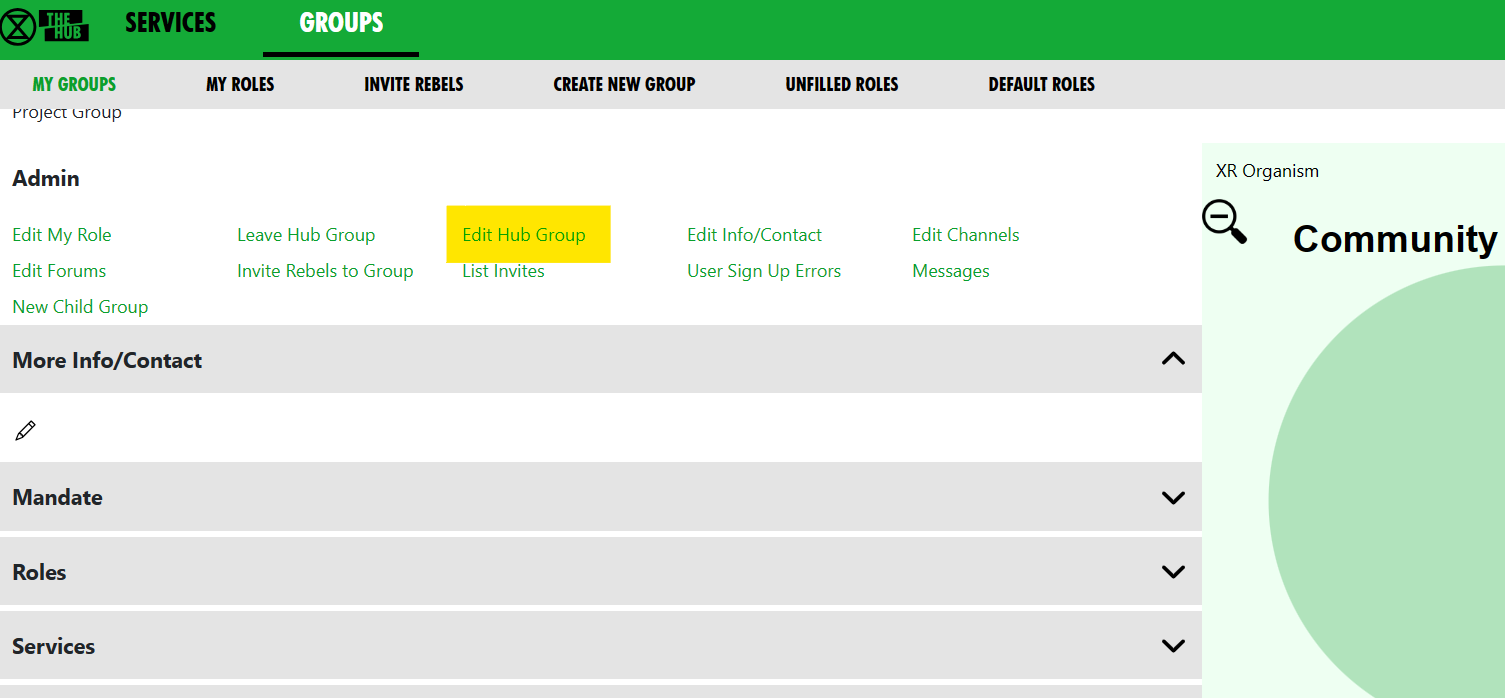
- use the 'Invite Rebels to Group' from the Admin section on the group page – then you will see this screen:

- You can add as many email addresses, logins or handles of people to invite as you like (one per line), and you can add a personal message for the users you invite.
-
NB If you put @ in front of a handle, the Hub will only search for that handle in Mattermost – otherwise, it will search handles and logins on all the services (some people have different handles in different places).
-
NB If you put @ in front of a handle, the Hub will only search for that handle in Mattermost – otherwise, it will search handles and logins on all the services (some people have different handles in different places).
- Invite emails will contain your email address, so the invitee can contact you for help or advice. If you have used a personal email to register on the Hub, that is the email that will be in the invite. If you are not happy with this, make sure there is a generic group email address in your group's Contact Info - then you will be offered the opportunity to use that email address in your invites by ticking the box.
- Invites expire in 14 days, so if someone doesn’t accept their invite within that time, you will have to invite them again.
- Invites normally go out by email – but if you search by handle, the Hub may find someone on Mattermost who has not registered with the Hub, and does not know their email – in which case it will send them a Mattermost Direct Message instead - the Hub's handle is xrukadmin.
How to invite people via a private Mattermost channel
If you click the Mattermost Invite green link at the top of the Invite People page above, you see this screen:
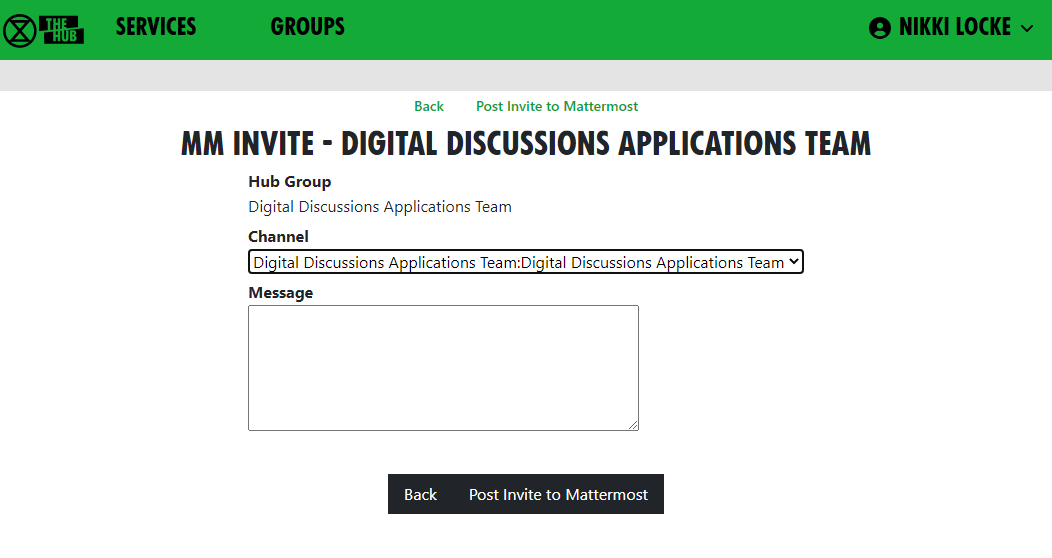
- This lets you select a private channel in Mattermost that belongs to your group, and post an invite link in there. Anyone who is in the private channel can follow the link to join the Hub. They will then have access to all your group’s channels, forums and cloud space.
- This is useful if you have invited people to your channels on Mattermost, but haven’t invited them through the Hub.
How to view invited people - List Invites
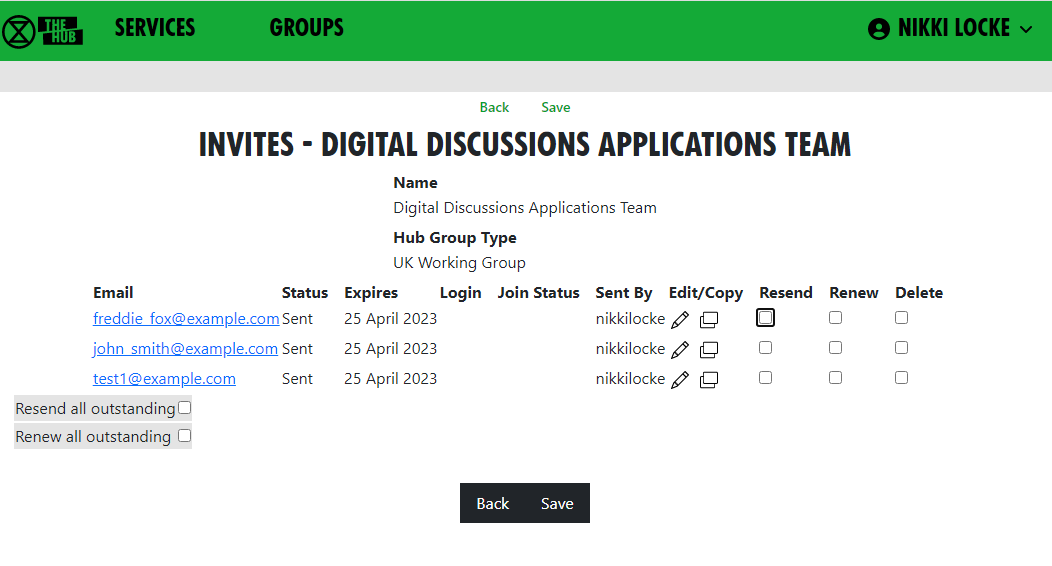
- This shows all the invites sent out for this Hub Group.
- Every invite still on file for the group is shown (all invites over 60 days old are removed).
- If the invite has been Accepted or Rejected, this is shown - there is nothing further you can do with these.
- If the person is on the Hub with that email, their Hub login is shown.
Columns
-
Status - Where the person is at with the invite you sent |
- Sent - You've sent it and they haven't Accepted
- Accepted - They've accepted and are now a Member of the group
- Rejected They've rejected their invite
- Expires - two weeks after the invite was sent.
- Login - the invitee's Hub login name (which can be different from their MM handle).
-
Join Status
- Member They have a Hub login AND have accepted the invite so are now a member of the organisation to which you sent the invite
- -blank- - They don't have a Hub login and they haven't accepted the invite
- On Hub The person is on the Hub, but has not accepted your invite
- Mattermost Problem - The person is on the Hub, but had a problem connecting to Mattermost. Please contact them to see if you can help (see Mattermost Problems below), or pass the problem to DDAT
- Forums Problem - As above, but for Forums - Nextcloud Problem - As above but for Nextcloud (UK Cloud)
- Edit/Copy
All invites with Sent status (i.e. that haven’t been accepted or rejected yet) have the following options:
- Edit icon - opens the invite, so you can edit it, or delete it. Note that, if you have changed anything on the screen, those changes will be lost if you click this (there is a prompt to make sure that’s what you want).
- Copy icon - copies the URL for the invite to your clipboard. This is useful if you want to send it to someone by some other means, as they haven’t received the email.
- Resend checkbox - tick this to mark the invite for resending by email. It will not actually be resent until you save the form.
- Renew checkbox - tick this to mark the invite for renewing (setting the Expiry date 14 days from now). It will not actually be renewed until you save the form.
- In addition, there are tickboxes for all at the bottom so you can easily resend or renew all the invites.
- If you then click 'Save', any invites where you have ticked Renew will be renewed, and you will be taken to the normal Send Invites screen, with the emails of all the people where you ticked Resend already filled in.
How to fix problems with people signing up
The 'User Sign Up Errors' button in the Admin section of your Groups page lists any errors users had when the Hub tried to add them to all the relevant spaces in Mattermost, UK Forums and UK Cloud. If you see any problems here that you can’t fix by speaking to the person, please contact us on Digital Discussions Applications Team Reception.
How to fix Mattermost (MM) Problems
The URL for XR's Mattermost is https://organise.earth
A Join Status of Mattermost Problem against an invite means they are on the Hub, but have not got on Mattermost for some reason. The solution begins with finding out what the problem is (usually by getting them to log into the Hub, and seeing what screens come up).
The problem is usually one of the following:
| Problem | Solution |
|---|---|
| Their login name already exists on MM, however doesn't belong to them, but they haven't changed it to one that isn't already in use | Click on the 'Try a different name to create a different login name on the Hub.' button, and try a different login name in the next screen.* |
| Their login name already exists on MM, does belong to them, but they haven't authorised the Hub to access Mattermost because they have forgotten their MM password | First get MM working by trying to log in with their login name, and clicking the button to reset the password that they have forgotten to something they can remember (e.g. their Hub password). Then they need to log in to the Hub (with their original Hub password), and authorise the Hub to access their account. |
| Their login name already exists on MM, does belong to them, but they haven't authorised the Hub to access MM because they haven't responded to (or haven't got) the email from XR Global 'Verify My Email' | First ask them to check their inbox (check Spam/Junk if not in their inbox) for the email from XR Global. If they can't find it, go to the MM sign-in page at https://organise.earth and ask them to sign in with the same details they used to create their Hub account and click the button to resend the email. Find the email from XR Global, and follow the link in the email - 'Verify My Email' - to activate their MM account. Then they need to log in to the Hub and authorise the Hub to access their account. |
| Their login name already exists on MM, does belong to them, but has a different email to the one they are using for the Hub | Change their email address on Mattermost or on the Hub, so they match. |
| Their email already exists on MM, but they haven't authorised the Hub to access Mattermost because they have forgotten their MM password | First get MM working by trying to log in with their login name, and clicking the button to reset the password that they have forgotten to something they can remember (e.g. their Hub password). Then they need to log in to the Hub (with their original Hib password), and authorise the Hub to access their account. |
| Their email already exists on MM, but they haven't authorised the Hub to access MM because they haven't responded to (or haven't got) the email from XR Global Verify My Email | First get MM working by trying to log in using their email, and clicking the button to resend the verification email. Next, find the email from XR Global in their inbox, and follow the link - Verify My Email - to activate their MM account. Then they need to log in to the Hub, and authorise the Hub to access their account.** |
*This screen shows if they have chosen a login name that matches an existing name on Mattermost. It lets them choose a different login name (if the Mattermost account isn't theirs), or link their Hub account to their Mattermost account:

**This screen shows if there is an existing Mattermost account for their email address. It lets them link their Hub account to their Mattermost account:

Removing people
To just remove someone from your group, click the 'Members' dropdown in your group screen, click on their entry, and then click 'Remove User From Hub Group' at the top.
If someone is stepping back altogether from all their roles, you may find the Step Back From Roles screen useful.
Add and Edit Groups, Channels & Forums
Note: If any of what follows makes you nervous, drop a request into Hub Help Desk on Mattermost and say you would like to practise Hub management for Trumpton! Then you can safely test functions without doing harm!
Groups
'Edit Hub Group' Screen
The 'Edit Hub Group' screen lets you rename your group, or any of its teams, channels, forum groups, forums or cloud group. Here is an example of how this screen is laid out for the 'DDAT' Circle:
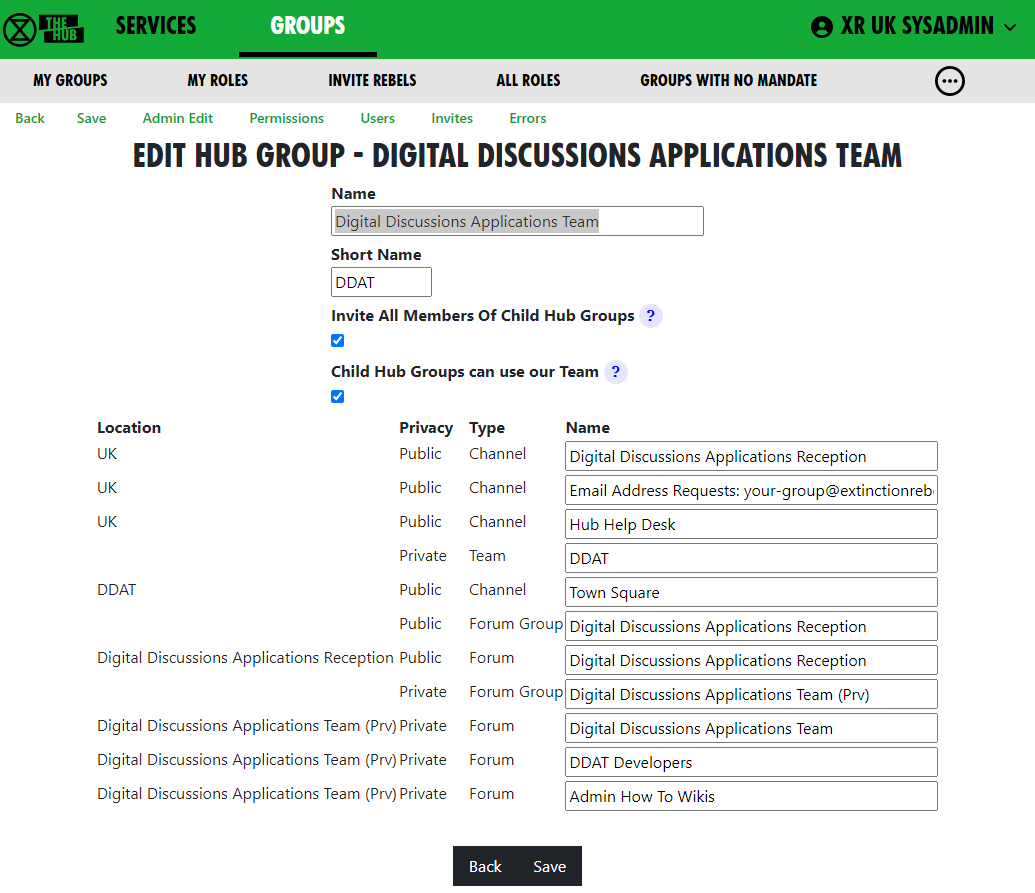
The edit screen helps when, for instance you change your circle name or shortened name. It will update all of the other names on the screen to match (albeit, you can still edit them too). When you click 'Save' it will update everything on the Hub and on the other services.
If the changes it makes automatically do not suit you, you can change names back on the: individual team, channel, forum or cloud folder.
Duplications. You may get an error message if one of the names you have chosen has already been used by another organisation. Choose a different, unique, name.
It also lets you change the setting where members of child groups are automatically invited to your group. If you tick 'Invite All Members of Child Hub Groups?', all members of any descendant (child, grandchild, etc.) group will be invited to join this group. When they accept this invite, they will be full members of your group, and have full access to everything, i.e.: Team, public and private channels, public and private forums, and cloud storage.
Note: if you change it from unticked to ticked, the invites will be sent out immediately when you 'Save'.
You can also change 'Child Hub Groups can use our Team'. If this option is ticked (this is the default), then new child groups you create will use the same Mattermost Team as this group.
How to Change Your Group Name
The Community Assemblies crew wanted to change their abbreviated name on the Hub. The yellow highlighted option is where they selected to change the Group's abbreviated name.
'Edit Hub Group' lets you edit your:
- group’s name
- short name
- whether you want members of Child Groups added to your Mattermost Team
- contact details for your group
- names of all your Channels
- Forum Groups
- Forums
- Nextcloud Group
Edit Contact Info Screen
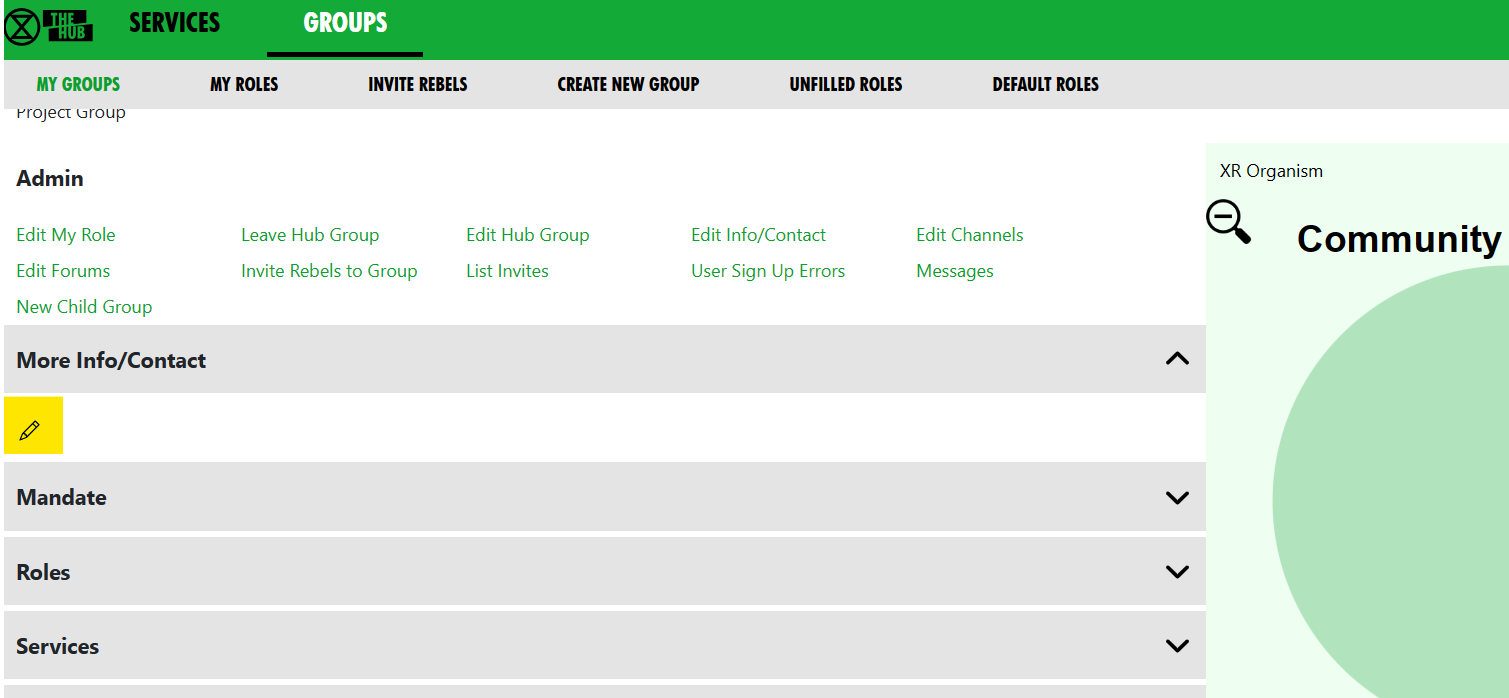
You can reach this screen by clicking the edit pencil (highlighted in yellow in the illustration) in the More Info/Contact dropdown of your Group screen. Click on the grey bars to open up drop down options.
At the top, under Public Info, is where you can place public contact details for your group. These will appear on the UK Regional Map, and possibly other public websites, such as social media sites.
IMPORTANT! Since public access to this information is possible, DO NOT PUT PERSONAL OR PRIVATE ADDRESSES IN HERE.
The last section, under Members Only Info, is information you only want members of your group to see. It is intended for such things as Zoom meeting links, or other information that might also go in a Mattermost channel header. If Mattermost is unavailable, the Hub is another way of group members accessing 'need to know' information, such as in this case, Trumpton Group's meeting arrangements.

Contact details and Members Only accept Markdown (like Mattermost and Forums), so you can format your details and put links in.
How to Create a New Child XR Group
If you are part of a large group which has a number of smaller working groups (e.g. a large working group, like Pathways, example working groups would be, for instance, 'Talks and Trainings', 'Foundation Programme', etc.). Where there are complex structures, you can create separate Hub Groups for your working groups on the Hub, with information on their new services.
Back to the Community Assemblies example, check out the yellow highlighted option below:
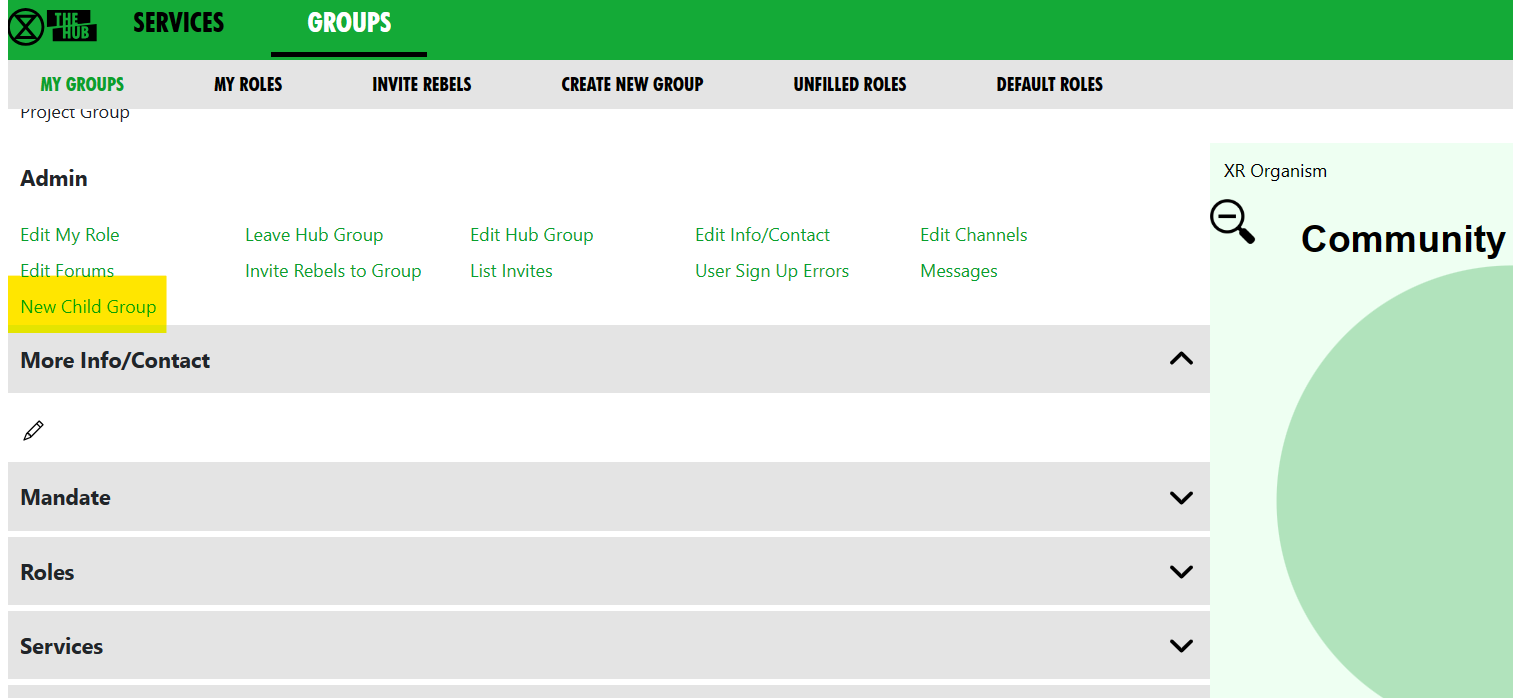
Click 'New Child Group' in the Admin menu of your Group display, or click "Create New Group" in the grey menu. This takes you to a new group screen in the 'Setting up a new group on the Hub' document.
Channels
How to Add a New Channel
Open the 'Services' grey dropdown bar on your Group page. Then click the
 ('+' symbol in a circle) button. This takes you to the Create Channel screen to create a public or private channel in the corresponding team.
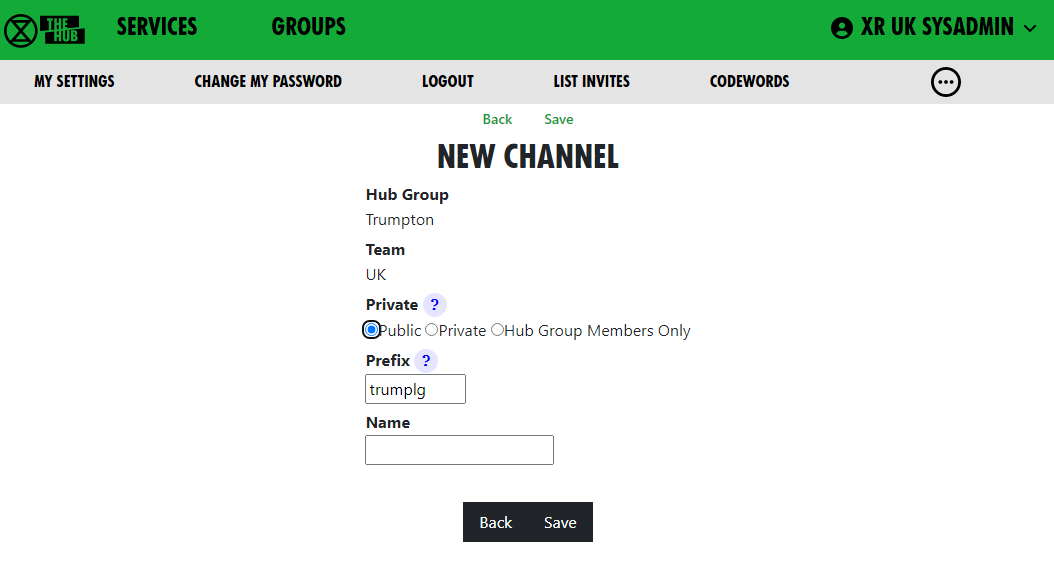
The name of the Channel will be made up of the Prefix and the Name. The Prefix defaults to your group short name; this is to help us avoid trying (and failing) to create 100 channels called “Media & Messaging” for 100 different working groups!
When you click 'Save', the Channel will be created right away. All your group members will be joined to it in due course. There is a background job running which does this, so it make take a while for it to catch up, or it will happen the next time they log in to the Hub.
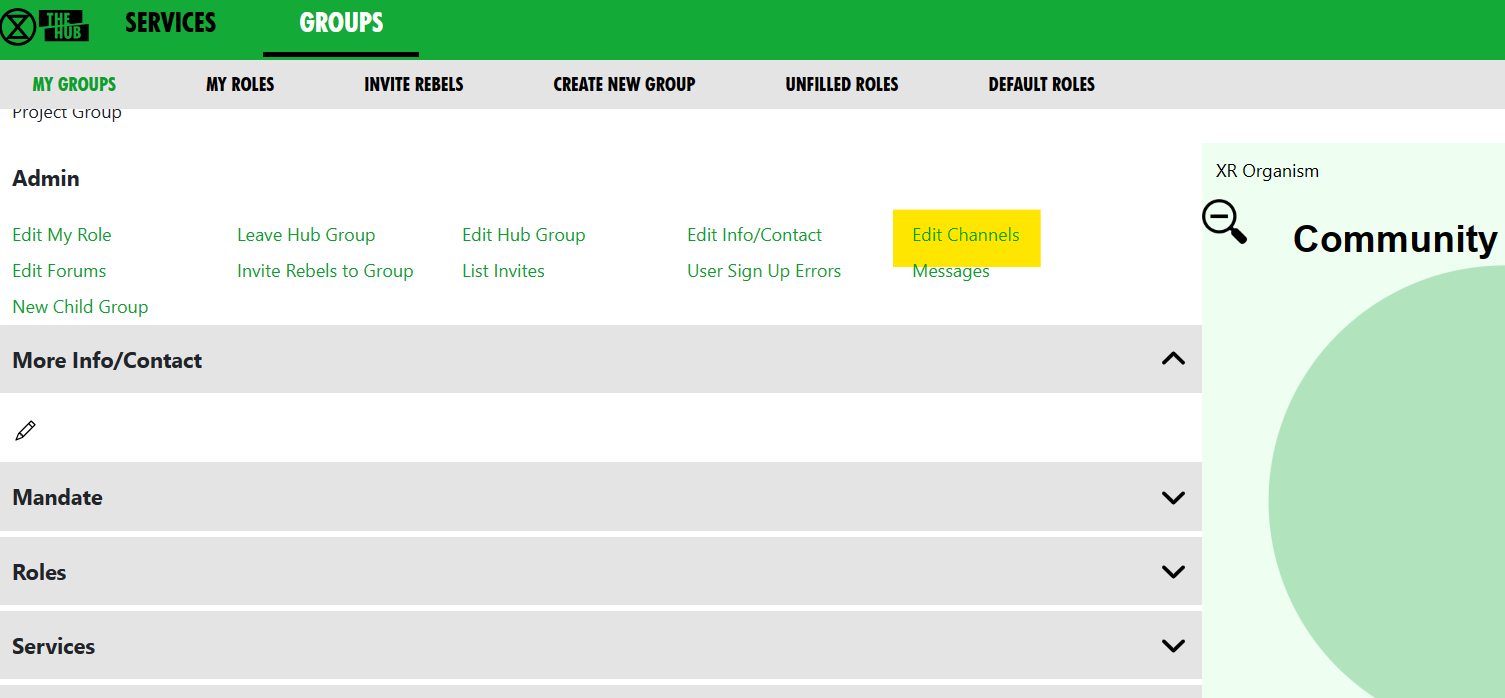
How to Change your Channel Names, Public / Private
Either click on the 'edit pencil icon' next to a channel, or on 'Edit Channels' in the top 'Admin' menu, which shows all the Channels for your group.

Clicking on one will show the Edit Channel screen:

This allows you to edit the name, and you can choose to change whether the channel is public or private. When you Save your changes, the Hub will update Mattermost with your changes.
The Edit Channels list has a 'Show Unclaimed' button allowing you to also include unclaimed channels you are in; you can pick one and claim it for your group.
How to See Who is in Your Channels
The Edit Channel screen (see above) also has a 'List Members' option to list all the members of the channel on Mattermost. This shows which of those people are on the Hub, and whether they are a member of your group.
There is also a button next to people who aren’t in your group, which you can tick to invite them.
There are bulk buttons at the bottom, to invite everyone who should be in the channel, or remove everyone who shouldn't be in it (because they are not members of your group).
How to Delete Channels

You can also delete channels in the 'Edit Channel' screen. (except for the ones the Hub needs you to keep, i.e.: your Reception and your main channel. Message the Hub Admins in the Digital Discussions Applications Team Reception or Hub Group Admins channels if you want to delete those.)
Deleting a channel here will also delete it on Mattermost.
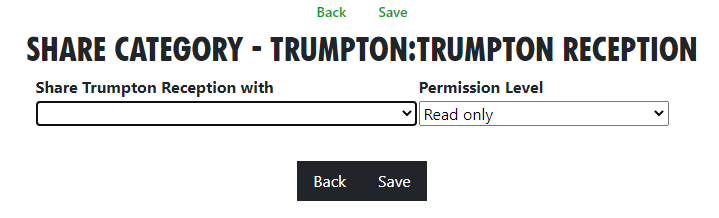
How to Share Channels With Other Hub Groups
You can share a channel with other groups. This is useful when multiple groups are working together on an action or project. All members of all the groups your channel is shared with are joined to that channel.
To do this, click on the  icon next to Shares in the Edit channel screen (see above), to see this (Trumpton group example) screen:
Choose the group you want to share with from the drop-down list. Another dropdown will appear, so you can share with multiple groups.
An  will appear to allow you to remove that share.
Click Save when done.
How to Restore Archived Channels
Mattermost lets anyone in a channel archive it. This removes it from the channel list. People sometimes do this by mistake, thinking it only archives it for them, not everyone! Important!: Archiving a channel archives it for everyone!
If someone has archived one of your channels by mistake, you can restore it the following day. The Hub notices it has been archived on its overnight check, and adds an Unarchive button to the Edit channel screen; this is how you restore the channel.
Claim Channels: If you already had Mattermost channels created before you came on to the Hub
Some people set up their group on Mattermost, without joining the Hub first. If you did this, you should now claim those channels for your group on the Hub. This way, the Hub knows they belong to you, and can join people to them when you invite them to the Hub.
The procedure for claiming a channel is as follows:
-
In Mattermost, invite @xrukadmin (the Hub’s login to Mattermost) to all the Teams and channels you want the Hub to know about. If inviting xrukadmin to a Team, make it a Team Admin (in 'Manage Members').
-
Wait 24 hours for the Hub to recognise your channels.
-
Claim the channels in the Hub:
- Go to your group in Groups
- Click Edit Channels
- Click the 'Include Unclaimed' button – this will add any other channels you are a member of but which don’t belong to a group on the Hub yet.
- Click on each channel you want to claim, check the details on the next screen, and click save to claim it for your group.
- You can then, if you wish, post a generic link to one of your private channels to allow anyone in that channel to join your group on the Hub. To do that:
- Go to your group in Groups
- Click Invite Users
- Click the Mattermost Invite button
- Choose the private channel to post the invite to
- Add an optional message from you
- Click Post Invite to Mattermost
Forums
How to Add a New Forum
Open the 'Services' dropdown on your Group page. Then click the
button, which takes you to the 'create forum' screen; here you can create a public or a private forum.
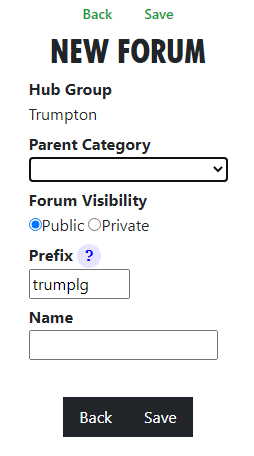
The name of the Forum will be made up of the Prefix and the Name. The Prefix defaults to your group short name, and is to help us avoid trying (and failing) to create 100 forums called “Media & Messaging” for 100 different working groups!
You must choose which top level category the forum goes in.
When you click Save, the Forum will be created right away. All your group members will be joined to it in due course (there is a background job running which does this, so it make take a while for it to catch up), or next time they log in to the Hub.
How to Change Forum Names and Locations or Delete a Forum
 You have 2 options:
- Click on the edit pencil next to a forum, or
- 'Edit Forums' lists the Forums for your group; clicking on one will allow you to edit the name and the parent category. When you 'Save' your changes, the Hub will update UK Forums with your changes.
You can also delete forums here. However, this does not include the ones that the Hub needs you to keep, i.e.: your Reception and your main forum. Message the Hub Admins in the Digital Discussions Applications Team Reception or Hub Group Admins channels if you want to delete those. Note: Deleting a forum here will also delete it on UK Forums.
How to Share Forums With Other Hub Groups
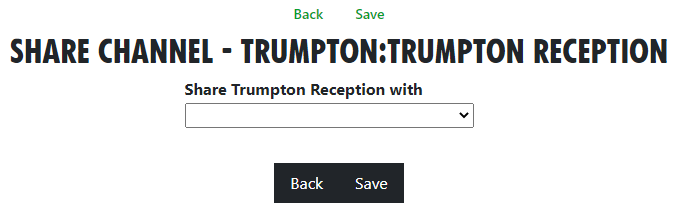
To share forums with other groups, click on the icon next to 'Shares' in the Edit Forum screen, to see this screen:
Choose the group you want to share with from the drop-down list. (In the image, the text reads: "Share Trumpton Reception with". You can also choose to limit this group's access to the forum in the 'Permission Level' dropdown.
Another dropdown will appear, so you can share with multiple groups. An will appear to allow you to remove that share.
Members
Adding Members
To add people to your group, you need to send them an invite. See Inviting People to your Group
Removing Members
To just remove someone from you group, open the "Members" dropdown, then click on their entry, then click "Remove User From Hub Group" at the top.
If someone is stepping back altogether from all their roles, you may find Step Back From Roles screen useful.
Edit Messages Screen

How to Change Default Welcome Messages
To add/edit messages click the 'Messages' link in your Group screen (see screenshot above).
Welcome messages are sent via Mattermost Direct Message to people who have just joined your organisation on the Hub. They come from xrukadmin (the Hub's Mattermost login). Note: xrukadmin does not read replies. It is recommended that you include instructions to contact your own Mattermost handle in the automated welcome message. E.g. "Do not reply to this message, contact @fred-xrtrumpton if you have any questions".
Just enter the message text, then click 'Save'. You can use Markdown formatting, like you can in Mattermost, Forums and Cloud. Subsequently, anyone who accepts an invite to your organisation will receive that message overnight, as the Hub runs updates in the early hours of the morning.
How to Set Auto-Reminder Messages
Reminder messages are useful for regular events, like weekly meetings. They are posted to your channel of choice on Mattermost, by xrukadmin, the Hub's Mattermost login, each night.
1. From your Admin options (top of the group in green)
 2. Select Messages
-
Select Reminder

-
Select New Reminder Message.
-
Type in your text and add any links, e.g. Zoom meeting, minutes etc. NB: The Hub uses Markdown in the same way Mattermost does. So you can use @all - and that will notify everyone in the Mattermost channel of the reminder when it's posted into the channel.
-
Choose the channel from the drop-down in which you want your reminder to be posted.
-
Choose the start date and the schedule.
-
Select Apply and check the bottom of the page to see exactly when your reminders will be posted.
-
Once happy, select Save.

XR Groups, Roles and Mandates
Read this guide to learn how to use the Hub to manage your group's mandates, roles, members, etc.
XR Groups Screen
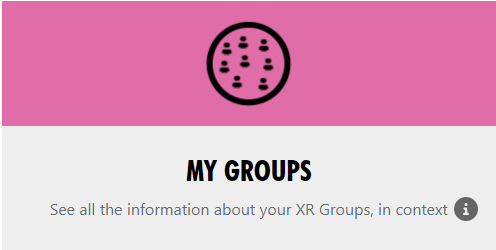
If you click 'My Groups' on the Home page, you will see a screen like this:
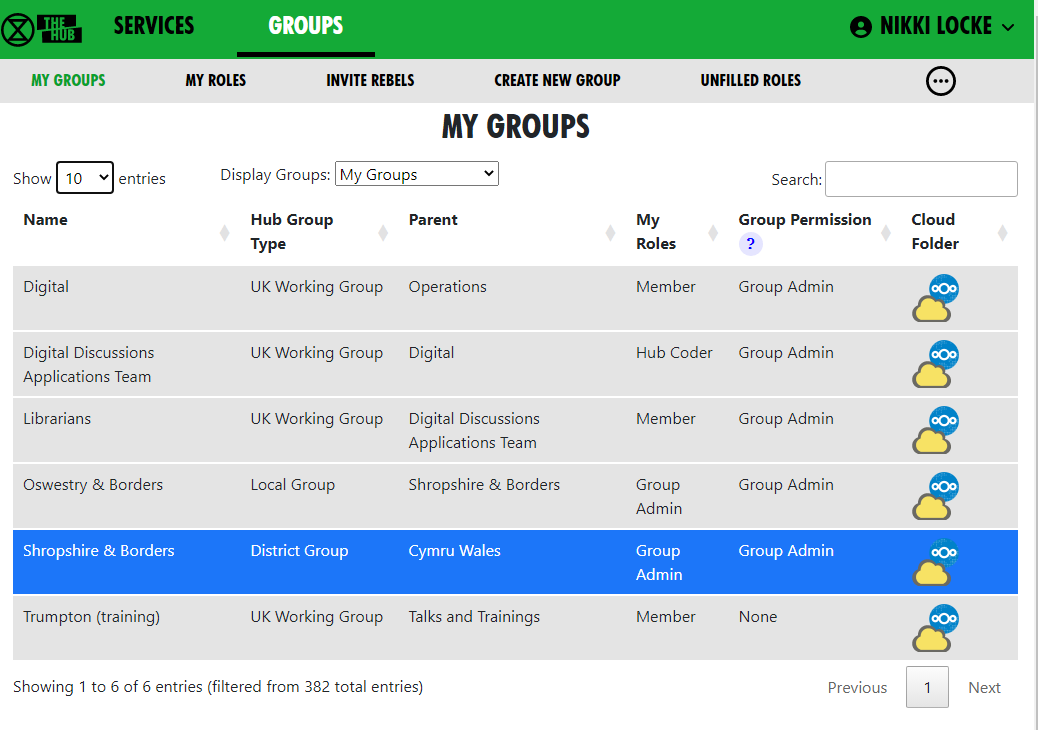
Choose a group to see all its details in context.
This is the Group Admin view – ordinary users can see this screen, but won’t have the links to change things.
If you want to become a Group Admin for a group in order to be able to edit here, you will need to contact your Internal Coordinator (IC) / External Coordinator (EC) or an existing Group Admin who is listed for your group. If all these people have stepped back, then contact your parent group Hub Admin.
This page shows the group in context. You can click on any of the group names (in the bar above the group name in bold, or in the diagram of the organism on the right) to see its parent and children groups. You can click on the dropdowns (in the grey boxes) to see more information.
Each group is displayed the same way. Public links are always clickable. If you are a member of the group, the private links are clickable too. If you are a Group Admin, the extra admin links also appear.
The organism graphic display shows the group in context – you can click the full screen icon (the black 4 x corners making a square, top right) to make it bigger.
You can click on groups within this view to shift your view to display a different group. To come back out from that group and back into the bigger framework of groups, use the spyglass icon, top left.
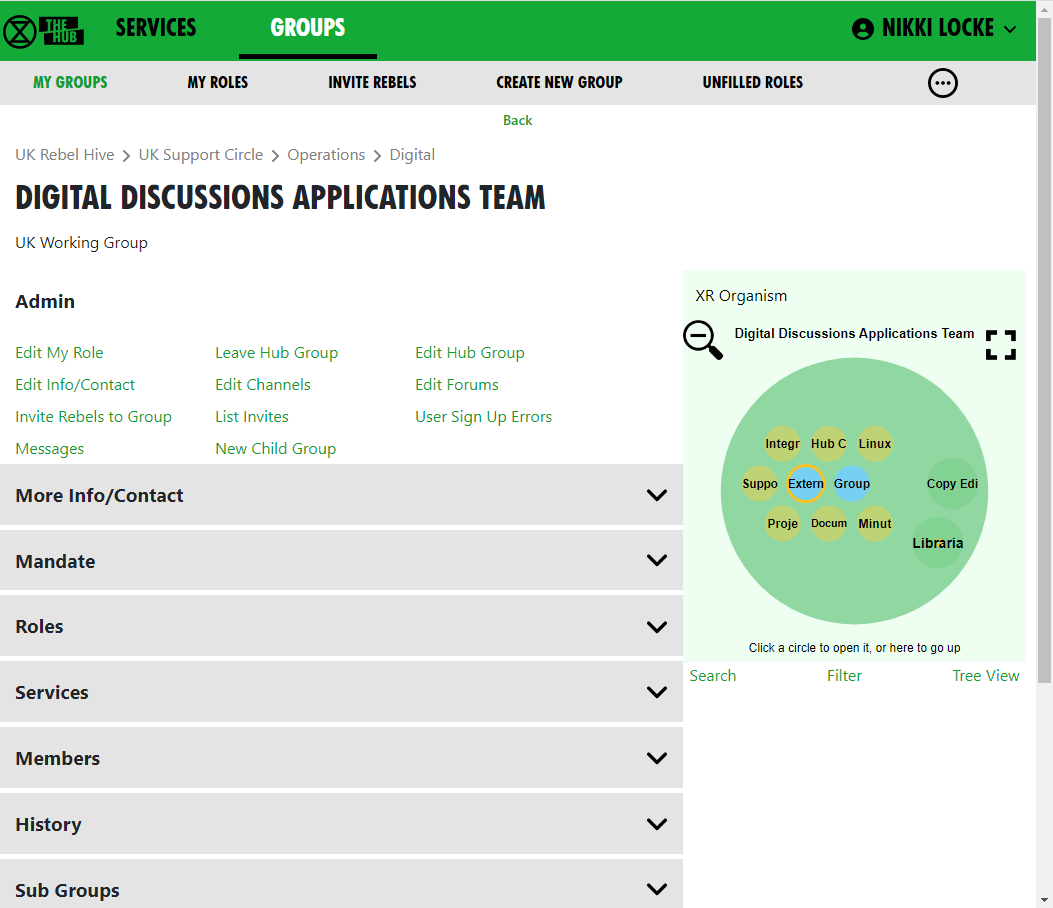
Structure
To find your way about XRUK, you can click on any group name on the screen to show that group, with its parent and children groups. Alternatively, you can click on a group in the Hub Circles XR Organism graphic display at the top right of the image above. This has a full screen button (the 4 x corners making a square, top right) to make it larger and easier to navigate.
If you are using the Hub Circles display, you can click the Filter link text below the graphic (in green font). This will hide some of the detail, to make the diagram less busy. If you set a filter, it is remembered, and used every time you open this view.
Here is an illustration of what the filter function brings up for someone looking at the Cymru Circle:
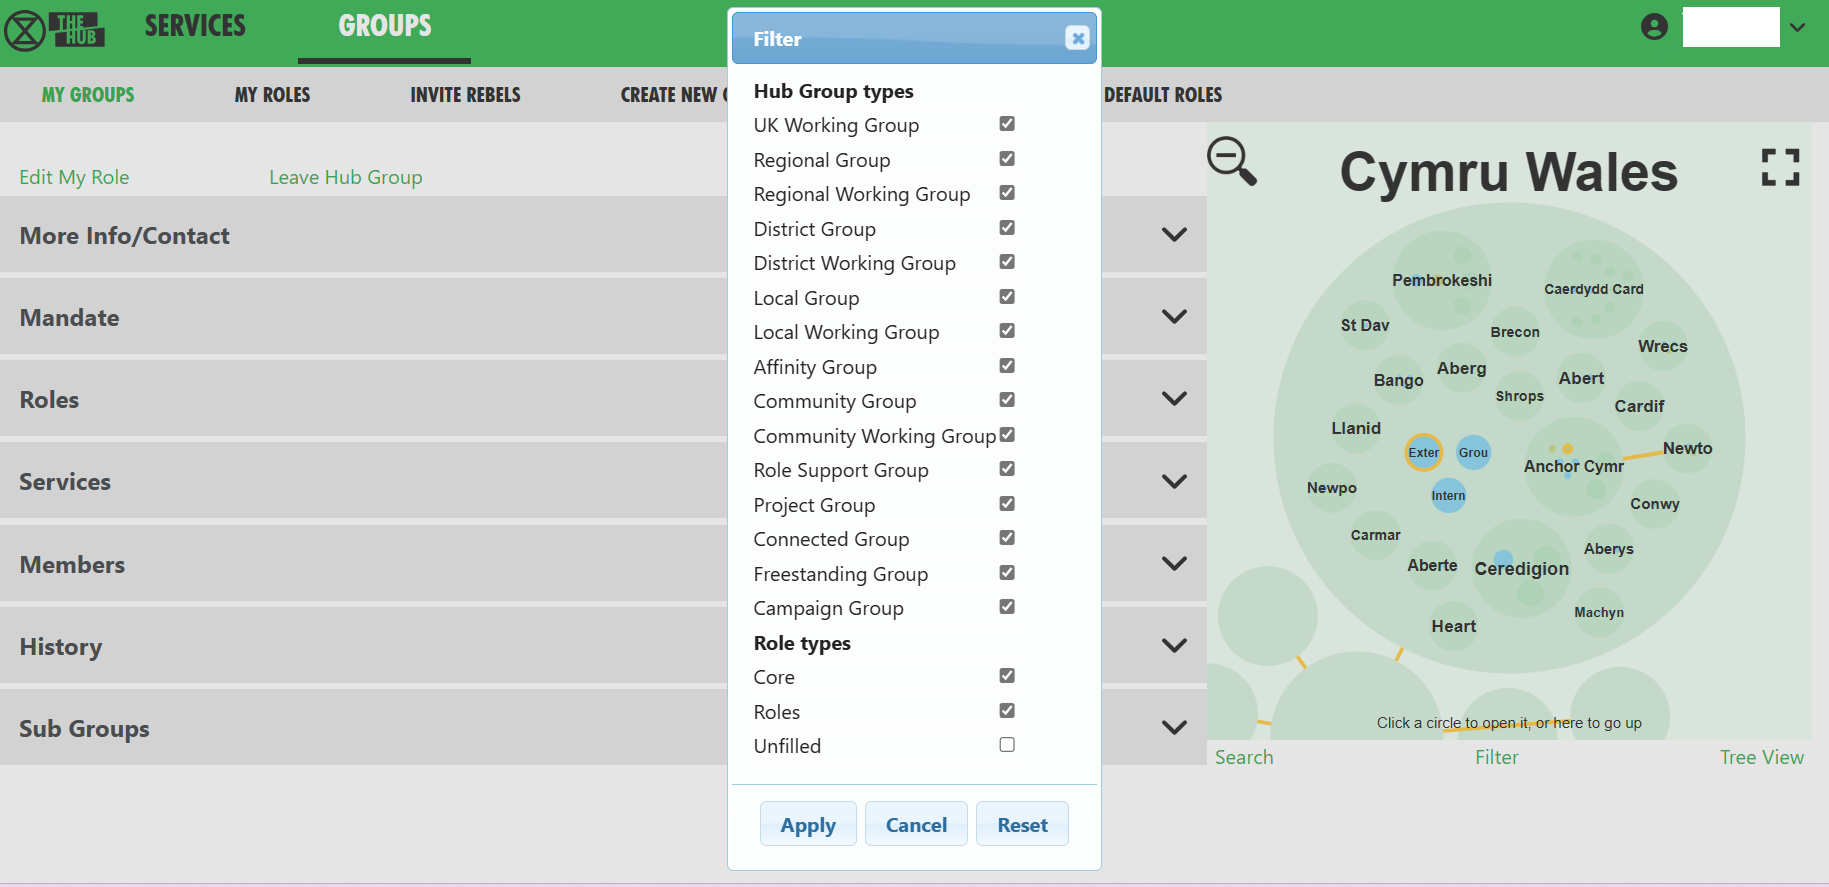
Don't be afraid of playing around with your options to filter here! Just remember that the filter stays in place for any future visit to this screen, so you might want to revert back to the full picture, with no filters before leaving the page!
XR Organism
To describe our XR UK organisational structure, we are on: organism.extinctionrebellion.uk. This is a public site which is updated from the Hub every night.
How To Find a Person to Contact Them on Mattermost
In the group they are a member of, click the grey 'Roles' band to open up a drop down of further detail. If you click the name of someone you wish to contact, you will automatically have a new tab opened that will take you to a direct messaging thread with that person on Mattermost.
Roles & Mandates
How to Change People's Roles in your Group
All roles all have a 'shelf-life', called a tenure, i.e. they have a pre-arranged end date, agreed with the person stepping into a role. Having an end or review date will allow for new people to step forward to take on responsibilities and allow for life-changes for those in the role. This helps to mitigate for power. When someone's role reaches its end point, the group should elect a replacement (can be the same person, if they are willing), and you should update the role holders on the Hub.
The 'Roles' dropdown (in the grey boxes) lets you view/edit the Roles within your group. Alternatively, you can click on an individual role in the display to edit it. See Edit Role screen below. The Roles dropdown view will show who is in the Core Roles and any sub-groups of that circle.
See Core Role Mandates, and templates for other role mandates, here. For more about core roles see the XR UK constitution.
How to Change Your Group's Mandate
The 'Mandate' dropdown (in the grey boxes) will show the group's Mandate. If you are Group Admin of the parent group, you will see an edit pencil button that will let you change the mandate.
To edit the Mandate:
- First ensure the parent circle has agreed the changes
- Select Mandate dropdown
- Click the edit pencil
- Make changes
- Save
The XR UK constitution says that all working groups should have a Mandate. However, not all parts of XR UK are covered by the constitution. Some Hub Groups were created without one. To make it clear when a group does not have to follow the constitution, we use different names:
| If the group follows the constitution | If it doesn't |
|---|---|
| Mandate | Scope |
| Role | Position |
| Purpose | What this group is for |
| Accountability | Activity |
| Domain | Resource |
(for more details see SOS Facilities on the Hub)
The Mandate/Scope sections include:
- Purpose/What this group is for
- Accountabilities/Activities
- Domains/Resources
- Policies (optional section)
As a guide to completing the Mandate, you might research those of similar Groups in your region, or UK wide (Working Groups and Circles). Such existing Mandates may assist with arriving at your own wording.
See Rebel Toolkit guidance here: Mandates and How to Write Them.
How to See Changes Made to Roles, Members, Mandates
The 'History' link (in the grey drop down boxes) will show all changes made to roles and mandates over time. If you are viewing a role or mandate, it will just show the history of that item.
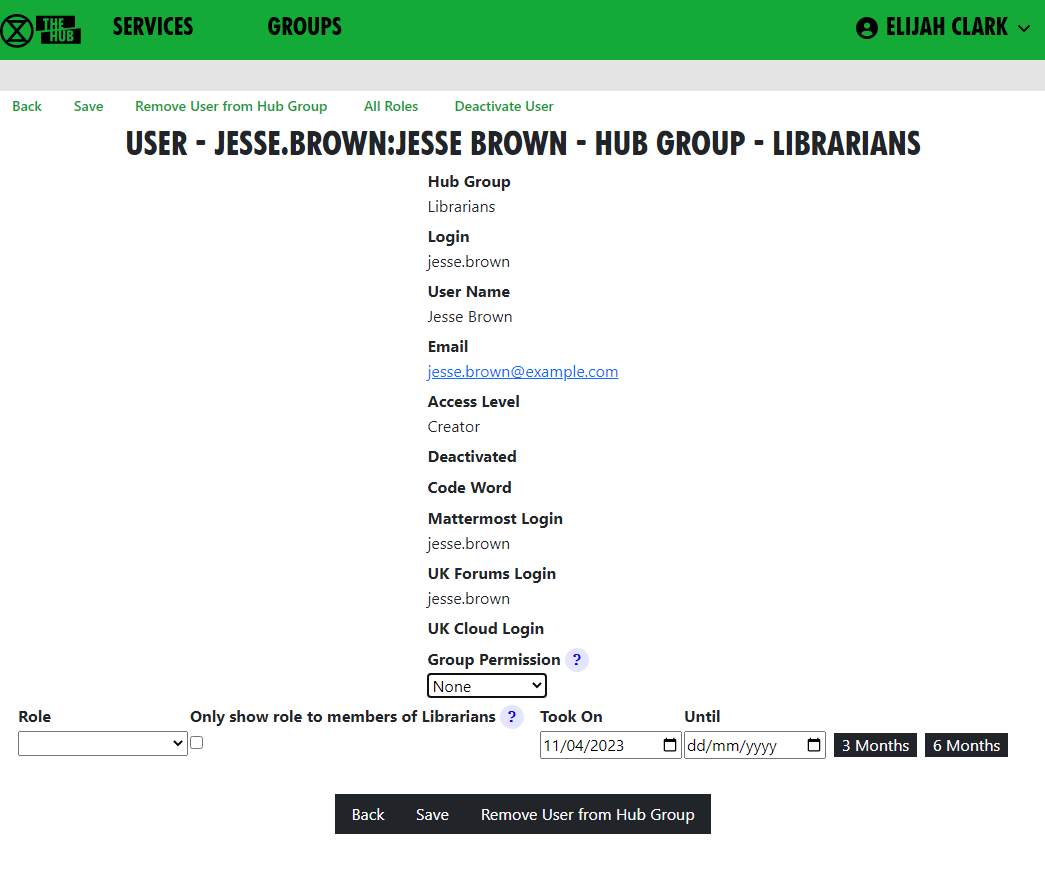
How to See People In My Group
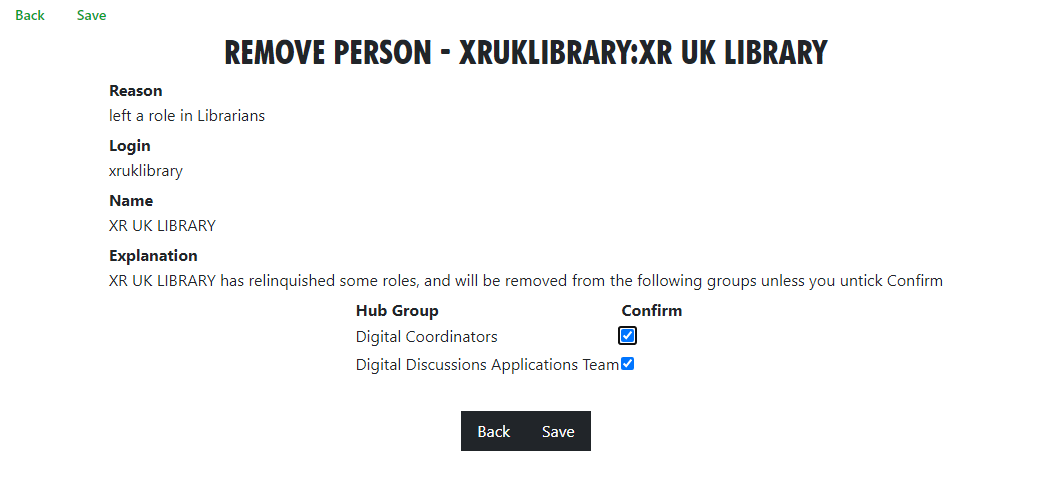
The 'Members' dropdown (in the grey drop down boxes) shows you a list of everyone in the group. Here you can set their roles, make them Group Admins or turn Group Admin status off. From there, you can click 'All Roles' to see all the roles that person has. From here you can click 'Step Back From Roles' to pass those roles on to someone else.
If you remove someone from one or more roles which are linked to another group, and that is the only role they hold in that group, you will see another screen where you can confirm whether or not they should also be removed from the other group.
An example of this might be an External Coordinator (EC) who is in a 'link role' to the Parent Circle. There may also be a link role from one group to another, e.g. Facilitation has a link role to XR UK Talks and Training.
How to Change My Role
'Edit My Role' in the Admin section lets you edit your own role in the group. Everyone in your group can view their own role, or step back from their role, only Group Admins can assign people to roles.
Edit Role Screen
When a new group is created on the Hub, it gets a set of 3 standard roles:
- Internal Coordinator
- External Coordinator
- Group Admin.
There are an additional 8 roles, suggested by the Self Organising Systems Circle, which may be selected by the Group Admin when adding new Roles to the original set.
To add a new role for your group, click the  icon, then insert the role name you require.
As you type, you are offered any Default Roles which match the input text; if you then select a Default Role, the form is prefilled with the details (including mandate) of that role - which can then be edited, if necessary.
This is just to save typing, and will help any Group Admin who may not know the exact wording of the Mandate for the desired Default Role. Note that any other new Role will have a blank Mandate - i.e. Purpose and Accountabilities - which may be completed at a later time.
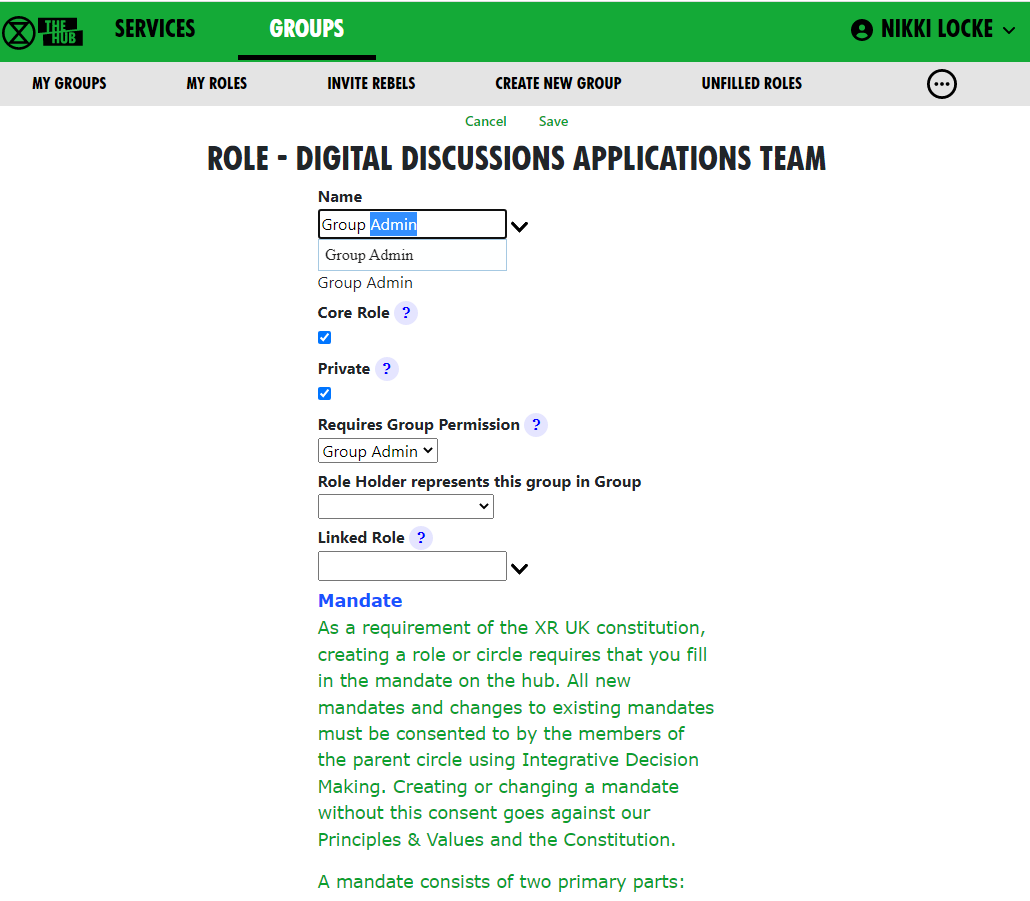 Ticking Core Role shows the role in blue instead of green in the diagram. Normally, only Internal Coordinator, External Coordinator and Group Admin are Core Roles.
The Private setting is the default for the role. If this is ticked, then users will have Private ticked by default. This can be changed by you or them.
Selecting a permission from the Requires Group Permission dropdown means that people assigned to this role automatically get that permission for this group, so they can invite people (Inviter), or edit roles, channels, forums, etc. (Group Admin).

You can add Accountabilities, or drag them using the handle to reorder them, or delete them with the red x button.
You can add Domains or delete them with the red x button.
Setting/Changing a Role Holder
You can place users in their role by selecting their names from the drop-down 'Login' list. With admin permissions, you may also remove them by clicking the red ‘X’ next to their name. The 'Private' setting by each user should be ticked if the user does not want anyone outside the group to see that they hold this role.
You can set an 'Until' date for each person assigned to a role. This is the date their holding of that role will be reviewed. This allows people assigned to a role for a limited time to be confident that they won’t be left holding that role forever. Roles where the 'Until' date has passed will show in red on the group diagram.
Linking a Role to Another Group
You can link a role to another group. Then, when people join in that role, they are automatically joined to a linked role in the other group. Usually, you will do this for the External Coordinator (EC) role; the EC of a working group or circle automatically joins the parent group as the sub-group’s representative. However, it doesn’t have to be the parent group; for example, in the past, Cymru Wales had a "Local Group Coordinators" group, that all their local group coordinators joined.
The only limitation on editing information in this regard is that you have to be a Group Admin of both groups, i.e.: parent and child.
To link a role, choose the group you want to link to in the Role Holder represents this group in Group dropdown.
Then either select an existing role in that group from the Linked Role dropdown, or type in a new role name if the new role will be created in the other group.
Normally a Group Admin of one group will create a child group, which automatically makes them Group Admin of the child group. They will then link the External Coordinator role in the child group to the parent group. They may well also appoint other Group Admins of the child group, then may remove themselves from the child group when this has been done. So just because they set up this administrative work does not mean to say they will continue in administering that group; they may hand to new Admins.
If nobody is Group Admin of both groups, Coordinators or Group Admins of both groups will have to ask a Hub Admin to do this task for you. If you don't know a Hub Admin, ask in Hub Help Desk on Mattermost.
If you remove people from a role which is linked to another group, and that is the only role they hold in that group, you will see another screen where you can confirm whether or not they should also be removed from the other group.
What Happens When a Role Allows Access to More Than One Hub Group?
When someone does one of the following things:
- Edits the Auto Join Roles screen (Hub Admins only)
- Edits the people in a role
- Edits the roles a person is in (+)
- Deletes a role
- Steps a person back from a role (+)
- Creates a group
- Deletes a group
- Admin edits a group (Hub Admins only)
- Removes someone from a group (+)
The change could entitle some people to be in different Hub Groups, e.g. if they join or leave a linked role, or a role with a support group.
The joining or inviting happen automatically, but any groups they should probably be removed from are first listed in a screen with tickboxes against each one, so the person making the change has a chance to untick people they do not want to be removed.
This removal screen is simpler in the cases with a + above, because only a single person is affected, so it just shows a list of groups the person could be removed from. In the other cases (without the +), it may have to show more than 1 person being removed from each group. In the example screen, both Albert Reid and Nathan Powell are candidates to be removed from both groups.
Here is the simple screen:
Here's the more complicated screen:

Please click 'Save' in this screen to carry out the removals. If you think a person should not be removed, first untick the corresponding 'Confirm' box.
Step Back From Roles Screen
You reach this screen by finding a person with a role in 'All Members', clicking on 'All Roles', then clicking on 'Step Back From Roles'.
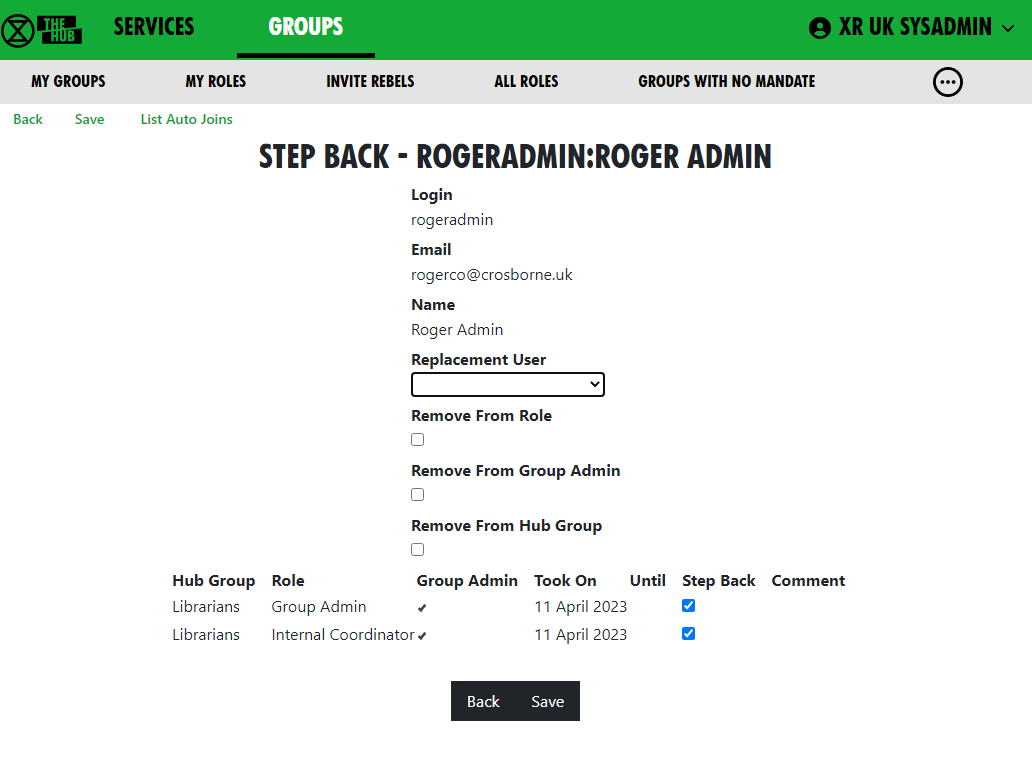 If you choose a replacement user from the dropdown, that person will be assigned to all the roles with 'Step Back' ticked (being joined to the organisation if they are not already in it).
If you check Remove From Role, the original person will be removed from the roles with 'Step Back' ticked.
If you check 'Remove From Group', the original person will be removed from all groups with 'Step Back' ticked.
If you remove someone from one or more roles which are linked to another group and that is the only role they hold in that group, you will see another screen where you can confirm whether or not they should also be removed from the other group.
So, for example:
| Change Required | Action |
|---|---|
| Add a new person into the role, to be trained by the original person | Select the new person in 'Replacement User'. Leave 'Remove From' boxes unticked. Tick all the roles you want the new person to be added to and untick the others. |
| Pass the role on to someone else because the original role holder has already stepped back. | Select new person in 'Replacement User'. Tick 'Remove From Role'. Tick all the roles they are stepping back from and untick the others. If the person has left the group(s) altogether, rather than just stepped back from the role to become an ordinary member, also tick 'Remove From Group'. |
| Step someone back from their role, without appointing anyone else | Leave 'Replacement User' blank. Tick 'Remove From Role'. Tick all the roles they are stepping back from and untick the others. If the person has left the group(s) altogether, rather than just stepped back from the role to become an ordinary member, also tick Remove From Group. |
Role Tenure
How to update role tenure, so you no longer get 'tenure expired' messages
Your Group Admin can set an Until date for each person assigned to a role, which is the date their holding of that role will be reviewed (the role tenure). This allows people assigned to a role for a limited time to be confident that they won’t be left holding that role for ever. Roles where the Until date has passed will show in red on the group diagram.
When the Until date passes, both the person and the group will receive a reminder message on Mattermost, and the role/person will be shown in red in the Hub organism diagram.
Formal, elected roles have a procedure laid down in the constitution (Choosing Role-Holders), which the group will follow to decide who holds the role and for how long.
Once any such formalities have been followed, the procedure for any of your Group Admins to update the Hub is simple:
- Log in to the Hub
- Click on Groups
- Click on the relevant group
- Open the Roles dropdown
- Click on the edit pencil for the relevant role
- Alter the Until date of the relevant person (there are 3-month and 6-month shortcut buttons to automatically set it to that period of time, if that's what you need)
- Click Save.
If you do not have a Group Admin, please get one of your Coordinators to contact Hub Help Desk on Mattermost, or email tech@rebellion.earth.
SOS Facilities on the Hub
This section describes how the Hub helps to implement the principles of Self-Organising Systems within XR UK. We'll show how the External Coordinator Role in a group, or circle, can be linked to a Representative Role in the parent group, or supercircle. We'll also show how Mandates for Working Groups need agreement with their supercircle.
Hub Groups and SOS
Our Organism diagram shows all the groups/circles on the Hub, and how they fit together within our self-organising structure.
The Hub is used by lots of different kinds of groups/circles, and some have decision-making power, so our Constitution says these should each have a Mandate. The Mandate details the group's Purpose (the result the group is trying to bring about), Accountabilities (what the group's jobs are) and Domains (resources that the group controls).
The decision whether to follow the Constitution rests with the groups at the outermost level of the Organism – the UK Rebel Hive (for UK Working Groups), the Regions and Nations, XR Youth, etc. Together with the Hive, many of the Regions and Nations have decided to adopt the Constitution. XR SOS will inform the Hub which groups have made this decision – you can see whether your group has adopted the Constitution by looking at your group on the Hub. Groups who have adopted the constitution are shown in a green colour, and ones which have not in a pink colour. To make it even clearer, we use different names for things if a group has not adopted the constitution:
| If the group follows the constitution | If it doesn't |
|---|---|
| Mandate | Scope |
| Role | Position |
| Purpose | What this group is for |
| Accountability | Activity |
| Domain | Resource |
Once a group has adopted the Constitution, then new Working Groups and Roles under that group must decide on and publish, via the Organism, a Mandate which contains a Purpose, as a minimum, but ideally Accountabilities too. This applies at all levels – thus every UK Working Group must have a Mandate, no matter how deeply nested it is within the structure. For Regions/Nations, this applies only to Regional Working Groups and District Working Groups. It isn't enforced to Local Groups (or their working groups) because most Local Groups are not large enough to need to use the full version of our SOS – but they can still have a Mandate if they want to.
Linked Roles
Within XR, it is often necessary for a group/circle to be represented in another circle. The classic example of this is the External Coordinator in a circle who will normally be linked to a Representative Role in the parent/supercircle. In this case, the Linked Role represents the subcircle in the supercircle and, in addition, the supercircle holds the subcircle's Mandate.
Linked Roles can also be used between any 2 circles in the Hub, such as:
- Some Regions & Nations have an Anchor circle or Local Group Coordinator's circle. They can link the External Coordinator role in each of their Local Groups to a role in the Anchor Circle.
- There is often a need for cross-group collaboration – Arrestee & Legal Support (A&LS), for example, has a rep who attends Actions meetings, to appraise A&LS of forthcoming actions, and to advise the Actions circle on arrest issues.
The Hub organises these roles so that someone joining the Linked Role in one circle is automatically elected to the Linked Role in the second circle – and joined to that circle, if they are not already a member. Linked Roles appear with a yellow border in the XR Organism diagram.
Note that when someone leaves a Linked Role in one circle, they are automatically removed from the Linked Role in the other circle. The Hub also offers to remove them from membership of the other circle (this is optional).
Which Hub Groups implement SOS?
There are many different kinds of Hub Group: the Rebel Hive contains the UK Working Groups, and their sub-circles (Child Groups). Regions and Nations have their own Working Groups, together with District and Local Groups, which again can contain working groups. While all the groups/circles within the Rebel Hive are subject to SOS, only the Regions/Nations that have adopted the new Constitution are obliged to implement SOS, and that is only above the Local Group level.
As well as Local Groups, there are also other groups where SOS doesn't apply, because they do not make decisions on behalf of the movement, including:
- Affinity group – small groups of people supporting each other and working to achieve XR's goals. These groups are most often used for organising actions. By organising as many small groups pursuing a shared vision, we avoid getting too bogged down in slow decision-making processes
- Community group – a group for rebels to connect and work together through communities of shared self-identity rather than of shared location (for example, faith, profession, ethnicity and sexual identity)
- Role support group – groups that provide help and mutual support to people in a certain role in other groups
- Connected group – a permanent ongoing group that does not have a mandate. Connected groups are autonomous and operate independently outside of Hive circles. They may have a Linked Role to a UK circle but are not allowed decision-making power in that circle. Decision-making power requires accountability. In order to be accountable, you need a mandate that the parent circle has consented to
- Project group – a group with no decision-making capability, which therefore is not required to have a mandate. Any decisions have to be made by another group that has the mandate to make them
- Local groups and below in Nations and Regions
Hub Groups where SOS is enforced
Before editing any Hub Group, make sure to check the constitutional status at the bottom of their Contact Info. This tells you whether the group has to follow the Constitution, and why. Thus, creating a new New Child Group for an constitutional group will require a Mandate to be entered before the Child Group can be created, unless it is one of the groups included in the list above (e.g. a Project Group).
Adding Linked Roles
See Linking a Role to Another Group
Default Roles are created by SOS
A set of important Default Roles has been created by SOS. These include External Coordinator, Internal Coordinator, Group Admin, etc. Hub Admins can edit these Default Roles, but they should only be changed with the permission of SOS. Click the Default Roles option on any Groups page (it may be in the ... continuation menu) to see the following listing:
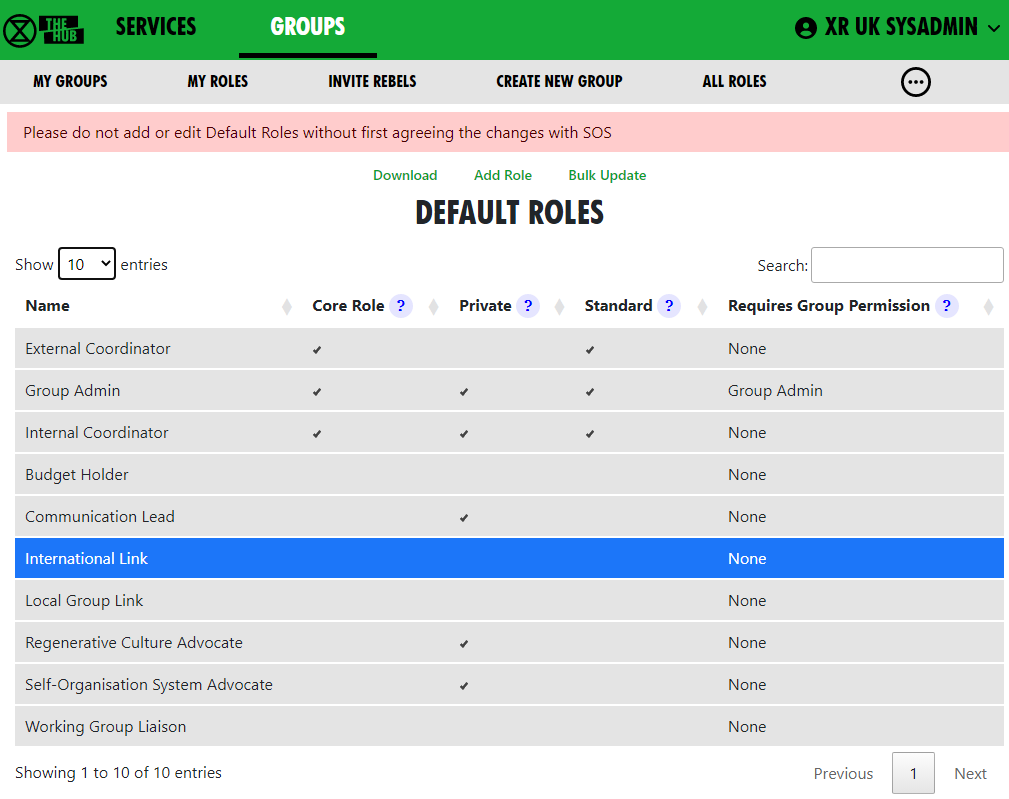
Group Admins selecting a new role can choose from these Default Roles to get a role prefilled with a standard purpose and accountabilities.
If the tick-box under Standard is ticked, then any new Child Group being created will get each one of these Standard Roles automatically.
Setting up a New Group on the Hub
This document takes you through the process of creating a new group on the Hub.
See also Good Practice Guide
Creating a New 'Child' XR Group
If you are part of a large circle which has numerous working groups (e.g. a large working group like Pathways, you may have a number of large and separate working groups, for example: 'Talks and Trainings', 'Foundation Programme',etc.). If this is the situation for your circle, you can create separate Hub Groups for your working groups on the Hub, alongside new services that group provides.
To create a new group, go to your group in My XR Groups; click the New Child XR Group button. Alternatively, click on the 'New Child Group' green font option via the 'My Groups\Admin' option from the grey menu bar along the top of your window. (See image above)
This shows the first page of the new group wizard (a support tool):
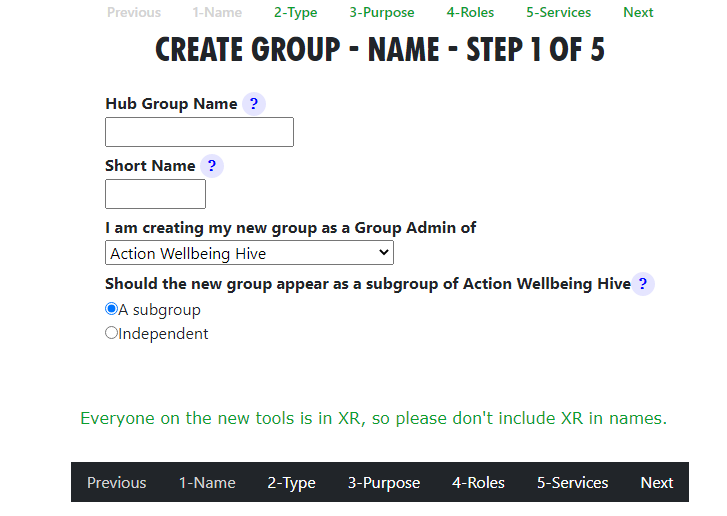
Name your new group, then add a short name. This is used as a prefix to channel and forum names, to distinguish them from other groups' channels/forums.
Select which Hub Group the new group relates to (NB you have to be its Group Admin to do this). For a subgroup, this will be the parent group.
Decide if the new group is a subgroup (e.g. a Working Group which is a subcircle of the group above) or an independent group (e.g. a new, nationwide Campaign Group which isn't run by an existing UK Working Group).
Click 'Next'.
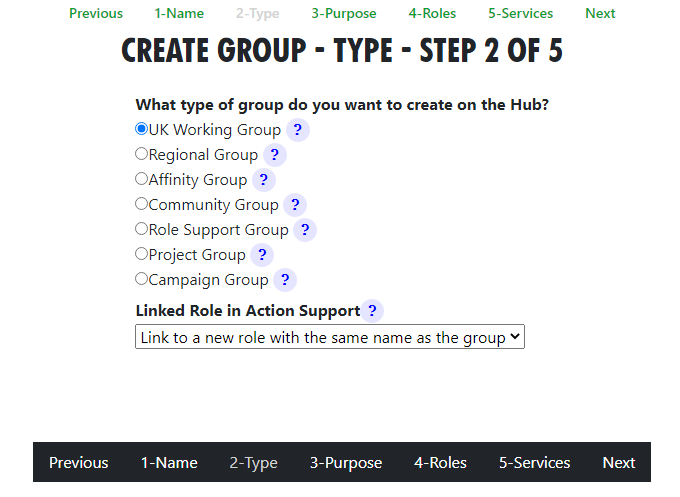
Type. Now you can choose what type of group to create. (See the image above for options)
If you create a subgroup, you can create a linked role; here, the External Coordinator of the new group represents the child (sub) group in the parent group.
SOS principles suggest that a new working group is created when a role becomes too much for one person to handle; the work involved needs a group of people to work on a project or new work stream. The existing role holder becomes External Coordinator of the new group, inheriting the mandate. The parent group defines the mandate of the new group in collaboration with the new team.
Linked Role
There are two choices here:
- If you are creating a new group to fulfil an existing role, then select the role in the drop down.
- If there is no existing role, just leave the dropdown unchanged; a new role is created in the parent group with the same name as the new child group.
Click 'Next'.
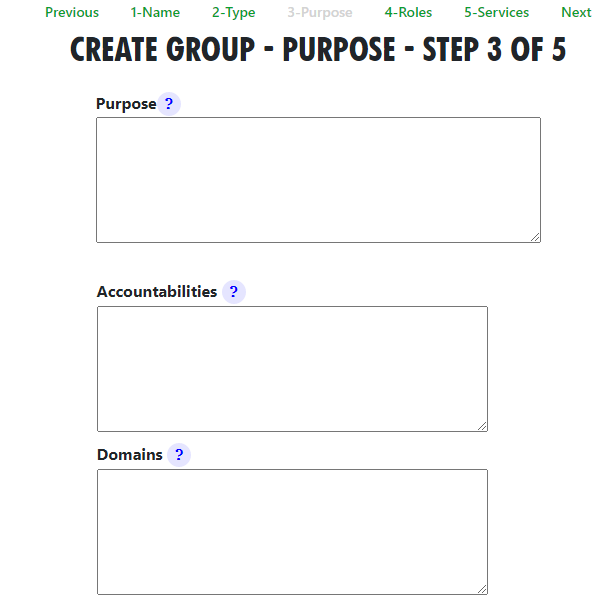
New Group Purpose (See above image)
Now you explain the Purpose of the new group. If it is a group that can (or must) have a mandate, you add this here. If the group may not have a mandate (e.g. a Project Group), you will only be asked what the group is for.
Click 'Next'.
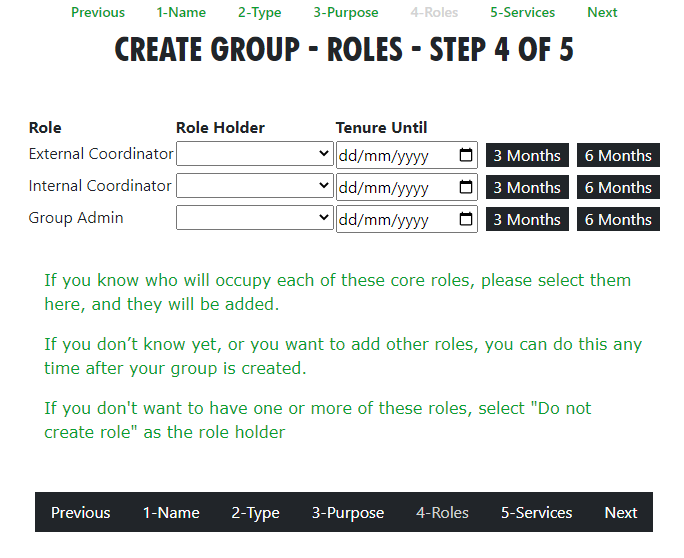
New Roles and Role Holders. Now you can choose which of the core roles to create and who will be in them. These role holders are selected from members of the group you are group admin of in the first page. This is just a handy shortcut - you can always add people to the group, and to roles, later on, after the group is created.
Click 'Next'.
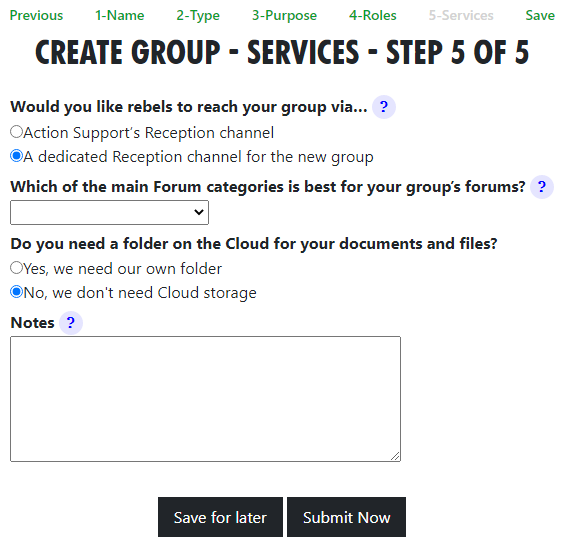
Services Finaly, you choose what channels, forums and cloud folder to create.
Click 'Save' when done.
Note: You can only have one new Hub Group pending/saved for later at a time. If you try to start a new one when you already have one which hasn’t been created, you will just be editing the existing form!
Once you have filled in the form, your new XR Group will have exactly the same kind of facilities as any other Hub Group, i.e.: channels on Mattermost, security groups and forums on UK Forums. Optionally a separate file storage area can be created on the UK Cloud.
People in the new group are not automatically also in the parent group. However, you can invite them to be in both, if your group agree. This requires discussion. If the parent (or any ancestor) group has Invite All Members Of Child Hub Groups ticked, they will be invited automatically to those groups. N.B. Invitees do not have to accept membership (for example, if already over-committed).
Already Have a Mattermost Team?
If your group is already on Mattermost (but not on the Hub), it is very important that you let DDAT crew know, so that we link the Hub to your existing team. Contact DDAT
Tell DDAT what your team is called, and which channels you want people to be joined to automatically.
You must give xrukadmin (the Hub’s login) admin access to your team, so the Hub can add people to it. You can only do this using a web browser or the PC app to connect to Mattermost; the phone apps do not have all the menu options.
The procedure is:
- Go to your team.
- Click the bar menu, 'Manage Members'.
- Click 'Invite People'.
- Type 'xrukadmin' in the 'Add' or 'Invite' people box.
- Go back to 'Manage Members'.
- Find it in the list; use the drop down to make it 'Team Admin'.
- Then go to each channel, to join 'xrukadmin' to each one.
You also need to join xrukadmin to any channels you want your members to be joined to automatically by the Hub. If you do not do this, the Hub cannot join people to your team and channels.
When the admins actually create your Hub Group on the new services, you will receive an email telling you this has happened. The next time you log in to the hub, your accounts on the new services will be set up for you automatically, so you can start using them.
Want a New Mattermost Team?
It is recommended that you use the same team as your parent (for local groups this will normally be the regional team). This is so your group can easily interact with other groups in the region.
Teams on Mattermost take significant resources on the server. You should only ask for a new team if your group is large, and will have many subgroups, each with their own channels.
Only the Mattermost admins can create Teams on Mattermost, so you need to DM them @xradmin and @xradmin2 to ask for a new team. The team name must not clash with an existing team, (especially in terms of mandate overlap or repetition). The group name must be between 2 and 15 characters long. Once this is created, please follow the instructions above in If you already have a Mattermost team.
Deactivating or reactivating someone's account
This page explains how to deactivate an account if someone is arrested or loses their phone or other device used to access our services. Group admins are able to deactivate their account.
See Compromised Account Procedure for precautions to take when access to an account is compromised.
Deactivating an account
Find the person whose account you're looking to deactivate by going to your group, opening the Members dropdown list and clicking on the person.
Click on the green Deactivate User link.
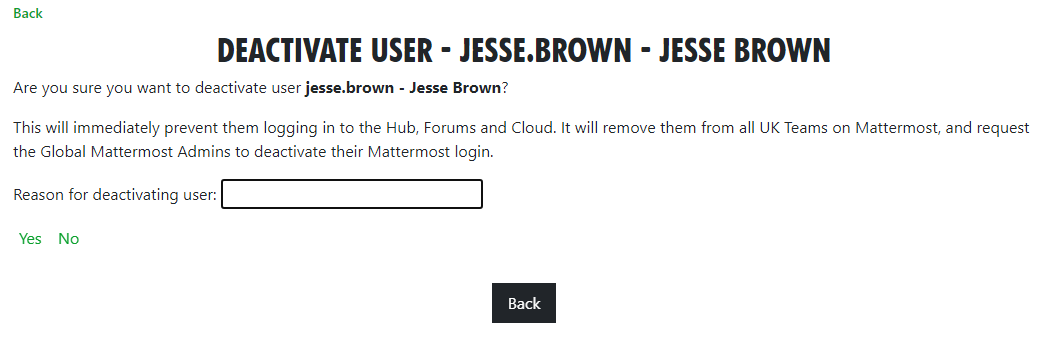 Enter the reason for deactivating the user, and click Yes.
The user will immediately be removed from all UK private teams on Mattermost, and their accounts on the Hub, Forums and Cloud will be deactivated. A message will also be sent to the global Mattermost admins asking then to deactivate the Mattermost account.
If the user has a vault account for the same email address as they currently have on the Hub, it will also be deactivated.
Reactivating an account
Do not reactivate the account of someone you do not know personally.
And, of course, make sure :
- They really have been released, and have all their devices back
- Their email address has not been compromised
If in any doubt, do not reactivate until their email address on the Hub and all other services has been changed to a new, uncompromised address. To do that, obtain their current Mattermost password, and ask your regional Hub Admin, or request in the Hub Help Desk on Mattermost.
Follow the same steps as outlined above – where previously the link would have said Deactivate User, it should now say Reactivate User. Clicking this link will bring up the confirmation screen:

Click Yes to reactivate them. The user will immediately be rejoined to all their UK private teams on Mattermost, and their accounts on the Hub, Forums and Cloud will be reactivated. A message will also be sent to the global Mattermost admins asking then to reactivate the Mattermost account.
If they are a member of Mattermost channels which the Hub does not know about, their membership of those channels will not be restored automatically. They need to rejoin them "by hand", by asking people in the channel to join them again.
If the user has a vault account for the same email address as they currently have on the Hub, it will also be reactivated.
How to create and use Forms on the Hub
The Hub allows Group Admins to create forms for people to fill in, and then look at (and share) the results.
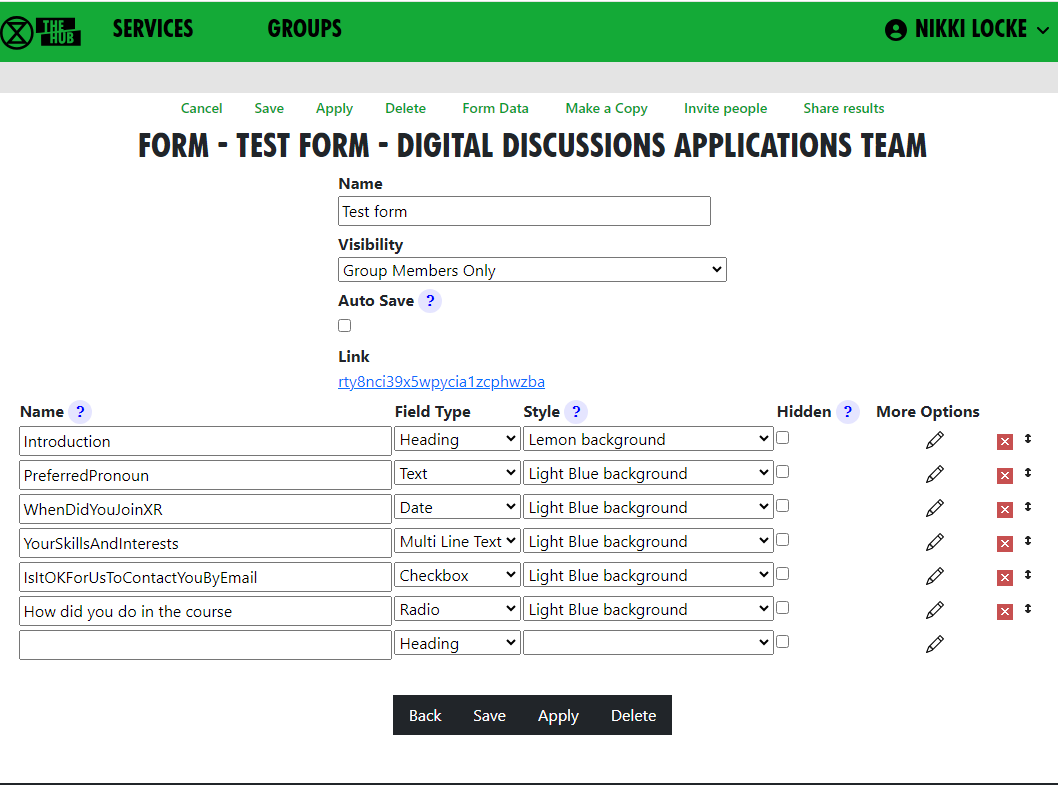
Creating a form
From your group's page on the Hub, click Forms in the Admin area.
You will see a list of forms that looks like this:
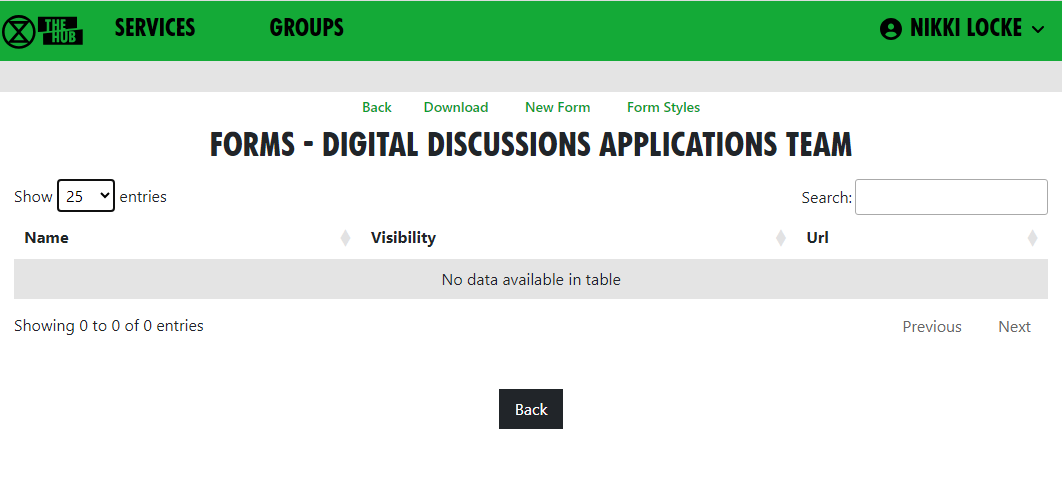
Click New Form to go to the form design page:
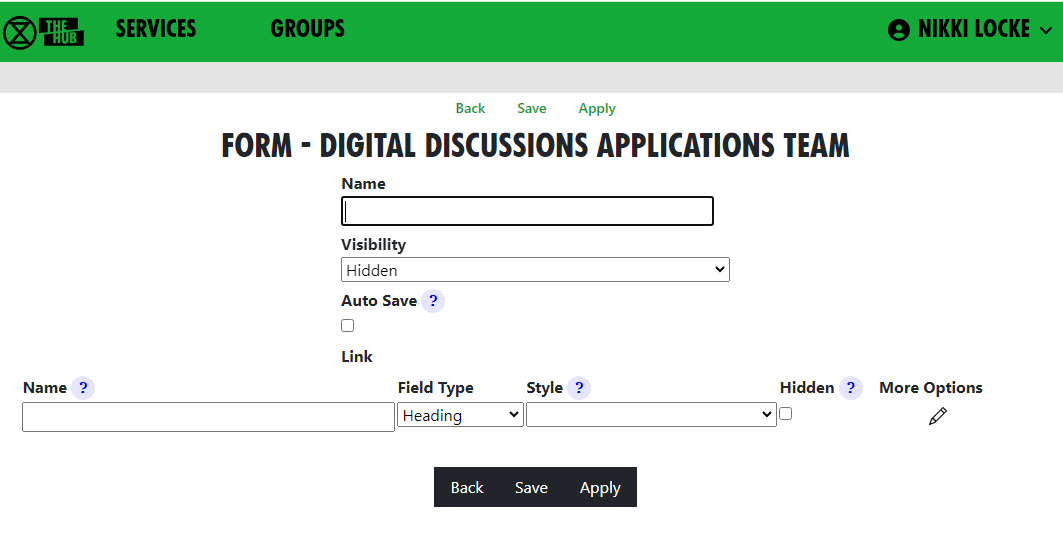
Give your form a name. All your group's forms must have different names.
You can decide who is allowed to fill in your form from the drop-down list

Normally the user has to click the Save option to save their data. If you tick the Auto Save tickbox, they won't have to do that - every time they eneter anything in a field in the form, the form will be saved.
Adding fields
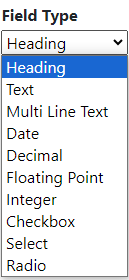
Each field on the form has a (unique to that form) name. The name must have no spaces or punctuation. WeUseCamelCaseLikeThis to make field names with more than 1 word in them. (The Hub will remove spaces and CamelCase the name for you if you forget. Camel because of the humps!) Fields can be Headings (just to instruct or separate parts of your form), or any of the types below:
The field type determines what the user can enter in the field. If you change it later, data may appear to be lost - e.g. if you have a text field which someone enters "hello" in, and you change it to decimal, "hello" isn't a number, so it won't be displayed. But, if you change it back again, the data will reappear.
By default the prompt for the field will be the name, Un Camel Cased - e.g. the name PreferredPronoun would be prompted Preferred Pronoun). The name is important, because any data entered into the field by users is stored against that name. If you change the name, any stored data for the original name will be lost.
Each time you start entering a new field, another space to enter the next new one will appear.
If you want to reorder the fields, use the drag handle  on the right. If you want to remove a field, click the red
  .
.
Here is an example form:
When people are filling it in, it looks like this:
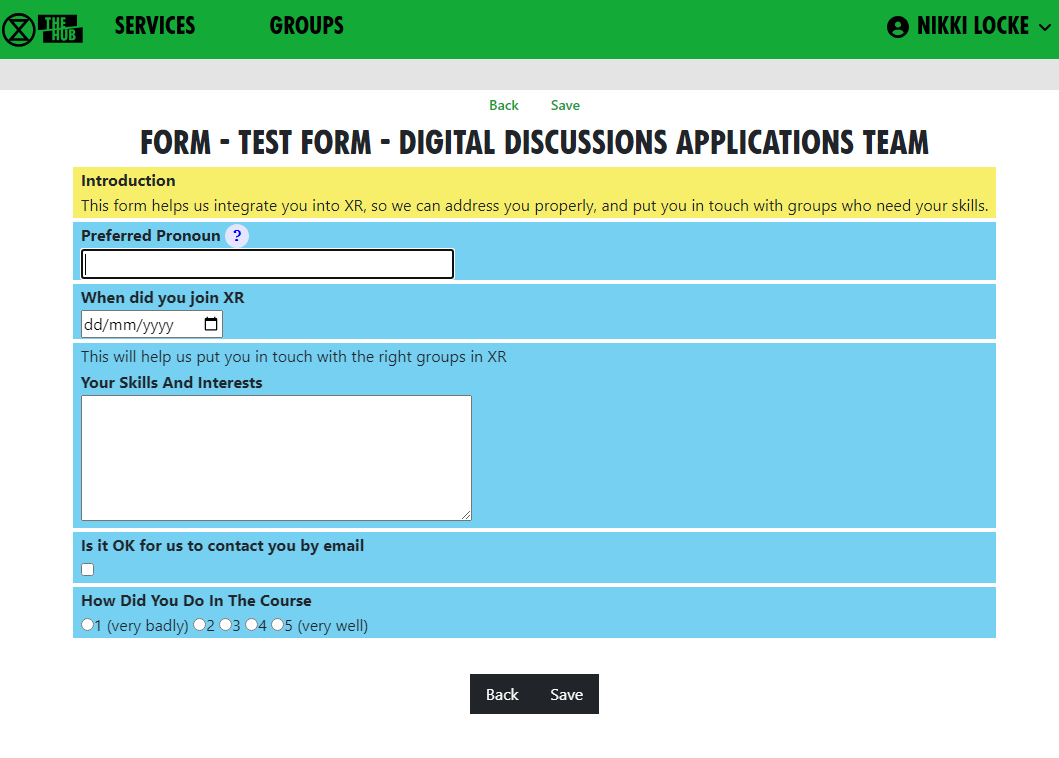
As you can see, there are issues with the camel casing when there is more than one capital letter together. And the form is very boring to look at. We can fix that, though.
Changing the styles of fields
Each field has a Style dropdown. A number of standard styles are provided (taken from the XR Style Guide). You can add your own styles if you know CSS - there is a Form Styles option on the main Forms list (see above).
There are more options you can add to fields - click the edit pencil  next to the field to see them:
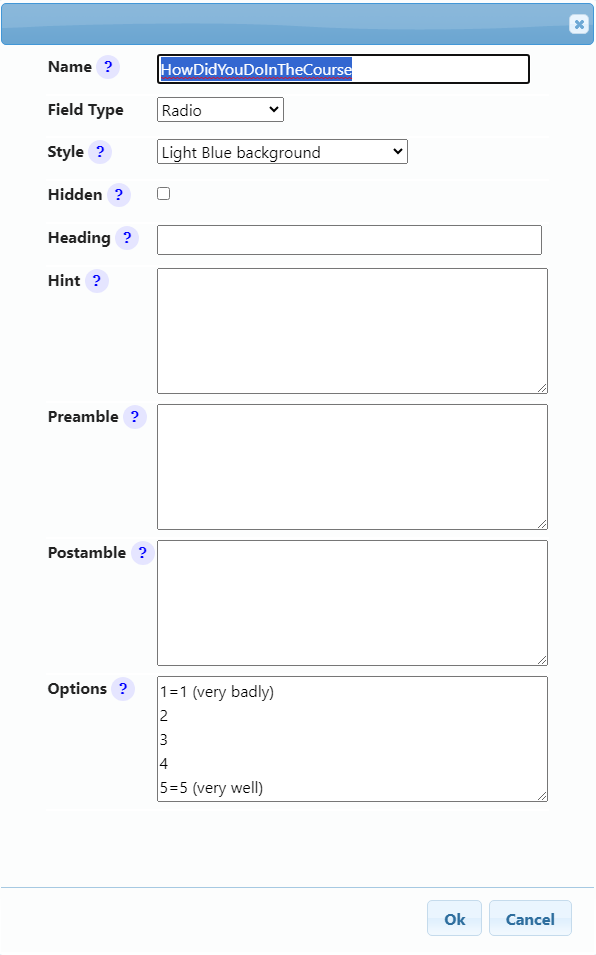
Here we have given the HowDidYouDoInTheCourse field a light blue background.
The Heading field lets you change the prompt for the field (so it isn't UnCamelCased from the field name) - a good way of fixing names with two or more capitals together, and also a way of changing the prompt but keeping the data people have already entered.
The Hint field shows a standard Hub pop-up hint question mark - if the user clicks on it, the hint pops up.
The Preamble appears above the field. You can use Markdown formatting here, just like Mattermost.
The Postamble appears below the field.
Options appears only for Select and Radio fields. It must be filled in to contain the options the user can choose from. You can see from the example above how these options appear on the screen - each line in the options box appears as a radio button the user can select (or an item in the dropdown for a Select field). If a line has = in it, the user sees the text to the right of the equals, but the form data shows the text to the left of the =. So, in this example, if the user selects "1 (very badly)", what gets stored in the field data is "1".
A lot of forms contain Yes/No questions. There are two good ways to do those
- Make a Checkbox field.
- Make a Radio field, with options Yes and No - if the user clicks Yes, Yes is stored in the field; if they click No, No is stored; and if they don't click either, the data will be blank.
You will notice that, as well as the usual Save button in the form editor, there is an Apply button. This saves the changes, but leaves the form editor open.
When I am tweaking the design of forms, I usually open the form editor in one tab, make the form visible to group members,and click Apply. Then I open the form to enter data in another window, so I can see what it looks like. I can switch back to the edit tab, alter stuff, and click Apply. Then I switch to the form entry tab and refresh it (F5 usually works) to see what the changes look like.
Inviting people to fill in a form
There are three ways of inviting people to fill in a form:
Inviting individuals
Once the form is saved, click "Invite people" when editing a form to ask people to fill in the form. You can also do this from the Forms tab in your group page. The invite screen is a bit like the form to invite people to your group:
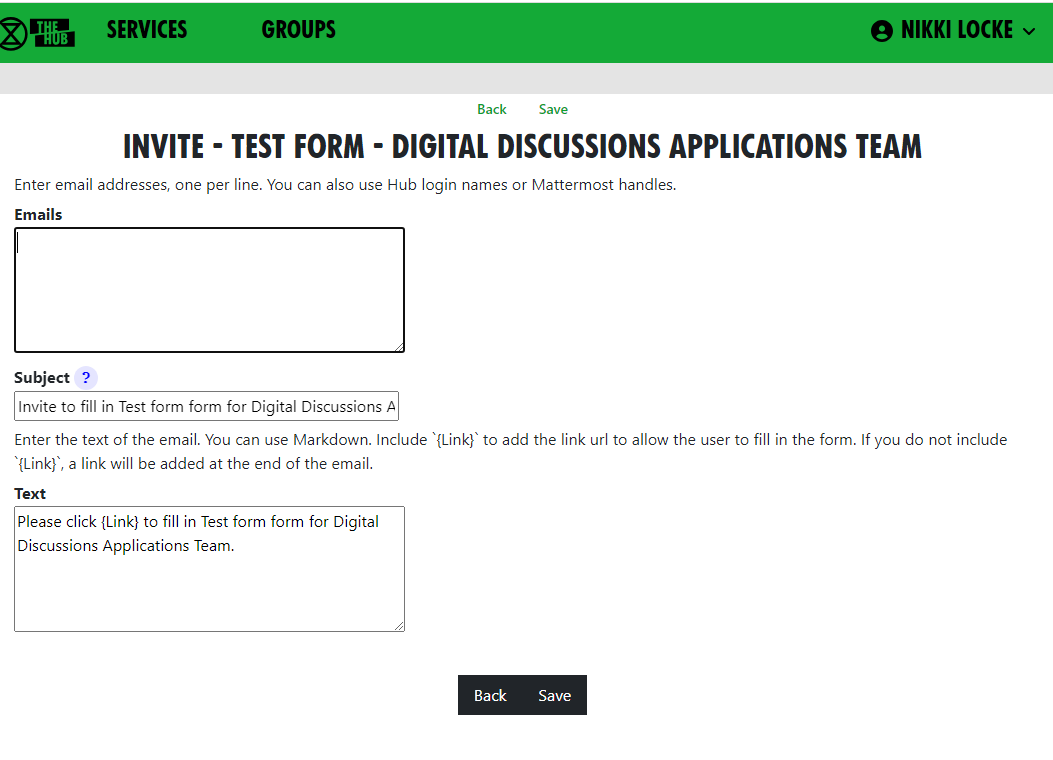
Fill in email addresses, login names, or Mattermost handles, one per line.
If you want to customise the email that is sent, change the text - but make sure you leave {Link} in the text - this will be replaced with a url for the user to click on to fill in the form.
When you click save, each person will be sent their own, personal link to fill in the form.
Making a generic invite anyone can use
When you are editing a form (or viewing the form in the list of forms), there is a link field. This is a link to the generic form invite. Right click it (long press on a touch screen) and copy the link.
You can publish this link, and anyone who clicks on it is taken to the Hub. If they are logged in (and have permission to enter data to the form - see Visibility above), they are taken to the form, ready to enter data. If they are not logged in (and the form is visible to the public), they are asked for their name and email address, and a link is emailed to them. (This two-stage process ensures that the person filling in the form is really the person with that email address.)
People on the Hub can fill in the form from your Hub Group page
If you have forms that are visible, they will appear in the Forms tab on your group's Hub page:

If a form is for group members only, it will only appear if the person is a group member. They can click on the green link to enter their data into the form (or go back and change it later).
Group Admins can see the other icons -  to add a new form,
  to edit it,
  to see the data and
  to invite people.
Looking at the data
When editing a form, the Form Data option shows you the form data. You can also do this from the Forms tab in your group page. You will see the field headings across the top, and one row for each person who has filled in the form. Group Admins can click on any row to see the data (and even change or delete it). The data is searchable, and you can sort by clicking on the column headings. You can also download the data using the Download button - maybe to add it to a spreadsheet or other package, to further analyse it.
Sharing the data with others
By default, only Group Admins can see the data. But, using the Share results option in the data or form screens, you can share the form data with any role on the Hub. This might be a role in your team that uses the data (so you don't have to make them Group Admin to let them see it), or a role in a different hub group (where the data needs to be shared with another group).
If you share the data with a role, anyone in that role can go to your group page, look in the Forms tab, and they will see the data icon against the form name, and can click on it to see the data in that form.
Behaviour and Good Practice
General responsibilities of Group Admins
- Group Admins have a responsibility to make sure that the Hub and communcation platforms are being used correctly and responsibly by members of their Hub Group. This document describes some 'best practices' that you may find helpful.
The Hub
- You should use the Hub to invite new people to your group. This is because an invite to the Hub sets people up correctly on all the new services.
- Your Hub Group Internal Coordinator should confirm the invitation before it is sent. This ensures that the new member is known to the Group and is, therefore, qualified to be invited.
- You can also invite people to individual services, but you have to do all the work the Hub would have done yourself (inviting people to the right Teams, Channels and Forums, for example), so it is much easier just to invite people via the Hub.
Mattermost
- Remind users to adjust their Notification Settings so that they receive appropriate warning of posts addressed to them personally, or the channels they belong to.
- Advise users when and when not to use
@alland@channel - Consider mild warnings against duplicating the same post in multiple channels. Set up
Broadcast Onlychannels for users to avoid this practice. - Prompt users to make full use of the Reply function to link answers to specific posts.
- Recommend switching to Forums for longer-form conversations and remind users to link from the channel to any associated Forum Topic.
UK Forums
- Encourage use of Forums by using them yourself and linking to Topics that will generate user interaction.
- Be supportive of Forum use by adding replies and likes to your user's posts. This will encourage them to contribute more to topics and feel more comfortable with the platform.
UK Cloud
- Although it's not in your mandate to manage your Hub Group's files and folders, maintain oversight of what is being saved on the Cloud. You may recommend how files are to be named - for ease of comprehension - and how folders are to be organised. This should lead to improved efficiency of storage and ease of retrieval for your Hub Group's users.
Discussion moderation
If you find any post that strays from the accepted guidelines, above, it's up to you to feed back your concerns directly with the originator of the post. If you do, then you should be sensitive with any language, but, as our regenerative statement says: "we have cultures of respect and listening, in which people deal with conflicts when they arise, feeding back quickly and talking about disagreements and issues without blaming and shaming."
If you find a post that needs moderation, reply directly to it and explain why you find it unacceptable and suggest, to the poster, a potentially more acceptable way of making their point, if that is possible. If the post requires removal, then remove it but you are strongly advised to leave an explanation of why you felt removal was necessary.
If you need extra support, please reach out to other admins via the Hub Group Admins Mattermost channel. In extremely difficult cases, you may want ot reach out to the Transformative Conflict team via their email: HealthyTeams@proton.me
Library (UK Cloud)
What is it?
The Library is a shared read-only area for all Rebels on UK Cloud. You can view and download documents, images, and other files from the Library but you do not upload material direct to the Library.
The Library is being gradually replaced by this Rebel Toolkit, but there are a few types of document that cannot be stored on the Rebel Toolkit, so they can go in the Library, and linked to from the relevant Rebel Toolkit page(s).
The Library contains folders for all XR UK groups who want them. There are also some common folders that cut across Working, Local, Regional groups.

How to find files in the Library
You will find the Library on your homepage on UK Cloud:
 \
\
In each folder in the Library there should be an About this folder.md text document containing details of what it contains.
Files will also be tagged and indexed and you can search for a file by tag.
Who looks after the Library?
Access to the library is controlled by the Digital Discussions Applications Team
How to set up a group folder in the Library
If your group has relatively static files that you want to share read-only with the entire movement then you need a folder in the Library on UK Cloud.
Everything in the Library is visible read-only to all Rebels with access to UK Cloud.
Groups can have a folder in the Library area which they can manage themselves - create any subfolders and files you want to share in there. The group library folder can either have full read-write access for all members of the group that owns it, or you might prefer to appoint a librarian(s) from the group to manage it on the group’s behalf.
To get a Library folder for your group simply request one by posting in the Library Reception on UK Forum - specify who will be managing it for the group (even if all members of your group have write access to it, it is a good idea to have one or two people who are mandated to curate it) and whether all members of the group will be able to create, update and delete files in there.
How do I add files to the Library?
Here is what the All Files home page looks like for a user who is a member of a local group (North Cornwall) which doesn't have its own Library shared area (it uses the Cornwall district one, covering all Cornwall Local Groups) and also of a Working Group (Operations Circle) which does have its own shared library folder:

This user can help manage the group's public library files (either she is
a Librarian for the group, or all the group members can manage their
public library files)
Many Groups will not actually need their own Library folder but can more usefully have their material published by a parent organisation. This would particularly apply to Local Working Groups who, if they are generating material of interest right across XRUK would be better served by having it posted in the National Working Group area.
This may also apply to Local Groups, who may be better using the Regional or District area in the Library rather than creating their own silo buried deep in an obscure corner of the Library.
Remember that the Library is intended for material of use to all XRUK members.
For files that are only of Local or Working Group interest then there is no need to use the Library - all members of the group will be able to use the group's private file area, and it is easy to share files (or even folders) with a few individuals outside the group by creating named share links to your private area.
What can I put in the Library?
You must NOT post anything in the Library which contains personal information (unless you have the express permission in electronic format from every individual identified for each specific publication). This includes names, email addresses, postcodes, phone numbers.
You must not use the Library to share non-XR documents (but you can share external links).
You must not use the Library to share potentially compromising details of action plans.
Be very careful when posting in your group's Library folder - only post material which your group has ownership of and responsibility for. Do NOT duplicate material that is elsewhere in the Library. If you wish to include files from another group in your Library area then save the URL of the target file in your Library folder - use the "Create Link" option on the [+] menu.
In general, for material that you want people to be able to view online without needing to edit, and that is not frequently changing (updates less than weekly) then it is preferred to save in PDF format. This allows easy online viewing on all devices without any special software and with a low overhead on the server.
Keep the master file in your group private file area and save a PDF copy to place in the Library.
For material that is rapidly changing, or that is a resource for others to download and use, then you may choose to save in office (docx, xlsx, pptx) or image (jpg, png) formats. In these cases it is recommended that you still keep a master version in your group private area and simply save a copy to the Library as and when it is updated.
If you wish to use other formats you can - but please be aware of accessibility issues. If you have files in a specialist format it may be more appropriate to keep them in your private file area and share links to the files from there with those who need or request access.
How to set up a Telegram-Mattermost link
We have a Matterbridge service, which enables you to link a Telegram channel or group to a Mattermost channel.
The purpose of this service is to reduce the number of communication tools you have to use.
Rebels who are comfortable with Mattermost can keep in touch with Telegram channels, without having to join the Telegram channel.
Likewise, rebels who do not want to use Mattermost, but want to stick with Telegram can do so, without being in a Telegram only silo.
The link can be one-way or two-way. For instance, the Rebellion Broadcast and Movement Broadcast channels are one-way, from Telegram to Mattermost, where only the Telegram channel members and admins can post to it. Mattermost readers of Telegram channel posts may reply on the Mattermost channel but these posts are not subsequently passed to the Telegram channel. (NOTE: Hub Admins can set a Mattermost channel to Broadcast Only, so people not in the Hub Group who own the channel have their posts removed every night.)
A group that has a thriving Telegram channel, with some people who do not want to use Mattermost, could set up a two-way Matterbridge link. This enables posts to be made and shared from either platform. Subsequently, members who do use Mattermost can leave the Telegram channel, whilst remaining in the overall conversation.
Prerequisites
It is very important that people in the existing channel or group know beforehand if you intend to set up a link to or from Mattermost. You should discuss:
- whether it is one-way or two-way
- why you are doing it, and
- who will get access?
This prior consultation and agreement on how the Matterbridge link will improve communications within the group will lead to a smoother introduction of the link.
How to get a link set up
Contact Tech Reception on Mattermost, and ask the admins to set up your bridge. They will need the information detailed below, but they can help you with getting your end set up if you find the following instructions difficult. For non-Mattermost users, please email: tech@rebellion.earth with your request and the info you need to supply.
What you need to do first
- Carefully consider security - if you link a private Mattermost channel to a Telegram channel, then the content is available to anyone who can get into the Telegram channel.
- Get the Telegram channel or group administrator to join user "XRUKMatterbridge_bot" (our bot) to the Telegram channel or group- see instructions below.
If it's a channel rather than a group, set the bot as Administrator - most of the admin permissions can be turned off - a Telegram->Mattermost link only needs to be able to read messages; a two-way link also needs to post messages. (NOTE: see section below for more detail). - Notify the Tech Reception or email tech@rebellion.earth that you have added the bot to your Telegram channel, and request them to set up the Matterbridge link. Include the Telegram channel or group name, the Mattermost Team and the Mattermost Channel.
How to add a bot to a channel on Telegram:
Desktop:
- Open the desktop app
- Go into the channel
- ... menu, Manage Channel
- Click Administrators
- Click Add Administrator
- Type the name of the bot ("XRUKMatterbridge_bot")
- Click on it to add
- Click OK to add it
- Turn off all the permissions (or allow posts if you want a two-way link)
- Click Save
It works the same on a phone:
- Open the app
- Go into the channel
- Tap on the title bar
- Tap administrators
- Tap Add Admin
- Tap the search icon
- Type the bot name ("XRUKMatterbridge_bot")
- Pick it from the list
- Turn off all the rights (or allow posts if you want a two-way link)
- Tap the tick at the top
Placeholder Hub Groups
Placeholder Groups represent groups who do not use the Hub, so that they appear in the Hub Circles diagram and can store their public-facing contact information.
Creating a Placeholder Group
Only people with Group Admin of All Groups permission (or above) can create Placeholder Groups. This includes regional Hub Admins.
To create a Placeholder Group, go to the parent of the group (usually a Region, or maybe a District), and click New Child Placeholder Group.

Enter the name and short name, and select the group type (usually Local Group).
Editing a Placeholder Group

Open the More Info/Contact Info dropdown, and click the edit pencil to add contact information.
What to do if the group wants to come on the Hub
If the group wants to come on the Hub, look for its trained Group Admin and then invite them to be Group Admin of the group. Then, when they look at the group on the Hub, they will then see the Add to Hub services button on the screen above.
If they don't have a trained Group Admin, you will have to find out what they need on the Hub, and do it yourself – but they will need a trained Group Admin at some point, so the first option is preferred.
When the Add to Hub services button is clicked, this screen appears:
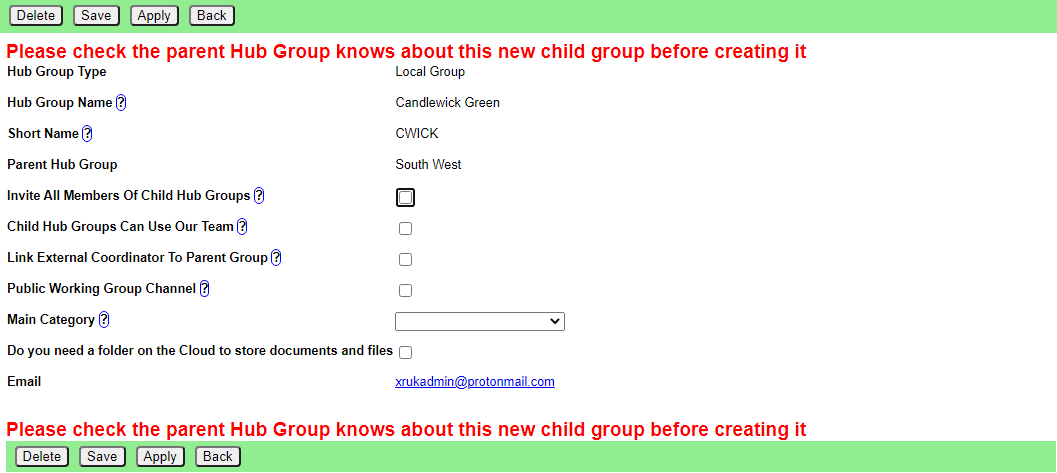
This is similar to the New Group Screen, but with fewer options, and all on one page.
Once it is filled in correctly, clicking Save should create the group on the services right away.