The Hub, Mattermost, Cloud and Forums
The XR supported tools we use to communicate with other XR rebels.
- Start Here
- The Hub
- What is the Hub?
- Using the Hub: The Basics
- Your roles
- Updating your settings
- Search for another rebel
- Problems getting on the Hub
- Compromised account procedure
- Mattermost
- How to Use Mattermost
- When to use the Forums instead of Mattermost
- Mattermost Moderation
- How to download and use the Mattermost App
- Creating Broadcast Messages on Mattermost
- Mattermost Boards
- Forums
- The Cloud
- Change your login name (handle)
- Video Guides to help you learn
- Accessing the Tools Using a Smartphone or Tablet
- Privacy and Security
- Hub Group Admin Guides
- The XRUK Volunteer Agreement
- Inviting People to your Group
- Add and Edit Groups, Channels & Forums
- XR Groups, Roles and Mandates
- Role Tenure
- SOS Facilities on the Hub
- Setting up a New Group on the Hub
- Deactivating or reactivating someone's account
- How to create and use Forms on the Hub
- Behaviour and Good Practice
- Library (UK Cloud)
- How to set up a Telegram-Mattermost link
- Placeholder Hub Groups
- Hub Admin Guides
- Intro to the Hub Admin Role
- Using the Hub Admin Interface
- Transferring data from the Map to the Hub
- Super Admin Functions
- Changing your personal details
Start Here
This document is a quick guide to get you started with using XRUK's online communication tools for the first time.
In this guide, you will learn:
- How to set up an account on the Hub.
- How to log in to Mattermost and send a message to your XR group in the UK.
- Find out where to find more information.
Note: This guide assumes that you will be using a desktop computer, although if you are using a smartphone the steps will be the same. You can use either your smartphone's browser app (e.g. Chrome or Safari), or you can download the Mattermost app. For a guide on using the online tools with a smartphone, please read this page.
Note: If you have any trouble with this guide, please contact your XR group's Hub Group Admin. If you don't know who this is or if your group doesn't have one, then please email tech@rebellion.earth.
If you need specific support with:
- Getting onto Mattermost
- How to use Mattermost
- Using the Hub (and XRUK's other services including the UK Cloud, UK Forums)
Please go here on the Rebel Toolkit or post questions or issues in the Hub Help Desk channel on Mattermost.
1. Joining the Hub 
What is the Hub?
The Hub is the key to accessing all of XR's UK online tools. It does two main things:
- When you join the Hub you will automatically have accounts created for you (with the same username and password) on all of the main tools that we use (including Mattermost).
- The Hub acts as a phone directory – you can use the Hub to find and contact other rebels and / or other groups.
For more information on the Hub, please read this guide.
How do I join the Hub?
-
Ask the Hub Group Admin of your XR group to send you an email invite to the Hub. If you don't know who this is, please email tech@rebellion.uk with the name of your group and the name of someone in XR who can vouche for you.
-
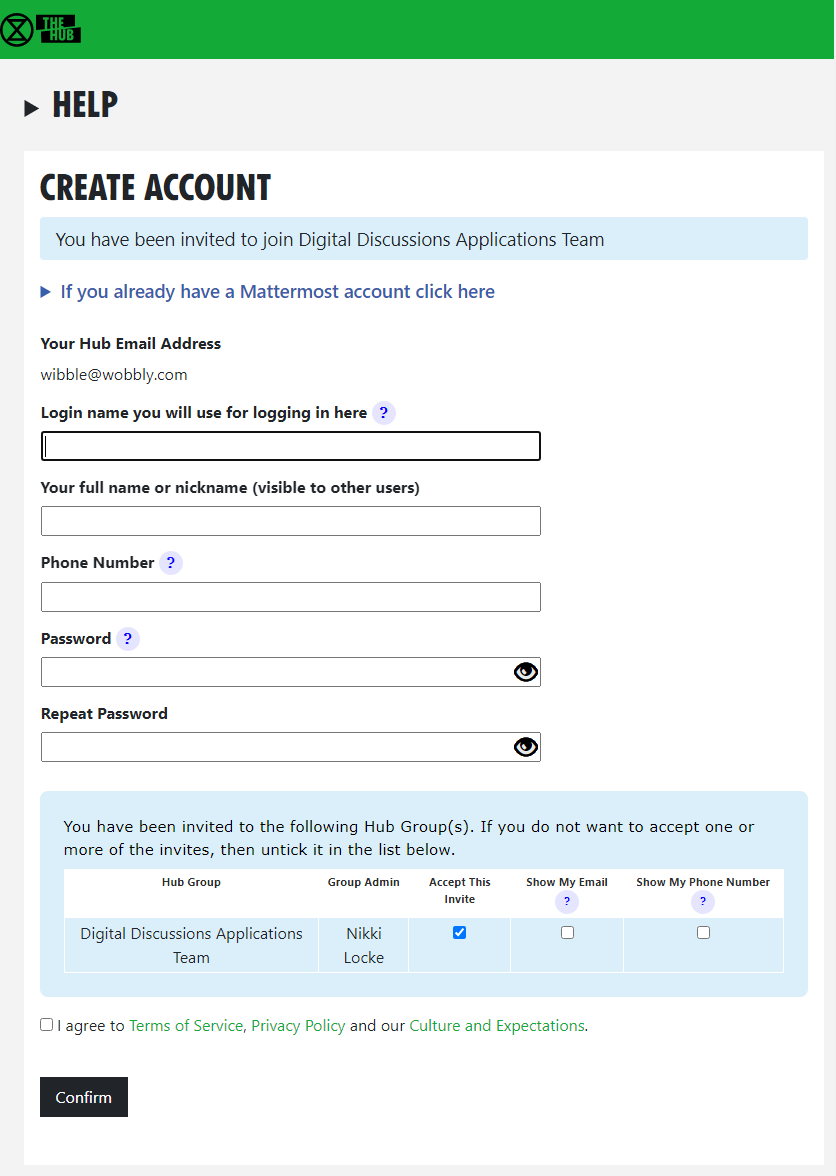
Open the invite and click on the link (you may need to check your spam folder). This will open a webpage containing a form that looks like this:

-
Fill in the form with your name (this is visible to other users, so you can use a nickname if you like), phone number (optional) and password. You are encouraged to create a username that is recognisably related to you - some rebels are happy to use their Local Group as part of their username – like
tom-bangor– while others may align with their Working Group – likerose-creatives. However, should you wish to remain anonymous, you are free to choose a username that totally conceals your identity. -
There is a list of groups you have been invited to. You can choose whether or not to reveal your phone number and/or email address to members of each group.
-
When you are done, click Confirm.
If you don't know where your local group is, there is a map. If your local group doesn't use the Hub, perhaps you could encourage them to do so - the Local Group Support team would be happy to help. Contact by email LGsupport@extinctionrebellion.uk.
Video
This video takes you through the steps outlined above. Or if you already have a Mattermost account but not a Hub account, watch this video instead.
Any problems?
If you are encountering any issues, read this page for information on how to fix the most common problems, as well as where to go to ask for help.
2. First steps on Mattermost 
What is Mattermost?
Mattermost is a secure chat application that your group can use to communicate instead of using a program like WhatsApp, Signal or Telegram. It can be used both on a desktop computer and a smartphone.
The main advantage Mattermost has over other chat tools is that it is MUCH easier to get in contact with other rebels. Most groups in XR, both in the UK and globally, are already signed up to Mattermost and it is simple to find and message them. Because Mattermost is used by XR Global, you can even get in touch with rebels across the world!
Please watch this video for a general introduction to Mattermost and its benefits.
Getting access
Video
For a video guide through these steps, see here.
Mattermost basics
Once you have successfully logged in to Mattermost, you should see a screen that looks like this:
[
On the left-hand side (5) are the public and private Channels that you are in. When clicking on the Channels, note that the messages shown on the right (15) will change.
Below the Channels are your Direct Messages (6). These are private conversations that you can have with individuals or small groups of up to 6 people.
If someone replies to a message you posted, or are following, the Threads (4) will light up - click here to see the replies.
At the far-left of the screen (1), you may see two or more blocks. These are Mattermost Teams and can be used to group Channels together. If you navigate between the different Teams, notice how the Channels shown change.
For a more detailed guide to using Mattermost, see this page on the Rebel Toolkit.
Sending your first message
To message your group for the first time:
- Find the correct Channel to post a message in. To do this, click through your Channels and Teams until you find a Channel with the same (or similar) name as your group.
- Write a hello message in the box at the bottom of the screen (16).
- Hit Enter to send the message.
3. Next steps
If you are interested in learning more, there are more advanced guides on the Hub, Mattermost, UK Forums and UK Cloud as well as XR's other UK tools.
We also strongly encourage you to read our Online Behaviour Guide and the information about your responsibilites around GDPR.
Lastly, if you have any trouble at all with these tools, please contact your group admin. They are there to help!
Extinction Rebellion UK Privacy Policy
Extinction Rebellion UK Terms of Service
The Hub
What is the Hub?
The Hub belongs solely to XRUK and is designed and maintained by our XRUK Digital teams. The Hub is used for a number of different things however its main purpose is to store our UK group information:
- which groups exist
- the group members
- role-holders
- group mandate / scope / group agreement
- group and members' contact details
- policies
- domains
The Hub maintains transparency by displaying our Self-Organising System [SOS], e.g. how our groups / teams / circles interact with each other; it shows us who's in a role and it also gives us their peferred method of contact. This is extremely useful because it makes it really easy to find the right people to talk to. The Hub also keeps track of the structure of XRUK groups - see My Groups.
We also use the Hub to connect many of our other tools and programs (e.g. Mattermost and UK Cloud) that rebels use to organise online.
Watch this video for a general introduction to the Hub and its benefits and also view the slides with clickable links of the slide presentation used in the video.
How do I join the Hub?
You can request a Hub invite to your group from your Hub Group Admin. If you don't know who this is, please email tech@rebellion.earth - let them know the name of your group and another person in your group who can vouch for you.
Why do we need it?
As well as doing important things like storing our group info and displaying our SOS, it also saves admin time by:
- Creating your accounts on XRUK's connected tools so you can sign-in / log-in with the same username and password on:
- the Hub
- Mattermost
- UK Cloud
- UK Forums
- Rebel Toolkit
- Rebellion Academy
- XRUK's Customer Relationship Managment [CRM] platform
- After you've accepted your Hub invite to a group, it automatically adds you to your group's Mattermost chat channels, Cloud folders and Forums.
- It can temporarily suspend your accounts if you're arrested so the authorities cannot get access to our platforms even if they take your phone or computer.
Futher info on how to join and use the Hub and Mattermost here.
Using the Hub: The Basics

This is the Hub home page. Here you can see links to many of XRUK's services. Click on any of the icons to go to them. Most browsers allow you to click while holding the Ctrl key to open the link in a new tab.
The grey area at the top contains links to training on the XR communication tools. If you already know all about the the subject, click "I'VE DONE THIS" and it will show you the next set of training. Once you have done them all, it will disappear (but you can get it back – there is a link at the very bottom of the page, if you scroll down).
Some of these icons only show if you are logged in to the Hub – click LOG IN in the top-right corner:

Admins will have extra options on this page, e.g. to invite other people to the Hub and XRUK's services.
Joining new XR groups
When you are invited to join the hub, or to join a new group on The Hub, you should get sent an email (check your spam folder if you can't find it). If you click on the link in the email, it will take you to a page that looks something like this:

Click the Create Hub Account button. You will see the following screen:
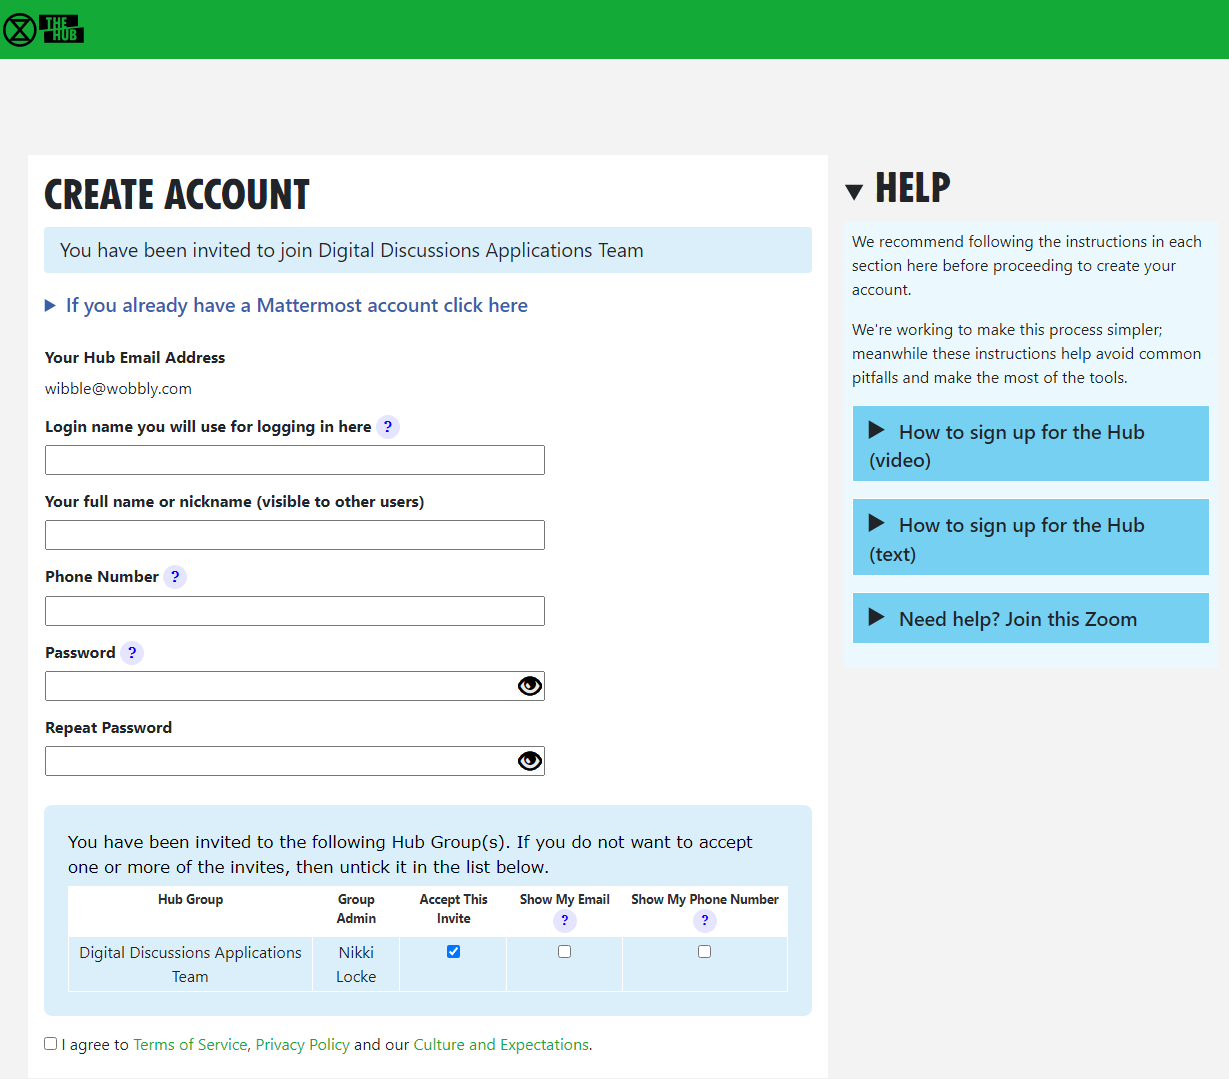
(If you are already on the Hub, some of this information will already be filled in.)
Notice the list of groups you have been invited to at the bottom of the screen. For each one, you can choose whether members of that group can see your email address and/or phone number. If you don't want to join one or more of the groups, you can choose not to accept the invite (by unticking the Accept box) – you will not be asked again (unless you are sent a new invite).
Simply fill in the form and click Confirm. You will be automatically added to the group(s) including all of its channels and forums.
It is also possible to accept your invites by clicking on Accept My Invites from the Hub home page.
Parts of the screen

- Hub logo – clicking here takes you back to the Hub Home Page
- Services – click here to go to the Services page
- Groups – click here to go to your Hub Groups
- Your menu – click here to drop down your menu (including your settings, help and logging out)
- Menu bar – all the options relevant to the current screen
- Menu bar overflow – if there isn't enough room on the screen for all the menu bar options, the extra ones will drop down if you click here
- Actions bar – all the options relevant to the current screen, e.g. Save or Delete
My Groups
You can see the groups you are in by clicking the My Groups tile:
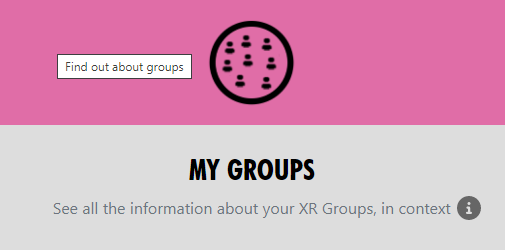
Or select the GROUPS menu option:
 .
.
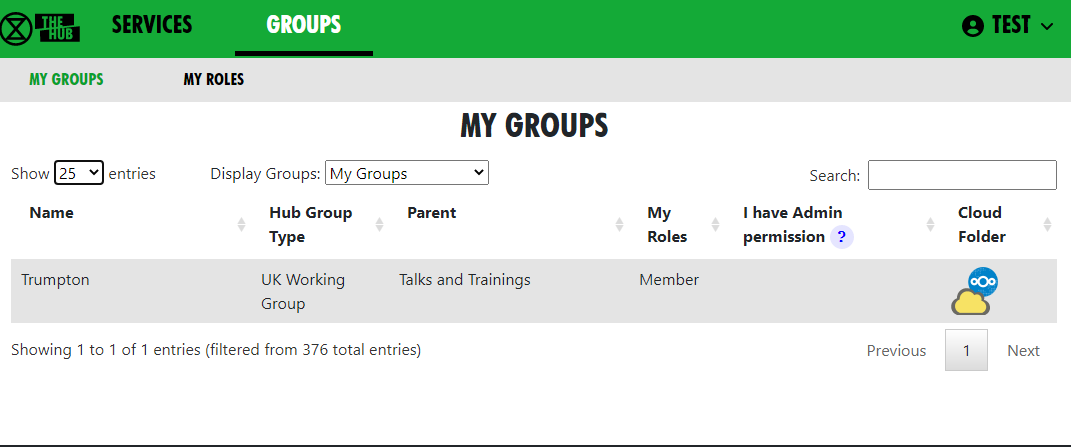
This brings up a list of Groups you are in. Click on ALL GROUPS at the top to see all the groups, even the ones you are not in. Click on a group to show the group in context.
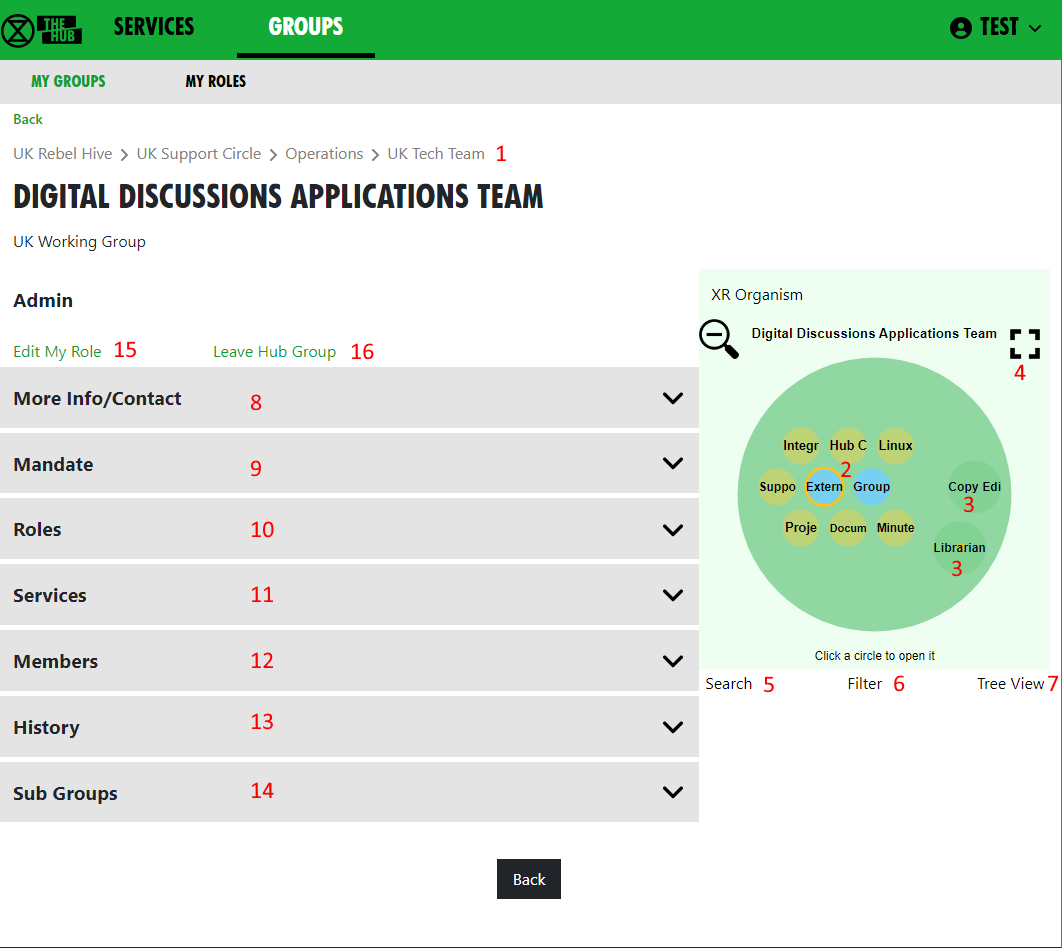
This screen is showing the Digital Discussions Applications Team UK Working Group. It also shows the parent groups (1) – click on one to go to it.
The Hub Circles display shows the group's Roles (2), and any child groups (3). This has a full-screen button to make it larger and easier to navigate (4). To find your way about the structure, you can click on any group to go to it, or on the background to go up a level.
If you want to find another group, you can use the search button (5).
You can click the Filter button (6) to hide some of the detail, to make the diagram less busy. If you set a filter, it is remembered and used every time you open this view.
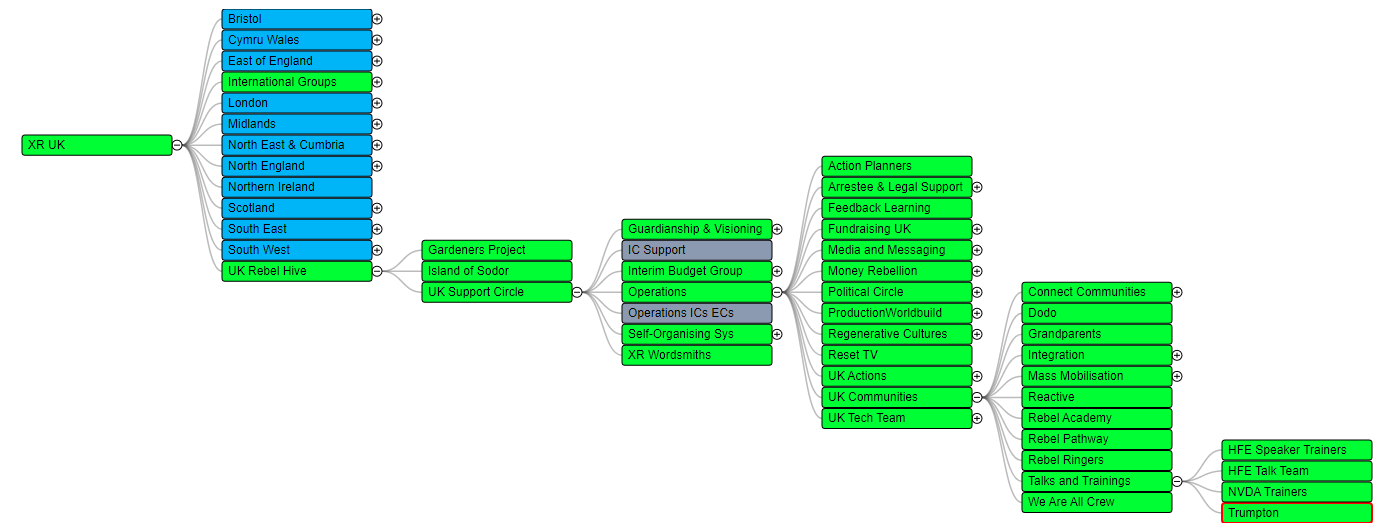
You can also display the groups in a Tree View (7) instead of the Circles Display.
Click any of the grey bars on the left to reveal more information:
- More Info/Contact (8) shows info about the group, links to social media, group email address, etc.
- Mandate or Scope (9) Mandate shows the group's Mandate within the XR SOS structure. Scope is for groups that don't follow the SOS constitution.
- Roles or Positions (10) shows the specific roles within the group, and who holds them. Click on a person's name to send them a direct message via Mattermost.
- Services (11) shows all the group's Mattermost Teams and Channels, Forums and Cloud space. Those you have permission to join are shown as clickable links.
- Members (12) only appears if you are a member of the group, and shows a list of all the other members.
- History (13) only appears if you are a member of the group, and shows you any changes that have been made to the group or roles within it.
- Sub Groups (14) shows any subcircles/subgroups
- Admin only appears if you are a member of the group, and contains links to allow you edit your role(s) (15) in the group, or leave the group (16). Group Admins will have more options here, e.g. to invite other people, and create or edit Channels, Forums and group information.
Secret Codeword
Click this icon to set a unique secret codeword to identify you. Then, if you want to communicate with XR (e.g. Arrestee Support) without revealing who you are to anyone listening, you can use the codeword. They can look it up on the Hub, and know who you are.
Only Arrestee Support, Hub Admins, and your Group Admins can see your codeword.
If you want to change your code word later, it is in Settings – click your name in the top-right corner to see the menu.
Your roles
Seeing all your Roles or Positions in all groups
Click on My Roles in the grey menu at the top of the GROUPS tab to see a list of all the roles you hold. There is a History option to show you all the changes to your role holding.
Viewing your individual roles or positions
Select your role from the list.

If you want to step back from the role, press "Step back from this role". If you want to step back from lots of roles in one go, see below.
You cannot add yourself to roles or positions – only your Group Admins can add people.
Your group can ask your Group Admin to create new roles/positions, or edit the mandates of existing ones.
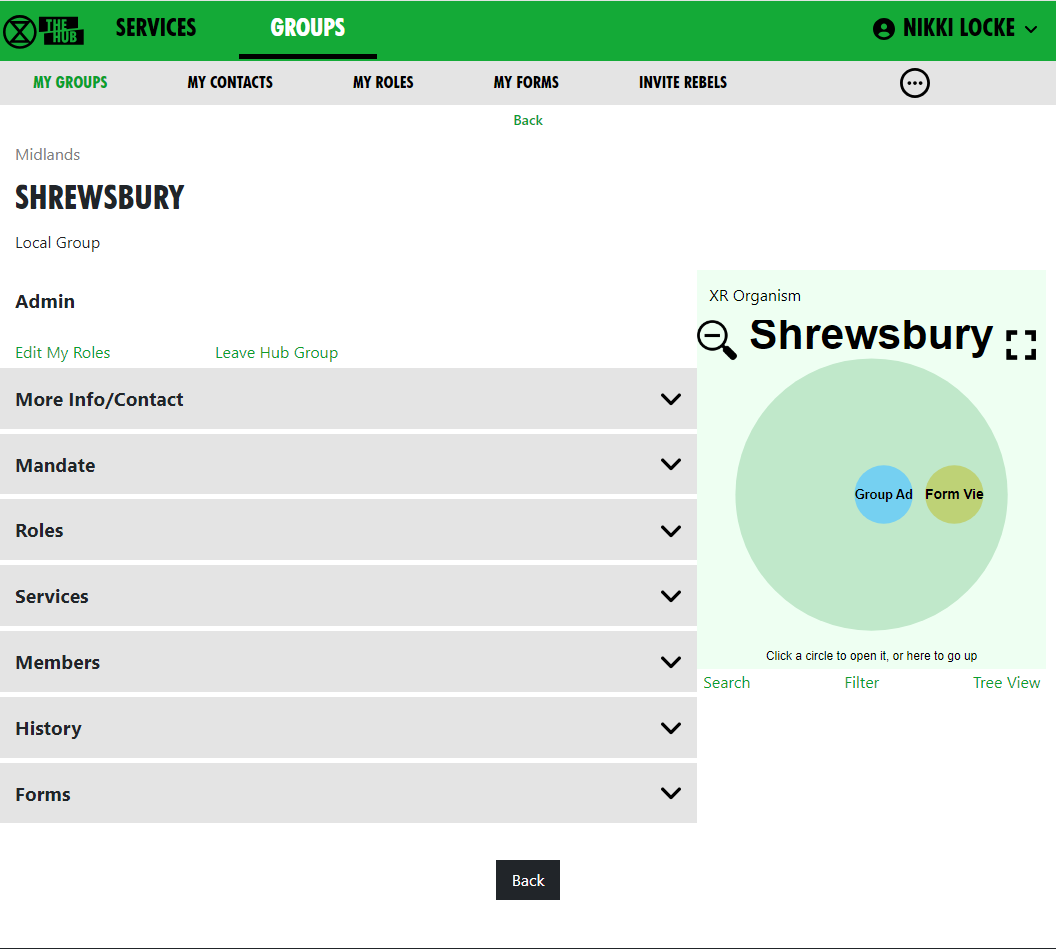
Leaving a group
If you want to leave a group, click Leave Hub Group when looking at a group in the GROUPS tab.
 This will remove you from the Hub Group and from all the private areas belonging to that Hub Group. It will not remove you from public Mattermost channels and forums, but you can do this yourself in Mattermost and Forums respectively, if you wish.
Seeing your roles in a particular group
If you have one or more roles in a group, you can see them by clicking on Edit My Roles when looking at a group in the GROUPS tab. (See screenshot above).
This shows all your roles in the group:
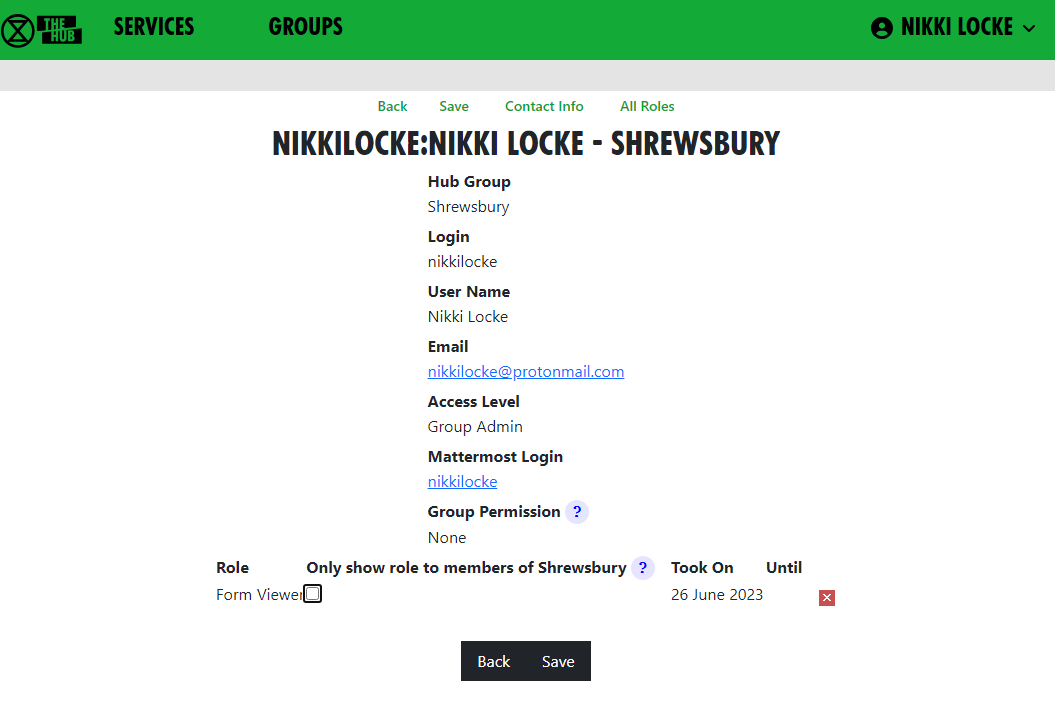
Private against a role means that only members of that group can see that you hold that role. This is useful if it is a spicy role you don't want everyone to know about. You can change this (remember to click Save to save the change).
If you click the little red x  against a role, then click Save, you will be removed from the role.
Stepping back from roles
Click on My Roles in the grey menu at the top of the GROUPS tab to see a list of all the roles you hold. Then click on Step Back From Roles.

This shows all your roles, all with Step Back ticked, and gives you the following options:
- Assign another user to the ticked roles
- Remove yourself from the ticked roles
- Leave the groups the ticked roles are in.
Bear in mind the following:
- Make sure only those roles you are stepping back from are ticked – untick the ones you want to remain in.
- If someone else has agreed to take on these roles, select that person from the drop-down list in Replacement User.
- If you want to remain in the role for a while (e.g. to train your replacement), leave Remove from Role unticked. But if you want to step back straight away, tick it.
- If you have Inviter or Group Admin permission in any of these groups, tick Remove Group Permissions to remove those permissions.
- If you are stepping back from the groups altogether, tick Remove From Hub Group.
Then click Save.
Updating your settings
Your menu
- Go to the Hub at https://hub.extinctionrebellion.uk and log in top right.
- Click on your username on any Hub page to see your menu. This can be found in the top right corner, here shown as TEST.

Settings
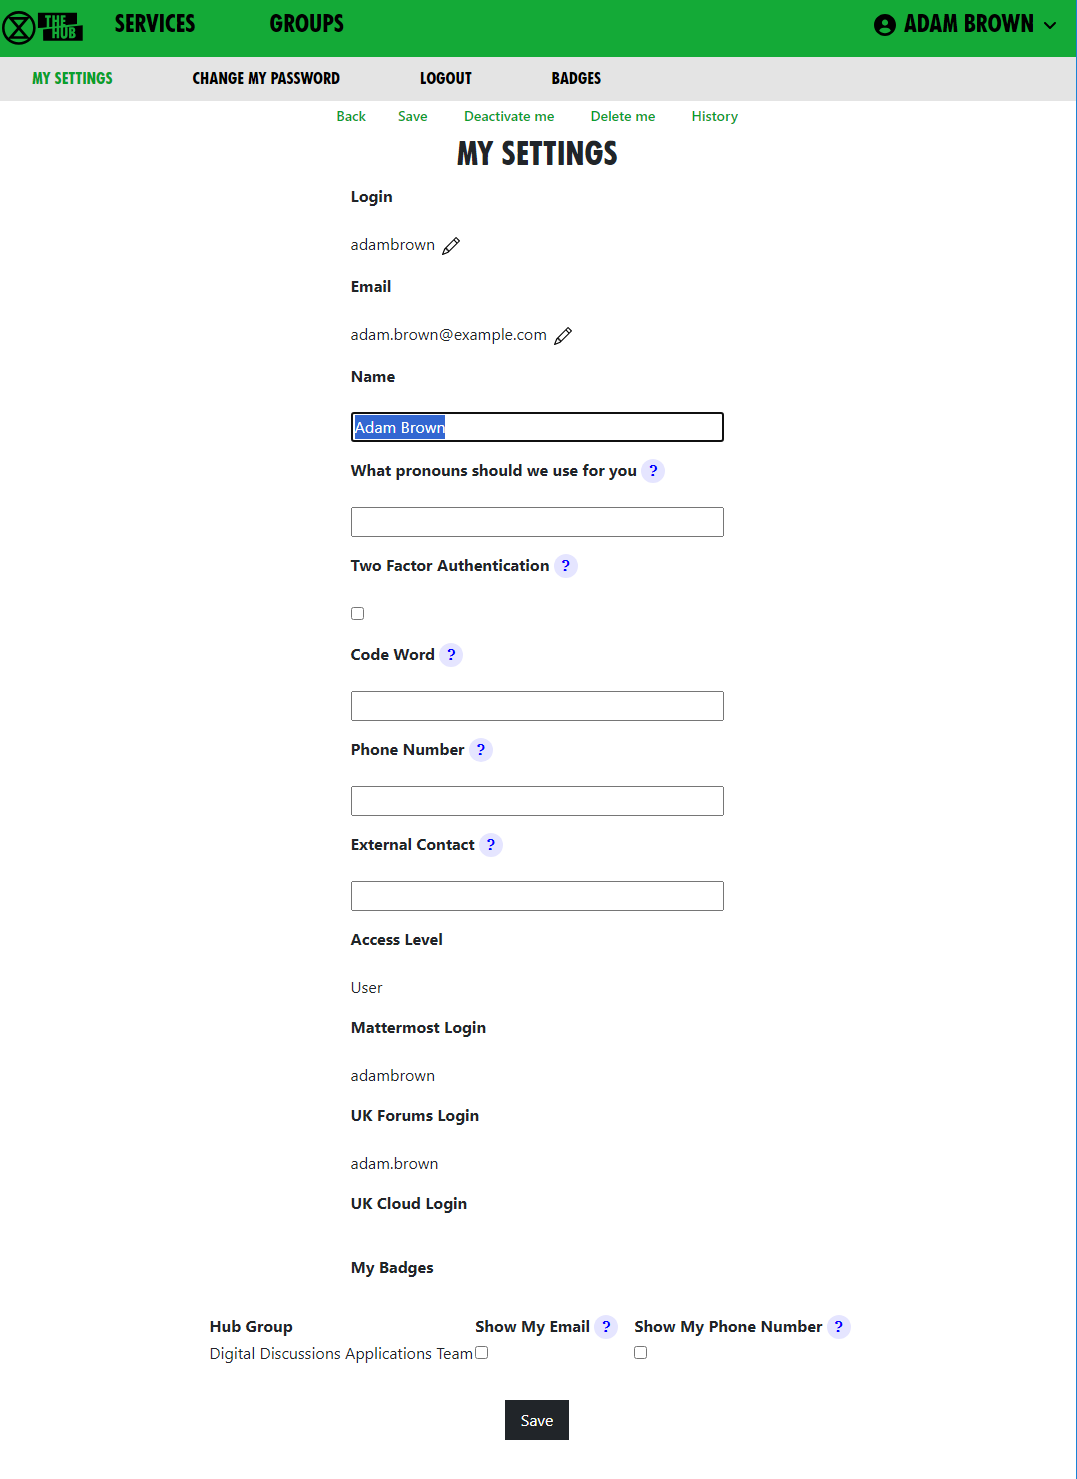
This form lets you change your name (this means your username. The Login is your 'handle' on Mattermost), preferred pronouns, secret codeword, phone number and external contact.
- Changing anything on this form just changes the information we hold on the Hub, not on Mattermost, UK Cloud or UK Forums. It also lets you change who can see your email and/or phone number.
- If you want to change/update your Login (handle) or Email and for these to change on the Hub and across the other services, see below.
You can set up Two Factor Authentication so that you have to confirm your login with an Authenticator app, like google Authenticator, before you can login. To do thios just tick the box, save the screen, and the next screen will help you set this up. You can always turn it off again by unticking the box.
Normally, people who wish to contact you about XR business will send you a message on Mattermost. It is therefore important that you check Mattermost regularly, particularly if you hold a role in a group, as otherwise you may miss these messages. If you really can't do that, then please put some other means of contacting you in the External Contact box, so people can get in touch. Note that this contact information is available to everyone on the Hub, i.e. bona fide verified XR members, not the general public.
Changing/Updating Login and Email across all our services
- There is an edit button (pencil symbol) next to Login and Email.
- Clicking the button takes you to a form to change your login details or email.
- These forms require you to enter your Mattermost password, as the Hub does not store your password, and it needs your Mattermost password to update your username or email address on Mattermost.
- A few people have different Hub and Mattermost passwords. If that is the case, you will be asked to confirm that they are different.
- Once you save the form, the Hub will try to change everything on all services - Hub, Mattermost, UK Cloud and UK Forums - to be the same.
If it is unable to do so, it will tell you which ones went wrong. The main reasons for this happening are:
- You put in the wrong Mattermost password
- Someone else is already using the login name or email you chose- Mattermost is global, so there are lots of users on Mattermost who aren't on the Hub.
If any errors occur, you can go back to My Settings and try different details.
Note: It is not possible to update a name (username) on UK Cloud. If you change your name the Hub deletes your old user record, creates a new one and then joins it to the same groups as the former. This is usually fine, but if someone shared a file or folder with you by name or you created personal calendars, decks or forms, they will be lost.
Change my password
This is reached from Settings. Here, you can change your password on the Hub only. To change your password elsewhere, you need to use the facilities on each other service.
Deactivate me
This is reached from Settings. Here, you can deactivate your login – e.g. if you have been arrested and/or your phone has been seized. You won't be able to log in to the Hub, Forums, Cloud or Mattermost until you get your Group Admin to reactivate you.
Delete me
This is the option to use if you want to be removed from the Hub, Mattermost, Forums and Cloud altogether.
Logout
This lets you log off, e.g. if you are using a shared computer and don't want the next person to be able to access your Hub account. Note this only logs you out of the Hub, and not from the individual services which you may have open in other tabs or apps.
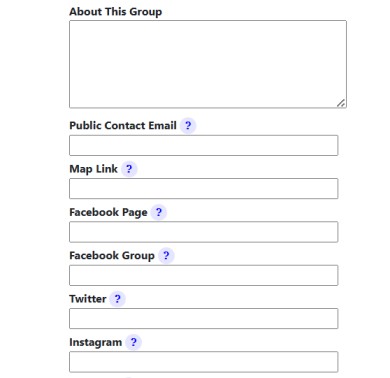
Adding additional contact info to groups on the Hub
On the Hub, you can add public contact details so that users can stay connected with your group, including a "Public Contact Email", Facebook Groups, Twitter accounts, etc. Most of the information is public and so published to anyone on the Internet, but if people want to keep information like Signal, Telegram or WhatsApp channels viewable to Hub members only, they should add it in External Contact Info which can be found at the bottom of the edit screen.
To add this contact information, you have to be a Group Admin of the relevant group, as otherwise the relevant box won't appear. On the Hub, select the group you are looking to add contact info to and click Edit Contact Info to bring up the editing screen. You can add public contact details on this screen.
Every Hub Group, including local groups, that doesn't check Mattermost regularly should also add external contact info to their Group Info/Contact tab on the Hub. This is so that people on the Hub can contact the group. In the External Contact info box at the bottom of the page you can add contact info such as WhatsApp and Signal details.

Search for another rebel
My Contacts
You can see a list of everyone who is in one the groups you are in by clicking the My Contacts tile on The Hub homepage:
Or select MY CONTACTS from the Groups screen. That shows this screen:
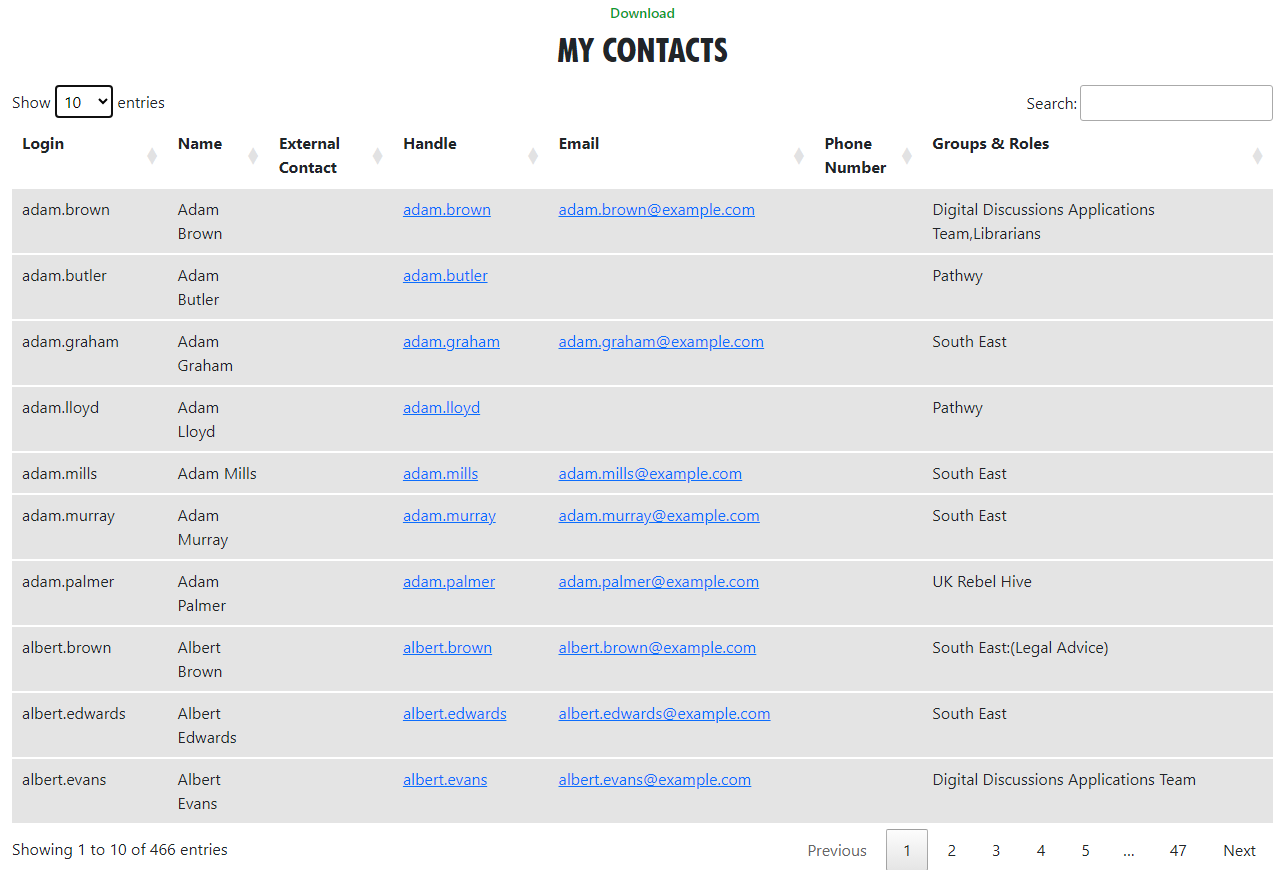
You can only see people's email address and/or phone number if they have chosen to show that to members of a group you are in. You can click on a link to message or email someone, or click elsewhere on the person's entry to see more detail:

You can see this person hasn't used Mattermost for a while, but they have put in an External Contact link, so probably best to use that to contact them.
Problems getting on the Hub
Listed below are several of the most common problems people have when they sign up to the Hub. If you are still having problems after reading this document, you should ask your Group Admin for help.
It says that an account with my username already exists
Watch this support video
If there is already an account on Mattermost with the same username that you have chosen, you will see this screen:
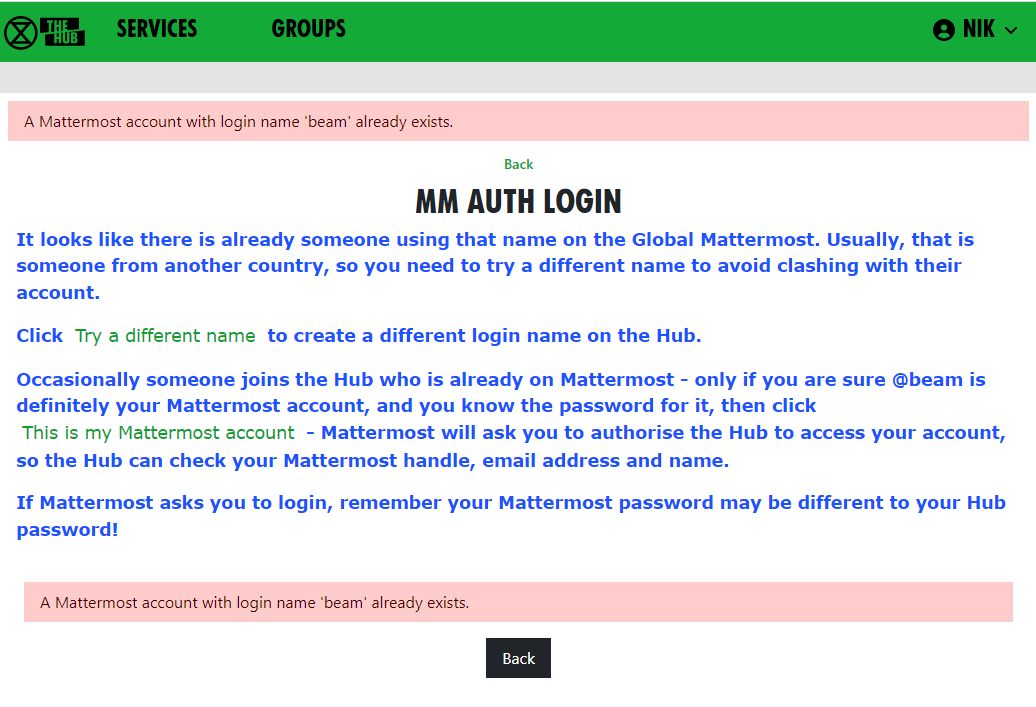
If you know you do not have an account on Mattermost, it just means you have chosen the same login name as someone else – click Try a different name to go back to the form, so you can try a different login name.
If you do have a Mattermost account under this name, click This is my Mattermost account to link the Hub to this account. If you are not already logged in to Mattermost in your browser, Mattermost will ask you to log in – you must use your Mattermost password here, which may be different to the one you just
entered for the Hub:

Mattermost will ask you to allow access:

It says that I already have a Mattermost account
If there is already an account on Mattermost with the same email address as your Hub one, you will see this screen:

You need to press the Continue button to link the Hub to this account.
I cannot remember my Mattermost password
If you have forgotten your Mattermost password, there is a password reset button, which will send you an email to reset your password.
It says my Mattermost account has not been validated
When your Mattermost account is first created, Mattermost will send you a verification email. You must click on the link in the email to validate your account. If you don't get the email, look in your junk email. If it is not there, there is a button to resend the verification email.
Compromised account procedure
All rebels with an account on the UK Hub, UK Forum, Global Mattermost and UK Cloud – which gives them access to material that should not fall into unfriendly hands, or that may compromise the legal position of themselves or others, for example, through providing evidence for conspiracy charges – need to be aware of these procedures.
Precautions to take when access to an account Is compromised
The steps below allow for the rapid temporary suspension of a compromised account on all XRUK services, to be followed either by reinstatement of the accounts with fresh passwords, or permanent deletion of the account as appropriate.
-
Set up, on the UK Hub, a secret codeword or phrase which you can easily remember and speak without having to spell it out, and that does not have ambiguous spelling.
- Log in on the UK Hub and click on the 'Set My Codeword' icon.

-
Enter your phrase or word in the box.
-
Once set, you can find and change your codeword by clicking on the Admin button and navigating to 'My Settings'.
-
Follow the advice available through the links below to secure any device that you use to access XR services and email (these were written for a previous Rebellion but are still relevant):
This should include any desktop devices you may leave at home that could be subject to a search warrant and seizure in your absence.
There is not yet a specific general guide to securing desktop devices against seizure – much of the laptop advice applies. Don't forget any memory sticks or CD/disc backups you may have lying around.
- DO NOT take any device, which has general access to your Hub accounts, into an arrestable situation! Please use a 'burner' phone and only install and use secure apps on it. See the Phone Security Guide above.
- If you have operational reasons for needing access to XR online services (other than Signal and Telegram and areas like the public website that do not require a login and can be viewed by anyone), you must be especially careful to ensure that your device is secure and that you don't lose it.
Loss of Your Device – Arrest, Loss or Confiscation
-
If you are arrested, tell your secret codeword to Back Office (Arrestee Watch) or a friend, ideally before your arrest, or if you are arrested without warning, as soon as possible afterwards (e.g. use one of your custody calls to tell Back Office).
-
If you lose your device, or if it is confiscated by the authorities, immediately let your Group Admin or Interal/External Coordinator know, so that they can inform the Hub Admin team.
-
The Back Office Volunteer, your Group Admin or Hub Admin on being told your secret phrase and that you have been arrested, or had a device(s) confiscated, will cross-check the secret codeword and if it is valid, immediately lock all of your accounts – the Hub, Forum, Mattermost and Cloud – until you are cleared. For Group Admins, here is how to deactivate and reactivate someone.
Restoring Your Hub Accounts
- When you are released, your accounts can be restored. You will need to contact your Group's Coordinator(s) and/or Group Admin for them to restore your account.
- If any of your devices are lost or remain with the authorities, you will need to change the email address you use for the Hub. This change must be done before your account is restored and it is recommended that you change your email even if your devices have been returned. Your new email address should be given to the Hub Admin via your Hub Group Coordinator/Group Admin. A new Hub Password will also be issued, and you should subsequently change this. Once the new email has been registered and the Hub account restored, you will be able to access all of your Hub Group information as before.
- If you are a member of Mattermost channels that the Hub does not know about, your membership of those channels will not be restored automatically. You will need to rejoin these by asking people in them to invite you again.
Non-Hub Services
-
The above ONLY applies to your Hub, UK Forum, Mattermost, UK Cloud and Vault accounts. If you have administrator or moderator access to any service that gives you visibility of others' account details or activity, then it is essential that you follow a similar procedure for those services as well.
-
For social media accounts, it is worth having a trusted close friend/partner who knows your password and can be instructed to change the password immediately should they hear you have been arrested.
Mattermost
How to Use Mattermost
Read this document to get familiar with Mattermost. It is used to communicate with XR groups as well as have 1-to-1 conversations. You can also watch this video for a general introduction to Mattermost and its benefits.
KEY INFO:
- Channels = Group chats
- Teams = collection of Channels
- DM = Direct Message 1 person or up to 7 people
If you need support with:
- General Tech - we use every platform in XR and we all need help sometimes!
- How to use Mattermost
- Getting onto Mattermost
- Using the Hub - and XR's other services including the UK Cloud, UK Forums
Please join one of the weekly sessions:
Tuesdays 18:00-18:30 (quick questions)
Thursdays 18:30-19:30 (longer training)
Join Zoom Meeting:
Meeting ID: 895 2855 8324 | Passcode: 278766
For a series of video guides to supplement the below information, see Video Guides to Help You Learn.
First Steps
Getting Access
Before you can access Mattermost you first need to create an account on the XR UK Communications Hub - Hub for short. For instructions on how to do that please read this guide.
Once you are on the Hub you can access Mattermost in a few ways:
-
Click on the Mattermost icon from the Hub main page.
-
Type https://organise.earth into your browser and hit Enter.
Once this is done we recommend adding the page to your bookmarks/favourites so it's easier to find in future.
Note: Mattermost is also available as an app so you can install it to your smartphone or tablet. Please read this document or watch this video for instructions on how to do this.
Landing Page
When you have logged in to Mattermost you will see a screen that looks a lot like this:

Note that we have added numbers to the screenshot and we will refer to this image throughout the document.
Navigation
Please watch this very helpful video for a guide to navigating Mattermost: from using Teams and Channels to saving and threading messages.
Teams
Teams appear on the far left of your screen (1). When you have Mattermost open either in a browser or in the app, you can click on the icons [coloured squares on the left] to switch between teams. Inside a team there is a collection of Channels.
Once you have been invited to the Hub and added to a Hub group, the Hub will automatically add you to the UK Team on Mattermost and any channels in the UK Team belonging to your group. However, your group might use other teams and by accepting your Hub invite, you also be added to these as well as the channels within them.
Checking who else is in my Team
To see the other members of a Team, click on the Main Menu (3) and select View Members.
Contacting other groups
Mattermost is different to other chat apps. One of its main benefits is being able to contact others even if you're not a member of their group or they're not a member of your group.
All XR UK groups on Mattermost have a public 'Reception' Channel in the UK Team, and their group members will be added to the group's Reception by default (you will probably be in one for your group).
To join another group's Reception Channel, click Find Channel or + Browse Channels (4), to search or browse for the Reception Channel you want to join and then click Join. The Channel will then appear in your Channels list.
Post your message, get your reply and then you can leave the Reception channel. Receptions are public channels so anyone in the UK Team can join, leave and rejoin public channels.
Joining other Teams
To join a public Team, click on the + sign below your list of Teams (1). This will bring up a list of all the other XR public Teams you are able to join, including for other countries. Click on one of the list of Teams to add yourself.
If you want to be added to a private Team (e.g. for your local group) you will need to speak to a Hub Group Admin who will be able to send you a Hub invite to the group.
Leaving a Team
To leave a Team, open the Main Menu (3), and then select the option Leave Team.
Note that once you have left a Team, if you want to re-join at any point, you will have to join (or be invited to) all the Channels you belong(ed) to previously.
Channels
Channels are just another name for group chats. Every group set up on the Hub will have a number of these Channels that you will be added to when you are invited to that Hub group.
Type of Channels

Some Channels are public, so anyone in the Team can join them. They have the world symbol to the left of the channel name. Some Channels are private, by invitation only, and they have a padlock next to them.
Joining Channels
To join a public Channel either click in Find Channel and search, or click the + button to browse Channels on the left (4). This will bring up a list of all of the public Channels in a Team. Click on any of these in the list to add yourself.
When you search for Channels you will only see all the public ones and any private channels you're already in.
If you need to join a private Channel that belongs to a Hub group, ask the Hub Group Admin to send you a Hub invite. If you need to join a private Channel that has only been created on Mattermost and doesn't belong to a Hub group, ask someone already in that Channel to add you. You could also post a message in that group's Reception Channel asking to be added.
Leaving a Channel
To leave a Channel, click on its name at the top of the screen (not where it appears on the left) and then select the option Leave Channel. Alternatively if you hover over the Channel on the left three dots will appear next to it and from that menu you can select Leave Channel.
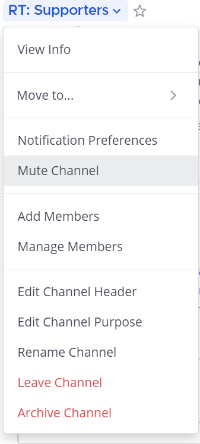
Muting Channels
You can mute a Channel if you want to stop receiving notifications from it but don't want to leave. To do this click the Channel heading (at the top of the screen), or hover over the Channel on the left and click the three dots, then click Mute Channel. You can also set whether you want to be notified if someone uses @all or @channel by clicking on Notification Preferences.
Default Channels
Every Team has two default Channels that you will be added to when you are added to the team:
-
Town Square: This is the communal area in each team that should be used for announcements and general XR-related discussions.
-
Off Topic: This is a place where team members can discuss things that aren't directly related to the business of the team (e.g. social activities).
Very Important: Please do not rename these default Channels as it will cause a lot of confusion.
Note: It is not possible to leave the Town Square Channel. If you want to stop receiving notifications you should mute the Channel instead.
Sorting Channels
If you hover over the CHANNELS header on the left (6) then click on the three dots you can sort your Channels one of three ways:
- Alphabetically
- by Recent Activity - the most recent will be at the top
- Manually - you can drag the Channels up and down into the order you prefer
If this isn't enough you can Create New Category which enables you to sort Channels into groups that suit you, for instance relating to particular projects or areas of interest. Once you have created your categories you can drag and drop Channels between them.
Creating Channels
Important: You should not create public Channels from inside Mattermost. Instead please get your Group Admin/Tech Champion to do this for you using the Hub.
To create a private Channel:
- Click on the + sign next to Find Channel (4)
- Select 'Create new Channel'
- Enter a name for the new Channel (and optional purpose and header), ensure Private is selected.
- Click Create Channel
Channel headers (18)
Underneath the Channel name at the top of the page is the Channel header. It is a useful place to put information about what the Channel is for and to store some useful links (e.g. your group's Forum or your regular Zoom meetings).
To see all the info click on the Channel name:
then click on View Info.
If you want to change what is written in the header click on Edit Channel Header. If you want to add links to this section the process is the same as here. Please confirm with your Group Admin before making any change to the Header.
Sending Messages (14)
You can write messages by typing in the box at the bottom of the screen. To send them hit Enter. The message will be sent to the Channel or Direct Message you are currently in.
Alerting people to messages
If you want a particular person to read a message you are sending, you can tag them by writing '@' followed by their username (e.g. @xrukadmin). This will send them a notification.
Important: You can also use @all or @channel to notify everyone in a Channel but please use this responsibly as for larger groups it is rarely appropriate and may annoy people.
Sending Direct Messages (7)
To send someone a Direct Message (instead of posting in a Channel):
- Click the + sign to the right of the heading DIRECT MESSAGES (7)
- Select the users you want to message (you can create group messages with up to a maximum of 6 people)
- Write and send your message
All of the Direct Message conversations that you have had will appear below the DIRECT MESSAGES heading to make it easier to contact them again. Next to each name, an icon shows whether they are online or not. Clicking on a username will display your Direct Message history with that user. Users you do not need to contact regularly can be removed from this list by pressing the cross to the right of their name.
Sorting your Direct Messages
Much like with Channels, Direct Messages can be sorted alphabetically or most recent first. You can also choose how many to show (all, 10, 15...). To change these settings hover over DIRECT MESSAGES then click the three dots to the right of it.
Replying to messages
It is possible to reply to messages posted in Channels or Direct Messages using 'Threads' (5). These are helpful if you are having multiple conversations at once so people don't get confused about which messages are related to which discussion. You can click Threads on the left-hand side of the screen to see these conversations. To reply to a message in a thread click on the Reply icon:

Note: For a full explanation you can watch the threading messages video (5 mins).
Reacting to messages
To add a reaction (e.g. a thumbs up or heart icon) to a message click on the Add Reaction icon:
 .
.
To post a reaction to a message you can click on the Emoticon icon on the bottom right of the message (16).
Searching for messages (10)
Use the search box to find messages and replies that match the search terms that you enter. All Channels that you are a member of in the current Team are searched.
Note: For a full explanation you can watch the Searching for messages video (3 mins).
Saving messages
You can click on the 'save' icon (like a bookmark) next to a message to save it for later, then bring up all your saved messages by clicking on the 'Saved posts' icon at the top right of the screen (11).
Note: For a full explanation you can watch the Saving messages video (3 mins).
Adding links
To add a picture click on the paperclip icon on the bottom left hand side of the screen (15). To add a nicely formatted link to your message, write the text you want to show in square brackets immediately followed by the link URL in round brackets. For example:
Check out this fantastic [guide to Mattermost](https://rebeltoolkit.extinctionrebellion.uk/link/394#bkmrk-page-title)!
will look like:
Check out this fantastic guide to Mattermost!
when sent.
Other formatting tips
Here are a few simple tips to make your messages look better:
- **bold** displays as bold
- _italic_ displays as italic
- ~~strikethrough~~ displays as
strikethrough - ```typewriter style``` displays as
typewriter stye - >quote displays as
quote
Copying messages
It can be difficult to copy messages in order to share them in multiple Channels without losing the nice formatting and any links. Currently the only way this is to:
- Open settings (17) and click on Advanced.
- Set Enable Post Formatting to Off.
- Copy and paste the messages that you want to share.
- Return to Advanced and set Enable Post Formatting back to On.
Rebel Compass (8)
This takes you to a bunch of links and resources from XR Global including plaforms, videos, documents, trainings, events etc.
Notification settings
Note: For a walkthrough of all the content in this section you can watch the Notifications (5 mins) and Account Settings (4 mins) videos.
To get the most out of Mattermost we strongly encourage you take the time to get your notification settings set up just right. This will make sure that you don't get overwhelmed by huge numbers of irrelevant notifications, and also that you won't miss any important messages that you need to see.
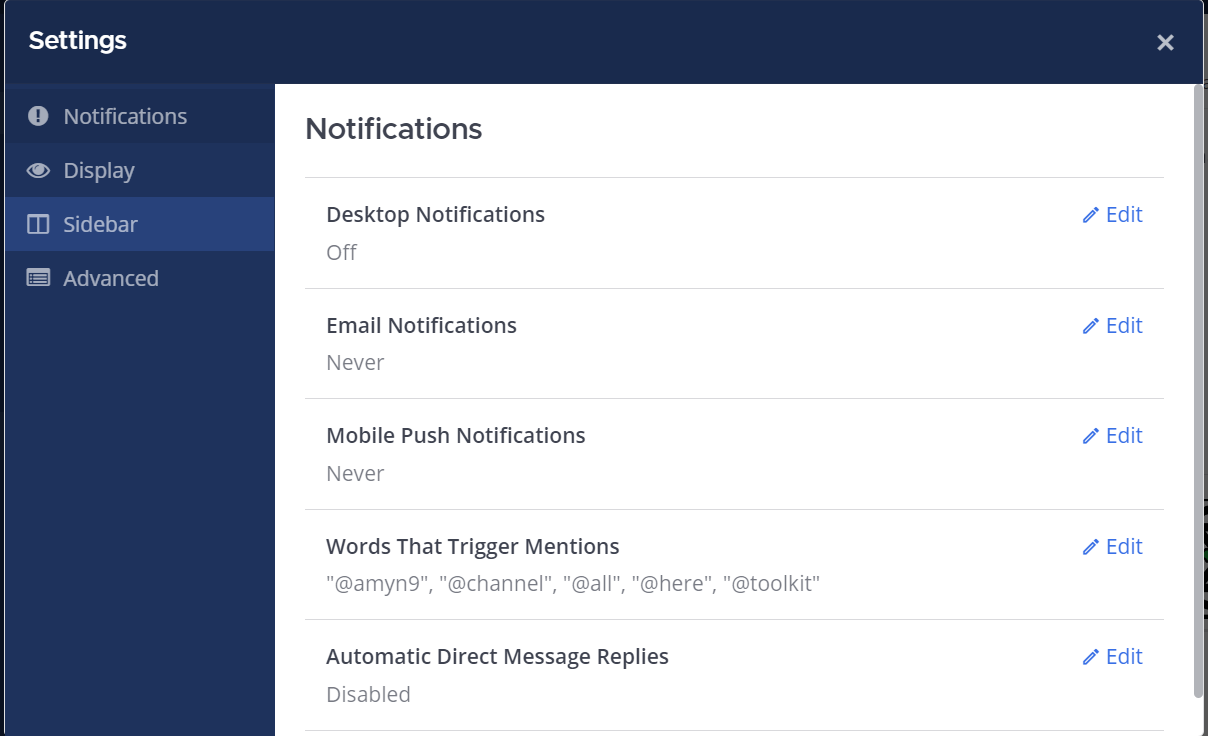
To modify the notification settings in Mattermost, open your settings (17) and click on Account Settings. You will then see this screen:
Setting desktop/mobile notifications
To modify these settings click Edit under the sections labelled Desktop Notifications or Mobile Push Notifications.
We recommend that Send desktop notifications (under Desktop Notifications) and Send mobile push notifications (under Mobile Push Notifications) are set to either For all activity or For mentions and direct messages.
Enabling email notifications
You can enable email notifications of Mattermost messages. To do this:
- Open your notification settings (see 'Notification Settings' above)
- Under Email Notifications click Edit
- Under Send email notifications tick Immediately
- Click Save
Setting notifications for reply threads
To be notified of all messages that happen in a thread you participated in you should:
- Open your notification settings (see 'Notification Settings' above)
- Under Reply notifications click Edit
- Tick Trigger notifications on messages in reply threads that I start or participate in
- Click Save
Personalising your mentions
It is possible to get notified every time a certain word gets mentioned in one of your channels. By default this will just be your username including the @ symbol (e.g. @myusername) but you can add extra words if you like. For example, if you do a lot of work on the Rebel Toolkit you may want to add toolkit to your list of words that trigger mentions.
To set this up:
- Open your notification settings (see 'Notification Settings' above)
- Under Words That Trigger Mentions click Edit
- Tick any of the tickboxes that apply
- Add any additional keywords (e.g.
toolkit) in the space below the tickboxes - Click Save
Seeing recent mentions (10)
Click on the top right @ sign to see posts where you have been mentioned recently.
Grouping unread messages together
You can get Mattermost to collect unread messages at the top of the sidebar so they are easier to find. To do this:
- Open the Mattermost settings (see 'Notification Settings' above)
- Click on the Sidebar tab
- Under Channel Grouping and Sorting click Edit
- Tick Unreads grouped separately
- Click Save
Setting up 'out-of-office' messages
If you will not be reachable on Mattermost for a while and would like to set an automatic reply that anyone who messages you will see then you should:
- Open your notification settings (see 'Notification Settings' above)
- Under Automatic Direct Message Replies click Edit
- Tick Enabled and write your message
- Click Save
You can follow the same process to disable the automatic messages when you return.
Getting rid of annoying messages from 'System'
In your Channels you will probably see lots of messages from 'System' notifying you that people have been added to, and left the Channel. You can turn these off by:
- Open the Mattermost settings (see 'Notification Settings' above)
- Click Advanced
- Set Enable Join/Leave Messages to Off
Further information
Setting your status
To change your status (which can be Online, Away, Do Not Disturb and Offline):
- Click on your image/icon at the top left of the screen (2)
- Click on the option that you want
Adding a profile picture
To add a profile picture to your Mattermost account:
- Click on (2) in the top right corner of the screen
- Click on Profile
- Scroll down and click Profile Picture, then click Edit
- Upload an image of your choice
- Click save!
Logging out
To log out of Mattermost, click on (2) (your profile picture) in the very top right corner of the screen and then click on Logout.
Other places to find information about Mattermost
There is a help button (12) at the top right hand side of the screen.
Here is list of other resources about Mattermost that you might find useful after reading this guide:
-
This is the official guide to Mattermost. It goes into a lot more detail than this guide but is more complicated and not all of it is relevant to XR.
When to use the Forums instead of Mattermost
What is the difference between chat and discussion?
Chat (Mattermost) and discussion (Forums) are two very different things. This document attempts to explain their individual uses.
Think of chat (Mattermost) as being a bit like conversations around a table in a cafe or pub or at a large dinner. There are multiple things going on at the same time, it may get noisy, threads get interrupted and side-tracked. There is a lot of good social communication going on, but the focus is more on exchange of ideas than working on a particular topic. It’s a big room, and you can move around multiple tables listening to what is going on and chipping in.
Think of discussion (Forums) as more like a meeting or conference with break-out sessions going on in parallel. Each category is a session, and each session might include several agenda items (topics). The sessions are focused on a particular area and are working on solving problems and developing ideas in that area.
Some people need one, some the other, some both.
Chat is more ephemeral; discussion is where work gets done. Trying to have a single system handle both inevitably involves compromises and results in confusion. In chat, it is often difficult to find previous ideas, and you therefore don’t want useful information which you might need again to be lost in there. In discussion, you are focussed on a specific topic and may want to avoid immediate distractions – difficult in chat rooms.
Chat benefits from quick responses, so a good mobile app can be important, but we must be careful not to exclude those without smartphones. One failing of the widely-used WhatsApp chat application is that it does require you to have a smartphone to use it. Even Signal, which can be used on a laptop without a tethered phone, requires access to a smartphone to initially set it up.
Discussion requires more active listening, considering what is said and providing a thoughtful response. Here mobile ‘presence’ is less important, and the layout needs to make it easy to find contributions and provide more detailed replies. A larger screen than a phone and a proper keyboard are often useful.
What tools should I be using?
Most Rebels involved in organising local or working groups will need discussion and should be on the Forum.
Less active people may not need online discussion at all, or they may occasionally respond to a call to participate in an important decision for the group, dipping into a discussion forum to do so.
For a local group, chat is probably what most people will use for day to day keeping in touch with each other. One big advantage of Mattermost is that it does not require a smartphone to use it. Furthermore, by employing a platform that is run by XR and used across all international groups it is both robust and secure, and enables the local, regional, national, and international chat channels that a user chooses to follow to all appear in one place.
Working and organising groups will probably be using both chat and discussion.
Further Information
For further information about this important distinction please refer to this blog post.
Mattermost Moderation
What is Moderation, why do we need it and who does it?
These questions arise with any open chat service like Mattermost, and we have to have guidelines on what is acceptable. Sometimes, posts can get heated and hurt people's feelings, so some sort of feedback and, possibly, corrective action, is necessary. That's what Moderation is all about - keeping the posts within agreed limits of acceptability for all our users.
So, who does it? Well, we're a Self Organising System and, like it says in the Online Behaviour Guide: "We owe each other a duty of care to make our presence on our communications platforms a comfortable and beneficial experience." Maintaining good behaviour falls to all of us, and we need to be careful to maintain this when starting or responding to a post.
Now, there will be times when you may find a post that fails to meet what you feel are acceptable standards. You may, of course, decide to reply to it directly yourself, and explain why you find it unacceptable - possibly suggesting, to the poster, a potentially more acceptable way of making their point. Alternatively, you might bring it to the attention of the channels's Team Admin(s) by Direct Message - you can find their usernames in the Channel Member drop down list.
However, there will sometimes be a need for more formal oversight, particularly with channels like Town Square and Off Topic, where greater numbers of members congregate and more diverse topics are discussed. This is where our own UK and Regional Moderators can help. Their objective is to basically keep an eye out for posts which may not be appropriate either in terms of content, wording or subject. Our Moderators are members of XR UK and have previous experience in looking after spaces like Mattermost, so you're in good hands. In order to moderate fairly, they will act anonymously - that is, they won't use their normal Mattermost username, but a special username containing the Moderator term, like @UKModerator3. This will allow our Moderators to be able to use MatterMost as ordinary rebels themselves , avoiding any interaction with other users being constrained by knowing they are Moderators, and helps to protect them from personal harassment or entreatment to restore edited/deleted posts.
Moderators will be able to edit and/or delete any posts they find unacceptable. Users will be warned if their posts are in conflict with our criteria for acceptability and, in the first instance, be asked to rephrase the offending post and, possibly, to refrain from continuing with the topic. If this is not possible, because the original poster refuses - or the post itself needs to be removed - then the post will be deleted. On edit or deletion, the reason for this action will be published, by the Moderator, in the channel. Further discussion on this action, or the post itself, will be limited by the discretion of the Moderator/s. Hopefully, the issue will be resolved amicably and an agreement reached by all parties. However, continuing the discussion may result in further a warning and/or subsequent action to bring the matter to a close.
As stated above, applying the moderation function is not a means to control discussion, but to make our chat space as comfortable and acceptable to everyone in it. There will be problems but, with supportive and constructive moderation, we will achieve this aim and minimise disruptive and negative behaviour in our Mattermost channels.
How to download and use the Mattermost App
XR's Mattermost is held on our own secure servers and the address [Server URL] is https://organise.earth
- Go to Playstore [Android] or App Store [iPhone]
- Search for Mattermost
- Select the Mattermost app - if you see several options e.g. Mattermost, Mattermost Business, Mattermost Classic or Mattermost Beta, select the one that either only says Mattermost or Mattermost Business. Mattermost Classic is for older phones and Mattermost Beta is for testers.
- Once the app has downloaded, open it and you'll see the Welcome screen. If you want to learn more, select Next and scroll through the screens. If you want to sign in straight away, select Sign in.
- Add organise.earth in Enter Server URL
- Add anything you like in Display Name - XR makes sense
- Select Connect

Next Log In to Your Account

Once logged in you'll see this screen

Now you're in, here's some handy tips!
- White/Red circles with numbers:
- Mattermost is guiding you to go there first
- These are notifications
- The number in the white circle is the amount of messages where your name/handle has been used/tagged - therefore those messages are specifically for you
- White/Red dot with no number:
- There are unread messages but you haven't been tagged in them so it's less urgent to read those
- Use Find channels to search for any channel [chat] in any of the Teams you're already in. [Teams are the coloured squares on the left] You don't need to select a specific Team first.
- Select the @ symbol at the bottom of your screen to find any message in any Team in any Channel where you've been tagged.
- Select the Bookmark symbol at the bottom of your screen to find any message you've saved.
- The plus sign + top right of the screen:
- Browse channels: Find and Join any public channel within any of the the Teams you're in. You can't find private channels if you're not a member of them.
- Create New Channel: Set up a public or private channel within the Team you've selected and then add people to the channel.
NB important:
- Only create a new channel directly within Mattermost if the channel is going to be temporary. If it's going to be long-standing or permanent, ask your Group Admin to create it as part of a Hub group on the XRUK Hub - this helps keep the movement transparent so we can all see what channels exist.
- To add people to your new channel - first, they need to be in the Team where you've created the channel so consider creating it in the UK Team as we're all in the UK.
- Open a Direct Message: Set up a direct message with 1 or up to 7 people.
NB important:
- To add a person/people to your direct message, they need to be in the Team you've selected. If you can't find them, select the UK Team and then select the + sign and then Open a Direct Message.
Creating Broadcast Messages on Mattermost
Broadcast messages on channels such as Movement Broadcast and Rebellion Broadcast have a specific style. Which is as follows:
- Image at the top which is relevant to the content.
- MESSAGE TITLE in Caps and Bold.
- Message text with Emoji’s where relevant (don’t over do the emoji’s).
- Where links are included the links should be shortened and underneath the relevant text, not beside it. This keeps the text more readable.
Example Message

Markdown used to create the message

#### **TEST BROADCAST MESSAGE TITLE**
Text of my message
:location_marker: Location Info
:date: Date / Time Info
:arrow_forward: Get more info [here:
[https://xrb.link/k49fWf0hy3](https://xrb.link/k49fWf0hy3)
Points to note about the above Markdown:
-
The first line of the message is the in-line image, created using the Imgur platform and is broken down as follows:
- The ! At the beginning denotes an in-line image
- The [imgur] part of the line is the image Alt Text, and can be just left as [imgur]
- The () part of the line is the link to the image. You need to ensure the .jpeg is included.
-
The message title has four hashes and a space before it. This makes the text a small heading.
-
There are two asterisks immediately before and after the message title. This makes the text bold.
Using the XR Link Shortener
https://xrb.link/ This is very self explanatory. You do need a Mattermost Account to use this.
Using Imgur image platform
https://imgur.com/ Imgur is free to use, but you will need an account.
Go to imgur.com, login and click on New post.

Upload the image.
Click on your Avatar in the top right of the screen and from the menu select Images.
Click on the image you just uploaded.

In the Sizes section of the screen (shown above) choose either Medium Thumbnail or Large Thumbnail.
Then Click on the Copy button next to the Markdown Link.
Paste the copied text into the top of your message. You need to change the text to add an exclamation mark to the start of the line. Example below:

Click on the message preview icon (the eye) to check that the message text and image are displayed correctly.
More information on formatting messages in Mattermost can be found below.
Related Information
Guide to Formatting messages in Mattermost
https://docs.mattermost.com/collaborate/format-messages.html
Broadcast Comms Guide
Guide to help UK groups plan and deliver their comms: https://xrb.link/K28cCF3CE
Broadcast Style Guide
Follow XR design and stay formatted when crossing channels.
Here’s how: https://xrb.link/k49fWf0hy3
Mattermost Boards
Introduction
Mattermost Boards is a project management and task-tracking tool integrated directly into the Mattermost platform. Boards allows teams to organise tasks, define workflows, and collaborate on projects within a single, secure environment.
Mattermost Boards can do a lot! If you'd like to do a deeper dive and find out more, e.g. how to create a board, create a card template, filter, add properties to a card and much more, please check out the Mattermost support info.
Basic steps for working with an existing board
1. Sharing and accessing Mattermost Boards
- Create a shared link, or invite team members directly.
- Board admins can select Share in the top-right corner to manage access and then add the rebel's handle.
- Or, boards can also be linked directly to channels to automatically provide access to all channel members.


2. Steps to create a new card from an existing template
- Open the board where you want to add the card.
- Click the word NEW [top right in blue] or the + sign at the top of a column.
- The new card will be created with pre-populated fields (properties, description) based on that template.


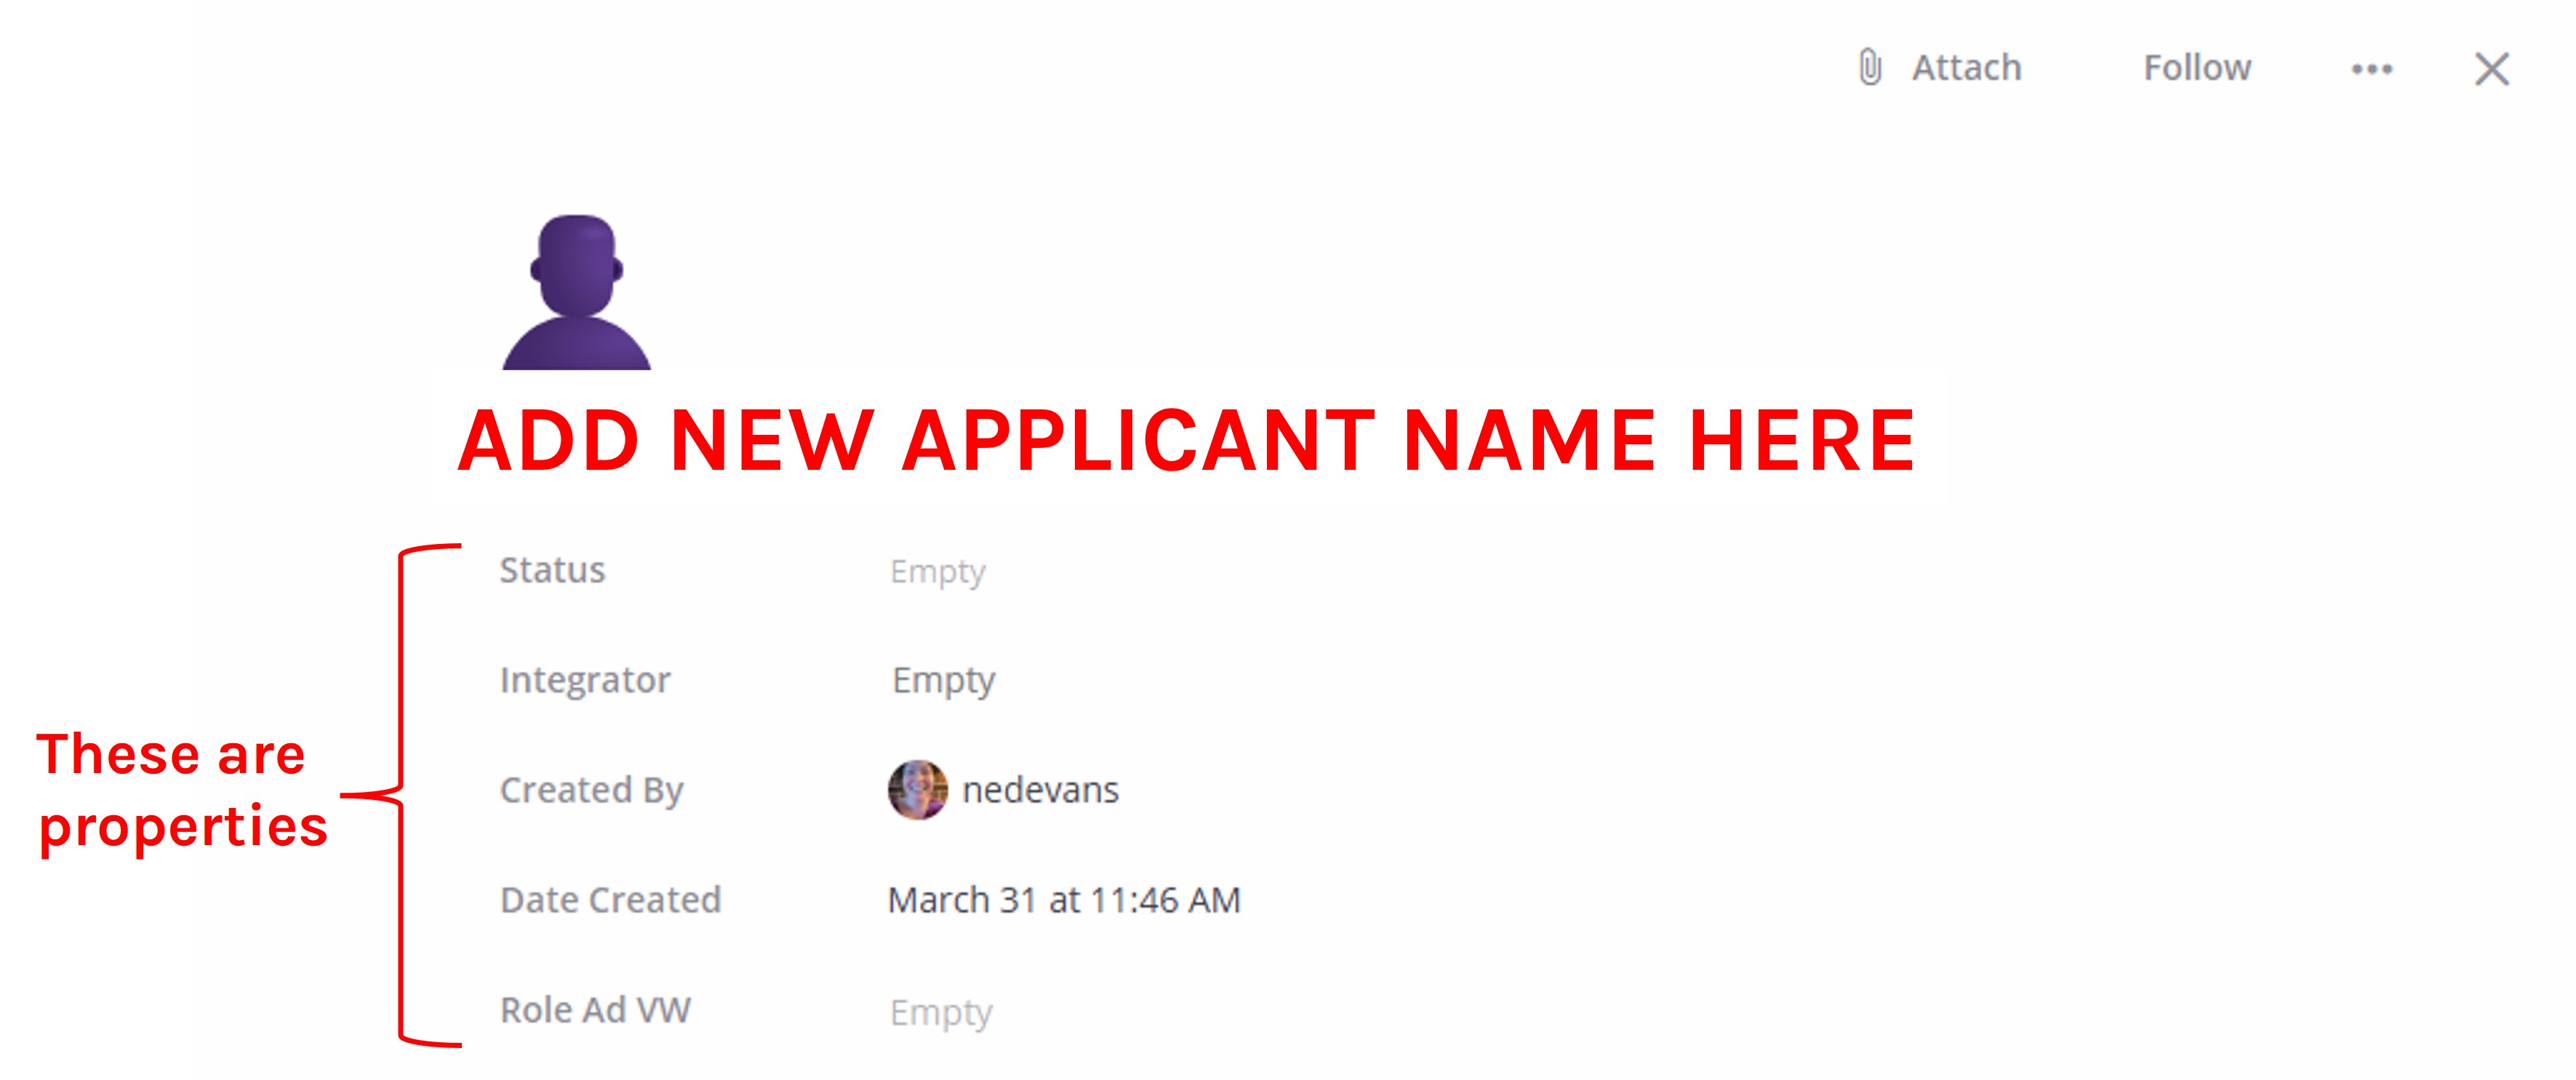
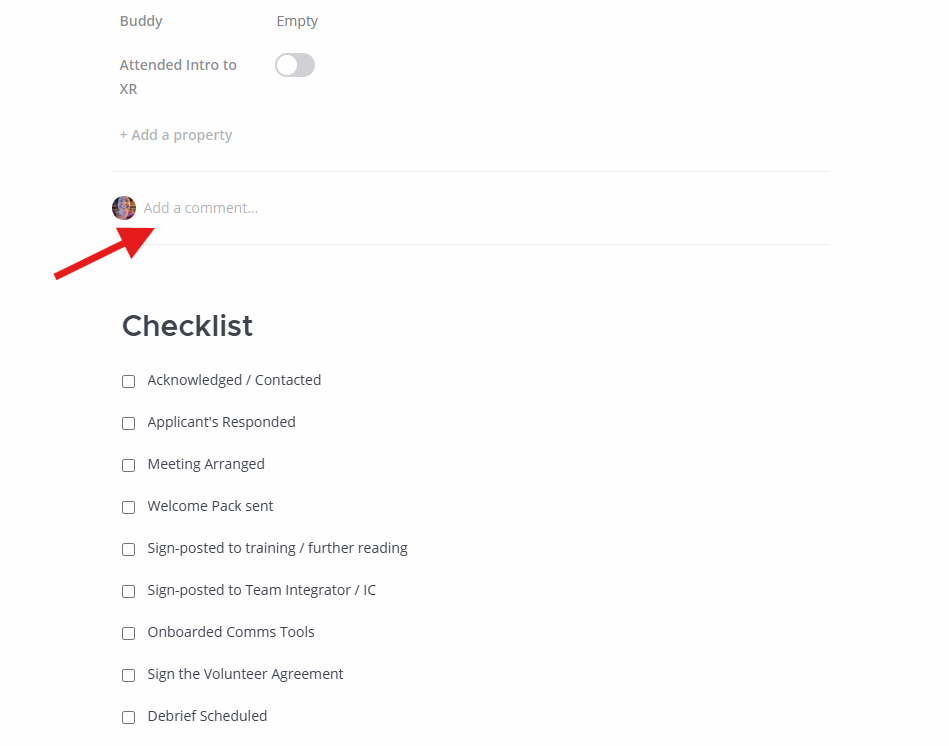
3. How to fill 'properties' on a card
Properties are common to all cards on a board.
- Open the card and click on a property field to input or select info (e.g. text, numbers, dates, people, links).
- Comments are useful for keeping a note of updates on progress.
- Checklists are handy for quickly seeing what tasks have been completed.


- You can move a card from one column to another by updating the 'Status' property or manually dragging cards from one column to another.
4. How to search for a card
- Use the Search Bar: in the top-right corner of the board view, click the Search cards field (magnifying glass icon).
- Type Keyword: start typing the card title, description, or content you are looking for. The board will filter cards in real-time to match your text.
5. How to add links to a card
- Open the card and add or use an existing URL property to paste in links directly.
- Or insert links into the card's description or comments section.
- Mattermost uses Markdown as a text editor.
- You can create a short link by using square and round brackets.
- Open a square bracket [type the name of the link and then close the bracket].
- Open the round bracket (and paste the link, then close the round bracket) Don't use any spaces inside or between brackets. If the name of your link is more than one word, you can use spaces to separate the words inside the square brackets.
Forums
What are UK Forums?
UK Forums have a slightly different purpose to Mattermost – here's a summary:
Mattermost is for:
- instant chat, that may sometimes be lost in the stream of messages
- asking someone for help
- finding a person or Group
Forums are for:
- focused discussions
- asking specific questions or finding a specific topic
- searching for information easily
So, if the issue needs more in-depth attention, where contributions go towards making decisions, perhaps, or where differences of approach need closer examination, a Forum Topic can act as both a focus and catalyst for discussion. Also, you can look back through the topic's contributions to see how a decision was made – this often helps to promote ideas and help to reach agreements.
Getting access
Important: You should have already completed the steps outlined on the START HERE page before attempting to access UK Forums. Otherwise, you will not have an account to log in to.
To access UK Forums:
- Click on the UK Forums icon on the Hub homepage. It will look like this:
![]()
OR
- Type https://forums.extinctionrebellion.uk into the URL bar of your browser and hit Enter.
You will then see a screen that looks like this:

The easiest option is to click the log in 'with XR UK Hub' button. Or, you can enter your username and password (same as for the Hub) and hit Log In.
Note: We recommend adding UK Forum to your browser's Bookmarks/Favourites so that it's easier to find in future.
Our Forums are organised in much the same way as Mattermost, but the format is not quite the same. Here's what you'll see when you first join UK Forums.
Basic Functions
Forums 'Landing Page'
On the Forums' 'Landing Page', you will find a complete list of the Forums you're part of as per your Hub Group Membership. For ease of reference, your Forums are classified into Eight Categories which reflect the different Regions/Nations and Working Groups (or Circles) that make up XR UK. Here's a typical Landing Page showing all Eight Categories:
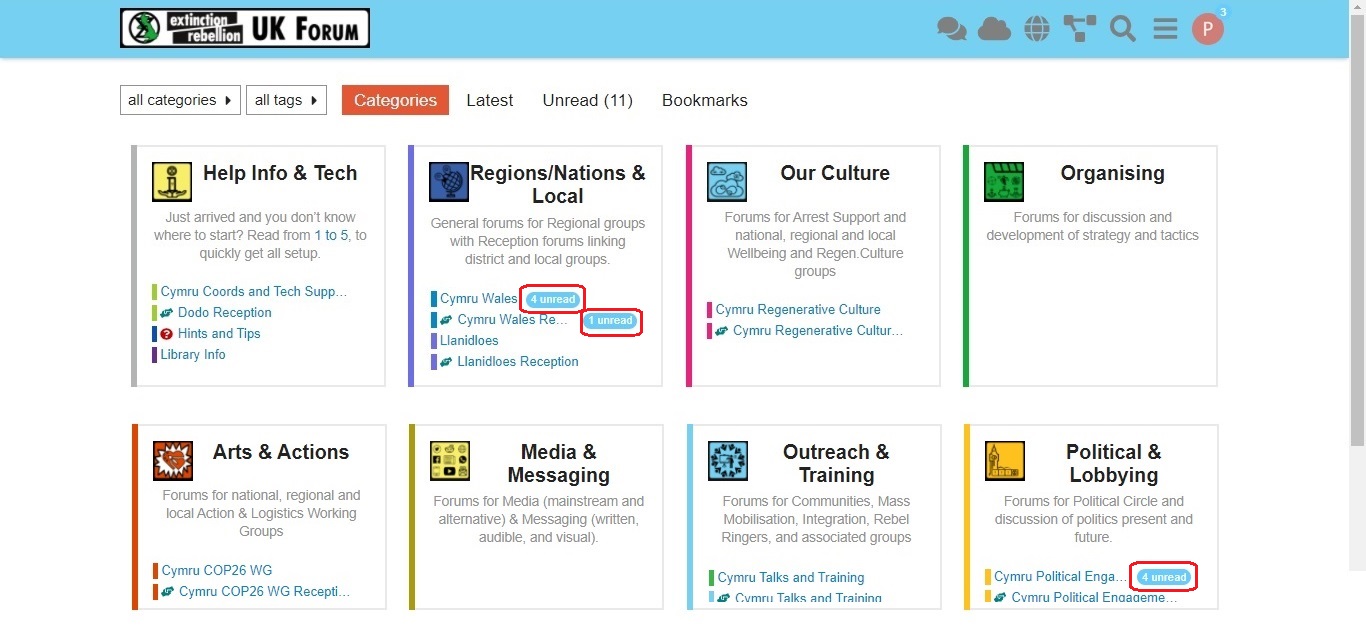
On the Landing Page, you'll find the Forums from each of your Hub Groups as clickable link names in the different Categories. If there's a new post waiting for your attention, you'll see an 'unread' or 'new' button – click on this to go to the flagged post. There are several other functions, which are descibed in more detail below; but, first, let's see how to read and reply to messages.
Reading and Replying to Posts
When you click on new or unread, you will be directed to the specific topic, where individual posts are listed in chronological order. If visiting the topic for the first time, you will see the initial post. If you've visited this topic before, you will see the post immediately after that visit. In the image, below, the "17/18" figures denote the 17th of 18 posts.

You may reply to any individual post, or make an additional post using the 'Reply' button. When you reply, you enter your text in the left-hand box – and you will see how the text will be displayed when your reply is posted, to the right. This is very useful for text formatting (Bold, Italics, Markdown formatting, etc.) - see below.

When you've finished your post, click the Reply button below the text box, and your reply post will be added to the Topic. It really is that simple – and, if you need to edit your reply after it has been posted, click the Pencil icon to re-enter the text box.
Now you know how to Post a Reply, it's time to look more closely at some of the Advanced Functions.
Advanced Functions
Using the Landing Page
Here, we have highlighted seven of the functions you will find on the Landing Page.

-
Communicatons tools links
Click on the icons to go to Mattermost, UK Cloud, XR UK's website and the Hub.
-
Search
Click the Magnifying Glass icon to search for keywords, etc. in the Forums.
-
Main menu
The three bars ('hamburger') icon brings up the main (drop-down) menu:

-
Latest
This takes you to a list of the latest posts in all your topics in each category.
-
Bookmarks
This takes you to a list of the topics you have bookmarked.
-
Categories
These include:- Help Info & Tech
- Regions/Nations & Local
- Our Culture
- Organising
- Arts & Actions
- Media & Messaging
- Outreach & Training
- Politcal & Lobbying
-
Forums
These are your Hub Group Forums where you can see and reply to posts in various topics.
Using my Forums
Overview
The eight top-level Categories - Help, Regions/Nations, Culture, etc. - are visible to everyone, but your membership of Hub Groups will determine the individual Public and Private Forums that are available to you.
Join other Public Forums
You can join any Public Forum by searching for the associated Hub Group by clicking on the Three lines (hamburger) icon in the top-right corner and selecting 'Groups for Forums'.
This will give you the Hub Groups list. You can search by entering text in the box at the top, or simply scroll down to find the relevant Group name. Click on Join to join the Group and get access to its Public Forums, or click on the name for more info. See the page Join groups for more information.
Join a Private Forum
To join a Hub Group's Private Forums, you will have to be invited into the Hub Group, so you will need to ask one of the Group Admins to invite you to join via the Hub.
Read-only Forums
Some discussions may be read-only for most people, with only certain people able to contribute (e.g. Hints and Tips).
Help - 'Page does not exist'
Sometimes, you will see a page like this:
 You may see this because you have clicked a link on another Platform, like Mattermost, which takes you to a Forum that you are not part of. To fix this:
- If you know the Forum is Public, and you also know the Hub Group, you can find it yourself (see above).
- If you can't find the name of the Forum, then you'll need to ask the person who posted the link to give you its name and that of the Hub Group. If the Forum is Private, this may involve you being invited to the Hub Group that owns the Forum.
Making your post
When to start a new topic
Before starting a new topic, it is always worth checking whether the issue has already been discussed (by looking through the previous topics) – it can be very frustrating when someone begins a fresh topic with a question that has already been answered.
Quote text from other posts
To do this, simply highlight the relevant text in the source post. The 'Quote' button will appear above the highlighted text:
 \
\
If you are already editing a reply, or starting a fresh topic, then in the top half of the screen, above the editing pane, you can browse around as normal and select text from any post, and the 'Quote' button will insert it in the editor for you.
If you have not yet started editing your reply, click the 'Quote' button to open the editing pane in the bottom half of the screen. The selected text will be inserted as a quote with the source post and contributor linked to it. You can then carry on and edit your reply as normal.
Add a link to a document or image
Links are inserted by writing the [text to display] in square brackets, immediately followed by the link itself (https://www.fulllinktext.com/blah) in round brackets. For example:
[Link to XRUK Website](https://extinctionrebellion.uk/) displays as: Link to XRUK Website.
Formatting posts
There are simple ways to make your message more readable:
- **bold** displays as bold
- _italic_ displays as italic
- ~~strikethrough~~ displays as
strikethrough - ```typewriter style``` displays as
typewriter stye - >quote displays as
quote
Alert someone to a post
If you want to draw the attention of another team member to a post you are making, type @ followed immediately by their username, e.g. '@username'. They will be notified of the mention.
Link to another topic or post
Simply copy the address from your browser and paste it into your new post. The Forums will automatically find the title of the topic and add that as the link text.
If you want to link directly to a particular post within a thread, copy the URL whilst the target post is on your screen. The link will have a post number added to the end and will link direct to that post.
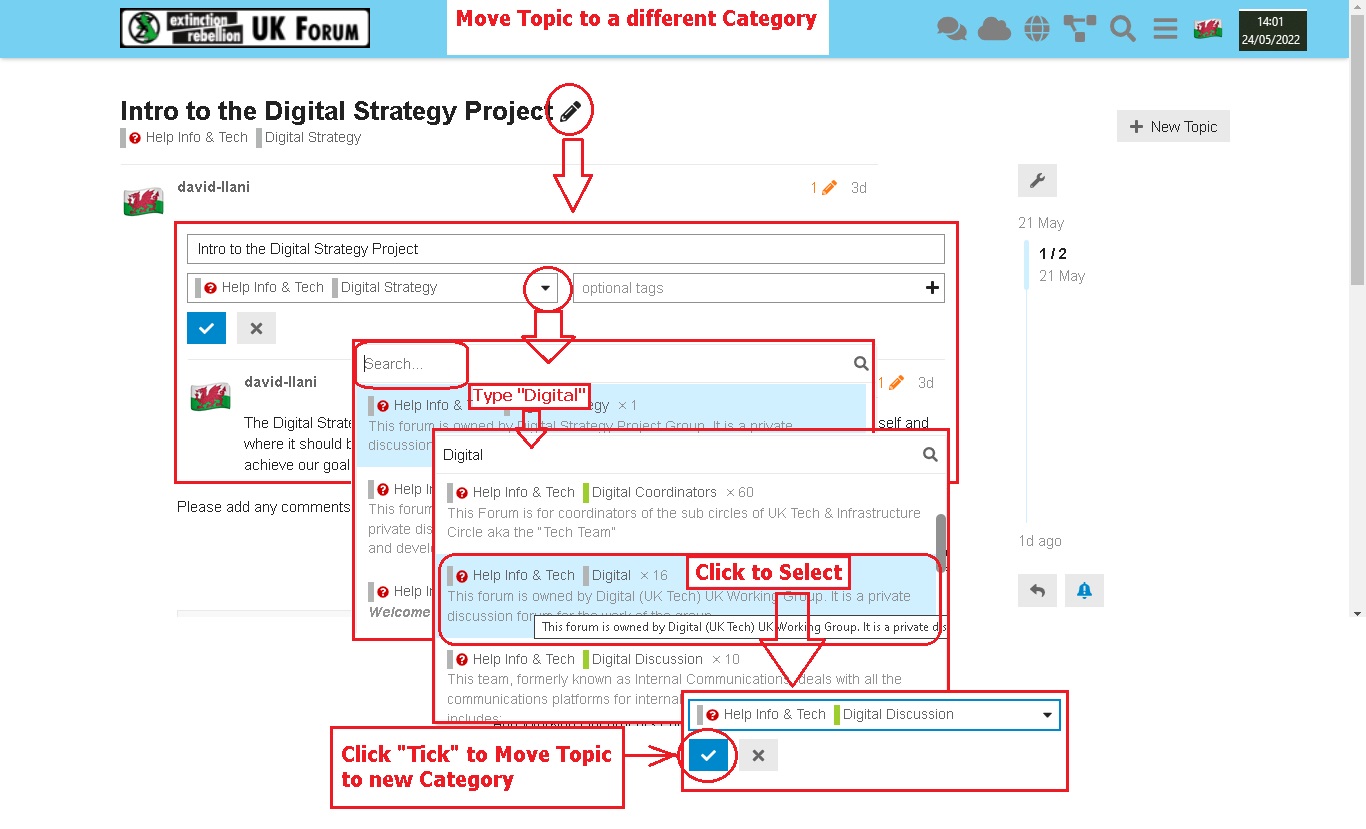
Move a Topic to a new Category
If you have set up a Topic and wish to move it to another Category, follow these steps:
- Click the "Pencil" by the title of your first post
- The current Category is displayed – open the drop-down menu
- In the search box, type in the text to help identify the new Category
- Select the appropriate Category from the drop-down menu
- Confirm your selection by clicking the "Tick"
Create a Poll
You can create simple polls directly in a post.
Polls are only visible to the other members of the particular Forum in which the topic (or reply) is created with the poll embedded. To create a poll, click the cog wheel icon while editing your post, and select 'Build Poll'.

Bookmarks and Tracking
Bookmark a post to view it later
There are three ways to do this:
-
At the bottom of each post, there is a line of icons:

Click the three dots to bring up more options:

Click the bookmark icon (circled in red in the image above) to bookmark the current post within the topic.
-
At the bottom of the whole topic, after the last post is a row of buttons. Click the
 button to bookmark the whole topic.
How to find bookmarked topics
There are two ways to do this:
- Click on your picture/avatar at the top-right of the screen, and then click the bookmark icon to access your most recent bookmarks list:

- If you are on a device with a keyboard and are not currently editing, then you can use the keyboard shortcut [g] followed by [b] to jump straight to your bookmarks page.
Follow or track a discussion
When you are viewing a topic, at the bottom of the screen, just above 'Suggested Topics', you will see a grey button with a coloured dot in it most likely marked 'Tracking'.
Click on that button, and then set the level of alert on that particular topic.
(To stop following, select 'Muted'):

Your Profile
You will have a 'profile' where you can set useful information about yourself that others can see, and upload a simple picture (an 'avatar') by which others can easily identify your posts. You will also be able to set preferences for notifications and how they are sent to you.
Find and edit my Forum Profile
Click on your picture/letter/avatar in the top-right corner of the screen:

Click on the person icon:

Select 'Preferences' from the menu:

There are several pages of preferences listed on the left on the browser screen, or in a selection box at the top on a mobile screen.
Be sure to scroll down through each page to find the topic you want – and remember to click the Save Changes button at the bottom of the page: otherwise, any changes you make will not take effect.

- You can change your name (full name) to something recognisable (especially if you have an obscure username) if you want people who know you to recognise it's you.
- You can upload a simple picture as your avatar to replace the default initial-letter-in-a-coloured-circle avatar.
Change the Landing Page
-
Go to your profile page (click on your picture/letter/avatar in the top-right corner, click on your name, and then select 'Preferences').
-
Select 'Interface' in the menu at the left (or in the select-box that says 'Account' if you are on a mobile device).
-
Scroll down and find the Default Home Page setting. Select your desired home page in the box from 'Categories | Latest | New | Unread | Bookmarks'.
-
Remember to scroll down to click the Save Changes button, or your changes won't take effect.
Change the page layout/colours
The default home page shows you all of the top-level Categories with their short descriptions, and any Forums that you are joined to in each Category.
There are two alternative layouts (called 'themes') available. These can be found under 'Themes' in the 'Interface' section.
-
XR UK Lightis the default theme with three columns of boxes -
XR UK Light 3colis the version with three columns -
xxDiscourse Lightdisplays the categories with a selection of the recent topics in all their Forums.
There are also 'Dark' variants of each theme if you prefer a layout with a black background.
The Cloud
What is UK Cloud?
UK Cloud is a place for Extinction Rebellion members to create, store, and share documents securely with each another. With it, you can collaboratively edit Office documents, making it a great alternative to tools such as Google Docs or MicrosoftOffice.
By 'Office' files, we mean files created in Microsoft Office programs, e.g. Word, Excel, etc.
UK Cloud can also be used to do a number of other things. For example, you can:
- Create a Kanban board (a visual organisational tool) for managing projects
- Create polls and forms
A short presentation on the XRUK Cloud is available here.
Important: Individual users have no personal storage area in UK Cloud. Instead, all files are the property of an XR group.
Getting access
Important: You should have already completed the steps outlined on the START HERE page before attempting to access UK Cloud. Otherwise, you will not have an account to log in to.
To access UK Cloud:
- Click on the UK Cloud icon on the Hub homepage, which looks like this:
![]()
OR
- Type https://cloud.extinctionrebellion.uk into the URL bar of your browser and hit Enter. You will then see a screen that looks like this:
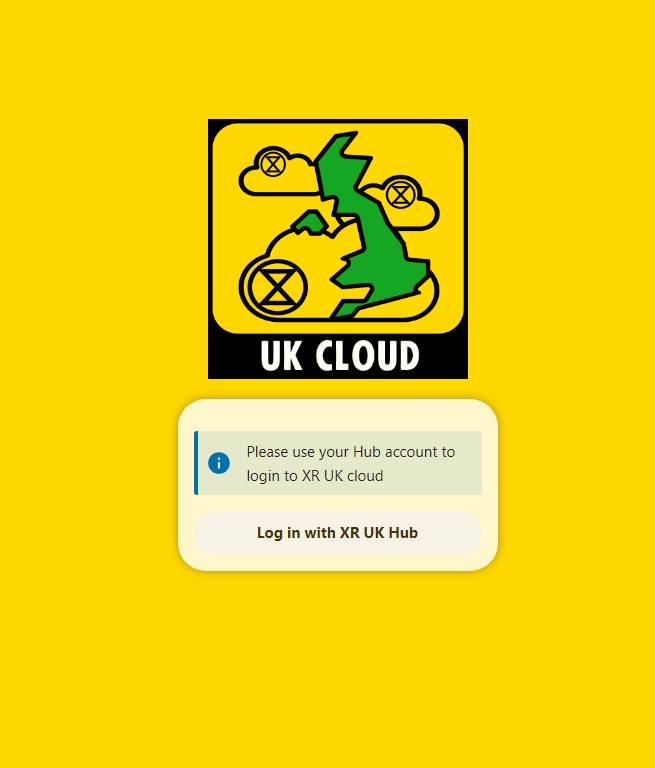
- Log in. Click Log in with XR UK Hub.
Note: We recommend adding UK Cloud to your browser's bookmarks/favourites so that it's easier to find in future.
Landing page
Once you have logged in, you will see a screen that looks like this:
![]()
We will refer to the parts of the screen circled in red throughout the rest of the document by referring to them by number in red font, e.g. A.
Managing files
Basic tasks
Finding files
On the landing page, you should see a number of folders that you have access to (E).
These include:
- Group folders for all the groups you are in (that have folders)
- Library everyone has read-only access to this folder. It contains files shared with the whole of XR in the UK by selected UK working groups.
- Files and folders people have shared with you individually, or with groups you are in.
To find a file, simply click on the folders to navigate between them until you are in the right one. You can always go back to the landing page by clicking the Cloud icon (A) at the top left of the page.
Uploading files
To upload a file, first click on the relevant folder. Files cannot be uploaded directly to the landing page. Then:
- Click the
 button at the top of the screen
 - Select Upload file
- Choose the file to upload
Important: Although we do our best to keep the data in these tools reasonably secure, you must not post directly incriminating material here. By doing so you risk the authorities taking down the server, which would upset our communications severely. Not only would you risk your own arrest, but the arrest of the system administrators.
An alternative is the XR Cryptpad with end-to-end encryption, but we still discourage long-term storage of directly incriminating material.
Deleting files
To delete a file, click on the three dots to the right of the file and select Delete File.
Editing Office documents
To edit Office documents such as spreadsheets and presentations, click on the document name as it appears on the Cloud. This will open the file in your browser for you to modify.
Editing Office documents can even work collaboratively, meaning that other people should be able to work on the document at the same time as you.
For more information on how to use the different editors, please refer to the ONLYOFFICE user guides.
Note: Unfortunately, Office documents cannot be edited on a mobile device. Please see here for more information.
Advanced tasks
Uploading files from Google Docs
Obviously, the ideal method is to move a document from Google Docs to the Cloud – download it from Google, upload it to your Cloud area, and then delete it from Google Docs.
However, if you really must leave the document in Google's care you can simply have a link to it in the Cloud. In this case:
- Get a link from Google Docs – with whatever options you require
- Navigate to the folder where you want the link to appear (in your shared library folder if you want all XR members to have access to it, or in your group folder if it is private to your group)
- Click the button at the top of the screen and select New Link
- Enter the name for the link as it will appear in the file list (this doesn't have to be the filename, so it is better keep it fairly short). Don't delete the ".URL" at the end of the name

- Press enter or click the arrow
- In the box that pops up after a second or two, enter the link URL from step 1 (or any other link you want) and click Save

And that's it. Your link will appear in the list of files, with a globe icon to indicate that it is an external link:

Sharing files or folders
The different types of sharing are:
-
Share with someone else in your group
To share a file with people in your group, click the
 icon next to Internal link (1 in the screenshot below). This will copy the link to your clipboard where it can then be pasted into an email, Mattermost message, etc.
 -
Share with a particular user or group
To share a file or folder with a specified user or group, type the name of the user/group into the box (2 below). As you type, a list of different users/groups should appear below where you are typing. Click on the user/group that you want to share the file or folder with. A new share should appear below, and you can copy the share link the same way as for internal links (see above).
Note: We don't recommend sharing files this way as it will clutter up the home page of the person you are sharing the file/folder with.
-
Share with everyone
If you would like to share a file so that anybody with the link can access it, even if they don't have a UK Cloud account, create a new Public Share link (3 below). This will create a link that can be copied and shared just like the other types of shares described above.
Important: Be careful when sharing documents publicly that you are not sharing anything that should be kept private (e.g. personal details).
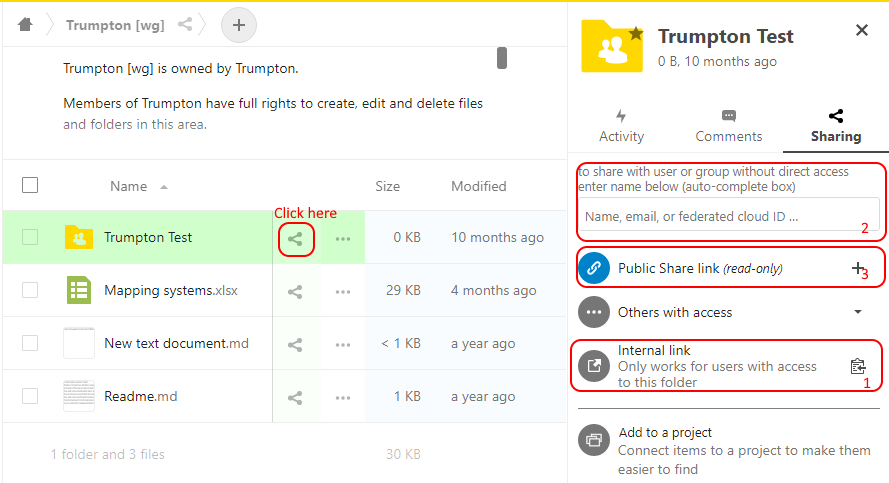
Creating and editing text files
To create a text file:
- Navigate to the folder you want to create the file in.
- Click the button at the top of the screen and then click New document.
- Enter the name for this document (
e.g. minutes.md).
The empty file will now open in your browser for you to edit. You can click on the icons at the top of the page to do things like create headings and lists and make text bold or italic. If you prefer, you can also use Markdown to add formatting, which lets you change text to headers, add lists, etc. This is very similar to what you can do in Mattermost.
The file will be automatically saved when you close it.
Undeleting files

- If you want to find a deleted file, click "Deleted files" at the bottom left of the UK Cloud screen, and then search the resulting list of deleted files
- You may need to put the file name into the search bar to help, as the list of deleted files can be long
- Also, if it is a recently deleted file, then ensure that the list is sorted by the most recent files first (toggle the up/down arrow)
- Find the file, click "Restore" and the file will be returned to its folder
Other tools
Deck
Deck is UK Cloud's project management/Kanban tool. You can access it from the top of the screen (B). Documentation about how to use the tools can be found here.
Polls
This is a tool for creating simple polls. It can be accessed from the top yellow header (C).
Forms
Forms is a tool for creating questionnaires. It can be accessed from the top yellow header (D).
Forms can be filled in from anywhere, with results available on the Forms Tab in the UK Cloud.
You can link a form to an OnlyOffice spreadsheet - choose the .xlsx option and then save the spreadsheet in whichever group's Cloud folder you wish. The spreadsheet will update automatically whenever someone completes the linked form.
- Select Results [top right]
- Select Create Spreadsheet
- Create xlsx
- Save to the folder of your choice
Further information
Why don't we have personal storage space?
Everyone’s Cloud account has 0 bytes of storage in their personal folder. This is for security reasons – if everyone had personal space, there would be nothing to stop someone uploading illegal material to their (fake) account, then reporting it to the police so that they raid XR and shut down the servers.
Everyone has access to the read-only Library, and people in an XR group that has requested storage have full read-write access to their group’s storage (where we trust other members of the group would spot suspect files, and remove them).
Change your login name (handle)
- If you want a different login name (known as your Handle on Mattermost), you need to change this on the Hub.
- n.b Please be aware that if you change your Login name, this will re-create your Cloud account. If anyone has shared files and/or folders with you on the Cloud, then your access to these will be lost.
- Do not change your handle on Mattermost, you must change it on The Hub. If you change your handle on Mattermost, then this will 'disconnect' your Mattermost account from your Hub account and Group Admins won't be able to find you to send you new invites to other Hub groups.
- Go to the Hub https://hub.extinctionrebellion.uk
- Log in [top right]

- Select the drop-down arrow [top right] and then Setttings
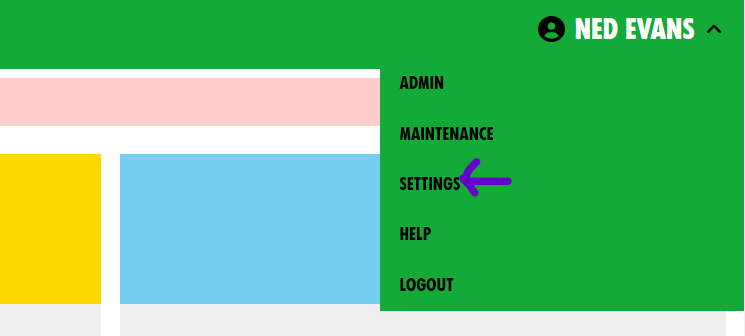
- Select the pencil icon next to Login name
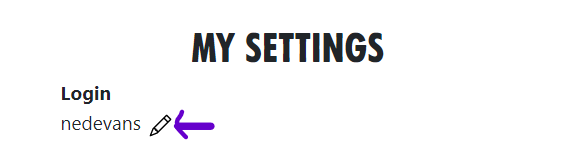
- Edit your Login
- Add your Mattermost password
- Select Save

- That will then change your Login on the Hub, Mattermost, Cloud and Forum
Video Guides to help you learn
This page contains links to video content that can be shared with your local groups to help get them on board with the new systems. Feel free to use whichever you find most helpful.
Accepting a Hub invite and how to access support:
https://tube.rebellion.global/w/dcJb6KYrFXyLzVCxPCTvrM?start=0s
This is useful for anyone who wants to get an overview of Mattermost, or thinks it's all rather complicated.
First Steps on Mattermost:
https://tube.rebellion.global/videos/watch/dbf49eaf-0d92-4af7-accc-489ff0300af8
This video takes you through how to get started on Mattermost, while the following videos cover specific parts of using Mattermost.
https://tube.rebellion.global/videos/watch/fd38312d-5f26-4d6c-a137-24bca1128206
Mattermost Notifications:
https://tube.rebellion.global/videos/watch/0e7e6f19-6ab8-47de-b770-fc19923f47c5
Mattermost Search:
https://tube.rebellion.global/videos/watch/0def354f-557d-411b-950d-bf61a6e6a59b
Mattermost 'Threading' Messages:
https://tube.rebellion.global/videos/watch/990bacfe-a3df-4b5f-9870-8818f2ba3db5
Mattermost Save Messages:
https://tube.rebellion.global/videos/watch/0c6a4cdc-94f4-4493-9f1b-d4ad757df710
Accessing the Tools Using a Smartphone or Tablet
Lots of rebels do not have access to a computer and instead rely on a smartphone or tablet to do their XR work. While the tools are designed primarily for use with a computer, they can also be accessed on a mobile device either by downloading an app or by using an ordinary web browser.
This guide aims to explain:
- How to access the tools using an app (if one exists), or the device's web browser
- Any key differences between the mobile and the desktop versions of the tools
The guide assumes that you are using either an Apple or Android device. If you are not, then you are unlikely to have an app that you can download, but the browser approach should still work.
Note: Before following the steps below, you must already have an account set up on the Hub. To do this, please follow the steps outlined in this guide.
Mattermost
Note: For a detailed explanation on how to use Mattermost, please read this guide.
App
Note: A common mistake rebels make is to assume that all they need to do to "get on Mattermost" is to download the app. To access via the app see the instructions below, but if you would rather not download the app, read this guide. Mattermost will work perfectly well in your device's browser.
To access Mattermost via the app:
- First, install Mattermost from either the Google Play Store or the Apple App Store. Please see this video for a guide to doing this.
- Open the app. You will see a screen that looks like this:
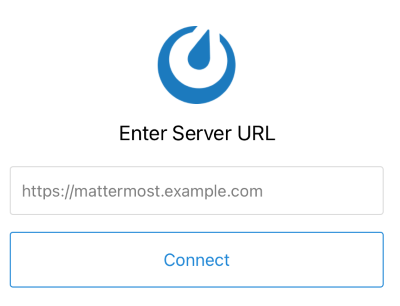
- Enter
https://organise.earthand click Connect - On the following screen, enter your username and password and click Sign in
Web browser
To access Mattermost using your browser:
Key differences
Switching teams and channels
To switch between teams and channels using either the app or browser, click on the three-line icon at the top left of the screen (circled in red below):

UK Forums
Note: For general information about using UK Forums, please read this guide.
App
To access UK Forums via the app:
-
Install Discourse Hub from either the Google Play Store or Apple App Store
-
Open the app. You will see a screen that looks like this:
-
Click + Add your first site
-
Enter
forums.extinctionrebellion.uk. You will then see a screen that looks like this:

-
Click connect (circled in red)
-
Follow the remaining instructions to log in using your username and password
Web browser
To access UK Forums via the browser:
UK Cloud
Note: For general information about UK Cloud, please read this guide.
Web browser
To access UK Cloud via the browser:
App
We do not recommend using the Cloud App. Testing (of a previous version) of the cloud app revealed a number of bugs which could interfere when multiple people are editing the same document.
To access UK Cloud via the app:
-
Install the Nextcloud app from either the Google Play Store or Apple App Store
-
Open the app. You will see a screen that looks like this:
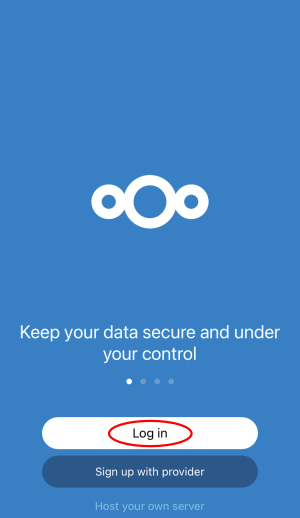
- Click Log in (circled in red). You will then be taken to a screen like this:
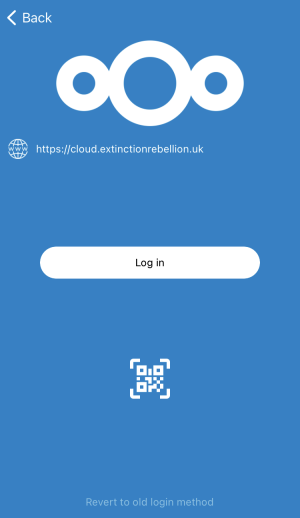
-
Enter
https://cloud.extinctionrebellion.ukin the URL field (as shown above) then click Log in -
Click Log in one additional time and you should now see this screen:

-
Click Log in with XR UK Hub to use your hub credentials
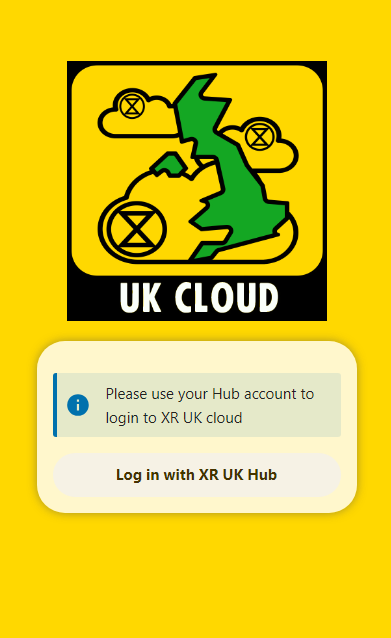
Privacy and Security
How private is your data on the XR communication services?
Data on our new services is held in an encrypted partition on a server in Switzerland (which has excellent data protection laws). Should we receive the statutory 24 hours notice of a data access request, we only have to shut down the server to make the disk about as much use to the authorities as a brick.
Having said that, data on a public channel in Mattermost, a public forum on UK Forums, or a shared folder on UK Cloud should be considered public -- if anyone in XR can access it, then you should assume there is a mole in the organisation, who can pass it on to the authorities.
All data on any server is accessible to the system administrator of the server. This is why we do not recommend using third party servers for anything in the least bit sensitive. The system administrators of all the XR servers (a handful in total) are all long standing XR members who are trusted by the movement.
Mattermost
The system administrators of the Mattermost server (none of whom are in the UK) ask that you do not share sensitive details of illegal activity on Mattermost.
Quote from the XR Global FAQ
The XR Mattermost is a service in use by hundreds of groups, for team chat, group updates and organising. As the service is shared, we need to make sure no one team or group makes this service any more of a target for our adversaries than it already is. If an adversary (including an insider or federal investigator) knows high-value information is stored on this server, they will focus on ways to reach it, including possible legal interventions. As such, the less sensitive and high-value information that is shared on Mattermost, the better for all of us, and it will keep ticking along just fine.
But what is meant by 'sensitive information'? Here is a non-exhaustive list of examples:
- Home addresses, personal phone numbers and full names of action coordinators
- Full names of rebels signing up for an action
- Credit card and bank details
- Car license plate numbers of rebels
- Login details for group social media accounts
- Leaks from truth tellers
- Date, time, place and participants of a planned clandestine action
Details such as above are best shared off-platform, on an end-to-end encrypted service like Signal, Wire or Session. For sensitive documents, use the end-to-end-encrypted XR Cryptpad. Use MM for chat and for organising (action planning should be in private teams and/or channels), but when the info gets hot, "I'll Signal you those details". This also ensures that if an adversary manages to get their hands on one account, they don't have all the pieces of the puzzle to sabotage an action, nor pair up individuals with a particular action plan, nor put faces to words with intent to commit crime (etc).
We want to be arrested for what we do, not what we plan to do, least of all for a few ideas we're throwing around.
This best-practice approach is referred to in Operations and Information Security as air-gapping as it puts space between mission-critical information and/or infrastructure. It's a great group and mission-centric habit to get into, and is broadly used in gov agencies, military and corporate sectors. It's a trick they don't want us activists to know and use!
Data in a private channel in Mattermost can only be accessed by members of the channel. Only other members of the channel can add new people, so that is the highest level of privacy available to you.
You may notice that private channels created by the XR UK Hub have xrukadmin as a member. This is the login of the Hub on Mattermost, and allows the Hub to add and remove members, rename the channel, etc. This function is there to save you work, so that people can be automatically added to your channels when you invite them to the Hub, and so you can remove people, and rename or delete channels from the Hub easily, without having to repeat your actions in the 3 different services.
The UK system administrators have access to this login, so they could, in theory, see everything you say in the channel. If you have something too private to reveal to the UK system administrators, then create a new private channel in Mattermost, rather than via the Hub. Of course, you will then be totally responsible for administering that channel, adding new people in, removing people you do not want in it, renaming it (in Mattermost), etc.
Please do not remove xrukadmin from a team or channel that has been created by the Hub without letting the system administrators know right away that you have done so -- if the Hub thinks it can access a team or channel, but it can't, that will cause error messages for your users.
UK Forums
Data in private forums on UK Forums can only be accessed by Forum group members (and the UK Forums administrators). You can check who is in the forum group by accessing the Forum Groups option on the Forums main menu, and finding the relevant group. You can remove people from the group by removing them from your organisation on the Hub (preferred), or in UK Forums (but the Hub may add them back again if you don't remove them there too).
UK Cloud
Data in private group folders in UK Cloud can be accessed by group members (and the UK Cloud administrators), and by anyone you share it with. Again, you can remove people from your organisation (and therefore access to your group) on the Hub.
Why are there private working groups?
This is quoted from a post by the global security expert (with minor formatting edits).
Something that comes up often is "Why are there private working groups? Why can't we all work in the open?" My own experiences in several large online communities, is that having private areas facilitates thriving, safer communities. A 'regime of openness', on the other hand, tends to seed decay, even paranoia and distrust. While that may seem counter-intuitive, there are a great many reasons why this is so:
Privacy is not Secrecy
First of all, we need to challenge the misbelief that Privacy and Secrecy are one and the same. They are not. To quote a beautiful work of literature, A Cypherpunk's Manifesto (EN), 1993
"Privacy is the power to selectively reveal oneself to the world."
There are things we would tell a sibling we would not a parent; that we would tell a friend that we would not tell a relative or boss. Privacy is the glue of a happy and healthy society, it is how we establish and manage our socio-emotional and physical boundaries.
If I walk up to a couple in the park and demand a summary of what they just talked about, to be included in their conversation, and they refuse, we wouldn't say they are being 'secretive'. Rather, they are asserting their basic human right to privacy.
So it follows that we should certainly not distrust those that seek and affirm privacy, rather those that rally against it, those that demand openness. Further, it should be no surprise that those suspicious of allowances for privacy are often from privileged socio-economic backgrounds.
It must be up to individuals when they choose to be open. This is only something that a de facto of privacy, alongside a basic right to anonymity, can provide.
Whole community poisoning
Private working groups also protect against a very real threat to online communities: Whole community poisoning. Should a troll or infiltrator, or organised group of such, come to Mattermost or Forums and be able to openly join every one of the dozens of teams on this server, every one of the channels and working groups, they can quickly ruin the social and cultural domains this server affords. Having private working groups and/or areas affords us Circles of Trust:
Circles of trust
Allowing members of private channels to manage those same domains encourages a sense of ownership, of trust. In essence, it embodies a decentralisation of trust, in that it is not centrally managed by a vetting process (like a Police file) but rather by transient (a table at a bar) or permanent (a village) communities themselves, through their own experiences (and ever branching degrees of separation).
Like all animals, we meet people, get to know them, and let them closer.
We need to talk about Google Docs
From the XR Global security expert again (slightly edited to refer to XR UK comm's services):
"Green and Black Cross, seasoned professionals in the support of activists in need in the UK, made a public statement in 2019 that they would no longer support XR UK. In their statement, one difficult to read, they specifically cite the use of Google (alongside WhatsApp and Facebook messenger) as a risk to rebels, opening them up for deep exposure to Police. Although things have moved on, their statements help to explain why we should not be using Google Docs, WhatsApp, or any other commercial data storage or communication tool for rebel's personal information.
We believe that the way XR stores personal data is inadequately secure (for example, in Google documents and forms). This means that personal data belonging to LOs is likely to be accessed by police.
We believe that the communication channels XR uses for legal observers are inadequately secure (for example, WhatsApp and Facebook messenger groups, public Facebook events and email lists with no bcc). This also means that communication through these channels is likely to be accessed by police.
Green and Black Cross, 2019
Their statement raises an old issue here on Organise.Earth [Ed: The server hosting the global Mattermost], one that is a primary motivation for the server existing in the first place: we endanger each other, and ourselves, when we work with surveillance capitalists. So let us stop doing it.
Google is a completely unsafe partner for civil disobedience, activism in general. We can't have a 'regenerative culture' and partner with that corporation. Green and Black Cross are veterans in this space, and we ought to heed their concerns. I share their concerns having assisted at-risk individuals and groups for years with their infrastructure, to keep them off-police-record and safe in their work.
Lists of Rebels in a Google Doc - any list of contacts - threatens those in less privileged operational environments, where police request information from Google, which they openly provide, to incarcerate that/those individual(s). It would be great to see us take this to heart and understand that it is uncaring and mutually harmful to continue to use Google products, not to mention WhatsApp (a meta-data harvest), as Green and Black Cross make so clear.
While an XR NL or XR SE (for instance) may find it unusual/paranoid/specious to have such concern, it is a 'projection of privilege' to assume the same jurisdictional/legal environment exists for all, where brave rebels working in difficult conditions are first surveilled (by statecraft, federal police) and then they are jailed, beaten and/or shot. Many of our rebels work in such environments. In the spirit of regeneration and mutual support, it is time for our ethics to be reflected in our communication infrastructure."
Solutions
Use Nextcloud to store and view documents on UK Cloud. Or the XR Global Cryptpad.
Both the Cloud and Cryptpad allow shared editing of documents, but do not expect this to be as slick as Google Docs, which has all the massive resources of Google behind it, and has probably cost millions to develop! Remember that the cost of using Google is that everything becomes easily available to both commercial and state interests.
When someone posts a link to a Google Doc, gently remind them that use of Google is provably unsafe, that we need to make the effort to copy its contents out to a document in our XR owned cloud. It is not just the content of the document that matters. Even with harmless content the ability to build up a profile of usage and users to infer activity by combining that with other data is a major privacy issue and potential security flaw.
Use Mattermost, Signal or Wire instead of WhatsApp. Owned by Facebook, WhatsApp produces a vast treasure-trove of meta-data and has a notoriously suspect record for data-privacy.
Get off Gmail and other commercial email services. Let us help each other get off GMail. No more sending around sensitive documents in GMail accounts. Use the privacy respecting ProtonMail or Tutanota instead.
Stop using Facebook and other commercial social media for anything strategic or sensitive. This should be done using Signal or Wire, or on UK Forums or Mattermost. Use air-gapping so that general information is on Mattermost or Forums, and specifics (such as car registrations, credit card numbers and addresses) is on Signal or Wire.
A Note on Passwords
When it comes to choosing a password, choose something which you can remember -- e.g. the initial letters of a phrase or line from a song that will stick with you, with some letters transposed to digit (o->0, I -> 1, to->2 etc) and a couple of uppercase and punctuation characters. The minimum length for a password is 8 characters and it should include both upper and lower case letters plus at least one digit and one symbol.
Do check that it is easy to type on all the keyboards you use -- mobile phones can make it a pain having to switch case, or switch between letters and digits, so you might want to have those grouped together in the password.
Don't rely on your device (or the cloud) remembering it for you -- there will come a day when you will need to actually type it because something has gone wrong. Ideally, keep all your passwords in a secure password manager (rather than giving them all to Google or Apple to remember).
Finally try to pick a password that you don't use elsewhere -- even if only by appending -xr to one of your standard passwords -- that will ensure that if your bank login gets stolen your XRUK ones are still ok and vice versa.
A Note on Using AI
Use AI for anything which you would happily read out loud on a crowded bus. If it is intended to stay secret, don't share it with AI. It can leak information, record information and may provide that information on request to government agencies and authorities.
Hub Group Admin Guides
This chapter is only relevant for people with the role of Hub Group Admin.
The XRUK Volunteer Agreement
On this page:
- How to sign the Volunteer Agreement
- How to check other people who have access to personal data have signed.
What the agreement is for
The XRUK Volunteer Agreement is an agreement which must be signed by people who have access to Personal Data. That includes all Hub Group Admins, and anyone else anywhere in XRUK who has access to any individual's data (like mailing lists, other lists of people, details of who is attending an action, etc.).
Personal data includes email addresses, phone numbers, addresses, or anything which could identify an individual. It does not matter whether the person is in XR or not, if you have access to their data, you should sign the agreement.
Signing the agreement
If you are on the Hub, and you haven't signed the current version of the Volunteer Agreement, the following icon will appear on your Hub Home screen:
Click the icon to go to the Volunteer Agreement on Action Network.
If you are not on the Hub, you can go there directly.
What happens if I have not signed
When you login to the Hub, if you are a Group Admin, or have other elevated permissions, you will see this screen:
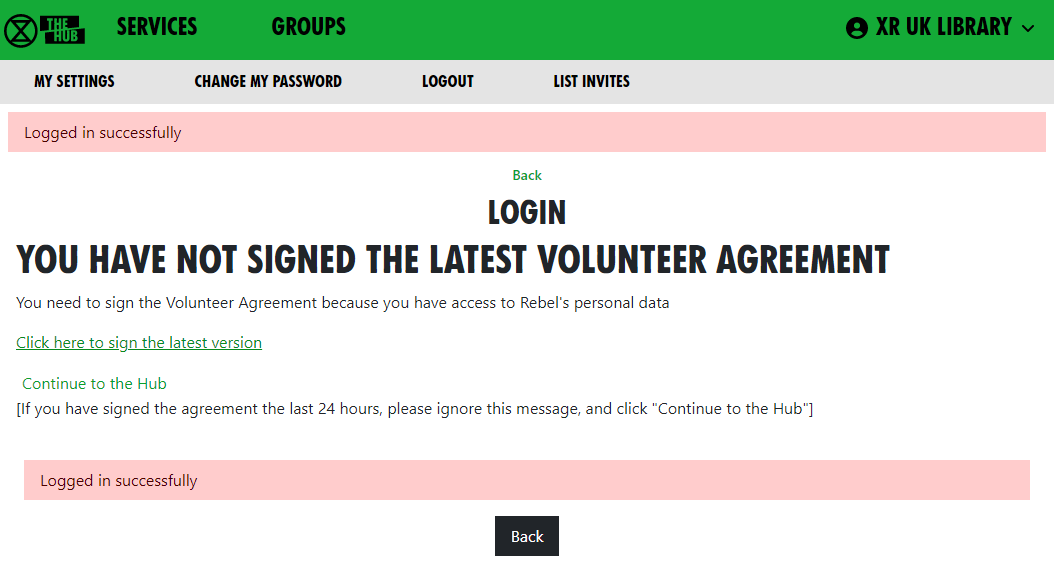
You should sign the ageement as soon as possible.
The Hub checks who has signed the agreement every night - so, if you sign, the Hub will not know about it until the next day. If you have signed today, so the Hub does not know, please click "Continue to the Hub".
What if I can't use my regular email address on Action Network
If, for any reason, you are unable or unwilling to use Action Network to sign the agreement with your regular email address, then copy the Volunteer Agreement from Action Network, paste it into an email, add some text to say you agree to abide by it, and send it to the "GDPR & Security" Team at dataprotection@rebellion.earth.
Checking if others have signed the agreement
Everyone in your group who has access to personal data (e.g. newsletter distributors, fundraisers, recruiters, Rebel Ringers, etc.) must sign the Volunteer Agreement. Please encourage them to do so.
Group Admins
If you are a Group Admin of a Group on the Hub, the "All Members" button will show you which version of the Volunteer Agreement your members have signed (if any).
You should ask anyone in your group who has access to anyone's Personal Data to sign it. If there is anyone in your group who has signed an older version of the Volunteer Agreement, they should sign the current version as soon as possible.
Administrators of groups not on the Hub
Action Network Admins can view whether people on their Action Network list(s) have signed the Volunteer Agreement by following these instructions.
If you are looking after Volunteers in systems outside the Hub, please contact the "GDPR & Security" Team at the GDPR & Security Mattermost Reception channel or by email: dataprotection@rebellion.earth. They can arrange for you to have access to the Hub, with special permission to look up email addresses to see if they have signed.
When you login to the Hub, your Home page will include this icon:

Click to go to this screen:
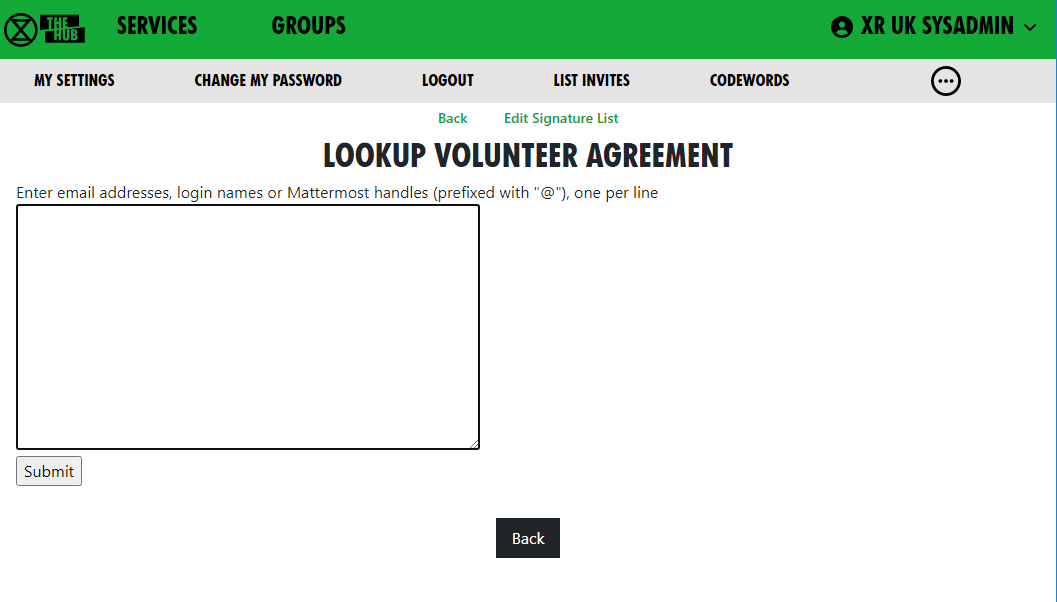 Enter one or more email addresses, one on each line, and click Submit, to see this screen:
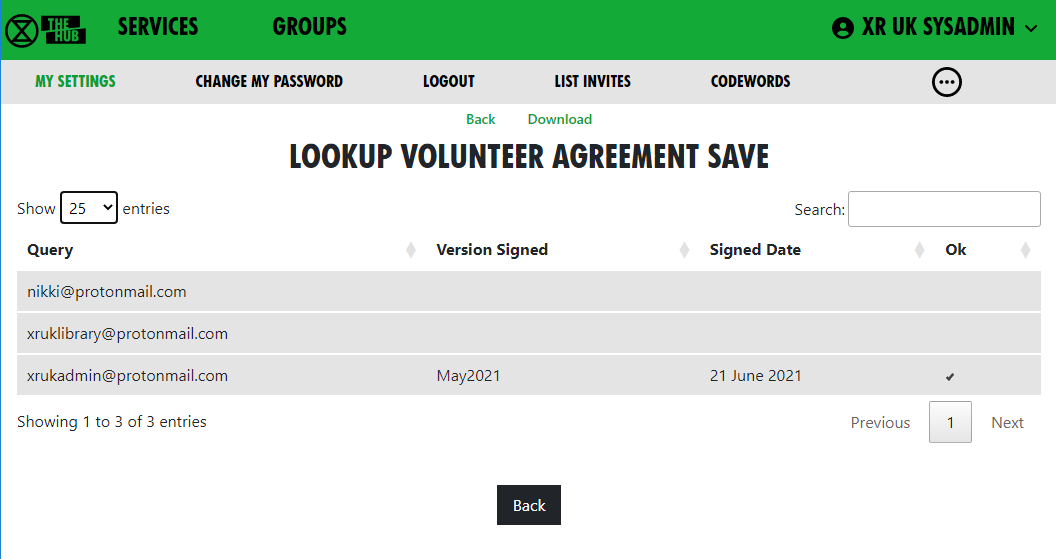 You see the email address or handle you entered, which version of the agreement they signed, when they signed it, and a tick under Ok if it is a current version. (The Volunteer Agreement may be updated from time to time, and, if the update is significant, people may need to sign the new version again.)
Updating the agreement
The Volunteer Agreement is jointly owned by the Pathway circle and the GDPR & Security circle.
GDPR & Security circle maintain the sections for Data Protection, Terms of Service, and Confidentiality. Rebel Pathway circle maintain the rest.
When we change this agreement in any significant way, there will be a new version in Action Network to sign. The new version will have a different flag on your record if you sign, and it will have a different date on the top of the page. Thus we know when people signed - and a record of what the form said at that time. This is for Data Protection record keeping.
Each circle will promote people to sign this form - and in that way encourage more rebels to know more about all the aspects here.
Inviting People to your Group
You should use the Hub to invite new people to your group. This is because an invite to the Hub sets people up correctly on all the XR services. You can also invite people to individual services, but then you would have to do all the work that the Hub could have done for you (e.g. inviting people to the right Teams, Channels, Cloud folders and Forums), so it is much easier to invite people via the Hub.
How to invite people to your group
Who is eligible to be added to the Hub?
We want to be as welcoming and enabling as possible of all new rebels who come to us enthusiastic to get stuck in. That said, the Hub is not a public space and a degree of caution should be exercised when inviting new people. Ideally, they should be known to and getting involved with your group.
If unknown people (e.g. from your area, but unable to get to meetings) request Hub invitations, please try to have someone meet them - a welcome to your group – before proceeding. This could potentially be via video chat if in-person isn’t possible. If a person seems unlikely to get involved locally but wishes to volunteer from home, then the Foundation Programme will likely be their best route in.
To get to the Hub, type - hub.extinctionrebellion.uk - into your browser address bar
To send a Hub invite
- select your group from the list of Groups
- use the 'Invite Rebels to Group' from the Admin section on the group page – then you will see this screen:

- You can add as many email addresses, logins or handles of people to invite as you like (one per line), and you can add a personal message for the users you invite.
-
NB If you put @ in front of a handle, the Hub will only search for that handle in Mattermost – otherwise, it will search handles and logins on all the services (some people have different handles in different places).
-
NB If you put @ in front of a handle, the Hub will only search for that handle in Mattermost – otherwise, it will search handles and logins on all the services (some people have different handles in different places).
- Invite emails will contain your email address, so the invitee can contact you for help or advice. If you have used a personal email to register on the Hub, that is the email that will be in the invite. If you are not happy with this, make sure there is a generic group email address in your group's Contact Info - then you will be offered the opportunity to use that email address in your invites by ticking the box.
- Invites expire in 14 days, so if someone doesn’t accept their invite within that time, you will have to invite them again.
- Invites normally go out by email – but if you search by handle, the Hub may find someone on Mattermost who has not registered with the Hub, and does not know their email – in which case it will send them a Mattermost Direct Message instead - the Hub's handle is xrukadmin.
How to invite people via a private Mattermost channel
If you click the Mattermost Invite green link at the top of the Invite People page above, you see this screen:
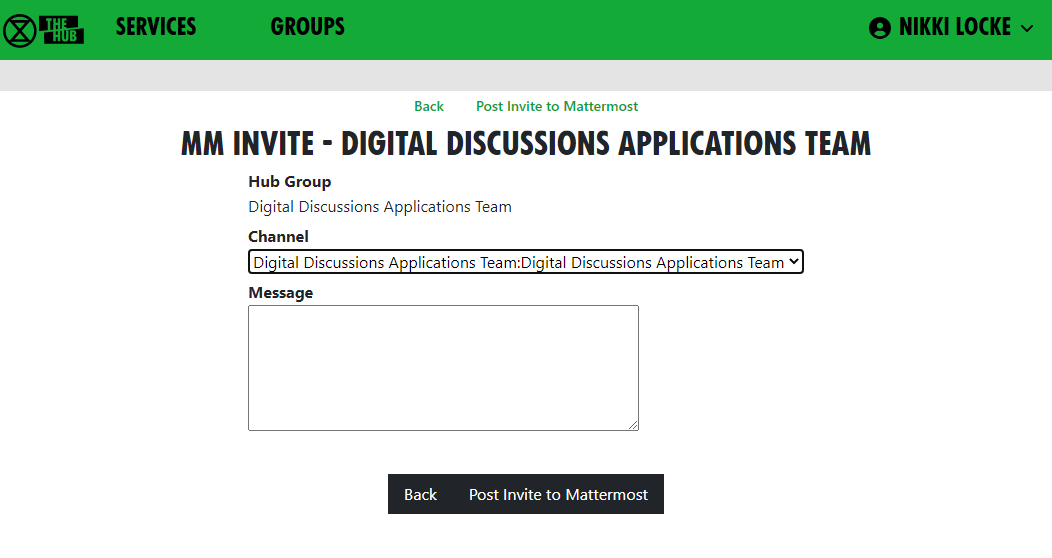
- This lets you select a private channel in Mattermost that belongs to your group, and post an invite link in there. Anyone who is in the private channel can follow the link to join the Hub. They will then have access to all your group’s channels, forums and cloud space.
- This is useful if you have invited people to your channels on Mattermost, but haven’t invited them through the Hub.
How to view invited people - List Invites
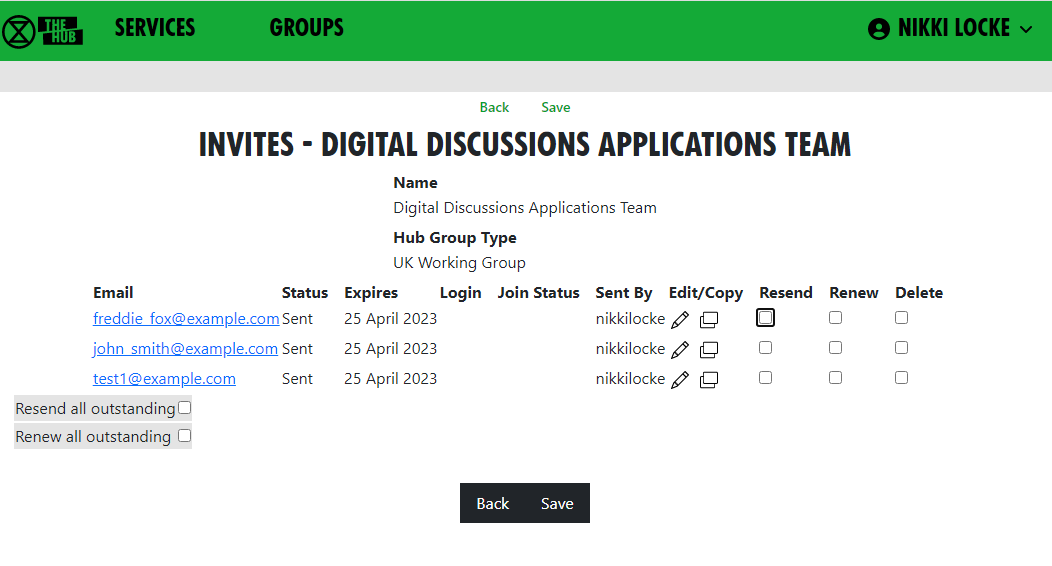
- This shows all the invites sent out for this Hub Group.
- Every invite still on file for the group is shown (all invites over 60 days old are removed).
- If the invite has been Accepted or Rejected, this is shown - there is nothing further you can do with these.
- If the person is on the Hub with that email, their Hub login is shown.
Columns
-
Status - Where the person is at with the invite you sent |
- Sent - You've sent it and they haven't Accepted
- Accepted - They've accepted and are now a Member of the group
- Rejected They've rejected their invite
- Expires - two weeks after the invite was sent.
- Login - the invitee's Hub login name (which can be different from their MM handle).
-
Join Status
- Member They have a Hub login AND have accepted the invite so are now a member of the organisation to which you sent the invite
- -blank- - They don't have a Hub login and they haven't accepted the invite
- On Hub The person is on the Hub, but has not accepted your invite
- Mattermost Problem - The person is on the Hub, but had a problem connecting to Mattermost. Please contact them to see if you can help (see Mattermost Problems below), or pass the problem to DDAT
- Forums Problem - As above, but for Forums - Nextcloud Problem - As above but for Nextcloud (UK Cloud)
- Edit/Copy
All invites with Sent status (i.e. that haven’t been accepted or rejected yet) have the following options:
- Edit icon - opens the invite, so you can edit it, or delete it. Note that, if you have changed anything on the screen, those changes will be lost if you click this (there is a prompt to make sure that’s what you want).
- Copy icon - copies the URL for the invite to your clipboard. This is useful if you want to send it to someone by some other means, as they haven’t received the email.
- Resend checkbox - tick this to mark the invite for resending by email. It will not actually be resent until you save the form.
- Renew checkbox - tick this to mark the invite for renewing (setting the Expiry date 14 days from now). It will not actually be renewed until you save the form.
- In addition, there are tickboxes for all at the bottom so you can easily resend or renew all the invites.
- If you then click 'Save', any invites where you have ticked Renew will be renewed, and you will be taken to the normal Send Invites screen, with the emails of all the people where you ticked Resend already filled in.
How to fix problems with people signing up
The 'User Sign Up Errors' button in the Admin section of your Groups page lists any errors users had when the Hub tried to add them to all the relevant spaces in Mattermost, UK Forums and UK Cloud. If you see any problems here that you can’t fix by speaking to the person, please contact us on Digital Discussions Applications Team Reception.
How to fix Mattermost (MM) Problems
The URL for XR's Mattermost is https://organise.earth
A Join Status of Mattermost Problem against an invite means they are on the Hub, but have not got on Mattermost for some reason. The solution begins with finding out what the problem is (usually by getting them to log into the Hub, and seeing what screens come up).
The problem is usually one of the following:
| Problem | Solution |
|---|---|
| Their login name already exists on MM, however doesn't belong to them, but they haven't changed it to one that isn't already in use | Click on the 'Try a different name to create a different login name on the Hub.' button, and try a different login name in the next screen.* |
| Their login name already exists on MM, does belong to them, but they haven't authorised the Hub to access Mattermost because they have forgotten their MM password | First get MM working by trying to log in with their login name, and clicking the button to reset the password that they have forgotten to something they can remember (e.g. their Hub password). Then they need to log in to the Hub (with their original Hub password), and authorise the Hub to access their account. |
| Their login name already exists on MM, does belong to them, but they haven't authorised the Hub to access MM because they haven't responded to (or haven't got) the email from XR Global 'Verify My Email' | First ask them to check their inbox (check Spam/Junk if not in their inbox) for the email from XR Global. If they can't find it, go to the MM sign-in page at https://organise.earth and ask them to sign in with the same details they used to create their Hub account and click the button to resend the email. Find the email from XR Global, and follow the link in the email - 'Verify My Email' - to activate their MM account. Then they need to log in to the Hub and authorise the Hub to access their account. |
| Their login name already exists on MM, does belong to them, but has a different email to the one they are using for the Hub | Change their email address on Mattermost or on the Hub, so they match. |
| Their email already exists on MM, but they haven't authorised the Hub to access Mattermost because they have forgotten their MM password | First get MM working by trying to log in with their login name, and clicking the button to reset the password that they have forgotten to something they can remember (e.g. their Hub password). Then they need to log in to the Hub (with their original Hib password), and authorise the Hub to access their account. |
| Their email already exists on MM, but they haven't authorised the Hub to access MM because they haven't responded to (or haven't got) the email from XR Global Verify My Email | First get MM working by trying to log in using their email, and clicking the button to resend the verification email. Next, find the email from XR Global in their inbox, and follow the link - Verify My Email - to activate their MM account. Then they need to log in to the Hub, and authorise the Hub to access their account.** |
*This screen shows if they have chosen a login name that matches an existing name on Mattermost. It lets them choose a different login name (if the Mattermost account isn't theirs), or link their Hub account to their Mattermost account:

**This screen shows if there is an existing Mattermost account for their email address. It lets them link their Hub account to their Mattermost account:

Removing people
To just remove someone from your group, click the 'Members' dropdown in your group screen, click on their entry, and then click 'Remove User From Hub Group' at the top.
If someone is stepping back altogether from all their roles, you may find the Step Back From Roles screen useful.
Add and Edit Groups, Channels & Forums
Note: If any of what follows makes you nervous, drop a request into Hub Help Desk on Mattermost and say you would like to practise Hub management for Trumpton! Then you can safely test functions without doing harm!
Groups
'Edit Hub Group' Screen
The 'Edit Hub Group' screen lets you rename your group, or any of its teams, channels, forum groups, forums or cloud group. Here is an example of how this screen is laid out for the 'DDAT' Circle:
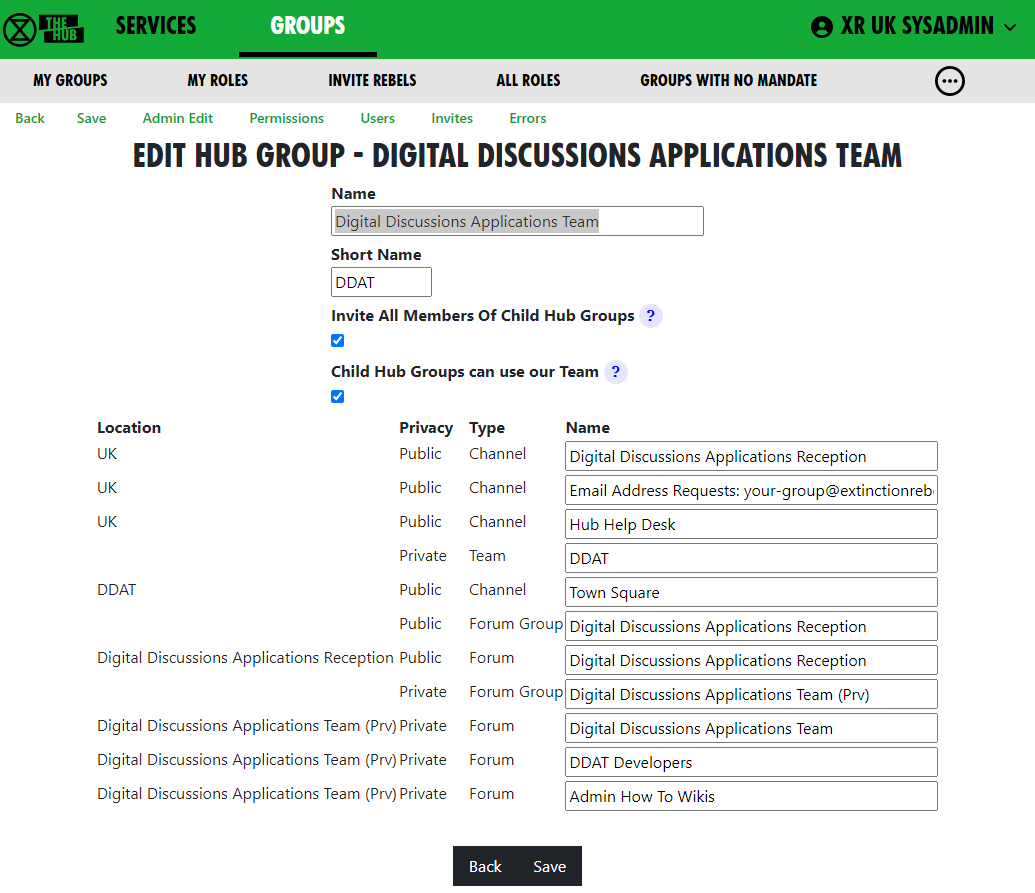
The edit screen helps when, for instance you change your circle name or shortened name. It will update all of the other names on the screen to match (albeit, you can still edit them too). When you click 'Save' it will update everything on the Hub and on the other services.
If the changes it makes automatically do not suit you, you can change names back on the individual team, channel, forum or cloud folder.
Duplications- you may get an error message if one of the names you have chosen has already been used by another organisation. Choose a different, unique, name.
It also lets you change the setting where members of child groups are automatically invited to your group. If you tick 'Invite All Members of Child Hub Groups?', all members of any descendant (child, grandchild, etc.) group will be invited to join this group. When they accept this invite, they will be full members of your group, and have full access to everything, i.e.: Team, public and private channels, public and private forums, and cloud storage.
Note: if you change it from unticked to ticked, the invites will be sent out immediately when you 'Save'.
You can also change 'Child Hub Groups can use our Team'. If this option is ticked (this is the default), then new child groups you create will use the same Mattermost Team as this group.
How to Change Your Group Name
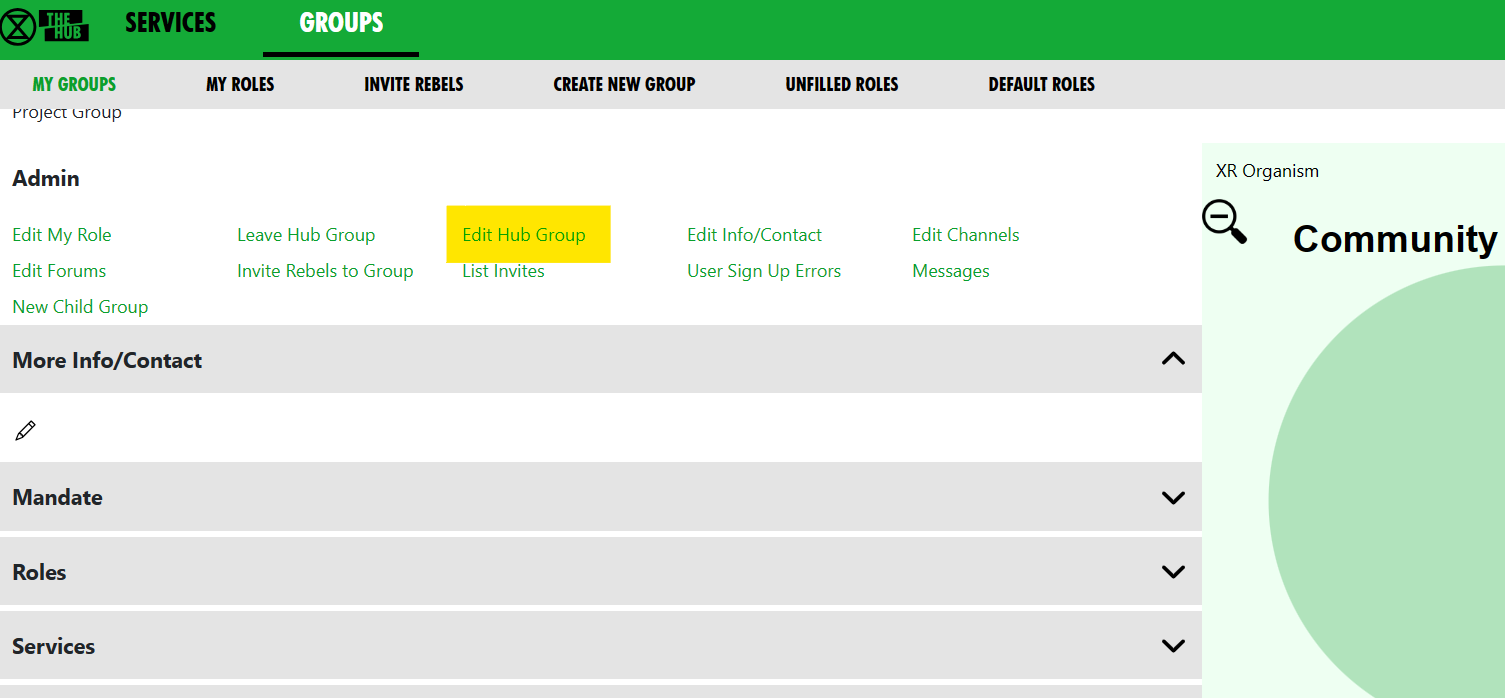
The Community Assemblies crew wanted to change their abbreviated name on the Hub. The yellow highlighted option is where they selected to change the Group's abbreviated name.
'Edit Hub Group' lets you edit your:
- group’s name
- short name
- whether you want members of Child Groups added to your Mattermost Team
- contact details for your group
- names of all your Channels
- Forum Groups
- Forums
- Nextcloud Group
Edit Contact Info Screen
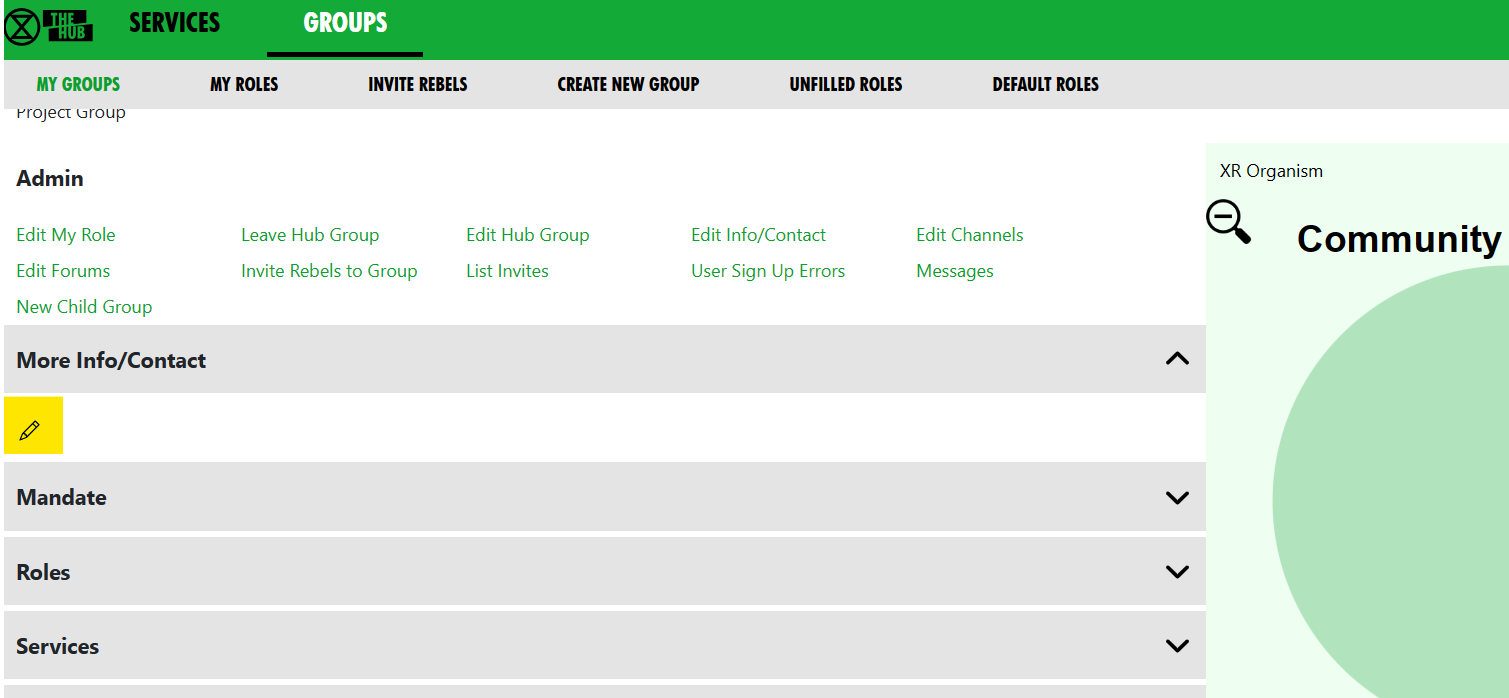
You can reach this screen by clicking the edit pencil (highlighted in yellow in the illustration) in the More Info/Contact dropdown of your Group screen. Click on the grey bars to open up drop down options.
At the top, under Public Info, is where you can place public contact details for your group. These will appear on the UK Regional Map, and possibly other public websites, such as social media sites.
IMPORTANT! Since public access to this information is possible, DO NOT PUT PERSONAL OR PRIVATE ADDRESSES IN HERE.
The last section, under Members Only Info, is information you only want members of your group to see. It is intended for such things as Zoom meeting links, or other information that might also go in a Mattermost channel header. If Mattermost is unavailable, the Hub is another way of group members accessing 'need to know' information, such as in this case, Trumpton Group's meeting arrangements.

Contact details and Members Only accept Markdown (like Mattermost and Forums), so you can format your details and put links in.
How to Create a New Child XR Group
If you are part of a large group which has a number of smaller working groups (e.g. a large working group, like Pathways, example working groups would be, for instance, 'Talks and Trainings', 'Foundation Programme', etc.). Where there are complex structures, you can create separate Hub Groups for your working groups on the Hub, with information on their new services.
Back to the Community Assemblies example, check out the yellow highlighted option below:
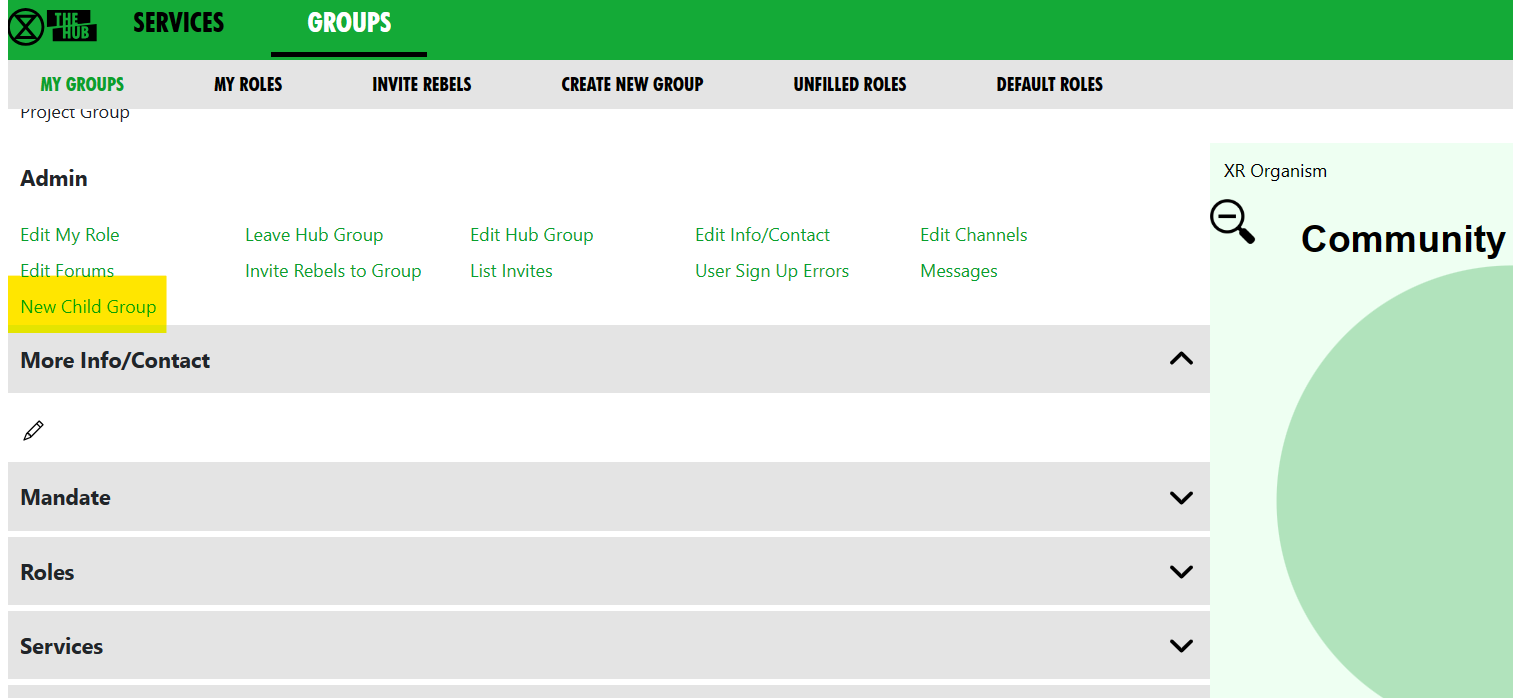
Click 'New Child Group' in the Admin menu of your Group display, or click "Create New Group" in the grey menu. This takes you to a new group screen in the 'Setting up a new group on the Hub' document.
Channels
How to Add a New Channel
Open the 'Services' grey dropdown bar on your Group page. Then click the
 ('+' symbol in a circle) button. This takes you to the Create Channel screen to create a public or private channel in the corresponding team.
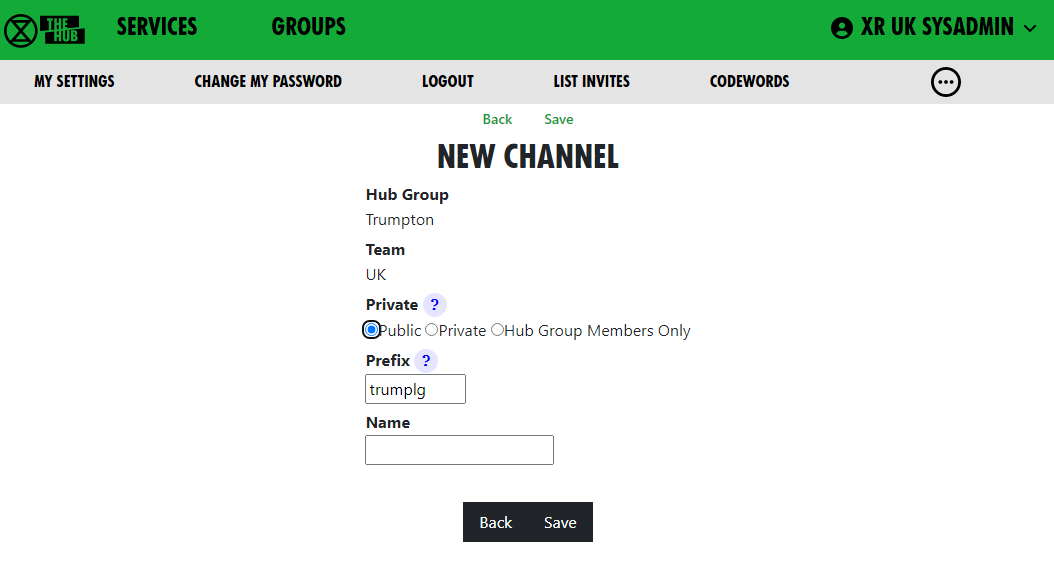
The name of the Channel will be made up of the Prefix and the Name. The Prefix defaults to your group short name; this is to help us avoid trying (and failing) to create 100 channels called “Media & Messaging” for 100 different working groups!
When you click 'Save', the Channel will be created right away. All your group members will be joined to it in due course. There is a background job running which does this, so it make take a while for it to catch up, or it will happen the next time they log in to the Hub.
How to Change your Channel Names, Public / Private
Either click on the 'edit pencil icon' next to a channel, or on 'Edit Channels' in the top 'Admin' menu, which shows all the Channels for your group.

Clicking on one will show the Edit Channel screen:

This allows you to edit the name, and you can choose to change whether the channel is public or private. When you Save your changes, the Hub will update Mattermost with your changes.
The Edit Channels list has a 'Show Unclaimed' button allowing you to also include unclaimed channels you are in; you can pick one and claim it for your group.
How to See Who is in Your Channels
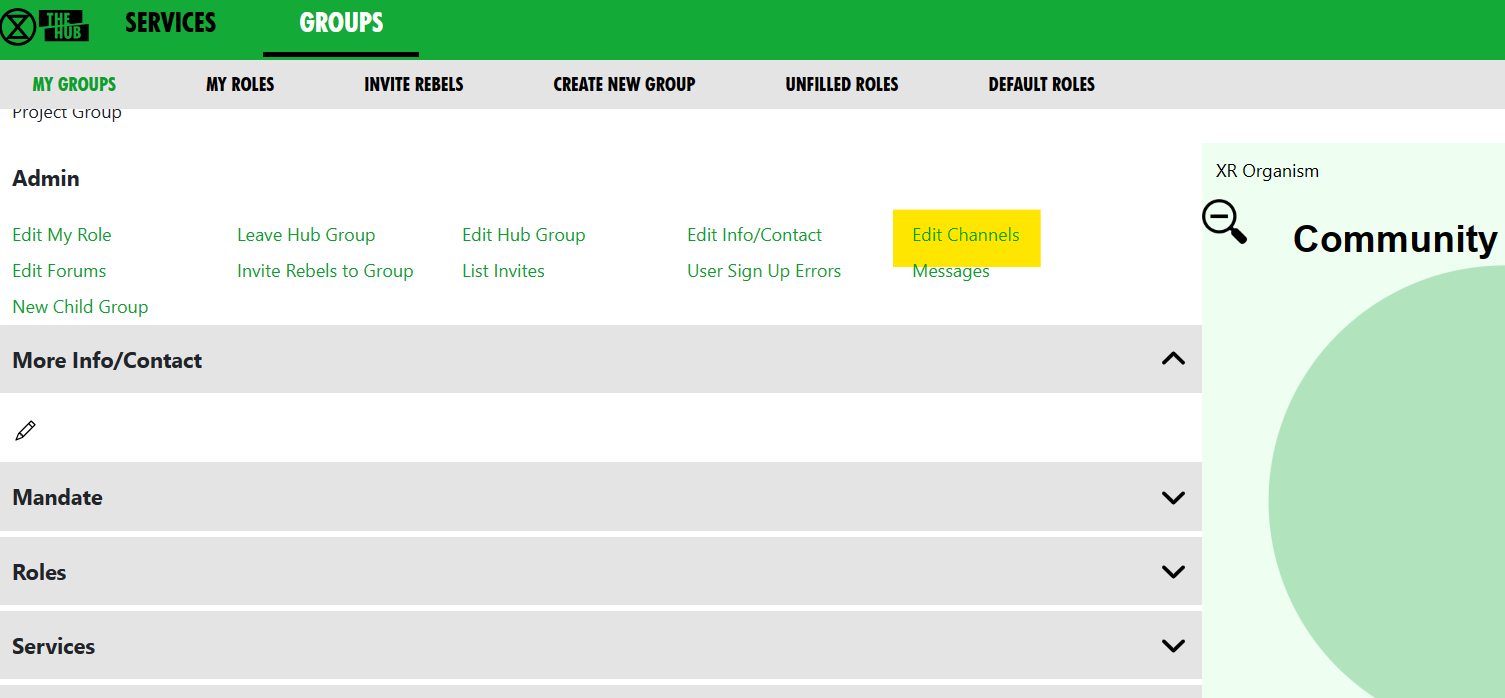
The Edit Channel screen (see above) also has a 'List Members' option to list all the members of the channel on Mattermost. This shows which of those people are on the Hub, and whether they are a member of your group.
There is also a button next to people who aren’t in your group, which you can tick to invite them.
There are bulk buttons at the bottom, to invite everyone who should be in the channel, or remove everyone who shouldn't be in it (because they are not members of your group).
How to Delete Channels

You can also delete channels in the 'Edit Channel' screen. (except for the ones the Hub needs you to keep, i.e.: your Reception and your main channel. Message the Hub Admins in the Digital Discussions Applications Team Reception or Hub Group Admins channels if you want to delete those.)
Deleting a channel here will also delete it on Mattermost.
How to Share Channels With Other Hub Groups
You can share a channel with other groups. This is useful when multiple groups are working together on an action or project. All members of all the groups your channel is shared with are joined to that channel.
To do this, click on the  icon next to Shares in the Edit channel screen (see above), to see this (Trumpton group example) screen:
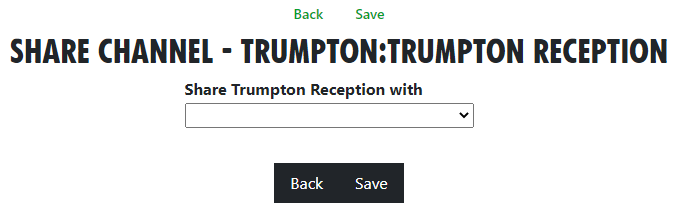
Choose the group you want to share with from the drop-down list. Another dropdown will appear, so you can share with multiple groups.
An  will appear to allow you to remove that share.
Click Save when done.
How to Restore Archived Channels
Mattermost lets anyone in a channel archive it. This removes it from the channel list. People sometimes do this by mistake, thinking it only archives it for them, not everyone! Important!: Archiving a channel archives it for everyone!
If someone has archived one of your channels by mistake, you can restore it the following day. The Hub notices it has been archived on its overnight check, and adds an Unarchive button to the Edit channel screen; this is how you restore the channel.
Claim Channels: If you already had Mattermost channels created before you came on to the Hub
Some people set up their group on Mattermost, without joining the Hub first. If you did this, you should now claim those channels for your group on the Hub. This way, the Hub knows they belong to you, and can join people to them when you invite them to the Hub.
The procedure for claiming a channel is as follows:
-
In Mattermost, invite @xrukadmin (the Hub’s login to Mattermost) to all the Teams and channels you want the Hub to know about. If inviting xrukadmin to a Team, make it a Team Admin (in 'Manage Members').
-
Wait 24 hours for the Hub to recognise your channels.
-
Claim the channels in the Hub:
- Go to your group in Groups
- Click Edit Channels
- Click the 'Include Unclaimed' button – this will add any other channels you are a member of but which don’t belong to a group on the Hub yet.
- Click on each channel you want to claim, check the details on the next screen, and click save to claim it for your group.
- You can then, if you wish, post a generic link to one of your private channels to allow anyone in that channel to join your group on the Hub. To do that:
- Go to your group in Groups
- Click Invite Users
- Click the Mattermost Invite button
- Choose the private channel to post the invite to
- Add an optional message from you
- Click Post Invite to Mattermost
Forums
How to Add a New Forum
Open the 'Services' dropdown on your Group page. Then click the
button, which takes you to the 'create forum' screen; here you can create a public or a private forum.
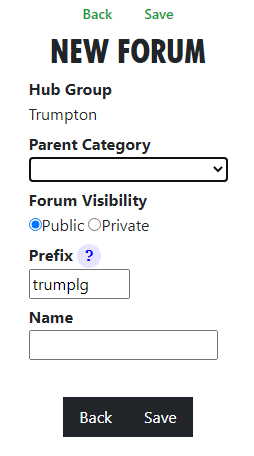
The name of the Forum will be made up of the Prefix and the Name. The Prefix defaults to your group short name, and is to help us avoid trying (and failing) to create 100 forums called “Media & Messaging” for 100 different working groups!
You must choose which top level category the forum goes in.
When you click Save, the Forum will be created right away. All your group members will be joined to it in due course (there is a background job running which does this, so it make take a while for it to catch up), or next time they log in to the Hub.
How to Change Forum Names and Locations or Delete a Forum
 You have 2 options:
- Click on the edit pencil next to a forum, or
- 'Edit Forums' lists the Forums for your group; clicking on one will allow you to edit the name and the parent category. When you 'Save' your changes, the Hub will update UK Forums with your changes.
You can also delete forums here. However, this does not include the ones that the Hub needs you to keep, i.e.: your Reception and your main forum. Message the Hub Admins in the Digital Discussions Applications Team Reception or Hub Group Admins channels if you want to delete those. Note: Deleting a forum here will also delete it on UK Forums.
How to Share Forums With Other Hub Groups
To share forums with other groups, click on the icon next to 'Shares' in the Edit Forum screen, to see this screen:
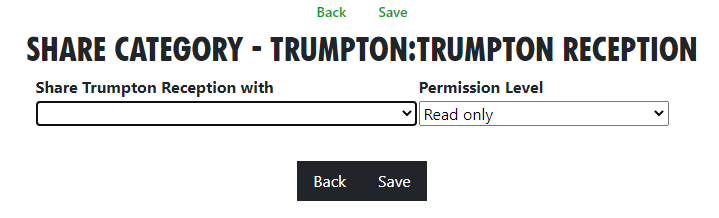
Choose the group you want to share with from the drop-down list. (In the image, the text reads: "Share Trumpton Reception with". You can also choose to limit this group's access to the forum in the 'Permission Level' dropdown.
Another dropdown will appear, so you can share with multiple groups. An will appear to allow you to remove that share.
Members
Adding Members
To add people to your group, you need to send them an invite. See Inviting People to your Group
Removing Members
To just remove someone from you group, open the "Members" dropdown, then click on their entry, then click "Remove User From Hub Group" at the top.
If someone is stepping back altogether from all their roles, you may find Step Back From Roles screen useful.
Edit Messages Screen

How to Change Default Welcome Messages
To add/edit messages click the 'Messages' link in your Group screen (see screenshot above).
Welcome messages are sent via Mattermost Direct Message to people who have just joined your organisation on the Hub. They come from xrukadmin (the Hub's Mattermost login). Note: xrukadmin does not read replies. It is recommended that you include instructions to contact your own Mattermost handle in the automated welcome message. E.g. "Do not reply to this message, contact @fred-xrtrumpton if you have any questions".
Just enter the message text, then click 'Save'. You can use Markdown formatting, like you can in Mattermost, Forums and Cloud. Subsequently, anyone who accepts an invite to your organisation will receive that message overnight, as the Hub runs updates in the early hours of the morning.
How to Set Auto-Reminder Messages
Reminder messages are useful for regular events, like weekly meetings. They are posted to your channel of choice on Mattermost, by xrukadmin, the Hub's Mattermost login, each night.
1. From your Admin options (top of the group in green)
 2. Select Messages
-
Select Reminder

-
Select New Reminder Message.
-
Type in your text and add any links, e.g. Zoom meeting, minutes etc. NB: The Hub uses Markdown in the same way Mattermost does. So you can use @all - and that will notify everyone in the Mattermost channel of the reminder when it's posted into the channel.
-
Choose the channel from the drop-down in which you want your reminder to be posted.
-
Choose the start date and the schedule.
-
Select Apply and check the bottom of the page to see exactly when your reminders will be posted.
-
Once happy, select Save.

XR Groups, Roles and Mandates
Read this guide to learn how to use the Hub to manage your group's mandates, roles, members, etc.
XR Groups Screen
If you click 'My Groups' on the Home page, you will see a screen like this:
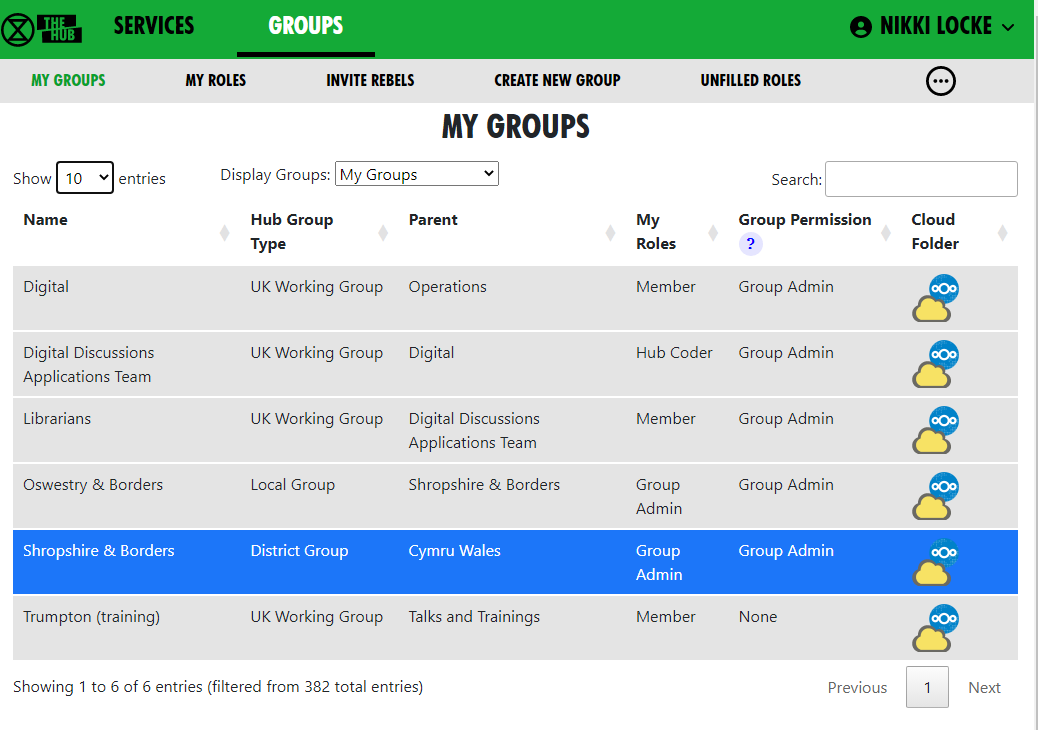
Choose a group to see all its details in context.
This is the Group Admin view – ordinary users can see this screen, but won’t have the links to change things.
If you want to become a Group Admin for a group in order to be able to edit here, you will need to contact your Internal Coordinator (IC) / External Coordinator (EC) or an existing Group Admin who is listed for your group. If all these people have stepped back, then contact your parent group Hub Admin.
This page shows the group in context. You can click on any of the group names (in the bar above the group name in bold, or in the diagram of the organism on the right) to see its parent and children groups. You can click on the dropdowns (in the grey boxes) to see more information.
Each group is displayed the same way. Public links are always clickable. If you are a member of the group, the private links are clickable too. If you are a Group Admin, the extra admin links also appear.
The organism graphic display shows the group in context – you can click the full screen icon (the black 4 x corners making a square, top right) to make it bigger.
You can click on groups within this view to shift your view to display a different group. To come back out from that group and back into the bigger framework of groups, use the spyglass icon, top left.
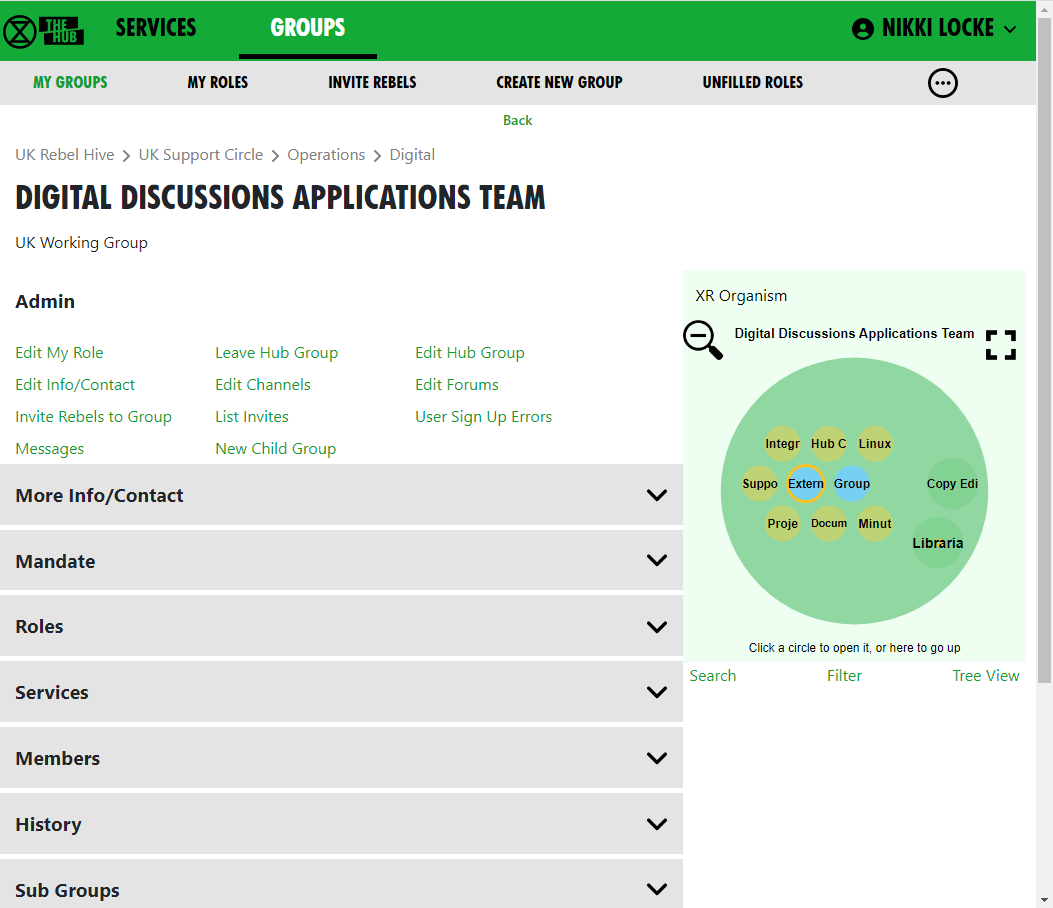
Structure
To find your way about XRUK, you can click on any group name on the screen to show that group, with its parent and children groups. Alternatively, you can click on a group in the Hub Circles XR Organism graphic display at the top right of the image above. This has a full screen button (the 4 x corners making a square, top right) to make it larger and easier to navigate.
If you are using the Hub Circles display, you can click the Filter link text below the graphic (in green font). This will hide some of the detail, to make the diagram less busy. If you set a filter, it is remembered, and used every time you open this view.
Here is an illustration of what the filter function brings up for someone looking at the Cymru Circle:
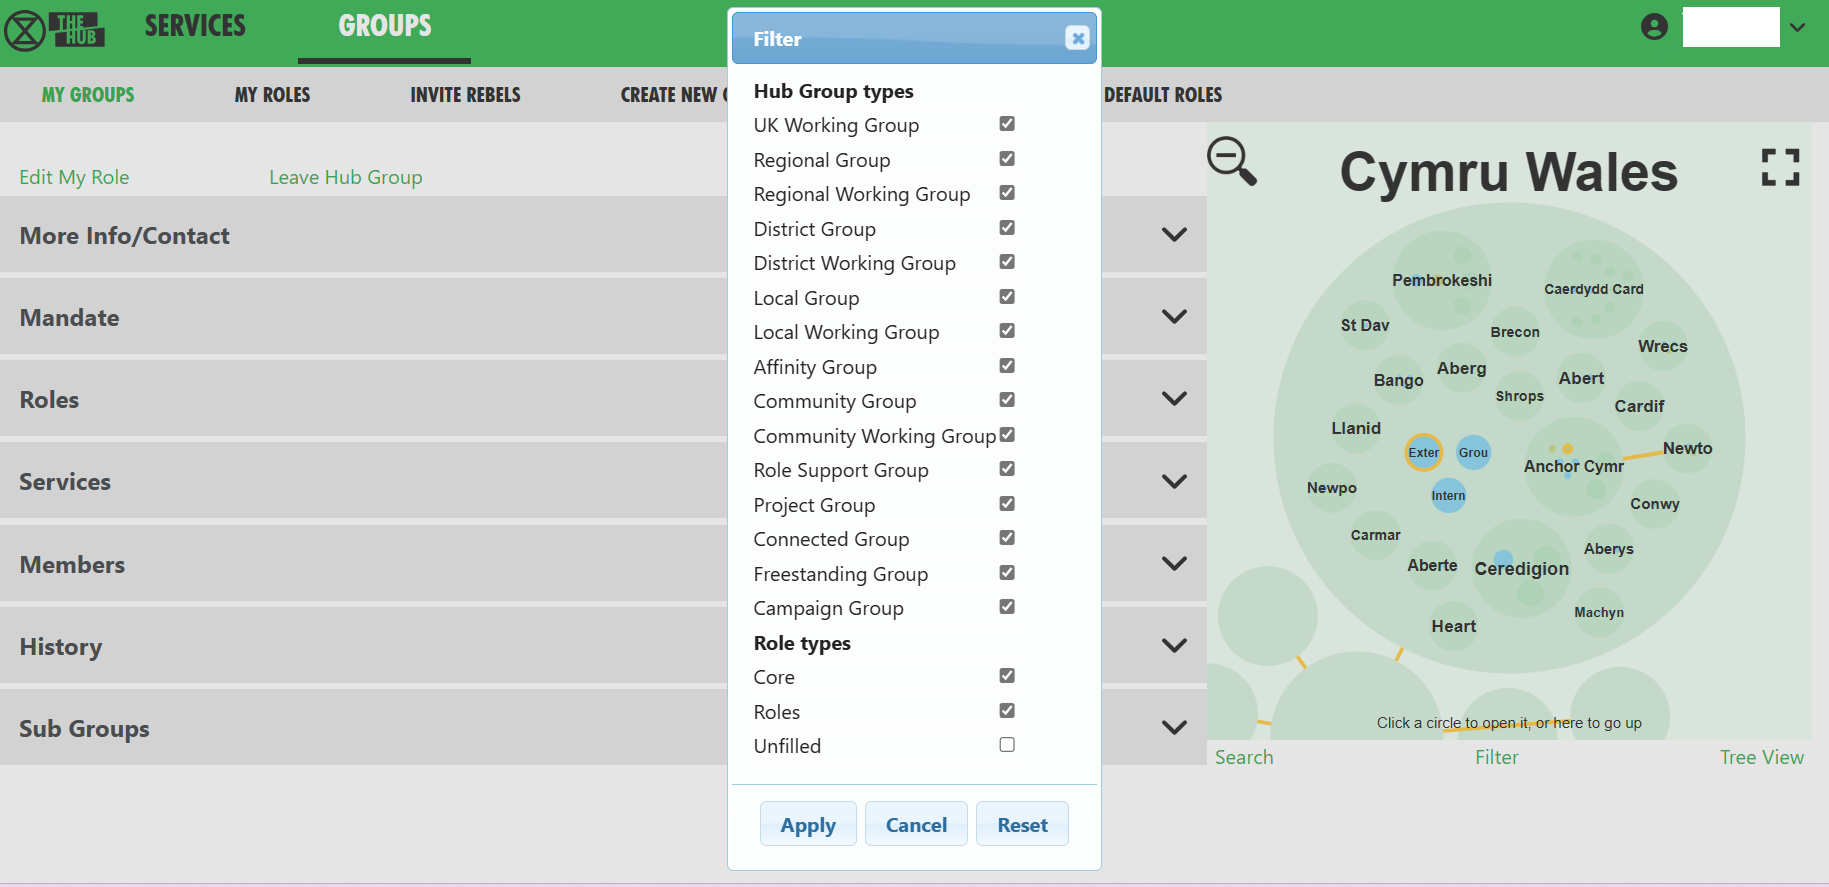
Don't be afraid of playing around with your options to filter here! Just remember that the filter stays in place for any future visit to this screen, so you might want to revert back to the full picture, with no filters before leaving the page!
XR Organism
To describe our XR UK organisational structure, we are on: organism.extinctionrebellion.uk. This is a public site which is updated from the Hub every night.
How To Find a Person to Contact Them on Mattermost
In the group they are a member of, click the grey 'Roles' band to open up a drop down of further detail. If you click the name of someone you wish to contact, you will automatically have a new tab opened that will take you to a direct messaging thread with that person on Mattermost.
Roles & Mandates
How to Change People's Roles in your Group
All roles all have a 'shelf-life', called a tenure, i.e. they have a pre-arranged end date, agreed with the person stepping into a role. Having an end or review date will allow for new people to step forward to take on responsibilities and allow for life-changes for those in the role. This helps to mitigate for power. When someone's role reaches its end point, the group should elect a replacement (can be the same person, if they are willing), and you should update the role holders on the Hub.
The 'Roles' dropdown (in the grey boxes) lets you view/edit the Roles within your group. Alternatively, you can click on an individual role in the display to edit it. See Edit Role screen below. The Roles dropdown view will show who is in the Core Roles and any sub-groups of that circle.
See Core Role Mandates, and templates for other role mandates, here. For more about core roles see the XR UK constitution.
How to Change Your Group's Mandate
The 'Mandate' dropdown (in the grey boxes) will show the group's Mandate. If you are Group Admin of the parent group, you will see an edit pencil button that will let you change the mandate.
To edit the Mandate:
- First ensure the parent circle has agreed the changes
- Select Mandate dropdown
- Click the edit pencil
- Make changes
- Save
The XR UK constitution says that all working groups should have a Mandate. However, not all parts of XR UK are covered by the constitution. Some Hub Groups were created without one. To make it clear when a group does not have to follow the constitution, we use different names:
| If the group follows the constitution | If it doesn't |
|---|---|
| Mandate | Scope |
| Role | Position |
| Purpose | What this group is for |
| Accountability | Activity |
| Domain | Resource |
(for more details see SOS Facilities on the Hub)
The Mandate/Scope sections include:
- Purpose/What this group is for
- Accountabilities/Activities
- Domains/Resources
- Policies (optional section)
As a guide to completing the Mandate, you might research those of similar Groups in your region, or UK wide (Working Groups and Circles). Such existing Mandates may assist with arriving at your own wording.
See Rebel Toolkit guidance here: Mandates and How to Write Them.
How to See Changes Made to Roles, Members, Mandates
The 'History' link (in the grey drop down boxes) will show all changes made to roles and mandates over time. If you are viewing a role or mandate, it will just show the history of that item.
How to See People In My Group
The 'Members' dropdown (in the grey drop down boxes) shows you a list of everyone in the group. Here you can set their roles, make them Group Admins or turn Group Admin status off. From there, you can click 'All Roles' to see all the roles that person has. From here you can click 'Step Back From Roles' to pass those roles on to someone else.
If you remove someone from one or more roles which are linked to another group, and that is the only role they hold in that group, you will see another screen where you can confirm whether or not they should also be removed from the other group.
An example of this might be an External Coordinator (EC) who is in a 'link role' to the Parent Circle. There may also be a link role from one group to another, e.g. Facilitation has a link role to XR UK Talks and Training.
How to Change My Role
'Edit My Role' in the Admin section lets you edit your own role in the group. Everyone in your group can view their own role, or step back from their role, only Group Admins can assign people to roles.
Edit Role Screen
When a new group is created on the Hub, it gets a set of 3 standard roles:
- Internal Coordinator
- External Coordinator
- Group Admin.
There are an additional 8 roles, suggested by the Self Organising Systems Circle, which may be selected by the Group Admin when adding new Roles to the original set.
To add a new role for your group, click the  icon, then insert the role name you require.
As you type, you are offered any Default Roles which match the input text; if you then select a Default Role, the form is prefilled with the details (including mandate) of that role - which can then be edited, if necessary.
This is just to save typing, and will help any Group Admin who may not know the exact wording of the Mandate for the desired Default Role. Note that any other new Role will have a blank Mandate - i.e. Purpose and Accountabilities - which may be completed at a later time.
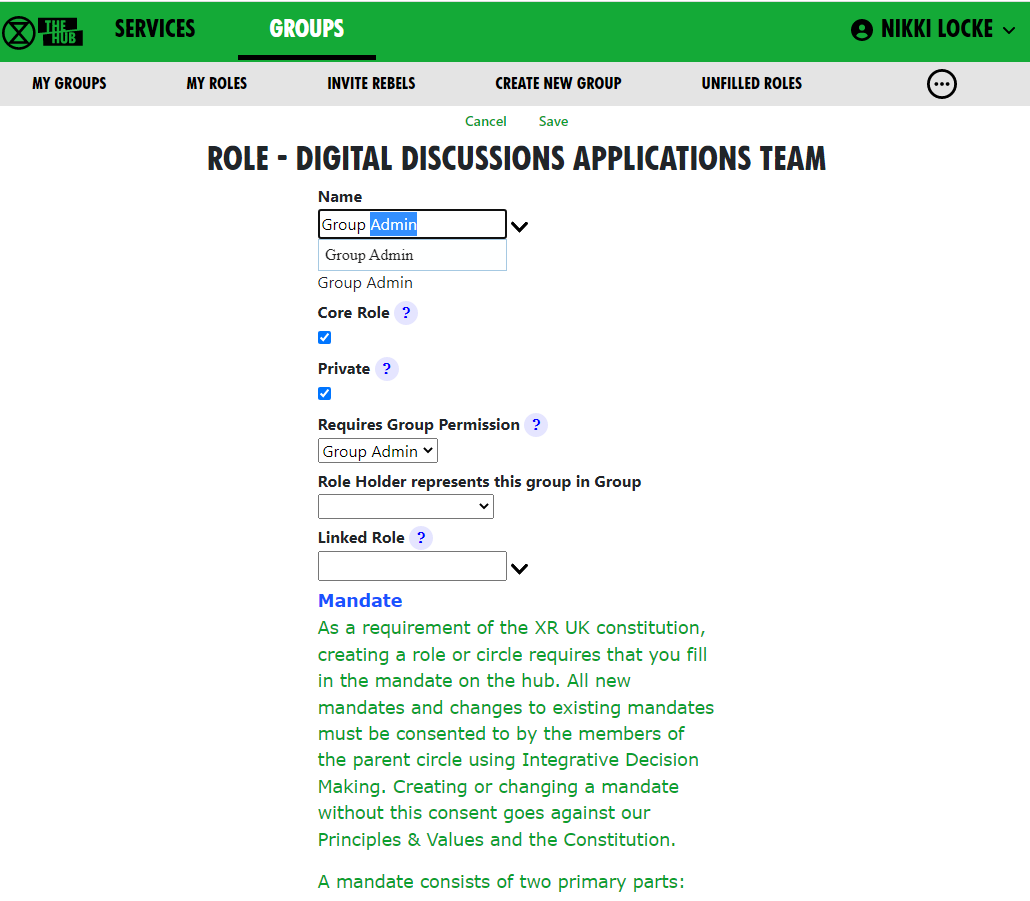 Ticking Core Role shows the role in blue instead of green in the diagram. Normally, only Internal Coordinator, External Coordinator and Group Admin are Core Roles.
The Private setting is the default for the role. If this is ticked, then users will have Private ticked by default. This can be changed by you or them.
Selecting a permission from the Requires Group Permission dropdown means that people assigned to this role automatically get that permission for this group, so they can invite people (Inviter), or edit roles, channels, forums, etc. (Group Admin).

You can add Accountabilities, or drag them using the handle to reorder them, or delete them with the red x button.
You can add Domains or delete them with the red x button.
Setting/Changing a Role Holder
You can place users in their role by selecting their names from the drop-down 'Login' list. With admin permissions, you may also remove them by clicking the red ‘X’ next to their name. The 'Private' setting by each user should be ticked if the user does not want anyone outside the group to see that they hold this role.
You can set an 'Until' date for each person assigned to a role. This is the date their holding of that role will be reviewed. This allows people assigned to a role for a limited time to be confident that they won’t be left holding that role forever. Roles where the 'Until' date has passed will show in red on the group diagram.
Linking a Role to Another Group
You can link a role to another group. Then, when people join in that role, they are automatically joined to a linked role in the other group. Usually, you will do this for the External Coordinator (EC) role; the EC of a working group or circle automatically joins the parent group as the sub-group’s representative. However, it doesn’t have to be the parent group; for example, in the past, Cymru Wales had a "Local Group Coordinators" group, that all their local group coordinators joined.
The only limitation on editing information in this regard is that you have to be a Group Admin of both groups, i.e.: parent and child.
To link a role, choose the group you want to link to in the Role Holder represents this group in Group dropdown.
Then either select an existing role in that group from the Linked Role dropdown, or type in a new role name if the new role will be created in the other group.
Normally a Group Admin of one group will create a child group, which automatically makes them Group Admin of the child group. They will then link the External Coordinator role in the child group to the parent group. They may well also appoint other Group Admins of the child group, then may remove themselves from the child group when this has been done. So just because they set up this administrative work does not mean to say they will continue in administering that group; they may hand to new Admins.
If nobody is Group Admin of both groups, Coordinators or Group Admins of both groups will have to ask a Hub Admin to do this task for you. If you don't know a Hub Admin, ask in Hub Help Desk on Mattermost.
If you remove people from a role which is linked to another group, and that is the only role they hold in that group, you will see another screen where you can confirm whether or not they should also be removed from the other group.
What Happens When a Role Allows Access to More Than One Hub Group?
When someone does one of the following things:
- Edits the Auto Join Roles screen (Hub Admins only)
- Edits the people in a role
- Edits the roles a person is in (+)
- Deletes a role
- Steps a person back from a role (+)
- Creates a group
- Deletes a group
- Admin edits a group (Hub Admins only)
- Removes someone from a group (+)
The change could entitle some people to be in different Hub Groups, e.g. if they join or leave a linked role, or a role with a support group.
The joining or inviting happen automatically, but any groups they should probably be removed from are first listed in a screen with tickboxes against each one, so the person making the change has a chance to untick people they do not want to be removed.
This removal screen is simpler in the cases with a + above, because only a single person is affected, so it just shows a list of groups the person could be removed from. In the other cases (without the +), it may have to show more than 1 person being removed from each group. In the example screen, both Albert Reid and Nathan Powell are candidates to be removed from both groups.
Here is the simple screen:
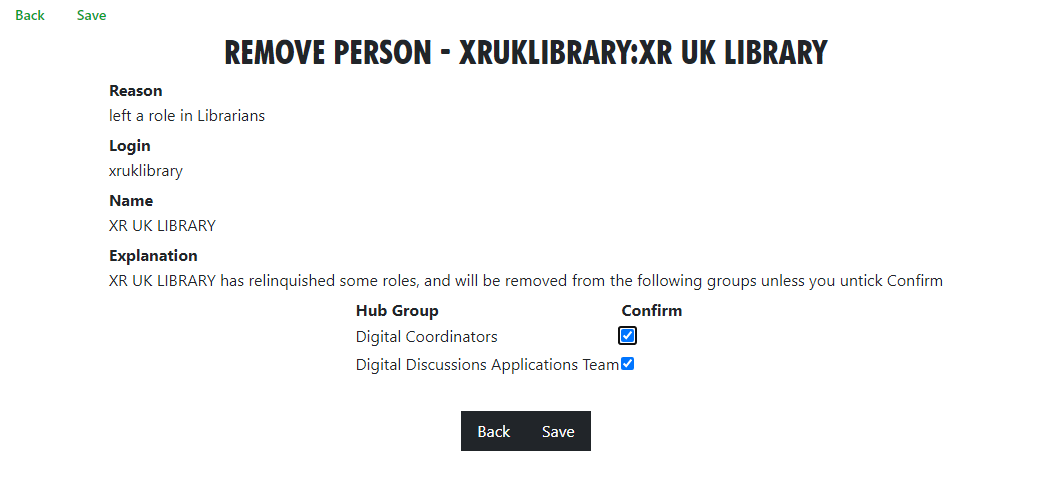
Here's the more complicated screen:

Please click 'Save' in this screen to carry out the removals. If you think a person should not be removed, first untick the corresponding 'Confirm' box.
Step Back From Roles Screen
You reach this screen by finding a person with a role in 'All Members', clicking on 'All Roles', then clicking on 'Step Back From Roles'.
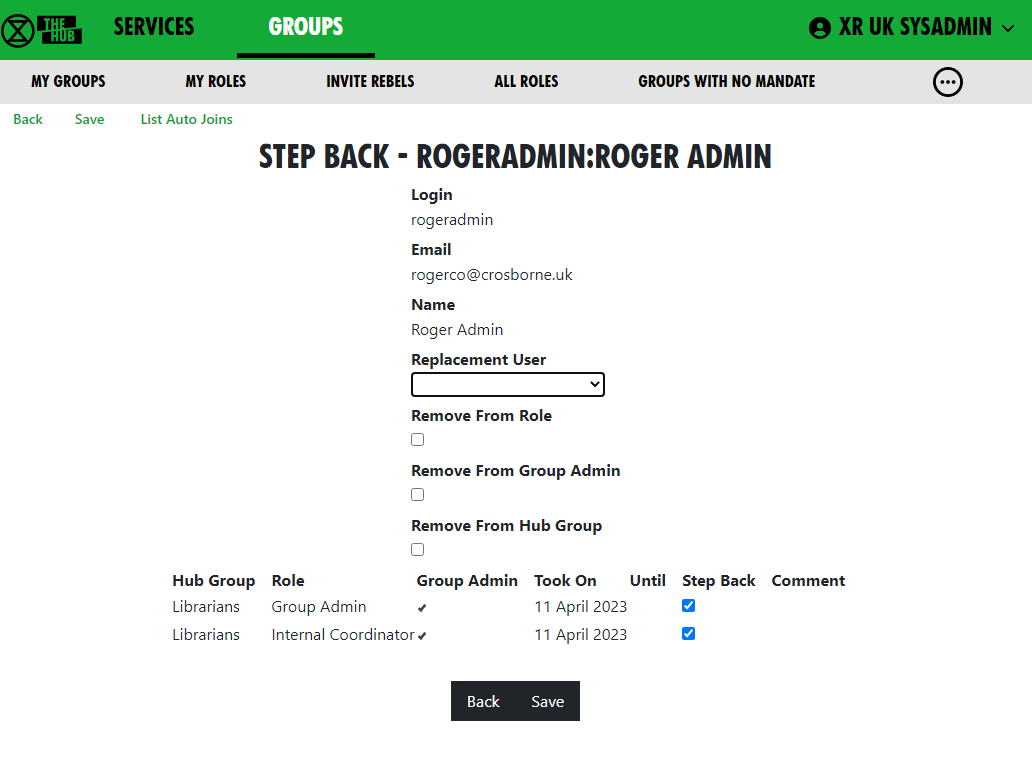 If you choose a replacement user from the dropdown, that person will be assigned to all the roles with 'Step Back' ticked (being joined to the organisation if they are not already in it).
If you check Remove From Role, the original person will be removed from the roles with 'Step Back' ticked.
If you check 'Remove From Group', the original person will be removed from all groups with 'Step Back' ticked.
If you remove someone from one or more roles which are linked to another group and that is the only role they hold in that group, you will see another screen where you can confirm whether or not they should also be removed from the other group.
So, for example:
| Change Required | Action |
|---|---|
| Add a new person into the role, to be trained by the original person | Select the new person in 'Replacement User'. Leave 'Remove From' boxes unticked. Tick all the roles you want the new person to be added to and untick the others. |
| Pass the role on to someone else because the original role holder has already stepped back. | Select new person in 'Replacement User'. Tick 'Remove From Role'. Tick all the roles they are stepping back from and untick the others. If the person has left the group(s) altogether, rather than just stepped back from the role to become an ordinary member, also tick 'Remove From Group'. |
| Step someone back from their role, without appointing anyone else | Leave 'Replacement User' blank. Tick 'Remove From Role'. Tick all the roles they are stepping back from and untick the others. If the person has left the group(s) altogether, rather than just stepped back from the role to become an ordinary member, also tick Remove From Group. |
Role Tenure
How to update role tenure, so you no longer get 'tenure expired' messages
Your Group Admin can set an Until date for each person assigned to a role, which is the date their holding of that role will be reviewed (the role tenure). This allows people assigned to a role for a limited time to be confident that they won’t be left holding that role for ever. Roles where the Until date has passed will show in red on the group diagram.
When the Until date passes, both the person and the group will receive a reminder message on Mattermost, and the role/person will be shown in red in the Hub organism diagram.
Formal, elected roles have a procedure laid down in the constitution (Choosing Role-Holders), which the group will follow to decide who holds the role and for how long.
Once any such formalities have been followed, the procedure for any of your Group Admins to update the Hub is simple:
- Log in to the Hub
- Click on Groups
- Click on the relevant group
- Open the Roles dropdown
- Click on the edit pencil for the relevant role
- Alter the Until date of the relevant person (there are 3-month and 6-month shortcut buttons to automatically set it to that period of time, if that's what you need)
- Click Save.
If you do not have a Group Admin, please get one of your Coordinators to contact Hub Help Desk on Mattermost, or email tech@rebellion.earth.
SOS Facilities on the Hub
This section describes how the Hub helps to implement the principles of Self-Organising Systems within XR UK. We'll show how the External Coordinator Role in a group, or circle, can be linked to a Representative Role in the parent group, or supercircle. We'll also show how Mandates for Working Groups need agreement with their supercircle.
Hub Groups and SOS
Our Organism diagram shows all the groups/circles on the Hub, and how they fit together within our self-organising structure.
The Hub is used by lots of different kinds of groups/circles, and some have decision-making power, so our Constitution says these should each have a Mandate. The Mandate details the group's Purpose (the result the group is trying to bring about), Accountabilities (what the group's jobs are) and Domains (resources that the group controls).
The decision whether to follow the Constitution rests with the groups at the outermost level of the Organism – the UK Rebel Hive (for UK Working Groups), the Regions and Nations, XR Youth, etc. Together with the Hive, many of the Regions and Nations have decided to adopt the Constitution. XR SOS will inform the Hub which groups have made this decision – you can see whether your group has adopted the Constitution by looking at your group on the Hub. Groups who have adopted the constitution are shown in a green colour, and ones which have not in a pink colour. To make it even clearer, we use different names for things if a group has not adopted the constitution:
| If the group follows the constitution | If it doesn't |
|---|---|
| Mandate | Scope |
| Role | Position |
| Purpose | What this group is for |
| Accountability | Activity |
| Domain | Resource |
Once a group has adopted the Constitution, then new Working Groups and Roles under that group must decide on and publish, via the Organism, a Mandate which contains a Purpose, as a minimum, but ideally Accountabilities too. This applies at all levels – thus every UK Working Group must have a Mandate, no matter how deeply nested it is within the structure. For Regions/Nations, this applies only to Regional Working Groups and District Working Groups. It isn't enforced to Local Groups (or their working groups) because most Local Groups are not large enough to need to use the full version of our SOS – but they can still have a Mandate if they want to.
Linked Roles
Within XR, it is often necessary for a group/circle to be represented in another circle. The classic example of this is the External Coordinator in a circle who will normally be linked to a Representative Role in the parent/supercircle. In this case, the Linked Role represents the subcircle in the supercircle and, in addition, the supercircle holds the subcircle's Mandate.
Linked Roles can also be used between any 2 circles in the Hub, such as:
- Some Regions & Nations have an Anchor circle or Local Group Coordinator's circle. They can link the External Coordinator role in each of their Local Groups to a role in the Anchor Circle.
- There is often a need for cross-group collaboration – Arrestee & Legal Support (A&LS), for example, has a rep who attends Actions meetings, to appraise A&LS of forthcoming actions, and to advise the Actions circle on arrest issues.
The Hub organises these roles so that someone joining the Linked Role in one circle is automatically elected to the Linked Role in the second circle – and joined to that circle, if they are not already a member. Linked Roles appear with a yellow border in the XR Organism diagram.
Note that when someone leaves a Linked Role in one circle, they are automatically removed from the Linked Role in the other circle. The Hub also offers to remove them from membership of the other circle (this is optional).
Which Hub Groups implement SOS?
There are many different kinds of Hub Group: the Rebel Hive contains the UK Working Groups, and their sub-circles (Child Groups). Regions and Nations have their own Working Groups, together with District and Local Groups, which again can contain working groups. While all the groups/circles within the Rebel Hive are subject to SOS, only the Regions/Nations that have adopted the new Constitution are obliged to implement SOS, and that is only above the Local Group level.
As well as Local Groups, there are also other groups where SOS doesn't apply, because they do not make decisions on behalf of the movement, including:
- Affinity group – small groups of people supporting each other and working to achieve XR's goals. These groups are most often used for organising actions. By organising as many small groups pursuing a shared vision, we avoid getting too bogged down in slow decision-making processes
- Community group – a group for rebels to connect and work together through communities of shared self-identity rather than of shared location (for example, faith, profession, ethnicity and sexual identity)
- Role support group – groups that provide help and mutual support to people in a certain role in other groups
- Connected group – a permanent ongoing group that does not have a mandate. Connected groups are autonomous and operate independently outside of Hive circles. They may have a Linked Role to a UK circle but are not allowed decision-making power in that circle. Decision-making power requires accountability. In order to be accountable, you need a mandate that the parent circle has consented to
- Project group – a group with no decision-making capability, which therefore is not required to have a mandate. Any decisions have to be made by another group that has the mandate to make them
- Local groups and below in Nations and Regions
Hub Groups where SOS is enforced
Before editing any Hub Group, make sure to check the constitutional status at the bottom of their Contact Info. This tells you whether the group has to follow the Constitution, and why. Thus, creating a new New Child Group for an constitutional group will require a Mandate to be entered before the Child Group can be created, unless it is one of the groups included in the list above (e.g. a Project Group).
Adding Linked Roles
See Linking a Role to Another Group
Default Roles are created by SOS
A set of important Default Roles has been created by SOS. These include External Coordinator, Internal Coordinator, Group Admin, etc. Hub Admins can edit these Default Roles, but they should only be changed with the permission of SOS. Click the Default Roles option on any Groups page (it may be in the ... continuation menu) to see the following listing:
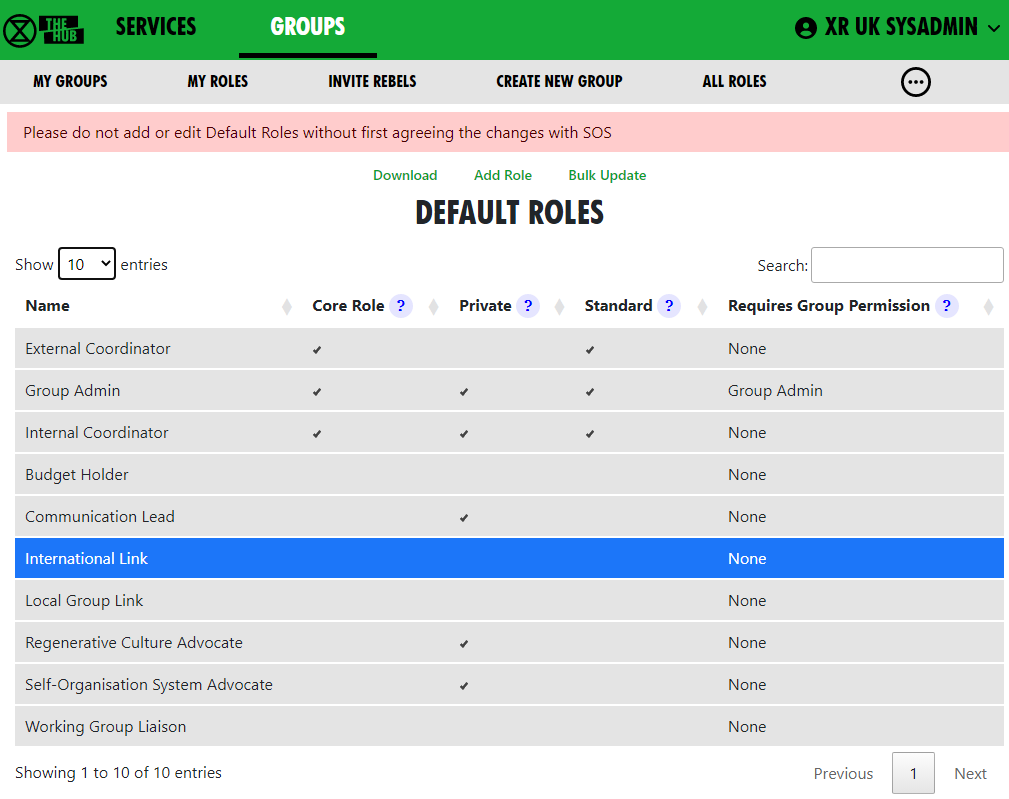
Group Admins selecting a new role can choose from these Default Roles to get a role prefilled with a standard purpose and accountabilities.
If the tick-box under Standard is ticked, then any new Child Group being created will get each one of these Standard Roles automatically.
Setting up a New Group on the Hub
This document takes you through the process of creating a new group on the Hub.
See also Good Practice Guide
Creating a New 'Child' XR Group
If you are part of a large circle which has numerous working groups (e.g. a large working group like Pathways, you may have a number of large and separate working groups, for example: 'Talks and Trainings', 'Foundation Programme',etc.). If this is the situation for your circle, you can create separate Hub Groups for your working groups on the Hub, alongside new services that group provides.
To create a new group, go to your group in My XR Groups; click the New Child XR Group button. Alternatively, click on the 'New Child Group' green font option via the 'My Groups\Admin' option from the grey menu bar along the top of your window. (See image above)
This shows the first page of the new group wizard (a support tool):
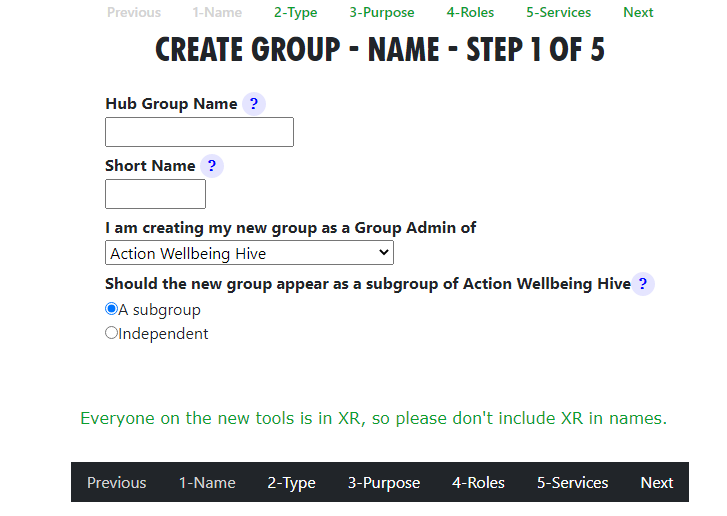
Name your new group, then add a short name. This is used as a prefix to channel and forum names, to distinguish them from other groups' channels/forums.
Select which Hub Group the new group relates to (NB you have to be its Group Admin to do this). For a subgroup, this will be the parent group.
Decide if the new group is a subgroup (e.g. a Working Group which is a subcircle of the group above) or an independent group (e.g. a new, nationwide Campaign Group which isn't run by an existing UK Working Group).
Click 'Next'.
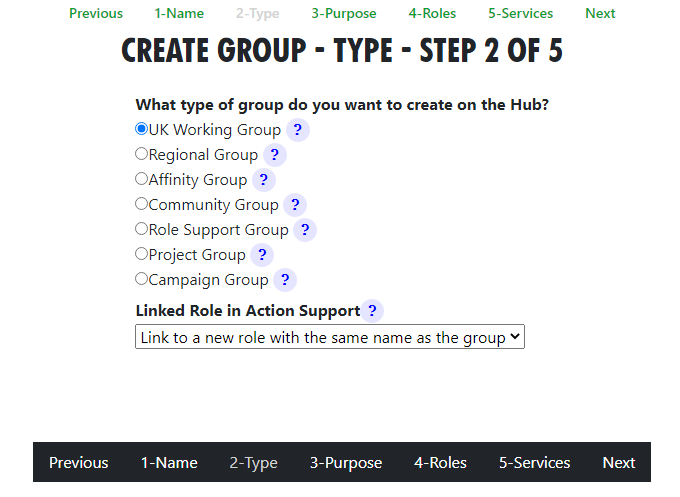
Type. Now you can choose what type of group to create. (See the image above for options)
If you create a subgroup, you can create a linked role; here, the External Coordinator of the new group represents the child (sub) group in the parent group.
SOS principles suggest that a new working group is created when a role becomes too much for one person to handle; the work involved needs a group of people to work on a project or new work stream. The existing role holder becomes External Coordinator of the new group, inheriting the mandate. The parent group defines the mandate of the new group in collaboration with the new team.
Linked Role
There are two choices here:
- If you are creating a new group to fulfil an existing role, then select the role in the drop down.
- If there is no existing role, just leave the dropdown unchanged; a new role is created in the parent group with the same name as the new child group.
Click 'Next'.
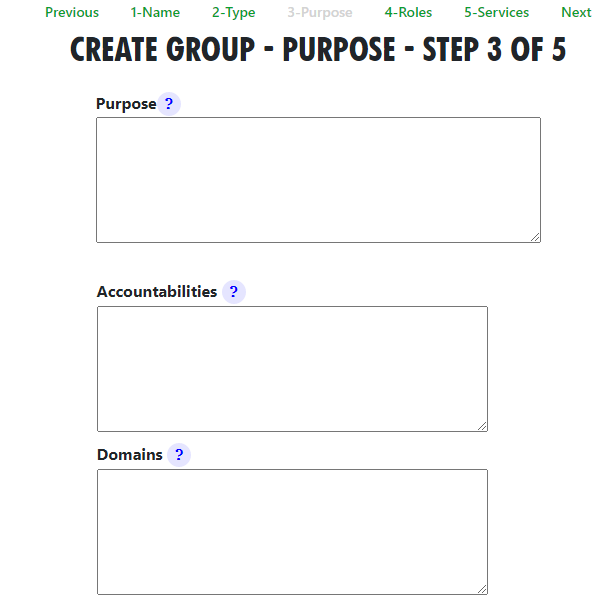
New Group Purpose (See above image)
Now you explain the Purpose of the new group. If it is a group that can (or must) have a mandate, you add this here. If the group may not have a mandate (e.g. a Project Group), you will only be asked what the group is for.
Click 'Next'.
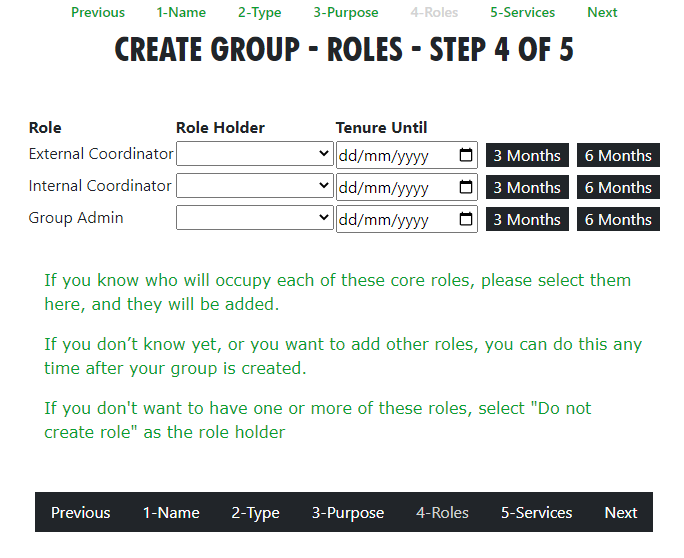
New Roles and Role Holders. Now you can choose which of the core roles to create and who will be in them. These role holders are selected from members of the group you are group admin of in the first page. This is just a handy shortcut - you can always add people to the group, and to roles, later on, after the group is created.
Click 'Next'.
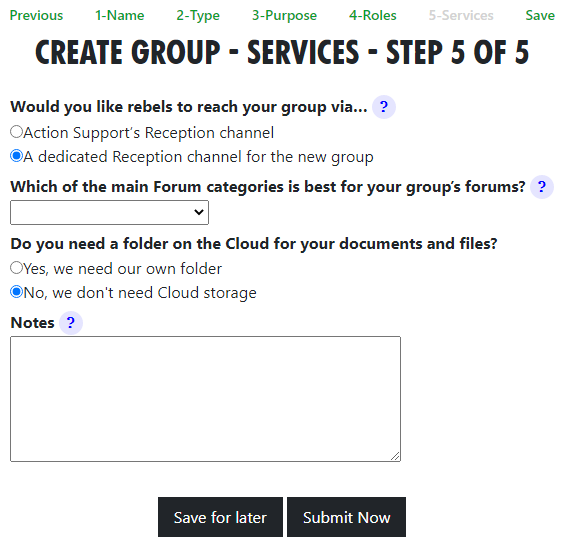
Services Finaly, you choose what channels, forums and cloud folder to create.
Click 'Save' when done.
Note: You can only have one new Hub Group pending/saved for later at a time. If you try to start a new one when you already have one which hasn’t been created, you will just be editing the existing form!
Once you have filled in the form, your new XR Group will have exactly the same kind of facilities as any other Hub Group, i.e.: channels on Mattermost, security groups and forums on UK Forums. Optionally a separate file storage area can be created on the UK Cloud.
People in the new group are not automatically also in the parent group. However, you can invite them to be in both, if your group agree. This requires discussion. If the parent (or any ancestor) group has Invite All Members Of Child Hub Groups ticked, they will be invited automatically to those groups. N.B. Invitees do not have to accept membership (for example, if already over-committed).
Already Have a Mattermost Team?
If your group is already on Mattermost (but not on the Hub), it is very important that you let DDAT crew know, so that we link the Hub to your existing team. Contact DDAT
Tell DDAT what your team is called, and which channels you want people to be joined to automatically.
You must give xrukadmin (the Hub’s login) admin access to your team, so the Hub can add people to it. You can only do this using a web browser or the PC app to connect to Mattermost; the phone apps do not have all the menu options.
The procedure is:
- Go to your team.
- Click the bar menu, 'Manage Members'.
- Click 'Invite People'.
- Type 'xrukadmin' in the 'Add' or 'Invite' people box.
- Go back to 'Manage Members'.
- Find it in the list; use the drop down to make it 'Team Admin'.
- Then go to each channel, to join 'xrukadmin' to each one.
You also need to join xrukadmin to any channels you want your members to be joined to automatically by the Hub. If you do not do this, the Hub cannot join people to your team and channels.
When the admins actually create your Hub Group on the new services, you will receive an email telling you this has happened. The next time you log in to the hub, your accounts on the new services will be set up for you automatically, so you can start using them.
Want a New Mattermost Team?
It is recommended that you use the same team as your parent (for local groups this will normally be the regional team). This is so your group can easily interact with other groups in the region.
Teams on Mattermost take significant resources on the server. You should only ask for a new team if your group is large, and will have many subgroups, each with their own channels.
Only the Mattermost admins can create Teams on Mattermost, so you need to DM them @xradmin and @xradmin2 to ask for a new team. The team name must not clash with an existing team, (especially in terms of mandate overlap or repetition). The group name must be between 2 and 15 characters long. Once this is created, please follow the instructions above in If you already have a Mattermost team.
Deactivating or reactivating someone's account
This page explains how to deactivate an account if someone is arrested or loses their phone or other device used to access our services. Group admins are able to deactivate their account.
See Compromised Account Procedure for precautions to take when access to an account is compromised.
Deactivating an account
Find the person whose account you're looking to deactivate by going to your group, opening the Members dropdown list and clicking on the person.
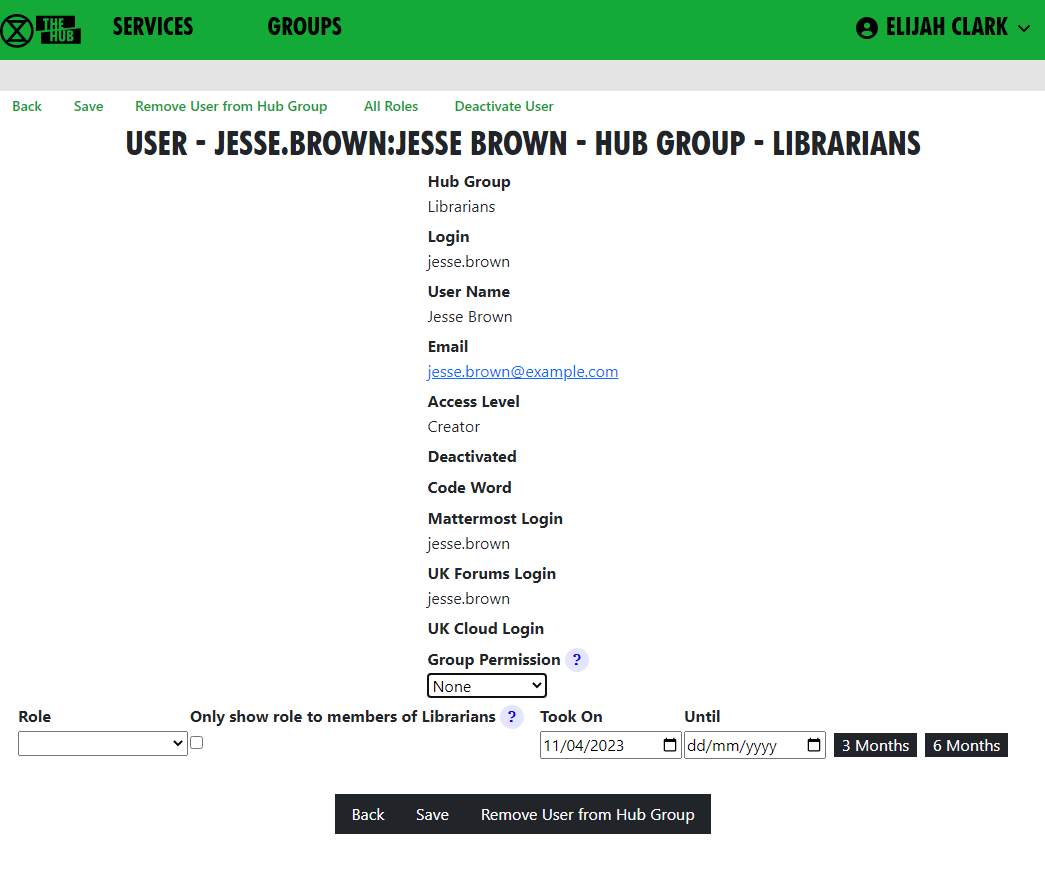
Click on the green Deactivate User link.
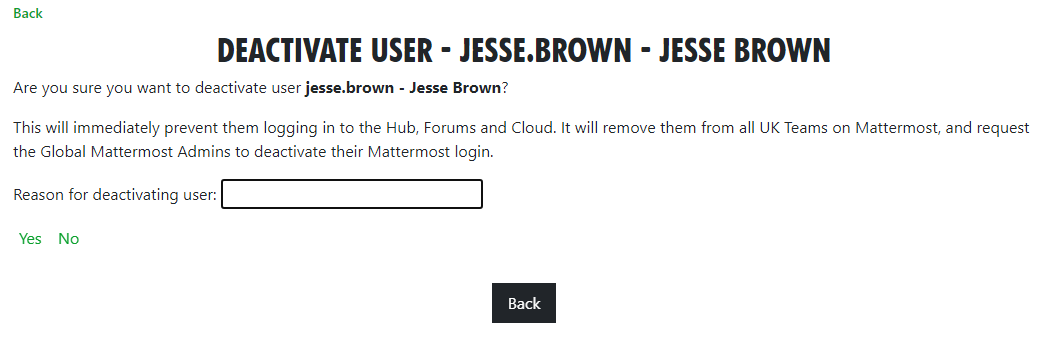 Enter the reason for deactivating the user, and click Yes.
The user will immediately be removed from all UK private teams on Mattermost, and their accounts on the Hub, Forums and Cloud will be deactivated. A message will also be sent to the global Mattermost admins asking then to deactivate the Mattermost account.
If the user has a vault account for the same email address as they currently have on the Hub, it will also be deactivated.
Reactivating an account
Do not reactivate the account of someone you do not know personally.
And, of course, make sure :
- They really have been released, and have all their devices back
- Their email address has not been compromised
If in any doubt, do not reactivate until their email address on the Hub and all other services has been changed to a new, uncompromised address. To do that, obtain their current Mattermost password, and ask your regional Hub Admin, or request in the Hub Help Desk on Mattermost.
Follow the same steps as outlined above – where previously the link would have said Deactivate User, it should now say Reactivate User. Clicking this link will bring up the confirmation screen:

Click Yes to reactivate them. The user will immediately be rejoined to all their UK private teams on Mattermost, and their accounts on the Hub, Forums and Cloud will be reactivated. A message will also be sent to the global Mattermost admins asking then to reactivate the Mattermost account.
If they are a member of Mattermost channels which the Hub does not know about, their membership of those channels will not be restored automatically. They need to rejoin them "by hand", by asking people in the channel to join them again.
If the user has a vault account for the same email address as they currently have on the Hub, it will also be reactivated.
How to create and use Forms on the Hub
The Hub allows Group Admins to create forms for people to fill in, and then look at (and share) the results.
Creating a form
From your group's page on the Hub, click Forms in the Admin area.
You will see a list of forms that looks like this:
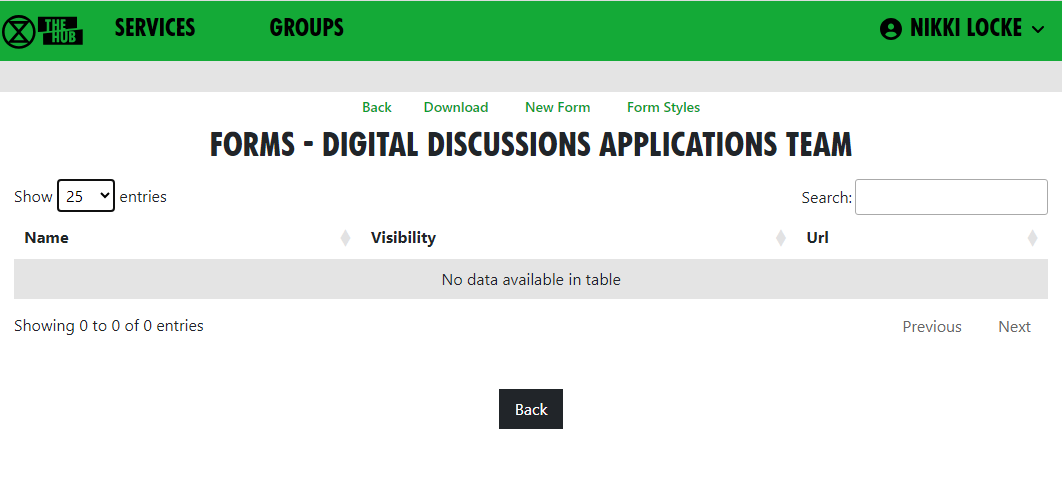
Click New Form to go to the form design page:
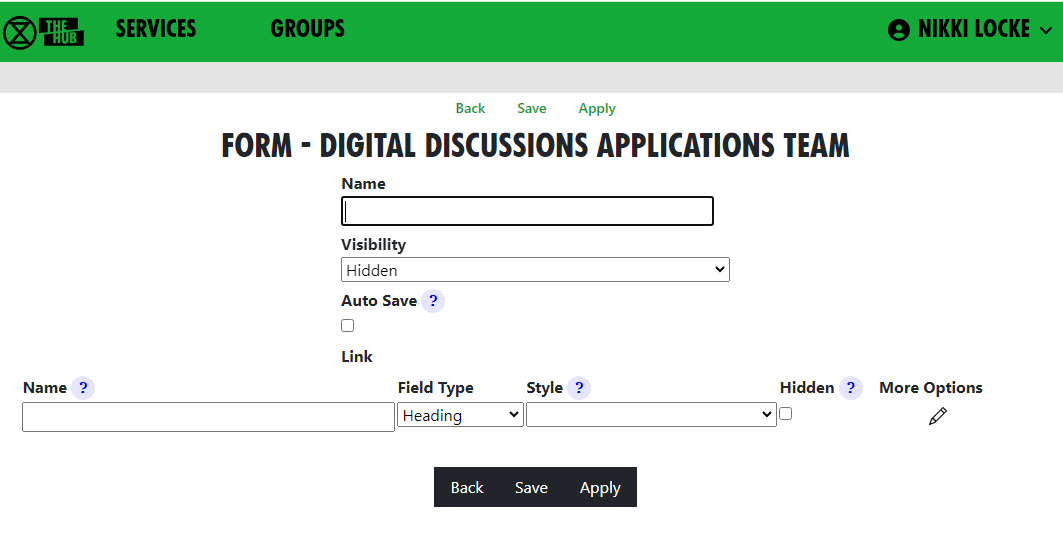
Give your form a name. All your group's forms must have different names.
You can decide who is allowed to fill in your form from the drop-down list

Normally the user has to click the Save option to save their data. If you tick the Auto Save tickbox, they won't have to do that - every time they eneter anything in a field in the form, the form will be saved.
Adding fields
Each field on the form has a (unique to that form) name. The name must have no spaces or punctuation. WeUseCamelCaseLikeThis to make field names with more than 1 word in them. (The Hub will remove spaces and CamelCase the name for you if you forget. Camel because of the humps!) Fields can be Headings (just to instruct or separate parts of your form), or any of the types below:
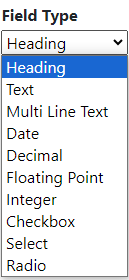
The field type determines what the user can enter in the field. If you change it later, data may appear to be lost - e.g. if you have a text field which someone enters "hello" in, and you change it to decimal, "hello" isn't a number, so it won't be displayed. But, if you change it back again, the data will reappear.
By default the prompt for the field will be the name, Un Camel Cased - e.g. the name PreferredPronoun would be prompted Preferred Pronoun). The name is important, because any data entered into the field by users is stored against that name. If you change the name, any stored data for the original name will be lost.
Each time you start entering a new field, another space to enter the next new one will appear.
If you want to reorder the fields, use the drag handle  on the right. If you want to remove a field, click the red
  .
.
Here is an example form:
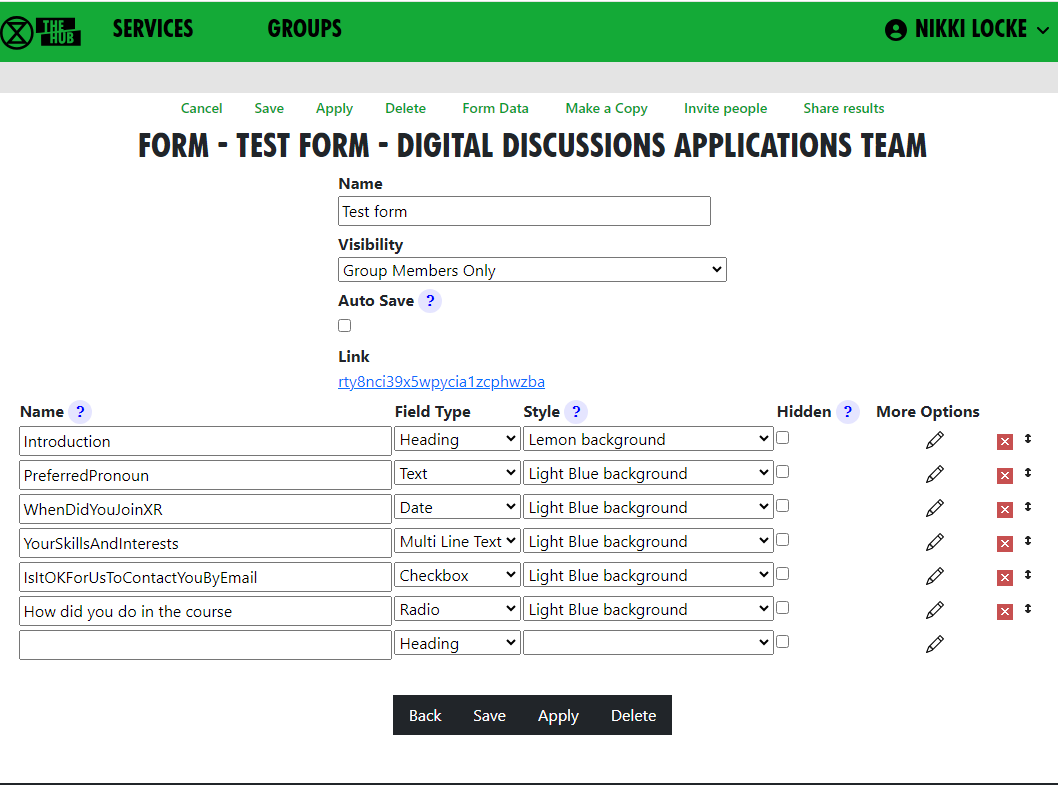
When people are filling it in, it looks like this:
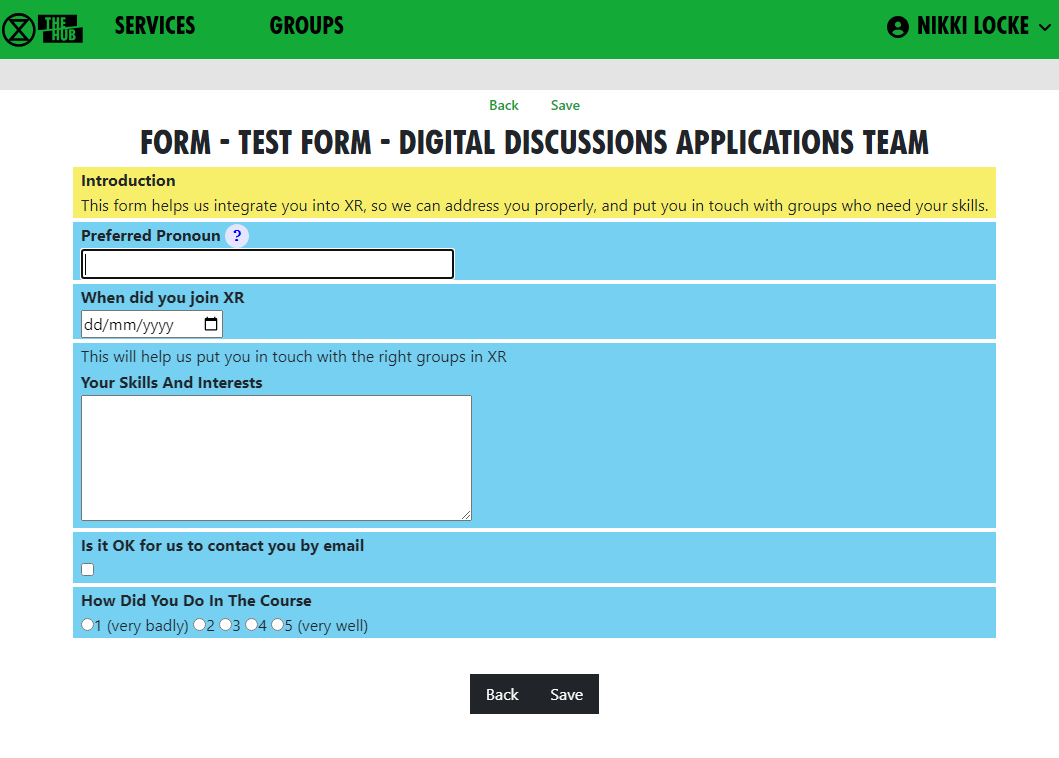
As you can see, there are issues with the camel casing when there is more than one capital letter together. And the form is very boring to look at. We can fix that, though.
Changing the styles of fields
Each field has a Style dropdown. A number of standard styles are provided (taken from the XR Style Guide). You can add your own styles if you know CSS - there is a Form Styles option on the main Forms list (see above).
There are more options you can add to fields - click the edit pencil  next to the field to see them:
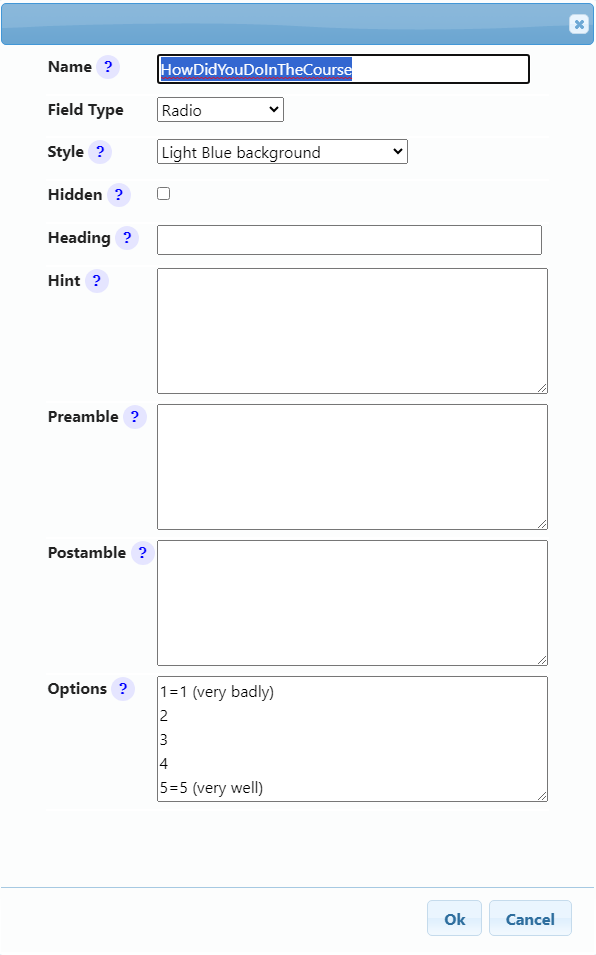
Here we have given the HowDidYouDoInTheCourse field a light blue background.
The Heading field lets you change the prompt for the field (so it isn't UnCamelCased from the field name) - a good way of fixing names with two or more capitals together, and also a way of changing the prompt but keeping the data people have already entered.
The Hint field shows a standard Hub pop-up hint question mark - if the user clicks on it, the hint pops up.
The Preamble appears above the field. You can use Markdown formatting here, just like Mattermost.
The Postamble appears below the field.
Options appears only for Select and Radio fields. It must be filled in to contain the options the user can choose from. You can see from the example above how these options appear on the screen - each line in the options box appears as a radio button the user can select (or an item in the dropdown for a Select field). If a line has = in it, the user sees the text to the right of the equals, but the form data shows the text to the left of the =. So, in this example, if the user selects "1 (very badly)", what gets stored in the field data is "1".
A lot of forms contain Yes/No questions. There are two good ways to do those
- Make a Checkbox field.
- Make a Radio field, with options Yes and No - if the user clicks Yes, Yes is stored in the field; if they click No, No is stored; and if they don't click either, the data will be blank.
You will notice that, as well as the usual Save button in the form editor, there is an Apply button. This saves the changes, but leaves the form editor open.
When I am tweaking the design of forms, I usually open the form editor in one tab, make the form visible to group members,and click Apply. Then I open the form to enter data in another window, so I can see what it looks like. I can switch back to the edit tab, alter stuff, and click Apply. Then I switch to the form entry tab and refresh it (F5 usually works) to see what the changes look like.
Inviting people to fill in a form
There are three ways of inviting people to fill in a form:
Inviting individuals
Once the form is saved, click "Invite people" when editing a form to ask people to fill in the form. You can also do this from the Forms tab in your group page. The invite screen is a bit like the form to invite people to your group:
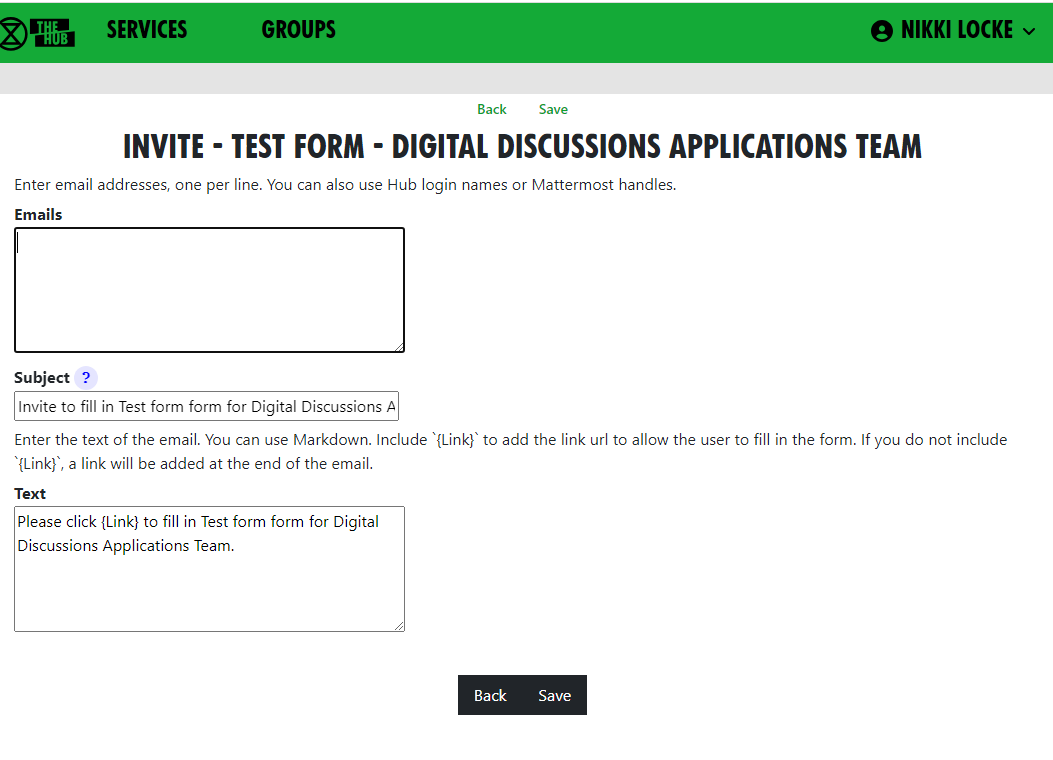
Fill in email addresses, login names, or Mattermost handles, one per line.
If you want to customise the email that is sent, change the text - but make sure you leave {Link} in the text - this will be replaced with a url for the user to click on to fill in the form.
When you click save, each person will be sent their own, personal link to fill in the form.
Making a generic invite anyone can use
When you are editing a form (or viewing the form in the list of forms), there is a link field. This is a link to the generic form invite. Right click it (long press on a touch screen) and copy the link.
You can publish this link, and anyone who clicks on it is taken to the Hub. If they are logged in (and have permission to enter data to the form - see Visibility above), they are taken to the form, ready to enter data. If they are not logged in (and the form is visible to the public), they are asked for their name and email address, and a link is emailed to them. (This two-stage process ensures that the person filling in the form is really the person with that email address.)
People on the Hub can fill in the form from your Hub Group page
If you have forms that are visible, they will appear in the Forms tab on your group's Hub page:

If a form is for group members only, it will only appear if the person is a group member. They can click on the green link to enter their data into the form (or go back and change it later).
Group Admins can see the other icons -  to add a new form,
  to edit it,
  to see the data and
  to invite people.
Looking at the data
When editing a form, the Form Data option shows you the form data. You can also do this from the Forms tab in your group page. You will see the field headings across the top, and one row for each person who has filled in the form. Group Admins can click on any row to see the data (and even change or delete it). The data is searchable, and you can sort by clicking on the column headings. You can also download the data using the Download button - maybe to add it to a spreadsheet or other package, to further analyse it.
Sharing the data with others
By default, only Group Admins can see the data. But, using the Share results option in the data or form screens, you can share the form data with any role on the Hub. This might be a role in your team that uses the data (so you don't have to make them Group Admin to let them see it), or a role in a different hub group (where the data needs to be shared with another group).
If you share the data with a role, anyone in that role can go to your group page, look in the Forms tab, and they will see the data icon against the form name, and can click on it to see the data in that form.
Behaviour and Good Practice
General responsibilities of Group Admins
- Group Admins have a responsibility to make sure that the Hub and communcation platforms are being used correctly and responsibly by members of their Hub Group. This document describes some 'best practices' that you may find helpful.
The Hub
- You should use the Hub to invite new people to your group. This is because an invite to the Hub sets people up correctly on all the new services.
- Your Hub Group Internal Coordinator should confirm the invitation before it is sent. This ensures that the new member is known to the Group and is, therefore, qualified to be invited.
- You can also invite people to individual services, but you have to do all the work the Hub would have done yourself (inviting people to the right Teams, Channels and Forums, for example), so it is much easier just to invite people via the Hub.
Mattermost
- Remind users to adjust their Notification Settings so that they receive appropriate warning of posts addressed to them personally, or the channels they belong to.
- Advise users when and when not to use
@alland@channel - Consider mild warnings against duplicating the same post in multiple channels. Set up
Broadcast Onlychannels for users to avoid this practice. - Prompt users to make full use of the Reply function to link answers to specific posts.
- Recommend switching to Forums for longer-form conversations and remind users to link from the channel to any associated Forum Topic.
UK Forums
- Encourage use of Forums by using them yourself and linking to Topics that will generate user interaction.
- Be supportive of Forum use by adding replies and likes to your user's posts. This will encourage them to contribute more to topics and feel more comfortable with the platform.
UK Cloud
- Although it's not in your mandate to manage your Hub Group's files and folders, maintain oversight of what is being saved on the Cloud. You may recommend how files are to be named - for ease of comprehension - and how folders are to be organised. This should lead to improved efficiency of storage and ease of retrieval for your Hub Group's users.
Discussion moderation
If you find any post that strays from the accepted guidelines, above, it's up to you to feed back your concerns directly with the originator of the post. If you do, then you should be sensitive with any language, but, as our regenerative statement says: "we have cultures of respect and listening, in which people deal with conflicts when they arise, feeding back quickly and talking about disagreements and issues without blaming and shaming."
If you find a post that needs moderation, reply directly to it and explain why you find it unacceptable and suggest, to the poster, a potentially more acceptable way of making their point, if that is possible. If the post requires removal, then remove it but you are strongly advised to leave an explanation of why you felt removal was necessary.
If you need extra support, please reach out to other admins via the Hub Group Admins Mattermost channel. In extremely difficult cases, you may want ot reach out to the Transformative Conflict team via their email: HealthyTeams@proton.me
Library (UK Cloud)
What is it?
The Library is a shared read-only area for all Rebels on UK Cloud. You can view and download documents, images, and other files from the Library but you do not upload material direct to the Library.
The Library is being gradually replaced by this Rebel Toolkit, but there are a few types of document that cannot be stored on the Rebel Toolkit, so they can go in the Library, and linked to from the relevant Rebel Toolkit page(s).
The Library contains folders for all XR UK groups who want them. There are also some common folders that cut across Working, Local, Regional groups.

How to find files in the Library
You will find the Library on your homepage on UK Cloud:
 \
\
In each folder in the Library there should be an About this folder.md text document containing details of what it contains.
Files will also be tagged and indexed and you can search for a file by tag.
Who looks after the Library?
Access to the library is controlled by the Digital Discussions Applications Team
How to set up a group folder in the Library
If your group has relatively static files that you want to share read-only with the entire movement then you need a folder in the Library on UK Cloud.
Everything in the Library is visible read-only to all Rebels with access to UK Cloud.
Groups can have a folder in the Library area which they can manage themselves - create any subfolders and files you want to share in there. The group library folder can either have full read-write access for all members of the group that owns it, or you might prefer to appoint a librarian(s) from the group to manage it on the group’s behalf.
To get a Library folder for your group simply request one by posting in the Library Reception on UK Forum - specify who will be managing it for the group (even if all members of your group have write access to it, it is a good idea to have one or two people who are mandated to curate it) and whether all members of the group will be able to create, update and delete files in there.
How do I add files to the Library?
Here is what the All Files home page looks like for a user who is a member of a local group (North Cornwall) which doesn't have its own Library shared area (it uses the Cornwall district one, covering all Cornwall Local Groups) and also of a Working Group (Operations Circle) which does have its own shared library folder:

This user can help manage the group's public library files (either she is
a Librarian for the group, or all the group members can manage their
public library files)
Many Groups will not actually need their own Library folder but can more usefully have their material published by a parent organisation. This would particularly apply to Local Working Groups who, if they are generating material of interest right across XRUK would be better served by having it posted in the National Working Group area.
This may also apply to Local Groups, who may be better using the Regional or District area in the Library rather than creating their own silo buried deep in an obscure corner of the Library.
Remember that the Library is intended for material of use to all XRUK members.
For files that are only of Local or Working Group interest then there is no need to use the Library - all members of the group will be able to use the group's private file area, and it is easy to share files (or even folders) with a few individuals outside the group by creating named share links to your private area.
What can I put in the Library?
You must NOT post anything in the Library which contains personal information (unless you have the express permission in electronic format from every individual identified for each specific publication). This includes names, email addresses, postcodes, phone numbers.
You must not use the Library to share non-XR documents (but you can share external links).
You must not use the Library to share potentially compromising details of action plans.
Be very careful when posting in your group's Library folder - only post material which your group has ownership of and responsibility for. Do NOT duplicate material that is elsewhere in the Library. If you wish to include files from another group in your Library area then save the URL of the target file in your Library folder - use the "Create Link" option on the [+] menu.
In general, for material that you want people to be able to view online without needing to edit, and that is not frequently changing (updates less than weekly) then it is preferred to save in PDF format. This allows easy online viewing on all devices without any special software and with a low overhead on the server.
Keep the master file in your group private file area and save a PDF copy to place in the Library.
For material that is rapidly changing, or that is a resource for others to download and use, then you may choose to save in office (docx, xlsx, pptx) or image (jpg, png) formats. In these cases it is recommended that you still keep a master version in your group private area and simply save a copy to the Library as and when it is updated.
If you wish to use other formats you can - but please be aware of accessibility issues. If you have files in a specialist format it may be more appropriate to keep them in your private file area and share links to the files from there with those who need or request access.
How to set up a Telegram-Mattermost link
We have a Matterbridge service, which enables you to link a Telegram channel or group to a Mattermost channel.
The purpose of this service is to reduce the number of communication tools you have to use.
Rebels who are comfortable with Mattermost can keep in touch with Telegram channels, without having to join the Telegram channel.
Likewise, rebels who do not want to use Mattermost, but want to stick with Telegram can do so, without being in a Telegram only silo.
The link can be one-way or two-way. For instance, the Rebellion Broadcast and Movement Broadcast channels are one-way, from Telegram to Mattermost, where only the Telegram channel members and admins can post to it. Mattermost readers of Telegram channel posts may reply on the Mattermost channel but these posts are not subsequently passed to the Telegram channel. (NOTE: Hub Admins can set a Mattermost channel to Broadcast Only, so people not in the Hub Group who own the channel have their posts removed every night.)
A group that has a thriving Telegram channel, with some people who do not want to use Mattermost, could set up a two-way Matterbridge link. This enables posts to be made and shared from either platform. Subsequently, members who do use Mattermost can leave the Telegram channel, whilst remaining in the overall conversation.
Prerequisites
It is very important that people in the existing channel or group know beforehand if you intend to set up a link to or from Mattermost. You should discuss:
- whether it is one-way or two-way
- why you are doing it, and
- who will get access?
This prior consultation and agreement on how the Matterbridge link will improve communications within the group will lead to a smoother introduction of the link.
How to get a link set up
Contact Tech Reception on Mattermost, and ask the admins to set up your bridge. They will need the information detailed below, but they can help you with getting your end set up if you find the following instructions difficult. For non-Mattermost users, please email: tech@rebellion.earth with your request and the info you need to supply.
What you need to do first
- Carefully consider security - if you link a private Mattermost channel to a Telegram channel, then the content is available to anyone who can get into the Telegram channel.
- Get the Telegram channel or group administrator to join user "XRUKMatterbridge_bot" (our bot) to the Telegram channel or group- see instructions below.
If it's a channel rather than a group, set the bot as Administrator - most of the admin permissions can be turned off - a Telegram->Mattermost link only needs to be able to read messages; a two-way link also needs to post messages. (NOTE: see section below for more detail). - Notify the Tech Reception or email tech@rebellion.earth that you have added the bot to your Telegram channel, and request them to set up the Matterbridge link. Include the Telegram channel or group name, the Mattermost Team and the Mattermost Channel.
How to add a bot to a channel on Telegram:
Desktop:
- Open the desktop app
- Go into the channel
- ... menu, Manage Channel
- Click Administrators
- Click Add Administrator
- Type the name of the bot ("XRUKMatterbridge_bot")
- Click on it to add
- Click OK to add it
- Turn off all the permissions (or allow posts if you want a two-way link)
- Click Save
It works the same on a phone:
- Open the app
- Go into the channel
- Tap on the title bar
- Tap administrators
- Tap Add Admin
- Tap the search icon
- Type the bot name ("XRUKMatterbridge_bot")
- Pick it from the list
- Turn off all the rights (or allow posts if you want a two-way link)
- Tap the tick at the top
Placeholder Hub Groups
Placeholder Groups represent groups who do not use the Hub, so that they appear in the Hub Circles diagram and can store their public-facing contact information.
Creating a Placeholder Group
Only people with Group Admin of All Groups permission (or above) can create Placeholder Groups. This includes regional Hub Admins.
To create a Placeholder Group, go to the parent of the group (usually a Region, or maybe a District), and click New Child Placeholder Group.

Enter the name and short name, and select the group type (usually Local Group).
Editing a Placeholder Group

Open the More Info/Contact Info dropdown, and click the edit pencil to add contact information.
What to do if the group wants to come on the Hub
If the group wants to come on the Hub, look for its trained Group Admin and then invite them to be Group Admin of the group. Then, when they look at the group on the Hub, they will then see the Add to Hub services button on the screen above.
If they don't have a trained Group Admin, you will have to find out what they need on the Hub, and do it yourself – but they will need a trained Group Admin at some point, so the first option is preferred.
When the Add to Hub services button is clicked, this screen appears:
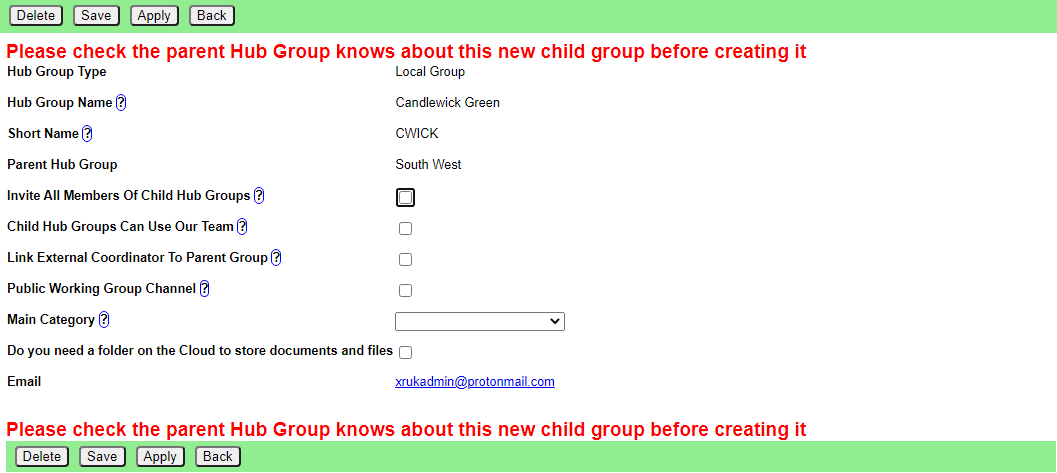
This is similar to the New Group Screen, but with fewer options, and all on one page.
Once it is filled in correctly, clicking Save should create the group on the services right away.
Hub Admin Guides
This chapter is only relevant for people with the role of Hub Admin.
Intro to the Hub Admin Role
OK - so you'd like to be a Hub Admin - great! It's a very rewarding role - you get to help in a variety of areas of Hub activity and reach out and support all members. This will often include Group Admins who may need support with some functions which they cannot access. As you will see, from reading the Using the Hub Admin Interface, the range of Hub Admin functions is quite extensive. In fact, some functions require great care, particularly those which affect the relationships between teams, and the authority they have, in line with the SOS - and Hub Admins need to be aware of the implications of their actions, before carrying them out, to avoid data loss and other "side effects".
So, let's look at where Hub Admins are generally required:
-
Supporting a Group Admin and Hub Group Coordinators with their Local Group or Working Group, etc. Setting and editing Link Roles, for example, where the Group Admin needs access to another Hub Group. You will, of course, be checking who is asking for a change, and making sure they have the necessary authority, before doing it.
-
If the Hub Admin has responsibilty for a Region or Nation, then they may be called to make changes to structure that impacts Regional Working Groups as well as coordinating groups, like Anchor Circle, etc. It's important that the Hub Admin maintains a close working relationship with the coordinators wishing to make such changes to ensure SOS principles are observed.
-
The Hub Admin may be asked to assist in inviting new members to the Region or Nation's Local Groups - this is the case when The Hub Admin has Gardener Accountabilities. When introducing new members to Local Groups, it is vital that the Group Admin and Coordinators of the Local Group are fully aware of the situation, so that the new rebel enjoys as positive an integration as possible.
-
Of course it may be that the new rebel's preferred Local Group is inactive - i.e. has no Group Admin or Coordinators. It's unlikely that simply joining them to that Local Group will be beneficial. Better to discuss integration at a Regional / National level, which will involve those Group Admins and Coordinators, together with an Integrator, if there's one available.
-
Lastly, issues can be discussed with other Hub Admins, via the Mattermost Hub Admin Channel, to which you will be automatically invited when you become a Hub Admin.
Good Luck and Thank You for joining the Hub Admins team!!
Using the Hub Admin Interface
Introduction
To access the Hub - type https://hub.extinctionrebellion.uk/ into your browser address bar. This brings you here:
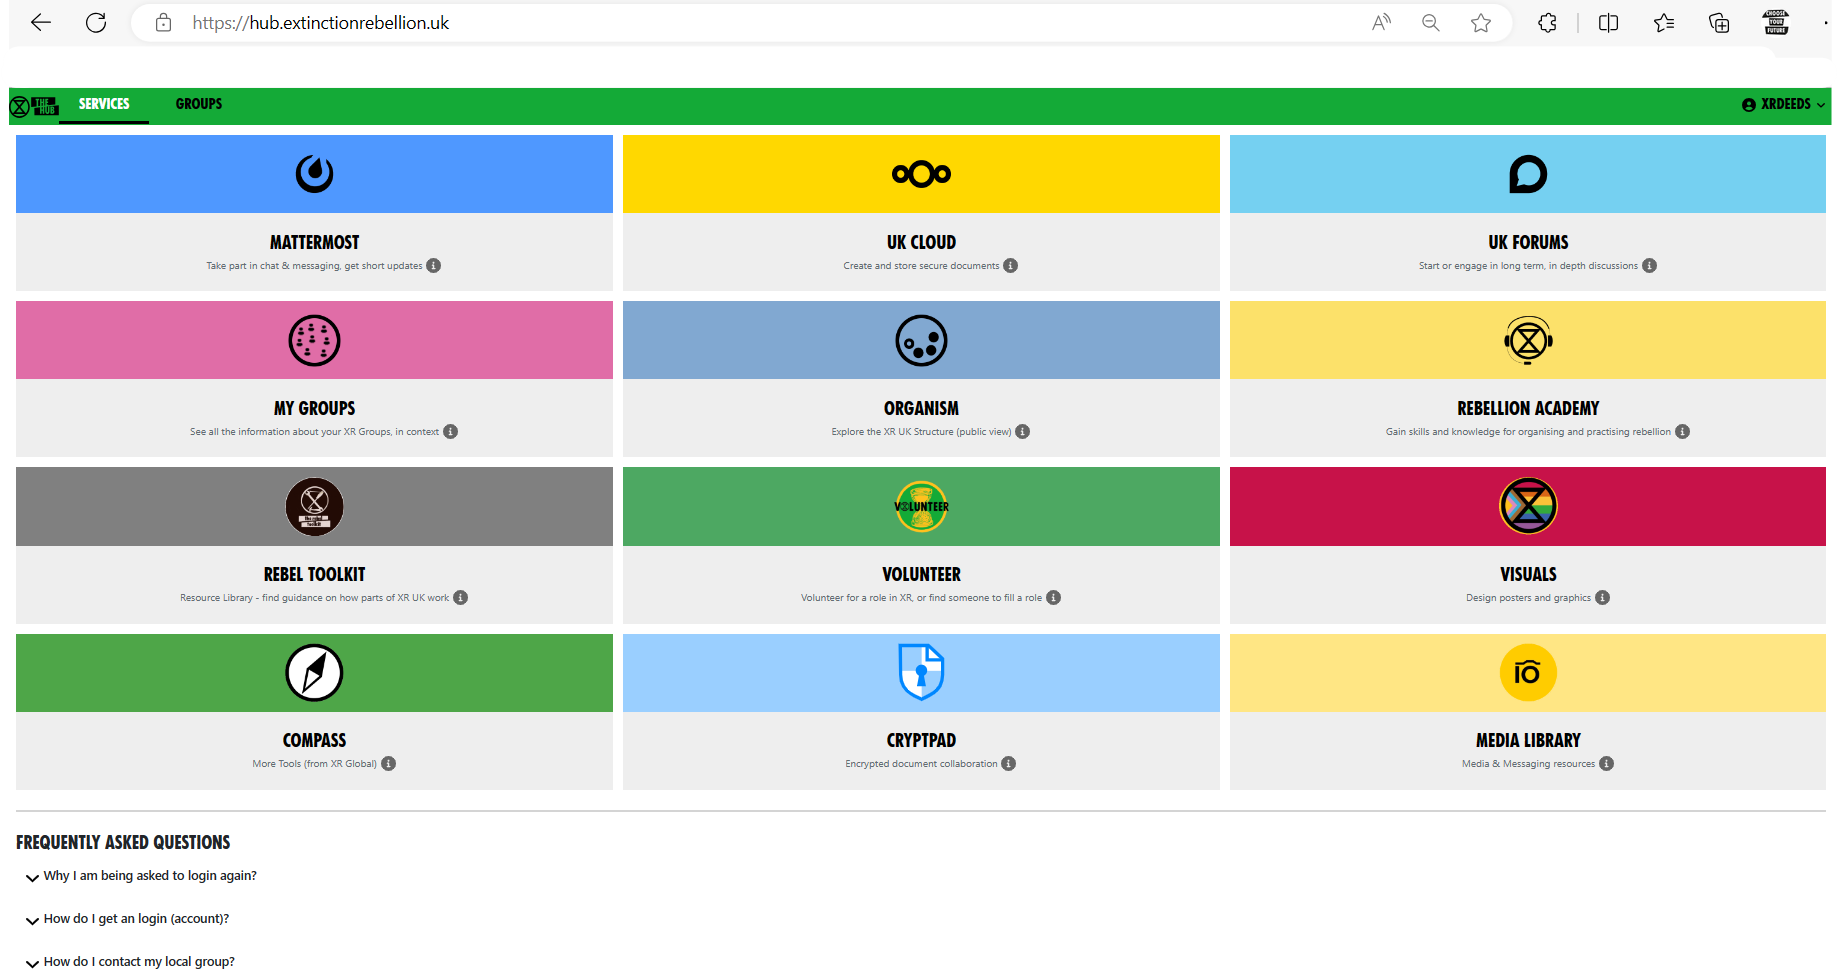
The Hub's Purpose
- To invite people to their new services, and set up a user's logins on these platforms, i.e. on Mattermost, UK Forum and UK Cloud. Once a rebel has an account, this gives them the ability to use the 'Login Using the UK Hub' button to login once only to get on, e.g.: Rebellion Academy, Rebel Toolkit, UK Forums, UK Cloud and so on.
- To set up Hub Groups associated with their new services. The Hub allows us to ensure all the complex permissions, etc., are set correctly. We can also ensure that people invited on are joined to the right things.
- As a 'rolodex' database of users, and what Hub Groups they are in. this means we can find out a contact for a group about which we know nothing. NB Some users may keep contact details private and access to data may be restricted.
To achieve its purpose, the Hub has a database of users, and their connections to Hub Groups & to the other services. A background task tries to keep the database in sync with the services, so every Team and Channel on Mattermost, every Group and Category on UK Forums, and every Group on Nextcloud has a database record in the Hub. Every user has a Login record which keeps track of their identity on each service, and a series of PersonIn<something> records which links their Login Record to each Team/Group/Whatever database record.
When someone accepts an invite, or logs in, a batch job runs in the Hub web server which joins them to everything they should be joined to on the other services.
When an admin creates a new Hub Group, a batch job runs to create the necessary stuff on the services.
Batch jobs show a progress bar on the web page while they are running.
In addition, there is a background job which periodically checks everything has been transferred correctly, picks up new channels, etc., which have been created on the services, and makes sure everyone is joined to the right things, and has the right permissions.
Your responsibilities
As a Hub Admin, you have the power to help people and groups who are having difficulties. Please use this power carefully, and lightly. Do not interfere in any way with anything belonging to a Hub Group without proper authorisation from the Hub Group's Coordinators. Do not move Hub Groups around, or link them, unless you have received proper authorisation from both the Hub Group's Coordinators, and the Coordinators of its existing parent and those of its proposed new parent.
The usual way to ask a group for authorisation is to post in their public Reception channel on Mattermost. If this is not possible, or there is no reply, written permission from a coordinator or group admin will do. If they have all stepped back, then you can consult the parent team instead.
To invite a person to the Hub
Admin/Create invites
This is usually done by Group Admins, from the XR Group display but there is a Hub Admin version here.
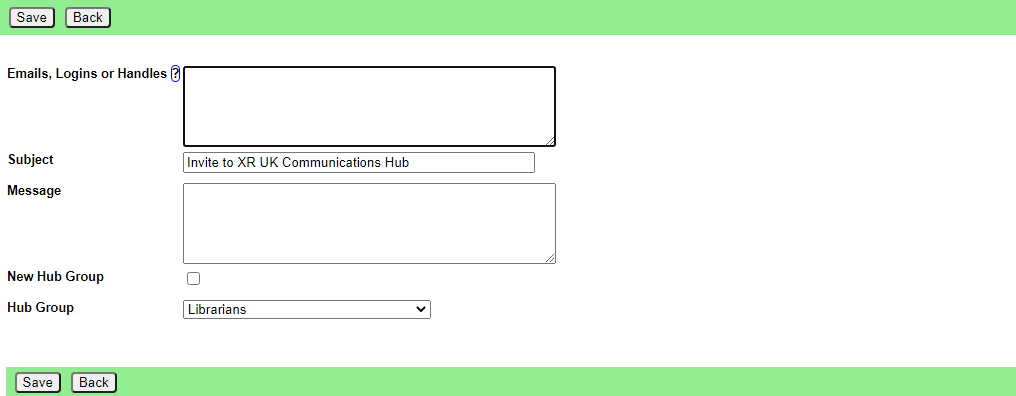
You can put a list of emails in the Emails box (1 per line), change the subject, add explanatory text, set the access level, and choose the Hub Group the user will be joined to.
Clicking Save will send invite emails to all the emails listed. Invites expire after 14 days (or whatever is set in Admin/Settings).
You don't have to fill in the message box unless you want to personalise the invites. The standard message will include your name and handles.
To check invites outstanding, or resend an invite
Admin/List Invites
This lists all the invites on the system (Group Admins will only see their own invites, Hub Admin sees all). Use the search box to find the one you want. Click on it to edit it. Check Resend Now to get the mail system to resend it when you click Save. The Password Reset checkbox tells you if it is a password reset invite the user has asked for. The Copy button copies the invite url to the clipboard, so you can paste it into another communications channel (e.g. if the user did not get the email).
To find a user
Admin/Lookup Users
Type in a search string and press Save. You will see a list of users whose login, name, email or mattermost handle contain that string. You can click on a user's email address to send an email, or on their Mattermost handle to send a DM.
Or click anywhere else to see a list of the Hub Groups they are in, and their roles in each group.
From that screen:
The Deactivate (or Reactivate) button is for use when a person loses their phone or other device they use to access our services (e.g. if they get arrested).
The Impersonate button makes you that user, and sends you to the home screen, logged in as them (useful for seeing the screen the way they do). Do not impersonate people for any other reason.
The Join Hub Group button lets you join a person to another group. You should only do this with the user's express permission - it is better to send them an invite.
Admin/Users
This lists all the users who have accepted an invite. Not recommended, as loading all that data takes a long time.
The Search box at the top right locates people by any of the fields. Click on a user to see details. Note that this list contains only details of the user's Hub login, name and email. If they have different logins on other services, and you don't know their email address, only their login on another service, you might be better searching in Maintenance/Logins.
Edit User screen

You can change anything here. The edit pencil next to Login and Email Address allow you to change those on all the services, but you will need the user's Mattermost Password to change things on Mattermost. The user has access to a similar screen under Admin/My Settings.
- Password You can reset a user's password to anything, by typing in Password and Repeat Password and clicking Save.
-
Access Level should be
- None - Please do not set Access Level to None
- User - ordinary user. Can change their own details, but not others. Cannot invite people.
- Group Admin - of one or more Hub Groups. Can invite people to those Hub Groups. Given trust level 3 in UK Forums.
- Creator - a creator can create Hub Groups without Hub Admin intervention
- All Groups Admin - has Group Admin rights to every Hub Group
- Admin - Can do anything.
- "Trusted in Discourse" (UK Forums) is a tickbox to say a Group Admin's permissions have been set in UK Forums. If they are wrong, it is worth resetting this tickbox.
The Hub Groups button shows you what Hub Groups the user is in, see below.
The Deactivate (or Reactivate) button is for use when a person loses their phone or other device they use to access our services (e.g. if they get arrested).
The Impersonate button makes you that user, and sends you to the home screen, logged in as them (useful for seeing the screen the way they do). Do not impersonate people for any other reason.
You can delete a user here - do not delete users without their permission or other authority (e.g. if there has been a conflict resolution process agreeing to expel the user from XR). There are two delete buttons - both will delete the user from the Hub, Forums and Cloud. The Delete From Mattermost Too button will also send a message to the Mattermost admins asking them to delete the user from Mattermost. This can take a day or two to be done.
Hub Groups a user is in screen
Clicking on one of the Hub Groups currently takes you to the Edit Hub Group screen, but this may change.
You can add the user to more Hub Groups using the Join Hub Group button. Please do not do this except with the express permission of the person concerned, and the Hub Group you are joining them to.
To find or update a Hub Group
Maintenance/Hub Groups
This screen lists all the existing Hub Groups. Use the search box to find the one you want. Click on it to edit. There is a New Hub Group button to create a new Hub Group from scratch - do not do this.
Edit Hub Group screen
There are two Edit Hub Group screens - the one the Group Admins have access to, and the Admin Edit screen (available from a button on the first Hub Group Edit screen). This describes the Admin Edit functionality.
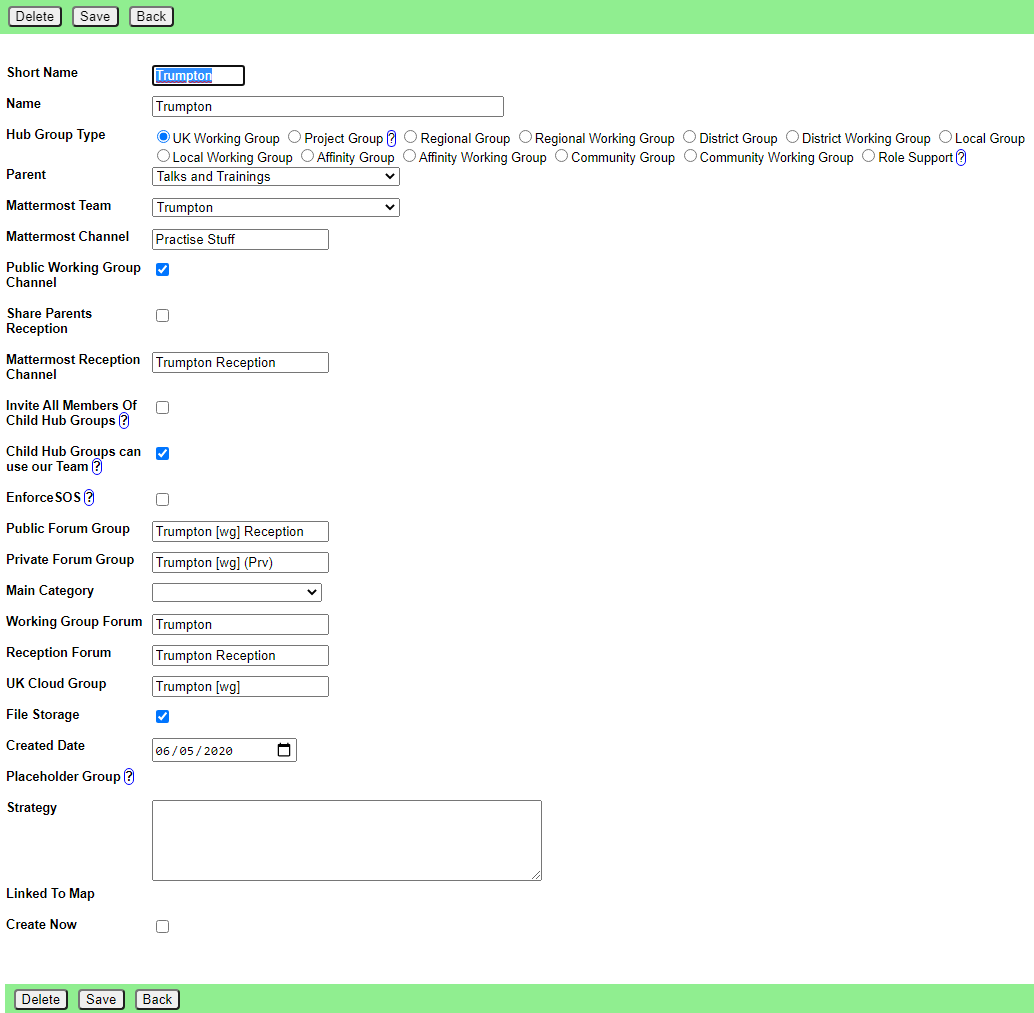
Be careful in this screen - changing any of the auto-complete boxes (e.g. team, channel, forum, group names) does not rename the thing - it links the Hub Group to the newly selected thing (creating it if it doesn't already exist). If you want to rename something, use the ordinary Group Admin's Edit Hub Group screen.
You can change any of the fields. If you check the Update Now box, the system will attempt to update the Hub Group on all the services when you click Save. Most of the text boxes are auto-complete, and will offer you existing records as you type. If you want to create a new item, just type a new name - you will get a confirmation box when you leave the field.
When you complete this screen, existing users who are members of this Hub Group will get their memberships of Teams, Channels, Groups, etc. updated.
Note that this screen is more flexible than the Edit Hub Group screen that the Group Admins (Tech Champions) fill in, allowing you to do some customisation which doesn't adhere to the standard guidelines (e.g. not give a group a Reception, put a group in a team which is not their parent's, etc.). Use these powers sparingly and wisely!
For existing Hub Groups, there is a Users button, see below.
Note the Linked to Map tickbox shows whether or not this group has a pin on the XR UK regions map linked back to this group.
You can change existing Hub Groups in this screen, but be aware that major changes like changing the Team will leave the old channels in the old team, as there is no way to move channels to a different team. There are other, similar limitations in UK Forums and Nextcloud, and the only way to tidy them up is by hand, in the individual tools.
Adding additional contact info to a Hub group
Group Admins can add additional contact info to a Hub group so that users can stay connected with your group, including a "Public Contact Email", Facebook Groups, Twitter accounts, etc. Most of the information is public (published to anyone on the Internet), but if people want to keep information (like Signal, Telegram or WhatsApp channels) to Hub members only, they should add it in External Contact Info (at the bottom of the edit screen).
To add this contact information, select the group you are looking to add contact info to and click Edit Contact Info to bring up the editing screen. You can add public contact details on this screen.
Every Hub Group (including local groups) that doesn't check Mattermost regularly should also add external contact info to their Group Info/Contact tab on the Hub. This is so that people on the Hub can contact the group. In the box at the bottom of the page (External Contact Info), you can add contact info such as WhatsApp and Signal details.
Note on changing Parent
Please be aware that changing a Hub Group's Parent mave have unforeseen consequences, like loss of user access to channels/forums/cloud files and joining users to other Hub Groups without invitation. Do not change Parent until you have fully determined the effects of the change and discussed these with the Coordinators of both the existing and proposed Hub Group Parent, together with the members and Coordinators of the Hub Group in question.
Note on changing the default channels
The main Reception channel, and the main private channel can be changed. Just start typing the replacement channel name.
If it is an existing channel, a drop down box will appear - select the correct channel. If it is a new channel, when you move off the field you will be asked to confirm you want to create a new channel.
Note on changing the Team of a Hub Group
If you want to change the Team of a Hub Group (I'm assuming it was in the UK Team, and you want to give it its own Team), the new Team has to exist already - only @xradmin and @xradmin2 can create new Teams. Go into the Hub Group, and select the new team. Tick the box to Create Now and Save it. This will connect to the new Team, and create the private channel in the new team. To finally tidy up, you may want to find the old channel in Maintenance/Channels, and delete it.
Note on changing whether forums are public or private
You can do this in UK Forums (as Discourse Admin). Find the forum you want to change, Edit it, choose the Security tab, edit permissions. Remove the public (or private) group from the list by clicking the x, and add the private (or public) group instead. Click Save. Job done.
To change the name of a Hub Group after it's been created
You can do this in the Group Admins version of the Edit Hub Group screen - it will also help you by suggesting new names for channels and forums.
Enforce SOS
This tickbox can be ticked to force all new working groups which are descendants of this group to have a Purpose filled in. "Working Groups" in this instance means all Hub Group Types which have Mandate set to "Must Have Mandate".
The intention is that top level groups (e.g. UK Rebel Hive) which subscribe to the Constitution (or, at least, that part which covers SOS) should tick this to enforce mandates on all their working groups.
There is no need to set this if an ancestor of the group already has it set - SOS will already be enforced.
See also XR Groups/Groups With No Mandate below for finding out which groups should have a mandate, and don't.
Users in Hub Group screen
Lists the Users in the Hub Group, and whether they are a Group Admin of that particular Hub Group (you can be a Group Admin on the hub, and of some Hub Groups but not others).
Click on a user to change whether they are Group Admin or not.
To change whether a user is Group Admin of a Hub Group
See Users in Hub Group screen above.
To create a new Hub Group
You can use the ordinary Group Admin Create Child Group option to do this.
Role Support Group Auto Join facilities
You can create Role Support Groups as children of UK Working Groups or Regional/National Groups.
New button on the XR Groups page
For Hub Admins Only a new "Auto Join Roles" appears in the XR Groups display for these groups. It takes you to a screen like this:
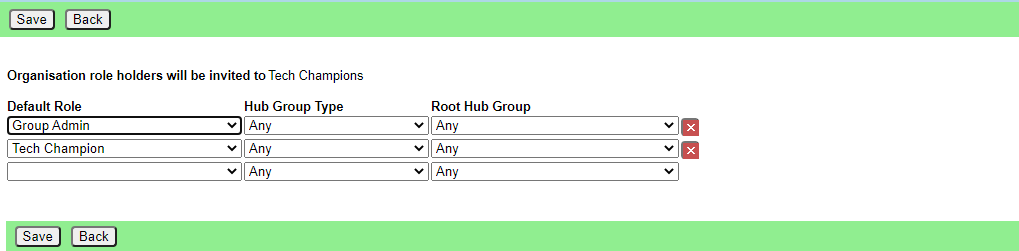 This is the list of roles (or group admin permissions) that are auto invited to this group.
The three selection fields are:
- The role (or Group Admin permission) that a person must hold to be invited.
- The type of Hub Group that the role must be in for the person to be invited.
- The root Hub Group. The person must be in this Hub Group, or one of its descendants to be invited.
So, in the screenshot, all Group Admins (Tech Champions) in Cymru Wales or any of its working groups, districts, local groups, etc. will be sent an invite to "Cymru Tech Champions".
To help Hub Admins work out who will be invited to what, there are buttons on the following displays:
| Display | Button | Purpose |
|---|---|---|
| Group Display | List People Auto Joined | Shows everyone with a role on this Hub Group that causes them to be auto invited to another Hub Group |
| Auto Join Roles | List People | Shows everyone invited to this Hub Group because they are in a role in another one |
| Role Display | List People Auto Joined | Shows who is in this role, and what Hub Groups they will be invited to because of it |
| Member Display | List Auto Joins | Shows all the auto join roles this person holds, and what Hub Groups they are invited to as a result |
How it works
When someone does one of the following things:
- Edits the Auto Join Roles screen
- Edits the people in a role
- Edits the roles a person is in (+)
- Deletes a role
- Steps a person back from a role (+)
- Creates a Hub Group
- Deletes a Hub Group
- Admin edits a Hub Group
- Removes someone from a Hub Group (+)
When saving the change, the Hub makes a list of all the people who would be invited to a role support type Hub Group using the settings before the change, then makes the change, then makes a list of all the people who would be invited after the change.
Then it invites all the people who are in the after list but not the before list, and removes all the people who are in the before list but not the after.
Note that the actual removals are first listed in a screen with tickboxes against each one, so the person making the change has a chance to untick people they do not want to be removed. Note also that people who are in a role in the group support Hub Group are not shown in this list, or removed automatically.
(+) The removal screen is simpler in these cases, because only a single person is affected, so it just shows a list of Hub Groups the person will be removed from. In the other cases, it has to show both person and Hub Group, as there is no reason why the same person might not be joined to two or more Hub Groups - e.g. all the Cymru Tech Champions will be joined to the UK level Tech Champions Hub Group, as well as the Cymru one.
Here is the simple screen:
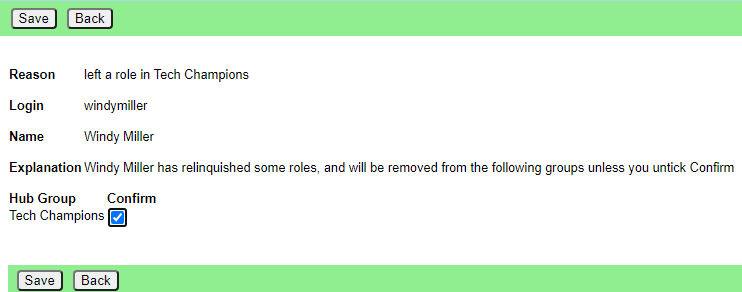
And the more complicated one:
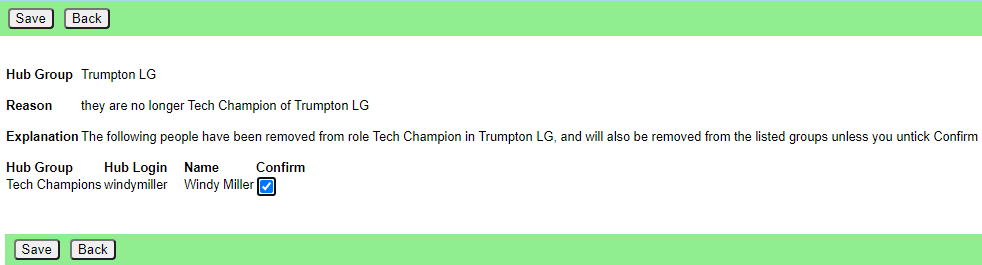 Please click Save in this screen to carry out the removals. If you think a person should not be removed, first untick the corresponding Confirm box.
Maintenance/Hub Group Forms
This lists all the current Hub Group forms Group Admins (Tech Champions) have filled in. By default, it only lists the forms where people have ticked the "Tick Here When Complete" box. You can see all the forms, including incomplete ones, by clicking "Show all" above the list.
Click on one to edit it. Check it makes sense from your knowledge of the Hub Group, and check back with the Group Admin (Tech Champion) if there is anything you think they have not understood, or if you don't understand why they have asked for something (or not asked for something).
If you make changes, click the Apply button to save the changes before proceeding.
There is a Create Hub Group button. This will pre-fill an Edit Hub Group screen with the information from the form (and invisibly attach extra information which is on this form). You can make any final custom changes there, and click Save on that form to actually create everything on the new services, and make the original Group Admin (Tech Champion) the Group Admin of the new Hub Group.
Admin/Batch Jobs
Lists running batch jobs. Not really needed, comes with the framework.
Admin/Web Logs
This lets you see the web server log file for today. To see a different day, use the Yesterday and Tomorrow buttons, or edit the url to add ?date=yyyy-mm-dd. Can be useful to see what went wrong if a user forgets what the error message said!
Admin/Job Logs
This lets you see the background job log file for today. To see a different day, use the Yesterday and Tomorrow buttons, or edit the url to add ?date=yyyy-mm-dd.
Admin/Search Logs
Allows you to search the log files (either Web or Job) back a specified number of days, and shows you the found lines, with a link to click on to go to that day.
Admin/Server Stats
Shows you performance stats for the server. There is a separate link for each day which takes you to a screen where you can view graphs of various server statistics (e.g. how busy the disk is, how much memory is in use, etc.)
Admin/My Settings
Everyone gets this -- change your name, role and how often you get error emails.
Admin/Matterbridge
This lists all the Telegram channels/groups the Hub knows about, and what Mattermost channels they are linked to.
If the channel you want to link to does not appear, but you know the Telegram channel id, you can use the New Channel button to add it - but this should not be necessary if someone has added the bot to the channel, as the Hub should pick it up automatically.
Click on an item to change it. Please don't mess with other people's bridges without authorisation!
Maintenance/Logins
Shows all the Login records. Each email address that has used the hub, or that has contributed to something transferred from Basecamp, will have an entry here. Login shows their login in the hub (if they have one - they may be a Basecamp user that hasn't accepted an invite). Mattermost, UK Forums and UK Cloud show their login names on each of those services. Click on one for the Edit Login screen.
Edit Login screen
This shows the user's login information for the services (a tick means they have a login). It also shows their Team, Channel and Group memberships. The Transferred checkbox indicates whether these have been update on the corresponding service - if you untick it, the background job will try to join them again. The Delete checkbox will delete that membership on the Hub (only - does not affect the services). None of these are actioned until you click Save.
Ticking the Update Now checkbox will attempt update their tool accounts right away when you click Save.
You can only delete Logins if the Login does not correspond to a User, and there is something wrong with it. If you want to delete a user, you need to do that in the Edit User screen. There is a User button above this Login screen which will take you there.
Maintenance/Sessions
This shows who has active login cookies. Mostly for xrukadmin to see if it is safe to shut down the server.
Maintenance/Teams
Shows the Mattermost Team records on the local database. Public Teams that have nothing to do with XR UK will appear here too. The Checked column indicates when the Team was last found on Mattermost. An old date may indicate that the team has been deleted from Mattermost. If so, after double checking on Mattermost, you may want to click on it, then delete it. Note that if the team is in use by something, you won't be allowed to delete it -- you need to read the message, go and find where it is used, and fix that first.
You can click on one to edit it (not recommended - you can break the connection between it and the service if you are not careful).
Maintenance/Channels
Shows the Mattermost Channel records on the local database. Public Channels that have nothing to do with XR UK will appear here too. The Checked column indicates when the Team was last found on Mattermost. An old date may indicate that the channel has been deleted from Mattermost. If so, after double checking on Mattermost, you may want to click on it, then delete it. Note that if the channel is in use by something, you won't be allowed to delete it -- you need to read the message, go and find where it is used, and fix that first.
The main Reception channel, and the main private channel belonging to each group cannot be deleted. If you want to change which channel is the main private channel, you can do that in Edit Hub Group/Admin Edit.
You can click on one to edit it (not recommended - you can break the connection between it and the service if you are not careful).
To make a channel Broadcast Only, or join a whole Team to it
In Maintenance/Channels, Hub Admins see an extra button Edit Broadcast Settings, which takes you to this screen:
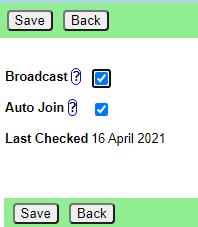
Tick the Broadcast button if you only want members of the group that owns the channel to post to it. Every night, the Hub will check for posts from other users, remove them, and send them a DM explaining that this is a broadcast only channel and to contact the group if they want something posted to it.
Tick the Auto Join button if you want everyone in the Mattermost Team joined to the channel automatically. Please do not do this without serious thought. Many rebels are already overloaded with too much information.
Maintenance/DsGroups
Shows the UK Forums Group records on the local database. The Checked column indicates when the Group was last found on UK Forums. An old date may indicate that the group has been deleted from UK Forums. If so, after double checking on UK Forums, you may want to click on it, then delete it. Note that if the group is in use by something, you won't be allowed to delete it -- you need to read the message, go and find where it is used, and fix that first.
You can click on one to edit it (not recommended - you can break the connection between it and the service if you are not careful). In the edit screen, you can click on Categories to see what Categories the group gives permission for.
Maintenance/DsCategories
Shows the UK Forums (Sub-)Category records on the local database. The Checked column indicates when the category was last found on UK Forums. An old date may indicate that the category has been deleted from UK Forums. If so, after double checking on UK Forums, you may want to click on it, then delete it. Note that if the category is in use by something, you won't be allowed to delete it -- you need to read the message, go and find where it is used, and fix that first.
You can click on one to edit it (not recommended - you can break the connection between it and the service if you are not careful). In the edit screen, you can click on Groups to see what Groups give permission for the category.
Maintenance/NxGroups
Shows the Nextcloud Group records on the local database. The Checked column indicates when the group was last found on Nextcloud. An old date may indicate that the group has been deleted from Nextcloud. If so, after double checking on Nextcloud, you may want to click on it, then delete it. Note that if the group is in use by something, you won't be allowed to delete it -- you need to read the message, go and find where it is used, and fix that first.
You can click on one to edit it (not recommended - you can break the connection between it and the service if you are not careful).
Maintenance/Forum Permissions
Shows all the UK Forums Groups and Categories, and the permissions connecting the two.
Maintenance/Hub Group Types
This allows you to edit the types of Hub Group shown in the New Hub Group screen. Please do not add or edit Hub Group Types without first agreeing the changes with SOS and DDAT.
XR Groups
Everyone gets this - shows your Hub Groups. Clicking on one shows the group.
XR Groups/Groups With No Mandate
This lists all the groups which:
- Are descendants of a group with Enforce SOS ticked
- Their Group Type has Mandate set to "Must Have Mandate"
- Don't have a Purpose
The intention is so that you can talk to each group's parent, and get them to fill in a Purpose and Accountabilities for the group.
XR Groups/Roles With No Mandate
This lists all the roles in groups which:
- Are descendants of a group with Enforce SOS ticked
- Their Group Type has Mandate set to "Must Have Mandate"
- Don't have a Purpose
The intention is so that you can talk to each group's parent, and get them to fill in a Purpose and Accountabilities for the role.
Some roles are Supporting Roles - i.e. they contain the mandate of a group.
XR Groups/Default Roles
This shows the default roles that a Group Admin creating a new role can choose from - e.g. External Coordinator, Internal Coordinator. They are templates prefilled with standard purpose and accountabilities, so the Group Admin knows what the standard form looks like.
Click on one to edit it, or click Add Role to add a new one.
Default Roles have an additional tickbox Standard. If this is ticked, then every new group being created will get one of these roles automatically.
Please do not add or edit Default Roles without first agreeing the changes with SOS.
Bulk Update
If you have made a change to a default role, you can bulk update selected Hub Group roles to make the same change to them. You should only do this if you have a mandate to do so (usually from SOS).
Click the Bulk Update button (either when editing a default role, or on the list of default roles), and you will see a list of all the changes that have been made.
Pick one, and you will see a summary of the changes made. Now choose which groups to apply the change to - you can choose a specific Hub Group Type (default: Uk Working Group) and/or a Root Hub Group (default: UK Rebel Hive). Only groups which are descendants (subcircles, sub-subcircles, etc.) of the chose group will be changed.
If it is a change to a role (rather than an accountability), you can also choose whether to only change roles where the previous values match.
When you click Save, all the corresponding roles in the selected Hub Groups will be updated to match your change.
Transferring data from the Map to the Hub
How to create Placeholder Groups on the Hub to align the Hub data with the Map data. Only available to Hub Admins.
Viewing Map data
Use the Map Data button in the XR Groups menu to list the data the Hub has collected from the Map (which is updated every night).
If you know the data has changed since last night, you can click the Refresh Map Data button to collect it again.
By default, this list only shows map data that does not have a hub id that matches a Hub Group. You can click the Include Matched button to see all the data.
Click on any group to see all the information the Hub has collected from the map.
Creating a corresponding Placeholder group on the Hub
If there is a group on the map that you know exists, and has up to date data, and the group does not exist on the Hub, click Create Placeholder Group.

This form allows you to correct or add any data. Check the parent group is set correctly (it defaults to the region for local groups, but you may have to change it if the group is in a district under a region, or the group is not part of a region), and the group type (which defaults to Local Group).
When you click Save a new placeholder group will be created.
Linking the map database to the new Hub groups
Once you have created all the placeholder groups, you then need to go into the map spreadsheet and update hub id for each new group, so the groups become linked.
The easy way to get a list of all the groups you have just created is to go back to the map data list, click on the Hub column, then click again, so it is sorted in descending order. The hub id of the new groups is in the Hub column - you can then go to the spreadsheet, find each group, and fill in its hub id.
Super Admin Functions
This section is for Hub Super Admins, and explains how to alter the structure and rules of Hub Group Types on the Hub.
Editing Hub Group Types
Go to Maintenance/Hub Group Types
The different kinds of Hub Groups are shown below:
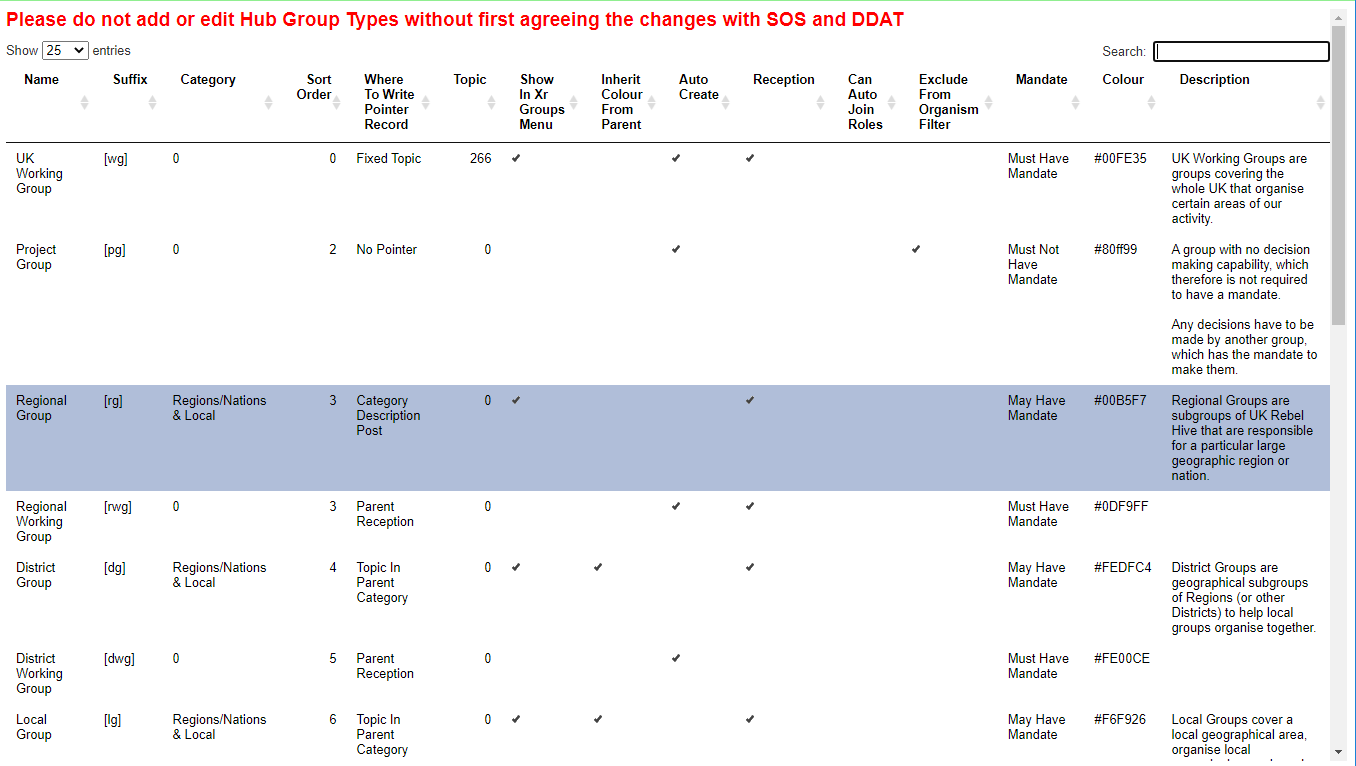
Click on one to edit it, or click New Hub Group Type to create a new one.
Please do not add or edit Hub Group Types without first agreeing the changes with SOS and DDAT.
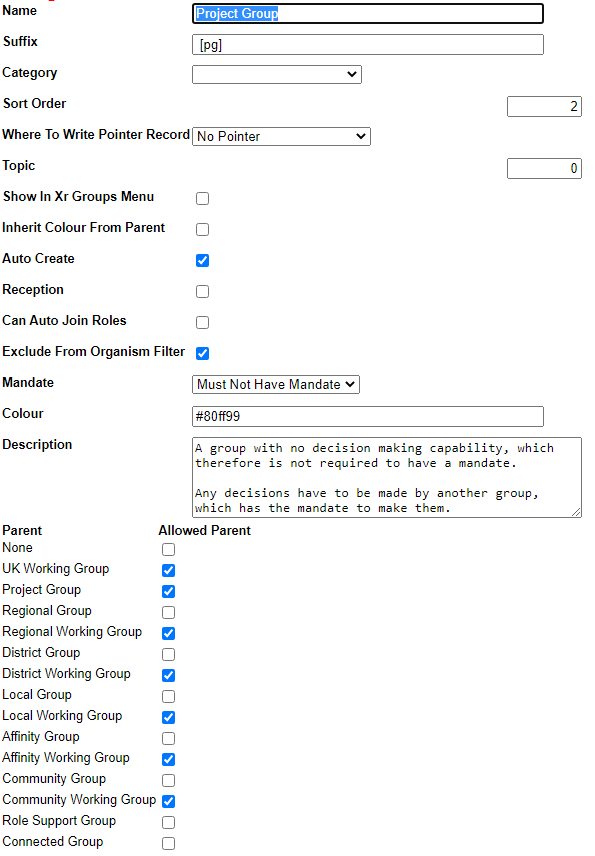
Important fields here are:
- Auto Create - If ticked, the Group Admin of a parent group can create this kind of group without checking by a Hub Admin.
- Reception - if ticked, groups will automatically have a Reception channel in the UK Team by default (otherwise they will share their parent group's Reception).
- Can Auto Join Roles - this is used for Role Support Groups, and allows the Group Admin to automatically join everyone within a section of XR who is in a certain role to this group.
- Exclude from Organism Filter - if ticked, this kind of group will not appear in the XR Organism diagram by default.
- Mandate - this has 3 values:
- May Have Mandate - a mandate is optional
- Must Have Mandate - a mandate is compulsory if one of the groups's ancestors has Enforce SOS ticked
- May Not Have Mandate - a mandate is not allowed, but the Group Admin can add a brief description of what the group is for - this is for groups like Project Groups that have no decision making power
Changing your personal details
Guidance to update details yourself
The Hub (Forums/Cloud) - You can change your personal details in My Settings - see Updating your settings.
To be removed from the Hub, Forums, Cloud and Mattermost altogether, contact your regional Hub Admin, post on Hub Help Desk on Mattermost, or email tech@rebellion.earth
Mattermost - The best way to change your details on Mattermost, or be removed altogether, is to change them on the Hub (see above).
If you are not on the Hub, but have a Mattermost account, you can ask to be removed by sending a direct message to @xradmin, @xradmin2, or @xradmin3 via Mattermost. If you are not already a member, you will need to join the xrGlobal team first).
Or, more simply, email tech@rebellion.earth.
Full data deletion requests
For full removal of your email address and other personal data, from ALL our services (The Hub, Forums, Cloud, Mattermost, Volunteer website, Rebel Toolkit, Rebellion Academy, CRM systems, The Vault and Action Network), contact tech@rebellion.earth