# Advanced
Extra information for people wanting to dig a little deeper in to what Action Network is capable of.
# Giving someone admin access
The following instructions are aimed at people who are already Admins (and have the permission level of 'Group Access'). If you feel like you should have this ability then contact the [Action Network Data Team](https://rebeltoolkit.extinctionrebellion.uk/link/634#bkmrk-page-title).
So if you are still reading - you are probably someone that has been using AN for a while and now would like to give another person Admin access to your AN email list.
##### Step One
Make sure they've signed the [volunteer agreement](https://actionnetwork.org/forms/xr-data-protection-agreement-2).
You can check they have by looking at their activist record* and noting that they have the tag **XR_May2021_Volunteer_Agreement**.
*You can find an activist quickly by using the top menu **People** then choosing **Activists** and entering their email address to find them.
##### Step Two
Give them access by clicking on 'Administrators' (find this menu item along the middle blue bar of options) - click '+ Add'.
[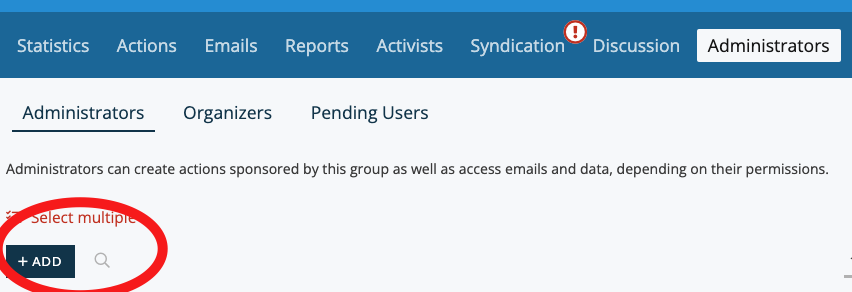](https://rebeltoolkit.extinctionrebellion.uk/uploads/images/gallery/2023-12/image-1701426187863.png)
Then type in their email address, click 'Send Invite'. They will be sent and email and they are immediately added as an 'Organiser'.
##### Step Three
Organiser doesn't allow anyone to do anything useful - so immediately promote them to 'Admin' by clicking 'Make User Admin', then you will be prompted to pick the permission to give to someone.
[](https://rebeltoolkit.extinctionrebellion.uk/uploads/images/gallery/2022-02/permissions.png)
If you just want them to be able to see and report on current activists on the list, then choose 'reports' and 'activists'. If you want them to be able to send out emails to the list, then also add 'Launch Email'.
Only give them the 'settings' permissions if you think they will need to make other people admins on a regular basis. The other permissions lower down the list are not normally required.
##### Step Four
Connect them to this [Rebel Toolkit book](https://rebeltoolkit.extinctionrebellion.uk/books/action-network-for-xr).
Add them to the two mattermost channels for support (see [here](https://rebeltoolkit.extinctionrebellion.uk/books/action-network-for-xr/page/contact-the-action-network-data-team) for those links).
Give them some training yourself, get them to [request training](https://rebeltoolkit.extinctionrebellion.uk/link/650#bkmrk-page-title) or ask the [Action Network Data Team](https://rebeltoolkit.extinctionrebellion.uk/link/634#bkmrk-page-title) for help.
# Using and exporting data
Occasionally, you may wish to use data outside of AN, for example, to make a list of phone numbers available to a trusted team of volunteers to make some calls.
The basic rule for this is that it's always better to keep data within Action Network. Below we explain why that's the case, and suggest some ways to share data with your team without downloading it to your own computers.
#### Why does this matter?
Action Network is designed to keep rebels' data secure. It uses a combination of security measures including data encryption, regular software updates, firewalls and scanning tools which makes it a much safer online space than a domestic computer.
Every time you download Rebels' data to your own computer, there's an increased risk that it can be accessed or leaked. For that reason, we'd strongly encourage you to follow some simple principles in using data outside Action Network:
- Necessity: Is there a way to achieve the same thing whilst keeping data inside Action Network?
- Relevance: Only download the details you actually need. For example, if you're phoning round to encourage people to get involved in a demonstration, it's likely you'll only need their first name and telephone number.
- Duration: If you do need to download data, try to keep it for the minimum time necessary. Keep it in a single location, share it only with trusted people, and when you're finished make sure it's deleted and removed from your recycle bin.
#### Sharing data without downloading
In Action Network, [build a report](https://rebeltoolkit.extinctionrebellion.uk/books/action-network-for-xr/page/create-reports-on-action-network) to identify the data you need. Remember to only include relevant fields.
On the lowest blue toolbar, select 'Report Access' and use the Email Invitation box to invite others to view the data within Action Network.
[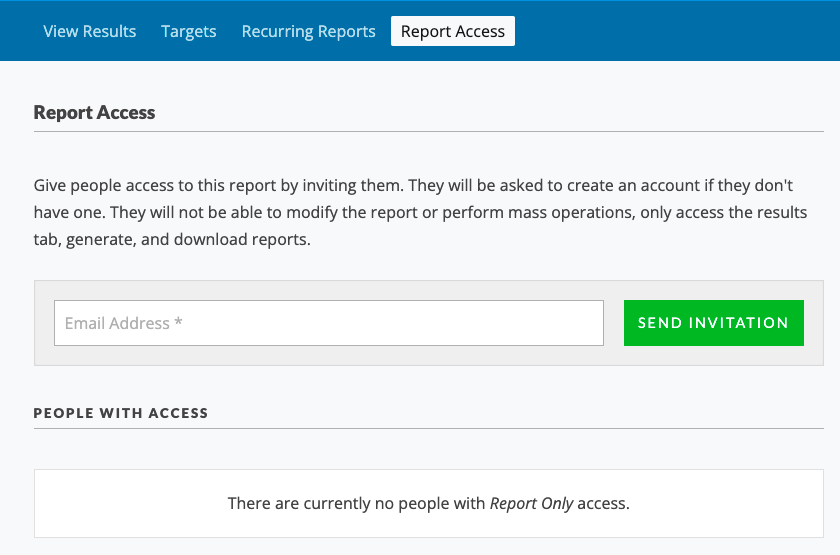](https://rebeltoolkit.extinctionrebellion.uk/uploads/images/gallery/2021-10/ReportShare.png)
Be aware that anyone you invite will be able to download the report. If they're not already familiar with data protection guidance, encourage them to read through this advice or ask them not to download it.
Anyone you share a report with should also have signed the [Volunteer Agreement](https://actionnetwork.org/forms/xr-data-protection-agreement-2).
When the duration of your campaign is over, revoke this report access.
#### If you need to download data
Occasionally you may decide there's no alternative but to download data from Action Network. If that's the case, you can download any report using the toolbar on the right hand side of the results.
Before you begin, make sure:
- Everyone who will have access to the data has signed the [Volunteer Agreement](https://actionnetwork.org/forms/xr-data-protection-agreement-2).
- Everyone has updated their computers to the latest versions of software. This helps to avoid bugs or leaks.
- You've agreed the minimum amount of relevant data you need to download.
- You've agreed the duration of your campaign and when you'll delete the data.
Ideally, keep the data as a cloud-based document, preferable our own [XR Cloud](https://rebeltoolkit.extinctionrebellion.uk/link/1068) on the Comms Hub, or Cryptpad rather than sharing multiple copies of the same Excel file by email. You'll probably need to download one copy to your own computer first, and then upload it to the cloud to share with others.
Avoid storing data on any portable device such as a USB drive, which can be easily mislaid.
When you've finished using the data, make sure it's deleted from:
- Your own computer and recycle bin
- Your cloud drive
- The computers and recycle bins of anyone who's worked with you and may have downloaded it
- Any portable storage devices, if you've had no choice but to use them.
If you have any questions, please contact the [Action Network Support Team](https://rebeltoolkit.extinctionrebellion.uk/link/634#bkmrk-page-title) or the [GDPR and security team.](https://rebeltoolkit.extinctionrebellion.uk/link/606#bkmrk-page-title)
# Merging or deleting a email list
You may wish to merge or delete an email list if:
- An email list was temporary (e.g. project that has finished)
- Local group isn't functioning any more
- You might want to merge two smaller local groups to form a bigger stronger one.
For any requests like this, please [contact the Action Network Data Team](https://rebeltoolkit.extinctionrebellion.uk/link/634#bkmrk-page-title)
Please don't struggle trying to download and re-upload email address. This can be done in a quicker and easier way by the Action Network Data Team. Don't be afraid to ask for help on things like this. We're here to help.
# Installing DKIM, SPF and DMARC records
**You only need to do this if you have your own domain. e.g. xrnottingham.org**
Setting this up helps improve the delivery rates to inboxes (rather than going to junk/spam).
This is highly recommended for lists over 5000 in size.
The extinctionrebellion.uk domain has already been set up. So if you use an email address on this domain as your reply-to email, then you don't need to do anything.
More info on how to get and use [@extinctionrebellion email addresses here](https://rebeltoolkit.extinctionrebellion.uk/link/1063#bkmrk-page-title).
It is not possible to set up DKIM/SPF/DMARC for gmail/hotmail/aol/outlook etc. These should already be recognised domains.
[Link to full instructions here](https://help.actionnetwork.org/hc/en-us/articles/360014433271-Installing-DKIM-and-SPF-records)
# Postcode searches
#### Adding UK list subscribers to Local Group lists
There are many subscribers on the UK list who have entered their postcode, but are not yet connected to a Local Group (LG). If you are from an active LG and want to find out if there are 'floating' rebels in your area, then [contact the Action Network Data Team](https://rebeltoolkit.extinctionrebellion.uk/books/action-network-for-xr/page/contact-the-action-network-data-team) (ANDT) for help in finding them and getting them added to your list.
# Custom field permission
In the XR Action Network system, it is possible to use forms to request information from rebels. Where possible, please use [existing questions](https://rebeltoolkit.extinctionrebellion.uk/link/655#bkmrk-page-title) in your form to match data that is already in the system. If you need to create new questions, please [contact the Data Team.](https://rebeltoolkit.extinctionrebellion.uk/books/action-network-for-xr/page/contact-the-action-network-data-team)
When creating questions please consider [GDPR implications.](https://rebeltoolkit.extinctionrebellion.uk/books/intro-to-technical-and-data-services/page/gdpr-and-personal-data)
The best things you can do to keep both you as the collector and the people participating in direct action safe is to:
- Only collect the data absolutely necessary
- Collect and store as little personally identifying information as possible
- Share the data with as few people as possible using permissions
- Delete the data as soon as it is no longer necessary.
More guidance from the GDPR and Security team can be found in their [page here](https://rebeltoolkit.extinctionrebellion.uk/link/606#bkmrk-page-title).
# Further training resources
#### Action Network help pages
You can browe the [Action Network Knowledge Base](https://help.actionnetwork.org/hc/en-us) for more guidance.
Also there are also [Action Network training sessions](https://actionnetwork.blog/events/) to sign up to.
**Please be aware for both of the above, some features may not be relevant or even available on the XR UK network (in particular 'Action Builder' and 'Mobile Messaging' are not features we currently pay for).**
#### Friends of the Earth
Friends of the Earth (FoE) have produced a good number of training videos and other training documentation to help FoE groups get to grips with using Action Network.
These FoE training materials cover a wider range of Action Network's functions than the emailing functionality currently in general use by XR groups. This includes creating petitions, letter campaigns, events and forms.
**Please be aware that not all this advice will be relevant to XR email lists and also that Action Network upgrade their software regularly, so some of the older videos may a little out-of-date.**
An overview of the FoE Action Network training materials is on their Action Network group page here: [https://actionnetwork.org/groups/friendsoftheearth](https://actionnetwork.org/groups/friendsoftheearth).
# Sending Attachments
You cannot attatch files to an Action Network email but you can store it on in an online drive like Google Drive and link to it. If you don't have your own drive you can store it on Action Network and add a download link to your email.
Click the ACTIONS button on the top navigation tool bar
[](https://rebeltoolkit.extinctionrebellion.uk/uploads/images/gallery/2024-07/screenshot-2022-11-23-at-10-34-04.png)
From the dropdown menu that appears, move your cursor over Files, and click on the plus (+) icon.
[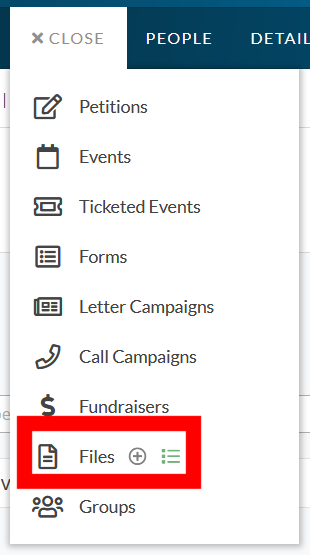](https://rebeltoolkit.extinctionrebellion.uk/uploads/images/gallery/2024-07/screenshot-2024-07-22-162616.png)
You can now upload and add your file.
[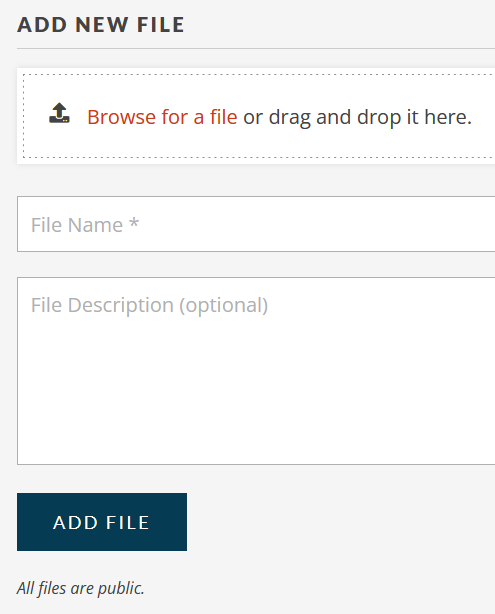](https://rebeltoolkit.extinctionrebellion.uk/uploads/images/gallery/2024-07/screenshot-2024-07-22-163409.png)
Give your file a name, and a description. Descriptions are optional, but are useful in helping others find what they need. Once you have added the file you will be taken to the file list.
[](https://rebeltoolkit.extinctionrebellion.uk/uploads/images/gallery/2024-07/image1.jpg)
Click on the link icon to get the web link for the document which you can then post into your email.
Remember that all files posted this way are publicly accessible.
# Refresh a form or event preview graphic
#### Telegram graphic preview refresh
If a url has been shared previously the preview is cached and will not update automatically. To force a fresh link preview, try one of these methods:
- go to t.me/WebpageBot and submit the url to force a refresh across Telegram
- OR create a new short link