Creating your event: Tickets, Payouts and Refunds
New costs since 2023s Big One
Since the big one, Eventbrite has since added new costs for paid-for events. These are for each event, so if you have two events, you will have two fixed fees to pay.
26-100 tickets have a fee of £7.99 per event (probably affecting bookings for 1 large coach).
101-250 tickets have a fee of £19.99 per event (probably affecting bookings for 2+ large coaches).
Ulimtied tickets- £34.99 per event.
This is in addition to the per-ticket processing fees, which are still charged as a percentage of each ticket.
See More information about the changes here.
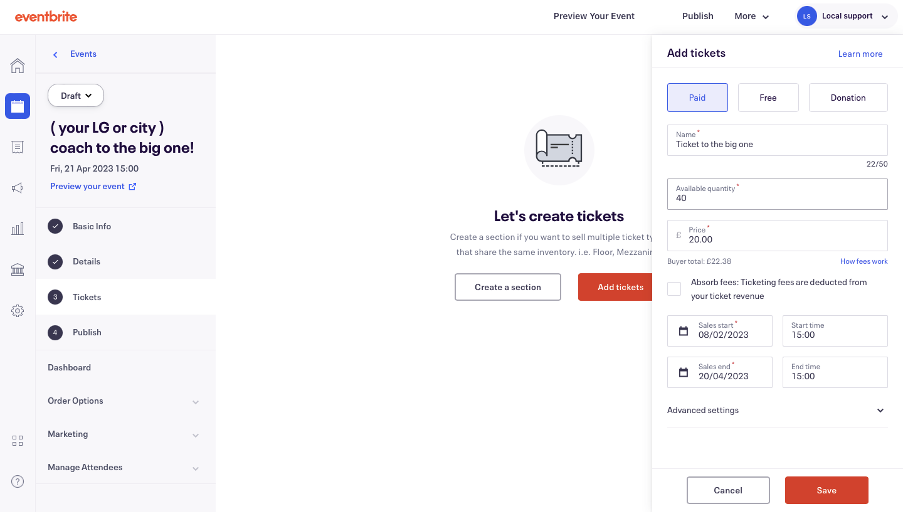
First click ‘Tickets’ on the left of your screen or 'Add tickets' in the middle of the screen, on the event dashboard page. This will open up a section to the right on your screen.
If your event is free to attend, select the 'free ticket' box, or if it's paid click the 'paid' box.
In the ticket name, Give it a name, such as 'Coach ticket to The Big One'. If you are offering different types of ticket you can specify those here, eg 'Coach ticket to The Big One- child'
For the available quantity add the amount you have capacity for. You can break up that capacity across multiple ticket types if needed.
It is important that you do not select ‘absorb fees’ when setting up the event, as this will mean you will be paying for the fees even if the ticket gets refunded, this will affect your payout from Eventbrite.
Make sure the currency is set to £ pounds and the country is set to the UK. Eventbrite payment processor should be automatically set.
You will then need to enter the time period the tickets will go on sale and an end time to stop selling tickets.
Once you have entered the name, amount of tickets, price of tickets (inclduding free) and time length for the sale of tickets, click save.
The payout from tickets sales
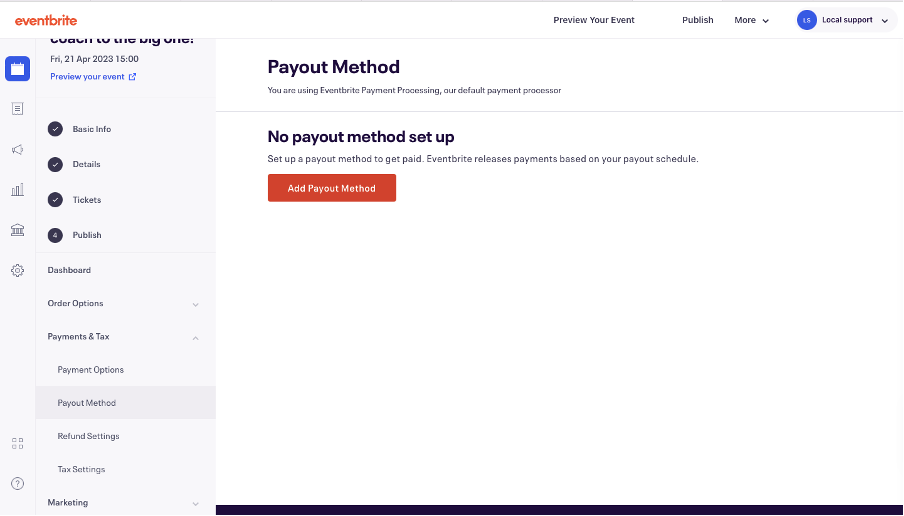
To withdraw the money paid for your ticket sales, on the event dashboard/edit page and once you have set tickets up, go to the left-hand sidebar, click ‘Payments & Tax’ and then 'Payout Method'. From here click ‘Add Payout Method’. This will then ask you to enter your bank account details.
Once you have entered your bank account details you will be sent the page below. To change the payout schedule click ‘Payout Schedule’ on the left side of the screen.
You can now chose from the following payment options:
- total amount 3 days after the event
- weekly on Wednesdays
- twice a month on the 1st and 15th
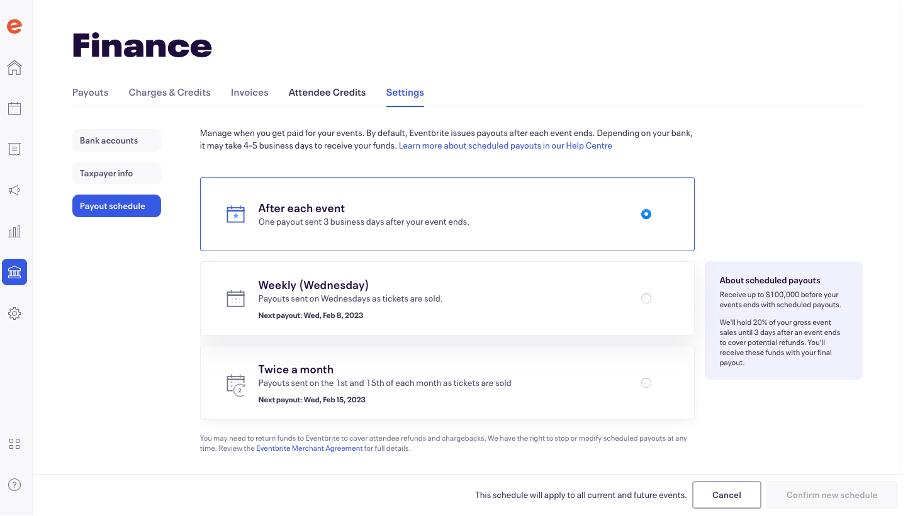
However if you chose either of the second two options, Eventbrite will hold back 20% of the ticket sales until after the event. But you may still want to withdraw some of the funds- it could be useful if someone has paid a big deposit and can't wait until after the event to be repaid. On the negative side, multiple withdrawals makes keeping track of the accounting a bit more complicated.
Eventbrite charges VAT, so we don’t need to change or edit the tax settings.
Refund policy
You need to select a refund policy, which must be on your event page. Refund policies may not be changed retroactively. We recommend setting this to 'On a case-by-case basis'. This means that if someone wants to ask for a refund, they can email in with their order number and a possible reason why. Setting up auto refunds puts you at risk of bad actors or being left in a financially difficult situation.
You will get an email notification if someone asks for a refund. You must respond to this within 3 days, and the email from Eventbrite will tell you how to process the refund.
By default, fees are not refunded on orders. This means that the attendee will receive a refund for the amount they paid minus the Eventbrite fees. There are a couple of exceptions: If the refund is made before the charge has settled (usually within 24 hours), the original charge will be completely voided. If the refund reason is "COVID-19", "Duplicate order", or "Event cancelled or postponed", the fees will be refunded as well.
If there are enough funds in your event balance to cover the refund, then Eventbrite will use those to pay for the refund. If there aren't enough funds in your event balance to cover the refund (because you have withdrawn some of the money), you have two option:
- You can add funds to your event. This option is best if you need to issue multiple refunds or partial refunds.
- If you don't add funds to your event, Eventbrite will ask for a debit or credit card to pay for the refund. This option is best for individual refunds, and you must refund the complete order this way.
To find out how to set the refund settings, go to the left-hand side bar on your events dashboard, then click ‘Payments & Tax’ and then click ‘Refund Settings’. You will need to select ‘On a case-by-case basis’ and click ‘Save’.

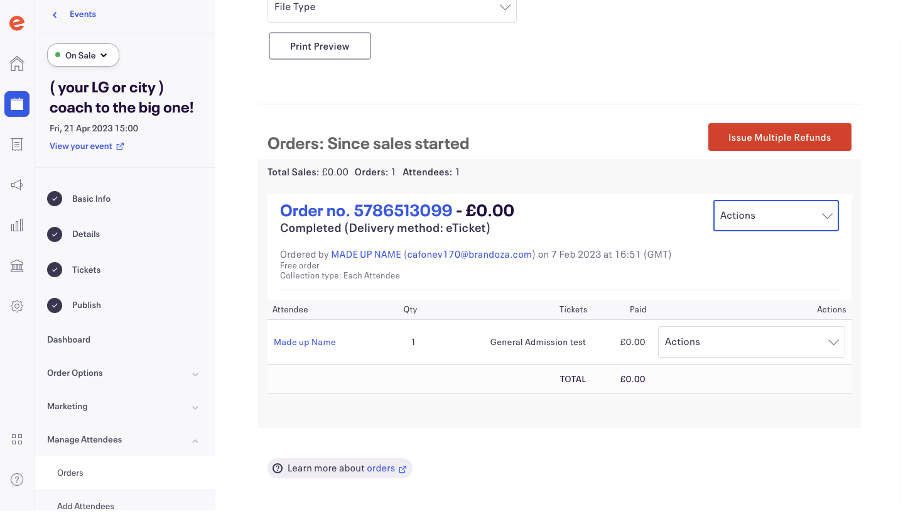
How to issue a refund
Go to the left-hand sidebar on your event dashboard, click ‘Manage Attendees’ and then ‘Orders’. To issue a refund, you will need either their name, email or order number. You can then use the search bar to search for this information. Press enter on the keyboard to generate the report.
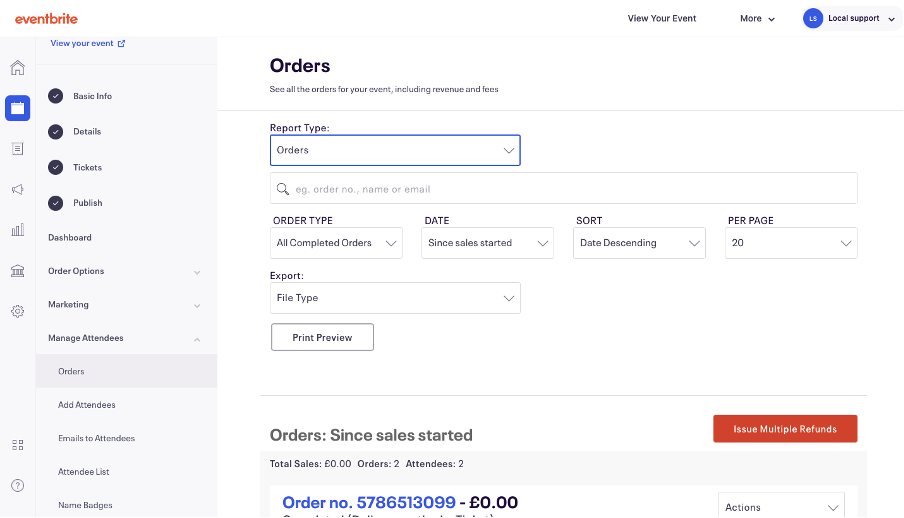
Once you have found the order to be refunded, on the right side of the order information, click ‘Actions’, and on the drop box menu that opens select ‘Issue Refund’. Then fill out the refund details, including the refund reason, which tickets you want to refund and the amount you want to refund (this should be 100%, unless the purchaser has asked to donate some of the cost of the ticket). Then click continue, add any 'Notes to the buyer' and then click 'Issue Refund'.