
How to Use Mattermost
Read this document to get familiar with Mattermost. It is used to communicate with XR groups as well as have 1-to-1 conversations. You can also watch this video for a general introduction to Mattermost and its benefits.
KEY INFO:
- Channels = Group chats
- Teams = collection of Channels
- DM = Direct Message 1 person or up to 7 people
If you need support with:
- General Tech - we use every platform in XR and we all need help sometimes!
- How to use Mattermost
- Getting onto Mattermost
- Using the Hub - and XR's other services including the UK Cloud, UK Forums
Please join one of the weekly sessions:
Tuesdays 18:00-18:30 (quick questions)
Thursdays 18:30-19:30 (longer training)
Join Zoom Meeting:
Meeting ID: 895 2855 8324 | Passcode: 278766
For a series of video guides to supplement the below information, see Video Guides to Help You Learn.
First Steps
Getting Access
Before you can access Mattermost you first need to create an account on the XR UK Communications Hub - Hub for short. For instructions on how to do that please read this guide.
Once you are on the Hub you can access Mattermost in a few ways:
-
Click on the Mattermost icon from the Hub main page.

-
Type https://organise.earth into your browser and hit Enter.
Once this is done we recommend adding the page to your bookmarks/favourites so it's easier to find in future.
Note: Mattermost is also available as an app so you can install it to your smartphone or tablet. Please read this document or watch this video for instructions on how to do this.
Landing Page
When you have logged in to Mattermost you will see a screen that looks a lot like this:

Note that we have added numbers to the screenshot and we will refer to this image throughout the document.
Navigation
Please watch this very helpful video for a guide to navigating Mattermost: from using Teams and Channels to saving and threading messages.
Teams
Teams appear on the far left of your screen (1). When you have Mattermost open either in a browser or in the app, you can click on the icons [coloured squares on the left] to switch between teams. Inside a team there is a collection of Channels.
Once you have been invited to the Hub and added to a Hub group, the Hub will automatically add you to the UK Team on Mattermost and any channels in the UK Team belonging to your group. However, your group might use other teams and by accepting your Hub invite, you also be added to these as well as the channels within them.
Checking who else is in my Team
To see the other members of a Team, click on the Main Menu (3) and select View Members.
Contacting other groups
Mattermost is different to other chat apps. One of its main benefits is being able to contact others even if you're not a member of their group or they're not a member of your group.
All XR UK groups on Mattermost have a public 'Reception' Channel in the UK Team, and their group members will be added to the group's Reception by default (you will probably be in one for your group).
To join another group's Reception Channel, click Find Channel or + Browse Channels (4), to search or browse for the Reception Channel you want to join and then click Join. The Channel will then appear in your Channels list.
Post your message, get your reply and then you can leave the Reception channel. Receptions are public channels so anyone in the UK Team can join, leave and rejoin public channels.
Joining other Teams
To join a public Team, click on the + sign below your list of Teams (1). This will bring up a list of all the other XR public Teams you are able to join, including for other countries. Click on one of the list of Teams to add yourself.
If you want to be added to a private Team (e.g. for your local group) you will need to speak to a Hub Group Admin who will be able to send you a Hub invite to the group.
Leaving a Team
To leave a Team, open the Main Menu (3), and then select the option Leave Team.
Note that once you have left a Team, if you want to re-join at any point, you will have to join (or be invited to) all the Channels you belong(ed) to previously.
Channels
Channels are just another name for group chats. Every group set up on the Hub will have a number of these Channels that you will be added to when you are invited to that Hub group.
Type of Channels

Some Channels are public, so anyone in the Team can join them. They have the world symbol to the left of the channel name. Some Channels are private, by invitation only, and they have a padlock next to them.
Joining Channels
To join a public Channel either click in Find Channel and search, or click the + button to browse Channels on the left (4). This will bring up a list of all of the public Channels in a Team. Click on any of these in the list to add yourself.
When you search for Channels you will only see all the public ones and any private channels you're already in.
If you need to join a private Channel that belongs to a Hub group, ask the Hub Group Admin to send you a Hub invite. If you need to join a private Channel that has only been created on Mattermost and doesn't belong to a Hub group, ask someone already in that Channel to add you. You could also post a message in that group's Reception Channel asking to be added.
Leaving a Channel
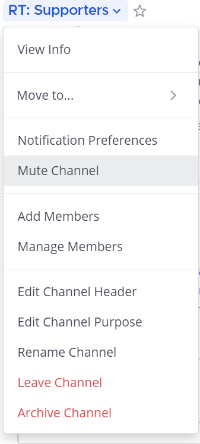
To leave a Channel, click on its name at the top of the screen (not where it appears on the left) and then select the option Leave Channel. Alternatively if you hover over the Channel on the left three dots will appear next to it and from that menu you can select Leave Channel.
Muting Channels
You can mute a Channel if you want to stop receiving notifications from it but don't want to leave. To do this click the Channel heading (at the top of the screen), or hover over the Channel on the left and click the three dots, then click Mute Channel. You can also set whether you want to be notified if someone uses @all or @channel by clicking on Notification Preferences.
Default Channels
Every Team has two default Channels that you will be added to when you are added to the team:
-
Town Square: This is the communal area in each team that should be used for announcements and general XR-related discussions.
-
Off Topic: This is a place where team members can discuss things that aren't directly related to the business of the team (e.g. social activities).
Very Important: Please do not rename these default Channels as it will cause a lot of confusion.
Note: It is not possible to leave the Town Square Channel. If you want to stop receiving notifications you should mute the Channel instead.
Sorting Channels
If you hover over the CHANNELS header on the left (6) then click on the three dots you can sort your Channels one of three ways:
- Alphabetically
- by Recent Activity - the most recent will be at the top
- Manually - you can drag the Channels up and down into the order you prefer
If this isn't enough you can Create New Category which enables you to sort Channels into groups that suit you, for instance relating to particular projects or areas of interest. Once you have created your categories you can drag and drop Channels between them.
Creating Channels
Important: You should not create public Channels from inside Mattermost. Instead please get your Group Admin/Tech Champion to do this for you using the Hub.
To create a private Channel:
- Click on the + sign next to Find Channel (4)
- Select 'Create new Channel'
- Enter a name for the new Channel (and optional purpose and header), ensure Private is selected.
- Click Create Channel
Channel headers (18)
Underneath the Channel name at the top of the page is the Channel header. It is a useful place to put information about what the Channel is for and to store some useful links (e.g. your group's Forum or your regular Zoom meetings).
To see all the info click on the Channel name:
then click on View Info.
If you want to change what is written in the header click on Edit Channel Header. If you want to add links to this section the process is the same as here. Please confirm with your Group Admin before making any change to the Header.
Sending Messages (14)
You can write messages by typing in the box at the bottom of the screen. To send them hit Enter. The message will be sent to the Channel or Direct Message you are currently in.
Alerting people to messages
If you want a particular person to read a message you are sending, you can tag them by writing '@' followed by their username (e.g. @xrukadmin). This will send them a notification.
Important: You can also use @all or @channel to notify everyone in a Channel but please use this responsibly as for larger groups it is rarely appropriate and may annoy people.
Sending Direct Messages (7)
To send someone a Direct Message (instead of posting in a Channel):
- Click the + sign to the right of the heading DIRECT MESSAGES (7)
- Select the users you want to message (you can create group messages with up to a maximum of 6 people)
- Write and send your message
All of the Direct Message conversations that you have had will appear below the DIRECT MESSAGES heading to make it easier to contact them again. Next to each name, an icon shows whether they are online or not. Clicking on a username will display your Direct Message history with that user. Users you do not need to contact regularly can be removed from this list by pressing the cross to the right of their name.
Sorting your Direct Messages
Much like with Channels, Direct Messages can be sorted alphabetically or most recent first. You can also choose how many to show (all, 10, 15...). To change these settings hover over DIRECT MESSAGES then click the three dots to the right of it.
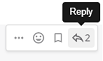
Replying to messages
It is possible to reply to messages posted in Channels or Direct Messages using 'Threads' (5). These are helpful if you are having multiple conversations at once so people don't get confused about which messages are related to which discussion. You can click Threads on the left-hand side of the screen to see these conversations. To reply to a message in a thread click on the Reply icon:
Note: For a full explanation you can watch the threading messages video (5 mins).
Reacting to messages
To add a reaction (e.g. a thumbs up or heart icon) to a message click on the Add Reaction icon:
 .
.
To post a reaction to a message you can click on the Emoticon icon on the bottom right of the message (16).
Searching for messages (10)
Use the search box to find messages and replies that match the search terms that you enter. All Channels that you are a member of in the current Team are searched.
Note: For a full explanation you can watch the Searching for messages video (3 mins).
Saving messages
You can click on the 'save' icon (like a bookmark) next to a message to save it for later, then bring up all your saved messages by clicking on the 'Saved posts' icon at the top right of the screen (11).
Note: For a full explanation you can watch the Saving messages video (3 mins).
Adding links
To add a picture click on the paperclip icon on the bottom left hand side of the screen (15). To add a nicely formatted link to your message, write the text you want to show in square brackets immediately followed by the link URL in round brackets. For example:
Check out this fantastic [guide to Mattermost](https://rebeltoolkit.extinctionrebellion.uk/link/394#bkmrk-page-title)!
will look like:
Check out this fantastic guide to Mattermost!
when sent.
Other formatting tips
Here are a few simple tips to make your messages look better:
- **bold** displays as bold
- _italic_ displays as italic
- ~~strikethrough~~ displays as
strikethrough - ```typewriter style``` displays as
typewriter stye - >quote displays as
quote
Copying messages
It can be difficult to copy messages in order to share them in multiple Channels without losing the nice formatting and any links. Currently the only way this is to:
- Open settings (17) and click on Advanced.
- Set Enable Post Formatting to Off.
- Copy and paste the messages that you want to share.
- Return to Advanced and set Enable Post Formatting back to On.
Rebel Compass (8)
This takes you to a bunch of links and resources from XR Global including plaforms, videos, documents, trainings, events etc.
Notification settings
Note: For a walkthrough of all the content in this section you can watch the Notifications (5 mins) and Account Settings (4 mins) videos.
To get the most out of Mattermost we strongly encourage you take the time to get your notification settings set up just right. This will make sure that you don't get overwhelmed by huge numbers of irrelevant notifications, and also that you won't miss any important messages that you need to see.
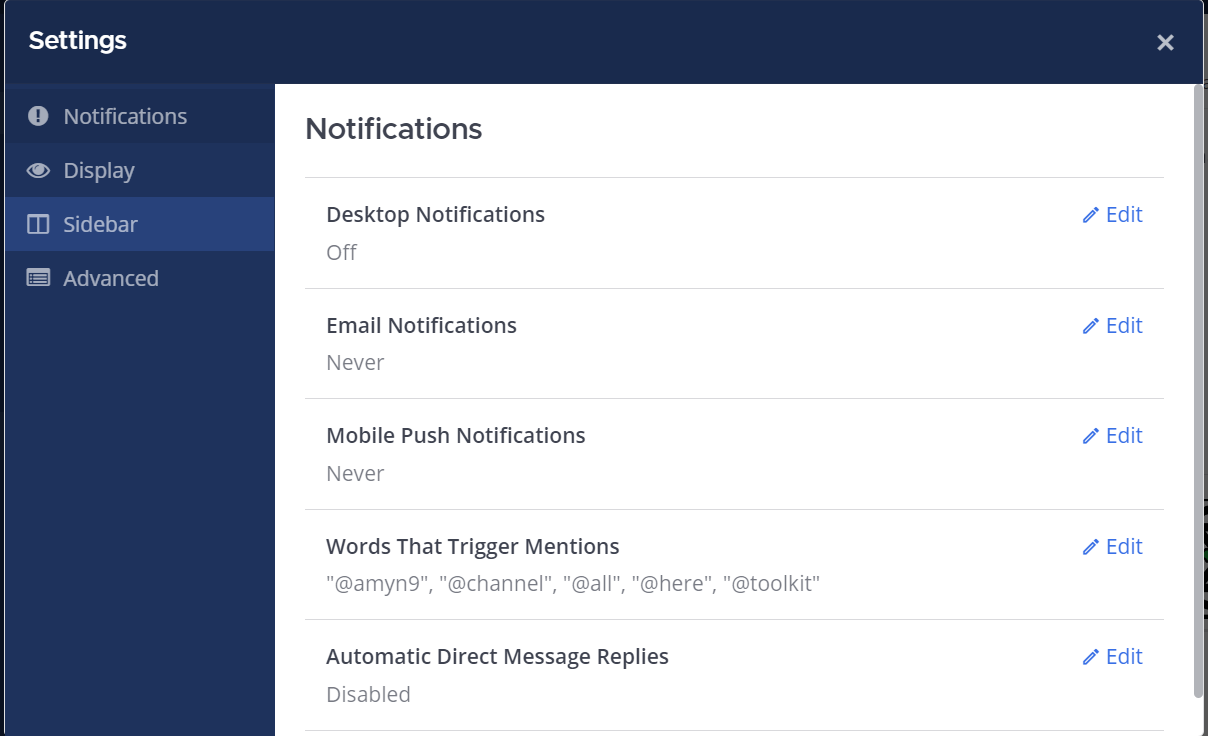
To modify the notification settings in Mattermost, open your settings (17) and click on Account Settings. You will then see this screen:
Setting desktop/mobile notifications
To modify these settings click Edit under the sections labelled Desktop Notifications or Mobile Push Notifications.
We recommend that Send desktop notifications (under Desktop Notifications) and Send mobile push notifications (under Mobile Push Notifications) are set to either For all activity or For mentions and direct messages.
Enabling email notifications
You can enable email notifications of Mattermost messages. To do this:
- Open your notification settings (see 'Notification Settings' above)
- Under Email Notifications click Edit
- Under Send email notifications tick Immediately
- Click Save
Setting notifications for reply threads
To be notified of all messages that happen in a thread you participated in you should:
- Open your notification settings (see 'Notification Settings' above)
- Under Reply notifications click Edit
- Tick Trigger notifications on messages in reply threads that I start or participate in
- Click Save
Personalising your mentions
It is possible to get notified every time a certain word gets mentioned in one of your channels. By default this will just be your username including the @ symbol (e.g. @myusername) but you can add extra words if you like. For example, if you do a lot of work on the Rebel Toolkit you may want to add toolkit to your list of words that trigger mentions.
To set this up:
- Open your notification settings (see 'Notification Settings' above)
- Under Words That Trigger Mentions click Edit
- Tick any of the tickboxes that apply
- Add any additional keywords (e.g.
toolkit) in the space below the tickboxes - Click Save
Seeing recent mentions (10)
Click on the top right @ sign to see posts where you have been mentioned recently.
Grouping unread messages together
You can get Mattermost to collect unread messages at the top of the sidebar so they are easier to find. To do this:
- Open the Mattermost settings (see 'Notification Settings' above)
- Click on the Sidebar tab
- Under Channel Grouping and Sorting click Edit
- Tick Unreads grouped separately
- Click Save
Setting up 'out-of-office' messages
If you will not be reachable on Mattermost for a while and would like to set an automatic reply that anyone who messages you will see then you should:
- Open your notification settings (see 'Notification Settings' above)
- Under Automatic Direct Message Replies click Edit
- Tick Enabled and write your message
- Click Save
You can follow the same process to disable the automatic messages when you return.
Getting rid of annoying messages from 'System'
In your Channels you will probably see lots of messages from 'System' notifying you that people have been added to, and left the Channel. You can turn these off by:
- Open the Mattermost settings (see 'Notification Settings' above)
- Click Advanced
- Set Enable Join/Leave Messages to Off
Further information
Setting your status
To change your status (which can be Online, Away, Do Not Disturb and Offline):
- Click on your image/icon at the top left of the screen (2)
- Click on the option that you want
Adding a profile picture
To add a profile picture to your Mattermost account:
- Click on (2) in the top right corner of the screen
- Click on Profile
- Scroll down and click Profile Picture, then click Edit
- Upload an image of your choice
- Click save!
Logging out
To log out of Mattermost, click on (2) (your profile picture) in the very top right corner of the screen and then click on Logout.
Other places to find information about Mattermost
There is a help button (12) at the top right hand side of the screen.
Here is list of other resources about Mattermost that you might find useful after reading this guide:
-
This is the official guide to Mattermost. It goes into a lot more detail than this guide but is more complicated and not all of it is relevant to XR.